
Complete Guide To Brother MFC-J4335DW Setup
When you have purchased a new printer for your home or workplace, you might be a little curious to print your documents or pictures smoothly But, before operating your printer, you have to carry out the initial process. Setting up a new printer is quite an easy task, and you can finish it within a few minutes. Well, all you have to do is just spend your little valuable time operating your printer without any hassle. So, let’s get into the instructions to start setting up your Brother MFC-J4335DW printer!
Jump To A Section
Let’s Begin The Hardware Setup Start Performing The Software Setup
○ Download The Latest Driver
○ Installing The Downloaded Driver
○ Steps To Install The Printer Software On Your Mobile Device Establishing Connection Between The Devices
○ Procedure To Connect Your Devices Using a USB Cable
○ Ways To Connect Your Devices Over a Wireless Network
○ Connecting The Devices Using Wi-Fi Direct
Let’s Begin The Hardware Setup
Basic Printer Preparations
● Unpack the box and remove the printed documentation, power cord, and ink cartridges from the package.
● Gently lift the printer from the pack and place it on a flat surface.
● Make sure that the delivered contents (including the Brother printer) are not defective.
● You can now start discarding the packing materials around the printer
● Then, remove all the protective tapes from outside and inside the printer
Fill
The Paper Tray With Plain Sheets
● First, pull out the paper tray completely from the printer and move the paper width guides to the outward position.
● Fan a stack of plain white sheets and insert it into the paper tray
● Now, adjust the paper width guides to the edges of the stack. But not too tightly
● Slowly insert the paper tray into the printer
● Next, pull out the paper support and raise it.
Make Your Printer Ready To Operate
● Connect the power cord to the back of your printer and the other end to an electrical outlet.
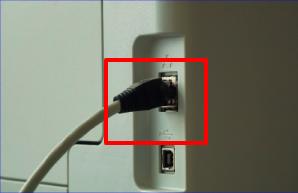
● Turn on the printer
Is everything okay there? Great! Way to go!
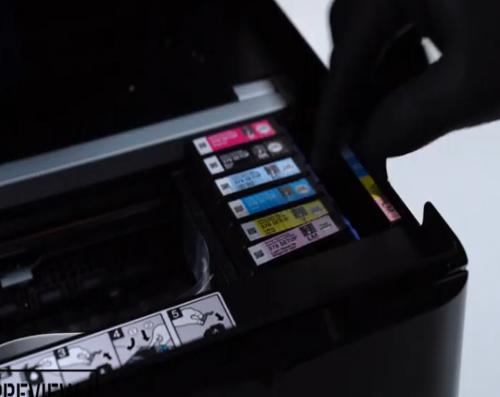
Proceed To Ink Cartridge Installation
● Open the ink cartridge cover of your printer
● Now, uncover one of the ink cartridges from the package and remove the protective tape.
● Carefully insert the ink cartridge into the respective slot.
● Make sure that the ink cartridge is installed correctly in its place.
● Repeat these instructions to install the remaining ink cartridges into the printer
● Close the ink cartridge cover
● Now go to the printer’s control panel and set the date & time by following the on-screen prompts.
● Then, go ahead with on-screen instructions to print the Print Quality Check Sheet and the Alignment sheet.
● Load the printer Alignment page with the scan side facing down on the scanner glass and perform the on-screen prompts on your printer to complete adjusting the alignment.
● If you want to change the language setting, go to Settings > Initial Setup > Local Language and press the OK button. Great job! You have now gone through the hardware setup of your printer Let’s move on to the procedure for software setup.
Start Performing The Software Setup
To make use of your printer functionalities even more effectively, you have to install the required driver on your computer But, before installing it, ensure that it supports your devices. The driver will also help your printer to communicate with other devices and can manage all the print-related tasks. You can download the printer driver on both your Windows and Mac computers. Suppose, you are a mobile user, you have to use a separate app Brother Mobile Connect. Well, let’s get started right away!
Download The Latest Driver
● Brother MFC-J4335DW Driver Windows 11 – Download
● Brother MFC-J4335DW Driver Windows 10 – Download
● Brother MFC-J4335DW Driver Mac 13 – Download
● Brother MFC-J4335DW Driver Mac 12 – Download
● Brother MFC-J4335DW Driver Mac 11 – Download
Installing The Downloaded Driver
● Now, navigate to the executable file on your computer and start the installation process.
● Click on the Next button to proceed.
● Next, perform the on-screen instructions to complete the driver installation.
● If you download the driver file from the printer’s official support page, then open the file to start the installation process.
● Once you run the driver file, you need to select your language from the drop-down list and click the OK button.
● Now, wait for some time to prepare the setup.
● Select I agree to this license agreement and click the Next button to proceed.
So far, going well? Alright! Keep processing to finish the driver installation as fast as we can.
● On the next screen, choose the Connection Type you wish to use and then click Next.
● Then, perform the on-screen prompts to complete the installation setup.
● After finishing the driver installation, you will see the “Software installation complete. Your machine is ready to use” message on the screen.
● At last, click on the Finish button.
Steps To Install The Printer Software On Your Mobile Device


● Make sure to connect your printer and mobile device to the same network.
● To install the Brother Mobile Connect app on your Android device, you can use Google Play Store.
● For iPhone users, you can use the App Store application to install the Brother Mobile Connect app.
● After installing it, tap the Open button.
● On the Home screen, touch the Add Machine option.
● Then, tap the Not Connected option.
● Follow the on-screen prompts to check if your mobile device is connected to the same network as your printer, and tap OK.
● On the next screen, enter your printer model name into the text field.
● Pick your printer from the available list and perform the on-screen instructions to connect your devices.
Well, great job! Now, you have completed the software setup for your printer Ready to connect your devices? Buck up! And proceed with the below procedures.
Establishing Connection Between The Devices
To make use of your printer functionalities through your computer laptop, or smartphone, you have to establish a proper connection between your devices. For this case, you can use one of the connection methods, such as USB, wireless, or Wi-Fi Direct. If you want to learn more, go through the below section!
Procedure To Connect Your Devices Using A USB Cable
The USB connection method is the easiest and quickest way to connect your printer to your computer Moreover you can automatically install the required driver for your printer To do so, perform the below instructions carefully
● Make sure to turn on your printer
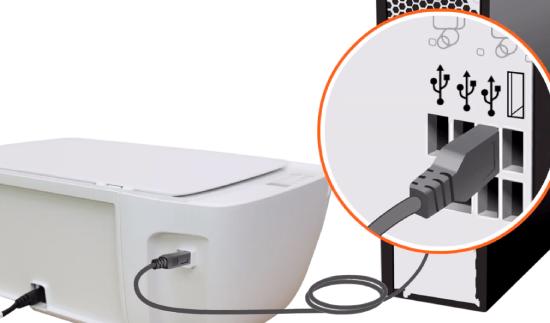
● Plug in the USB cable to your printer USB port.
● Then, connect the other end of the USB cable to the computer’s USB port.
● Ensure to use a proper USB cable to connect your devices.
● Click the Start menu at the bottom-left corner of your computer s main screen.
● Navigate to the Control Panel window using the search bar
Did you see the Control Panel window on your computer? Yes? Good! Way to go!
● Go for the Devices and Printers option from the list.
● Next, click the Add a printer option.
● Select your printer name from the available list and click the Next button.
● The printer installation window will appear on the screen.
● Now, start to install your printer on your computer
For Windows 10 Users
● Confirm that your printer is turned on.
● To connect your printer and computer, use a proper USB cable.
● Then, go to the Start menu on your computer s main screen.
● Open the Settings window and choose the Printers & Scanners option in the left menu panel of the window
● Here, click the Add a printer or scanner option.
● Choose your printer from the available list on the window
● The printer installation window will appear on the screen.
● Now, follow the on-screen prompts to complete the printer software installation on your computer
Need proper guidance for wireless connection? Keep reading the upcoming sections!
Ways To Connect Your Devices Over A Wireless Network
Using The WPS Method
● Go to your printer s control panel and press the Wireless button.
● Using the arrow keys, select the WPS/Push Button option on the printer and press OK.
● Then, follow the on-screen prompts to start the wireless setup wizard.
● When the printer prompts you to start WPS, immediately hit the WPS button on your wireless access point/router
● Next, press the OK button on the printer s control panel.
● After successfully connecting your printer, you will see the Connected message on the screen.
Using The PIN Method
● Ensure that your printer is turned on.
● Go to the printer s control panel, and press the Settings button.
● Now, choose the Network option from the list and press OK.
● Use the arrow keys to select the WLAN(Wi-Fi) option and press OK.
● Then, choose the WPS/PIN Code option using the arrow keys and press OK on the printer screen.
● Follow the on-screen prompts to enable the wireless setup wizard.
Going on well? Great! Keep processing the remaining steps to complete the connection process.
● When you see the eight-digit PIN on the screen, the printer will search for the wireless router/access point.
● On your computer, open the browser and type the IP address of your wireless device.
● Next, navigate to the WPS settings page and input the PIN that is displayed on your printer
● Follow the on-screen instructions carefully and add your printer to your computer
● Once it is done, click the Next button.
● Again, enter the PIN and click Next.
● After connecting your printer successfully, click the Close button.
If you face any difficulty while connecting your printer to the network, get in touch with our technical experts. They will help you to resolve the issues.
Complete Guide To Brother MFC-J4335DW Setup
When you have purchased a new printer for your home or workplace, you might be a little curious to print your documents or pictures smoothly But, before operating your printer, you have to carry out the initial process. Setting up a new printer is quite an easy task, and you can finish it within a few minutes. Well, all you have to do is just spend your little valuable time operating your printer without any hassle. So, let’s get into the instructions to start setting up your Brother MFC-J4335DW printer!
Let’s Begin The Hardware Setup
Basic Printer Preparations
● Unpack the box and remove the printed documentation, power cord, and ink cartridges from the package.
● Gently lift the printer from the pack and place it on a flat surface.
● Make sure that the delivered contents (including the Brother printer) are not defective.
● You can now start discarding the packing materials around the printer
● Then, remove all the protective tapes from outside and inside the printer
Fill The Paper Tray With Plain Sheets
● First, pull out the paper tray completely from the printer and move the paper width guides to the outward position.
● Fan a stack of plain white sheets and insert it into the paper tray
● Now, adjust the paper width guides to the edges of the stack. But not too tightly
● Slowly insert the paper tray into the printer
● Next, pull out the paper support and raise it.Proceed To Ink Cartridge Installation
● Open the ink cartridge cover of your printer
● Now, uncover one of the ink cartridges from the package and remove the protective tape.
● Carefully insert the ink cartridge into the respective slot.
● Make sure that the ink cartridge is installed correctly in its place.
● Repeat these instructions to install the remaining ink cartridges into the printer
● Close the ink cartridge cover
● Now, go to the printer’s control panel and set the date & time by following the on-screen prompts.
● Then, go ahead with on-screen instructions to print the Print Quality Check Sheet and the Alignment sheet.
● Load the printer Alignment page with the scan side facing down on the scanner glass and perform the on-screen prompts on your printer to complete adjusting the alignment.
● If you want to change the language setting, go to Settings > Initial Setup > Local Language and press the OK button.
Great job! You have now gone through the hardware setup of your printer Let’s move on to the procedure for software setup.
Start Performing The Software Setup
To make use of your printer functionalities even more effectively, you have to install the required driver on your computer But, before installing it, ensure that it supports your devices. The driver will also help your printer to communicate with other devices and can manage all the print-related tasks. You can download the printer driver on both your Windows and Mac computers. Suppose, you are a mobile user you have to use a separate app Brother Mobile Connect. Well, let’s get started right away!
Download The Latest Driver
● Brother MFC-J4335DW Driver Windows 11 – Download
● Brother MFC-J4335DW Driver Windows 10 – Download
● Brother MFC-J4335DW Driver Mac 13 – Download
● Brother MFC-J4335DW Driver Mac 12 – Download
● Brother MFC-J4335DW Driver Mac 11 – DownloadSteps To Install The Printer Software On Your Mobile Device
● Make sure to connect your printer and mobile device to the same network.
● To install the Brother Mobile Connect app on your Android device, you can use Google Play Store.
● For iPhone users, you can use the App Store application to install the Brother Mobile Connect app.
● After installing it, tap the Open button.
● On the Home screen, touch the Add Machine option.
● Then, tap the Not Connected option.
● Follow the on-screen prompts to check if your mobile device is connected to the same network as your printer and tap OK.
● On the next screen, enter your printer model name into the text field.
● Pick your printer from the available list and perform the on-screen instructions to connect your devices.
Link : https://fixmyprinter.us/brother-mfc-j4335dw-setup/
Tollfree : +1 909-751-0101