VELCO VTR-100
07/24
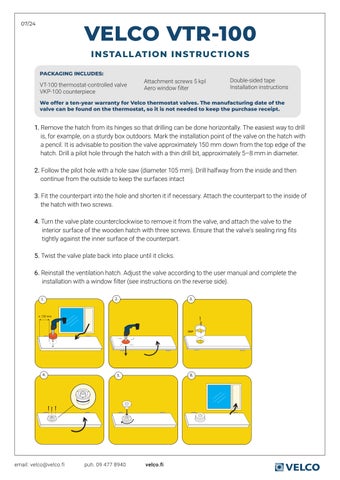
I N S TA LL ATI O N I N S TRU C TI O N S PACKAGING INCLUDES:
VT-100 thermostat-controlled valve VKP-100 counterpiece
Attachment screws 5 kpl Aero window filter
Double-sided tape Installation instructions
We offer a ten-year warranty for Velco thermostat valves. The manufacturing date of the valve can be found on the thermostat, so it is not needed to keep the purchase receipt.
1. Remove the hatch from its hinges so that drilling can be done horizontally. The easiest way to drill is, for example, on a sturdy box outdoors. Mark the installation point of the valve on the hatch with a pencil. It is advisable to position the valve approximately 150 mm down from the top edge of the hatch. Drill a pilot hole through the hatch with a thin drill bit, approximately 5–8 mm in diameter. 2. Follow the pilot hole with a hole saw (diameter 105 mm). Drill halfway from the inside and then continue from the outside to keep the surfaces intact 3. Fit the counterpart into the hole and shorten it if necessary. Attach the counterpart to the inside of the hatch with two screws. 4. Turn the valve plate counterclockwise to remove it from the valve, and attach the valve to the interior surface of the wooden hatch with three screws. Ensure that the valve’s sealing ring fits tightly against the inner surface of the counterpart. 5. Twist the valve plate back into place until it clicks. 6. Reinstall the ventilation hatch. Adjust the valve according to the user manual and complete the installation with a window filter (see instructions on the reverse side). 1.
2.
3.
n. 150 mm
VKP
4.
email: velco@velco.fi
8.
5.
puh. 09 477 8940
velco.fi