5 minute read
Producing a Movie with Lumion

by TD Garden
Working with clips
Clips are essential to create a movie and the way you control these clips can make a big difference. Things like copying, deleting, and moving clips are not difficult tasks, so we are going to cover some tips to increase productivity. When recording a clip, notice the buttons next to the viewport, as shown in the screenshot:
Advertisement
They may not look that significant but these buttons do wonders, and instead of using trial and error to get correct values, these tools provide a quick and effective way to do so. The Camera Up and Down button is useful when you need to keep the same camera height throughout the clip, increasing the accuracy of your shots.
Another useful feature that creates believable movies is the Set eye level at 1.60 button, which sets the camera height to the standard 1.60 meters of height. This is the normal height from which a person gets his or her perspective and would be able to see the environment and in the building.
The Horizontal eye level feature is not something new because you could have access to this using the Ctrl + H key combination, but it is still nice to have everything in one place which saves you time and helps you to keep focused when creating or adjusting a camera path.
Composition–a useful tool
Before we even start with this section, there is something you need to understand: this book is not about composition, and the goal of this section is not to detail step-by-step how to create good compositions.
So what is the point? The main goal is to make you aware that creating good movies in Lumion is not a simple fact of pointing the camera at something and starting to record. To create a successful animation, it is essential that you at least have a good understanding of these guidelines:
• Rule of thirds: This is basically a compositional guideline and it states that when you divide, vertically or horizontally, the screen in three equal sections, these virtual lines show points of interest that help to create tension and an interesting composition. These points are called focal points because our eyes are naturally drawn to them and for that reason we can place interesting aspects of our scene there. You may notice when adjusting the camera in the Movie or Photo mode, there is a thin grid that appears to help you to see where these points are.
• Depth of field and Leading lines: The goal of these techniques is to lead the viewer's eye where you want to. Depth of field (DOF), in particular, can create a very dynamic clip if you animate the focus going from one point to another. You can use straight, diagonal, and curved lines to create depth and a sense of movement.
• Foreground/Background: When shooting an image or movie, the camera's lens can sometimes flatten the foreground and background, and this removes most of the depth. A good way to ensure you add depth to an image or shot is by using different elements in the foreground, middle ground, and background. This works because our eye recognizes these layers of information and this in turn creates a more interesting composition.
• Framing: This involves using foreground and middle ground objects to work as frames for your subject. For example, a classic example is using trees to naturally create a frame for the subject.
To help you learn more about some of these techniques, have a look at the following website: http://compositionstudy.com/
The best way to learn is by studying how the masters use these techniques to produce stunning photos.
As you can see, this is only a tiny parcel of techniques available and how they can be used. Keep in mind that the goal of composition is to guide the viewer's attention to the main subject of what you are showing. A video with a lack of composition will confuse the viewer since he or she will not be able to really understand where to focus his or her attention.
A great example of camera shots can be found in the movie, The Third and Seventh, by Alex Roman. It is a masterpiece in all senses and provides good examples to study and apply to your work.
Another step to producing believable renders and, in this case, movies is the appropriate use of Lumion's effects.
Adding realism with Lumion's effects
Using effects is not something new because you have been using them all along in this book. The previous chapter covered some effects that can also be used in the Movie mode, such as sun study, shadow, reflection, two-point perspective, and Global Illumination. All of these effects can be used for a movie and you only need to be careful with the two-point perspective which may not work well with an extreme camera angle. However, what other effects can you use to add realism to the animation?
The depth of field and Vignette effects
The next two effects are related to photo-realism because both of them happen when you use a real camera. In simple words, depth of field in a photograph is the distance between the nearest and farthest objects that are in focus and acceptably sharp. Why should you care about this?
Depth of field is a tool that can help to guide the viewers' attention to the areas you want without any distractions. It can also be used to separate objects from the background making them stand out and, when used correctly, depth of field can have a deep impact both on the art and quality of the photograph.
Being an aide for creating believable renders, it's no surprise that an effect called depth of field is available. This is not the easiest effect to use in Lumion and for that reason, here is some explanation on what each setting does:
• Focus distance: This specifies where the camera should focus. If you start with a value of 1, you can see on the bottom section a strip of clear sharpness, then you can increase the value until that section reaches the area that you want to be in focus.
• F stop: With this setting, keep in mind that higher values remove the blur and lower values can be used to create a bokeh effect.
• Smoothness: This is used to create sharper edges, but you probably should leave this at 1
• Isolate foreground: This controls the depth of field layers in front of the camera but usually doesn't produce a good result.
• Expansion: This works great for close-ups to get a sharper look at the 3D model in focus.
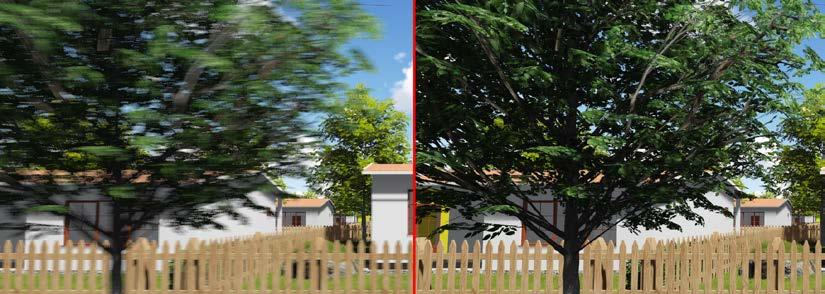
The following screenshot can help you understand the benefits of using depth of field and other effects that mimic a real camera:
It may be difficult to perceive all the effects and, in particular, depth of field but certainly there is a big difference between the two images. The image on the right-hand side shows a few more effects that can be used to increase the image quality and one of them is the Vignette. Essentially, a vignette is a natural gradual darkening that happens in almost every camera, in particular when using a wide-angle lens. But a vignette can be used as a composition tool as well, helping the viewer to focus his or her attention to a specific point on the image. In Lumion, this effect can be found under the Artistic tab, but keep in mind that the vignette needs to be of something subtle in order to work.
There are a few more effects you may want to have a look at, such as Noise and Chromatic aberrations. These effects can help a lot to make the image look more natural and this is because both of them are a natural result of using a real camera, but again don't overuse it. All these effects need to be applied in a very subtle way; otherwise, the viewer will get distracted with a ridiculous vignette or chromatic aberration. There is another effect that is essential in any animation you create.