9 minute read
Producing a Still Image with Lumion

by TD Garden
Throughout this book, you have been working really hard to build a well-optimized scene. This has involved importing a 3D model, assigning materials, and then adding more content using Lumion's library. However, now that you have a scene how can you export it? How can you show the world what you have been working on? There are several ways you can do this, but in this specific chapter you will learn the best techniques to create still images using the Photo mode. This is perhaps the most requested medium to present the information the client requires. The following list shows some of the topics we are going to cover:
• Quick overview: Photo mode
Advertisement
• Saving and loading camera positions
• Built mode with effects
• Saving and loading effects
• Adding effects
• Photo and movie effects
• Sun study–a useful tool
• Shadow effect to correct shadows
• Realistic reflections with the Reflection effect
• Two-point perspective effect
• Improving illumination with Global Illumination and Hyperlight®
Producing a Still Image with Lumion
One thing that is worth mentioning is that you will benefit a lot from having a quick look at the next chapter. The truth is that creating still images and animations are very close subjects in nature, and in Lumion what you need in order to create a still image is very similar to what you need to create an animation. Actually, if your primary goal is to create animations and then some still images, you can do everything in the Movie mode.
With the next chapter, something that it is worth learning is how to create a good composition. Yes, just because you have a camera, even virtual, doesn't automatically make you a good photographer.
And before we start with the Quick overview section, you need to keep in mind that the effects you will learn here can also be applied in the Movie mode.
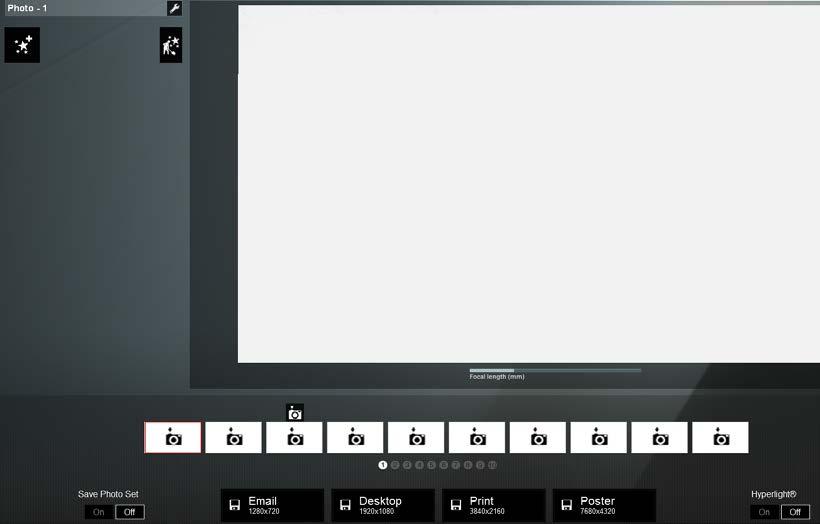
A quick overview–the Photo mode
The Photo mode is where you can find all the tools needed if you are only interested in creating still images. Let's have a quick look at the interface for this mode and explore some useful features:
This interface may look different if you are using a version previous to Lumion 5 but, overall, the most important features you need to produce a still image are the same. What are the best practices in order to take full advantage of this menu?
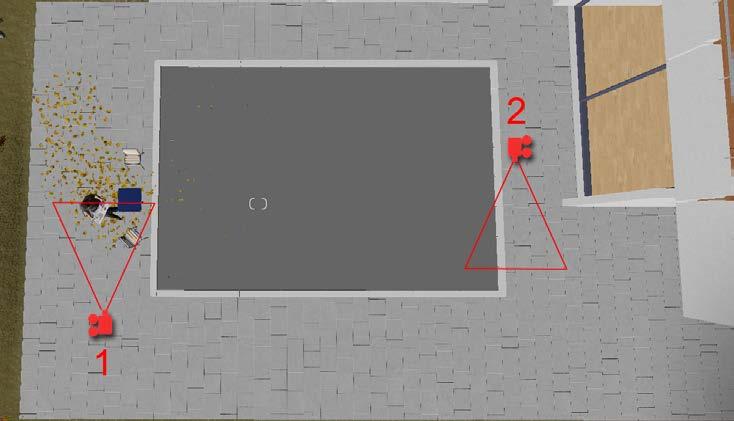
Saving and loading camera positions
This is one of the most important features you need to keep in mind to create stunning images. You can access this feature in the Photo mode by using the bottom section, as shown in the following screenshot:
However, during the process of creating a 3D world, you eventually came across really good camera positions. It's true that you can jump to the Photo mode and save the camera position but a more efficient way is by using the following keyboard shortcuts:
• CTRL + 0, 1, 2 to 9: This shortcut is used to save up to 10 camera positions that are stored in Photo Set 1
• SHIFT + 0, 1, 2 to 9: This shortcut is used to load saved camera positions that you can find stored in Photo Set 1
This will certainly increase your workflow's speed but there is another feature that is worth mentioning and using.
The Build mode with effects
Using effects is a great way to enhance the scene, but sometimes it may be difficult to tweak certain areas. The viewport in Photo mode is not that big so one good practice is using the Build with effects button, as shown in the following screenshot:
Producing a Still Image with Lumion
This makes it possible for you to get back to the Build mode but all the effects will become active and you can see them in action, like for example when working with the Rain or Snow effects. Using this mode gives you the opportunity to see if the effect is doing a good job, in particular, when you have to tweak shadows and the depth of field. One word of caution: too many effects will make the viewport very slow, such as if you have the Global Illumination effect applied. It is always a good idea to test just a few effects at a time.
Another feature that is very useful is the ability to save and load stacks of effects in different projects. Let's have a look at it.
Saving and loading effects
While you are working with Photo mode, you may use the same effects over and over in multiple projects and in the end, the settings will not differ that much. Lumion lets you save a stack of effects as a Lumion movie effects file (*lme) that can be loaded into a different project. The process is extremely simple, as shown in the following screenshot:
Under the File menu, you can find two submenus that let you Save or Load a Lumion movie effects file. This can prove to be practical when trying different settings for the same scene or when saving a good effects combination for later use. It is a simple technique but the ability to create presets of effects is priceless.
Next, we will start covering some effects that can be used to improve the quality of your image. However, before we start, there is something you need to know regarding the effects mentioned in this chapter: there aren't any magical settings that will automatically create a fantastic render.
A beginner often thinks that there is a secret formula to create beautiful art and tends to forget that experience, hard work, and practice is what makes a good piece of art. The following effects are just a small selection of what is available, but they truly can make all the difference in your project.
Photo and movie effects
As mentioned at the beginning of this chapter, most of the effects can be applied in either Photo or Movie mode. For that reason, the knowledge you acquire here can and should be used when creating animations.
For the next effects, we will firstly begin by explaining why the effect is useful, and secondly offer some tips to use it.
Sun Study – a useful tool
The first effect you can use is the Sun Study and this effect lets you pinpoint a geographical location of your project. This affects the sun and the shadows produced which in turn lets the architect see how these two elements affect the building and the surroundings.
This effect can be found under the World tab and allows a very accurate selection of the building's location by using the latitude and longitude values.
To help you get the exact location of the building, refer to: http://www.latlong.net/
Shadow effect to correct shadows
Shadows are essential to create a believable render but, at the same time, they are very expensive to calculate and simulate. To avoid any flickering and shadow artifacts, Lumion applies the shadow on top of every surface with a small offset. This small offset sometimes can give the impression that the objects are floating. To solve this and other issues, you can use the Shadow effect found under the World tab.
Producing a Still Image with Lumion
The Shadow correction setting helps you to correct shadow offset from the object, but there are other settings that are worth keeping in mind:
• Sun shadow range can be used to tweak shadows' quality, but higher values will make objects far away lose their shadows
• Ambient scale, Ambient, and Ambient diffuse need to be perfectly balanced to remove some blotchiness that may appear in corners and other areas where two surfaces are very close to each other
Realistic reflections with the Reflection effect
Even when using the reflection control ball, the glass reflections may not look that good for close-up images. For these situations, you have the Reflection effect found under the World tab, which provides realistic and accurate reflections.
Lumion 5 allows a reflection plane to be added to a water plane or a water material.
The process to apply this effect is very simple and you may feel tempted to add reflection planes to every single surface in the scene. That is not wise for several reasons. Firstly, you can only have 10 reflection planes in each scene and secondly, each reflection plane will mirror the entire scene, which means that each new reflection plane will have a massive impact on your scene.
A good way of solving this issue is by making all the glazing on each facade a single mesh with low polygon count.
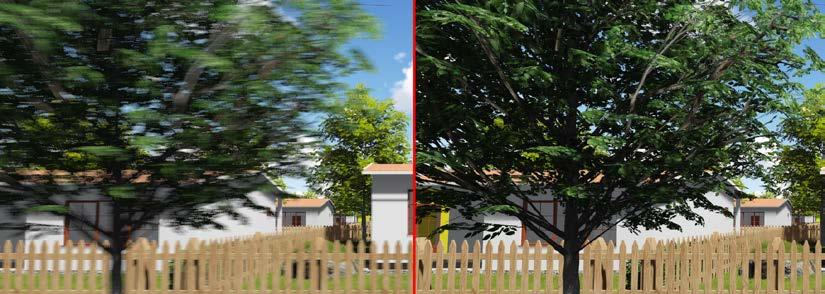
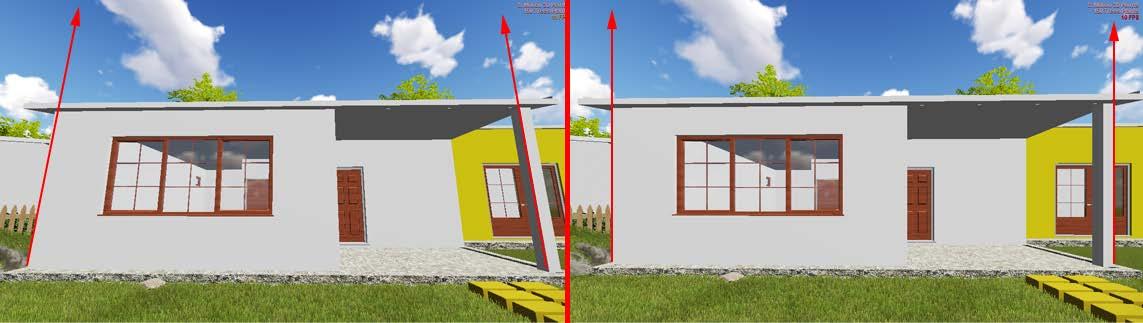
Two-point perspective effect
While tweaking and adjusting the camera, sometimes it is necessary for you to correct the camera's perspective and for that you can use the two-point perspective effect. But why is that necessary? Have a look at the following comparison between the camera with and without this effect:
Because Lumion uses a three-point perspective, sometimes the camera angle can make the objects look taller and stretched, as you can see from the previous screenshot in the left-hand image. However, sometimes we need to straighten the vertical lines in the scene irrespective of the camera angle. That is when the twopoint perspective comes into play to correct the camera and make your scene more eye-pleasing without strange angles and distortions.
Improving illumination with Global Illumination and Hyperlight®
The exterior lighting is often very simple and you only need to worry about the sun's position to render different moods. However, things get a little bit trickier when working with interior scenes and in particular, when there are no windows or when they are small. Primarily, Lumion uses the sun to light the scene but only a few rays of light will hit the interior of your scene and, for that reason, one thing you should start doing is making good use of lights.
But that leads to another problem we have covered previously in this book: too many lights will produce shadows that in turn make the scene heavy and increase the render time. However, Lumion provides a fantastic effect called Global Illumination that you can find under the World tab. What is the best way to use this effect in Lumion?
Producing a Still Image with Lumion
This effect substantially improves the interior lighting by simulating global illumination, which provides more realistic lighting. What is global illumination? In simple terms, it is a group of algorithms that help to produce more realistic lighting by taking into consideration not only the light that comes from light sources (sun, spotlights), but also the light reflected by objects and that is bouncing around the scene.

There are two ways you can use this effect:
• The first one involves scenes that are lit only by exterior light, like the sun. For that reason, you need to use the Sun amount settings to tweak how much the sun influences the interior lighting, the Falloff speed settings to tweak the smoothness of the interior light, and the Reduce spots settings in case you have some artifacts with extreme values. It is always a good idea to use a fill light as a helper to produce a nice interior lighting, even if you want to only use the sun as your main source.
• The second way you can use this effect is when working with interior lighting, like spotlights and fill lights. Creating a light rig for an interior scene involves a balanced use of Lumion's lights and the Global Illumination effect. You may feel tempted to fill the room with loads of lights but that is not going to help you. The first step is adding one single light to the scene and adding the Global Illumination effect, as shown in the following screenshot:
• The next step is for you to use the Spotlight GI amount slider (at the bottom) to start to increase the effect of that light into the scene. Eventually, you will realize that even a single light drastically improves the interior lighting quality. Even if you have multiple lights, try this effect with just two or three because the render time will not increase too much.
Maybe you find the Global Illumination too difficult to set up or perhaps discover the render time increased because of this effect. In that case, you may want to use Hyperlight®. Hyperlight® is a proprietary technology developed specifically for Lumion 5 and this technology is a physically-based method of incorporating light reflections into a scene, improving the light quality. Where can you find this Hyperlight® feature? Have a look at the following screenshot:
As you can see, this option can be either On or Off and then you tweak the intensity of the effect using the slider. A downside of this feature is that there is no preview to see how Hyperlight® is affecting the scene. You need to actually render a preview and adjust accordingly.
Another aspect you will certainly notice is that this effect will increase the noise present in the render but there is a way you can tackle this issue. Render a bigger image and then resize the image in Photoshop or GIMP; this will help to reduce some of the noise.