3 minute read
Curved paths with the Advanced move effect

by TD Garden
Don't let the name of this effect deceive you. The difference between the Move effect and the Advanced move effect is that, with the latter, you can use keyframes to create more complex animations, as shown in the following screenshot:
Although the effect seems great, what is the best way to use it? Have a look at the following list:
Advertisement
• Start by creating a keyframe for the initial position, move the time bar to the end and create another keyframe by simply moving the 3D model to the desired position.
• The time bar represents the length of your clip, so use this to avoid creating an animation that ends in a loop.
• Add a third keyframe where you want the 3D model to change direction.
• As shown in the previous screenshot, keep adding additional keyframes to create a smooth turn.
• Use the Time offset if you want to delay the animation in relation to the clip. This is a great way to avoid that look when the animation starts exactly with the clip. A few seconds of delay creates a good transition and doesn't look fake.
Animation Techniques in Lumion
When working with small scenes, these two effects will help create a scene full of life and that doesn't involve much work, since the number of 3D models you have to animate are few. But what about an urban scene with loads of people and cars moving around? Do you have to animate individual 3D models using the Move or Advanced move effects? The answer is no and let's see why.
Making good use of the Mass move effect
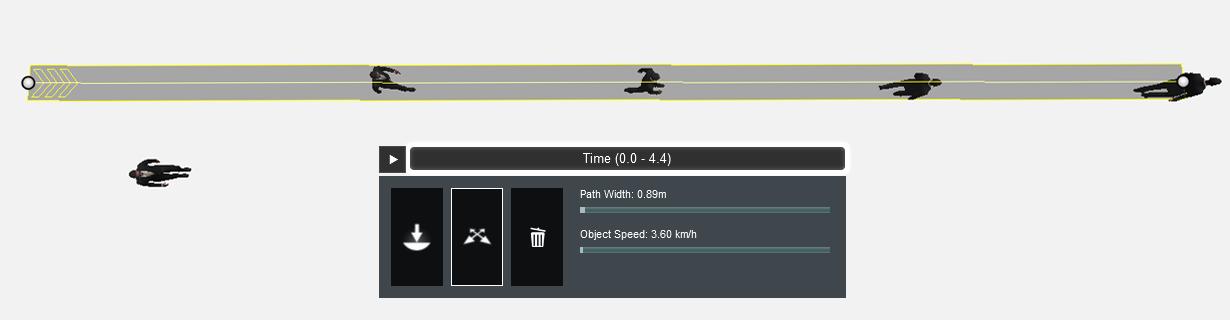
You certainly are making good use of the Mass placement tool, which allows you to place a great variety of 3D models and bring randomness and uniqueness to the scene. But when it's time to animate all of these 3D models, the Move and Advanced move effects are not the best options. Instead, you need to use the Mass move effect and, as shown in the following screenshot, it's not that difficult to utilize:
Placing the path is the first step you need to perform and you are not constrained to a single path. The path you create sets two important aspects: the length of the animation and its direction. But there is one essential point that you need to keep in mind in order for this effect to work, which is that the 3D models need to be on top of the path (the gray strip you see on the screen). For example, in the previous screenshot, one of the men was left out of the path and, for that reason, when you play the animation he will stay in the same position.
One way you can solve this is by moving the 3D model on top of the path or increasing the Path Width value in order to cover the location where the 3D model is. Another thing that you don't need to worry about is that the path will only work with objects that are animated, such as people walking and cars moving. This means that if there is a tree on top of the path, the tree will remain static when you play the animation.
And finally, don't forget that cars and people move at different speeds, which you can tweak by changing the Object Speed setting.
Although this was a small chapter, the workflow you learned here is an important step to create professional and efficient animations. In this chapter, your focus was on how to create animations using imported 3D models or some of the native Lumion models.
However, you also learned that planning is at the heart of every successful animation and that this planning can be achieved by using a simple storyboard to set up scenes and camera movements. Then, you saw how to efficiently import animations and control them using a simple clip. After this, you learned how to use three simple but efficient effects to create animations that can bring life and uniqueness to your scenes.
Nevertheless, these effects are just the start. There is so much you can do with effects and that is something we will cover in the next chapter. Also, we will start to produce still images with the help of the Photo mode and add a special touch with effects.