4 minute read
Working with materials in Lumion – three options

by TD Garden
You probably noticed in Chapter 3, Creating an InteriorScene with Lumion, we mentioned that there are three options to work with materials in Lumion:
• Using Lumion's materials
Advertisement
• Using the imported materials that you can create on your favorite modeling application
• Creating materials using Lumion's Standard material
Let's have a look at each one of these options and see how they can help you and when they best suit your project.
Using Lumion's materials
The first option is obvious; you are using Lumion and it makes sense using Lumion's materials, but you may feel constrained by what is available at Lumion's material library. However, instead of thinking, "I only have 600 materials and I cannot find what I need!", you need to look at the materials library also as a template to create other materials.
For example, if none of the brick materials is similar to what you need, nothing stops you from using a brick material, changing the Gloss and Reflection values, and loading a new texture, creating an entirely new material. This is made possible by using the Choose Color Map button, as shown in the following screenshot:
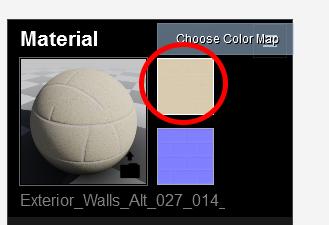
When you click on the Choose Color Map button, a new window appears where you can navigate to the folder where the texture is saved. What about the second square? The one with a purple color? Let's see the answer in the next section.
Normal maps and their functionality
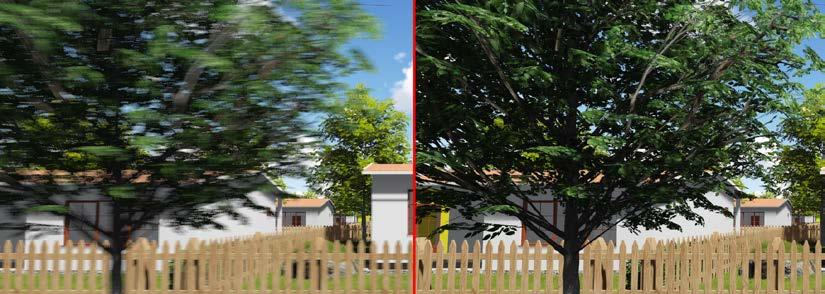
The purple square you just saw is where you can load the normal map. And what is a normal map? Firstly, a normal map is not a bump map. A bump map uses a color range from black to white and in some ways is more limited than a normal map. The following screenshots show the clear difference between these two maps:
The map on the left is a bump map and you can see that the level of detail is not the same that we can get with a normal map. A normal map consists of red, green, and blue colors that represent the x, y, and z coordinates. This allows a 2D image to represent depth and Lumion uses this depth information to fake lighting details based on the color associated with the 3D coordinate.
The perks of using a normal map
Why should you use normal maps? Keep in mind that Lumion is a real-time rendering engine and, as you saw previously, there is the need to keep a balance between detail and geometry. If you add too much detail, the 3D model will look gorgeous but Lumion's performance will suffer drastically. On the other hand, you can have a low-poly 3D model and fake detail with a normal map.
Working with Physically Based Materials
Using a normal map for each material has a massive impact on the final quality you can get with Lumion. Since these maps are so important, how can you create one?
Tips to create normal maps
As you will understand, we cannot cover all the different techniques to create normal maps. However, you may find something to suit your workflow in the following list:
• Photoshop using an action script called nDo: Teddy Bergsman is the author of this fantastic script. It is a free script that creates a very accurate normal map of any texture you load in Photoshop in seconds.
To download and see how to install this script, visit the following link: http://www.philipk.net/ndo.html
Here you can find a more detailed tutorial on how to use this nDo script: http://www.philipk.net/tutorials/ndo/ndo.html
This script has three options to create normal maps. The default option is Smooth, which gives you a blurry normal map. Then you have the Chisel Hard option to generate a very sharp and subtle normal map but you don't have much control over the final result. The Chisel Soft option is similar to the Chisel Hard except that you have full control over the intensity and bevel radius. This script also allows you to sculpt and combine several normal maps.
• Using the Quixel NDO application: From the same creator, we have a more capable and optimized application called Quixel NDO. With this application, you can sculpt normal maps in real-time, build your own normal maps without using textures, and preview everything with the 3DO material preview. This is quite useful because you don't have to save the normal map and see how it looks in Lumion. 3DO (which comes free with NDO) has a physically based renderer and lets you load a 3D model to see how the texture looks.
Find more information including a free trial here: http://quixel.se/dev/ndo
• GIMP with the normalmap plugin: If you want to use free software, a good alternative is GIMP. There is a great plugin called normalmap, which does good work not only by creating a normal map but also by providing a preview window to see the tweaks you are making.
To download this plugin, visit the following link: https://code.google.com/p/gimp-normalmap/
• Do it online with NormalMap-Online. In case you don't want to install another application, the best option is doing it online. In that case, you may want to have a look at NormalMap-Online, as shown in the following screenshot:
• The process is extremely simple as you can see from the preceding screenshot. You load the image and automatically get a normal map, and on the right-hand side there is a preview to show how the normal map and the texture work together. Christian Petry is the man behind this tool that will help to create sharp and accurate normal maps. He is a great guy and if you like this online application, please consider supporting an application that will save you time and money.