12 minute read
The Import, Export, and Merge scene features

by TD Garden
Handling massive and complex scenes can be challenging, not only because of the amount of information in the scene but also because Lumion's viewport can struggle to present so much information.
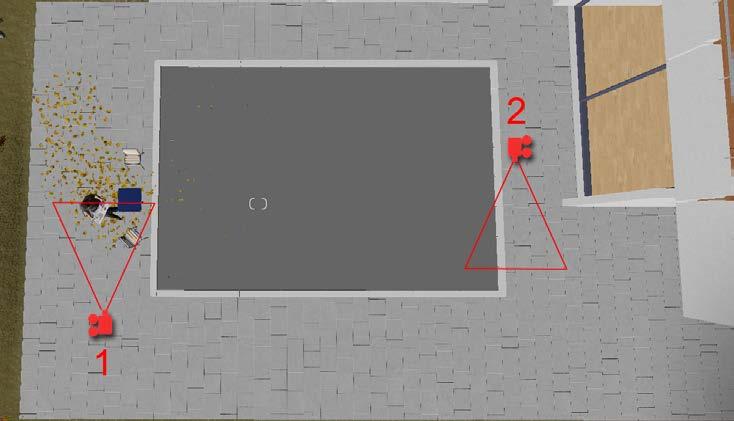
Let's consider the example showed in the following screenshot:
Advertisement
For this project, the client only wanted some still images of the house in the centre, and because this was an urbanization, all the houses would be the same with some differences in the exterior materials.
The most logical first step was to divide the scene into blocks with six houses, export all of the blocks, and use the coordinate system to place them in the correct positions. However, because of the camera's position, you can still see some of the houses around the main subject. That means we had to fill the space with the same house, trees, vegetation, and so on.
Although possible, it is not very practical and easy to copy six houses with all of that information and place it on each block around the main subject.
Remember that you can move and duplicate an object or multiple objects using this combination: Move tool + Shift + Alt. The Shift key keeps the same height while moving.
This is when Import full scene and Export full scene comes to the rescue. When you go to the Files menu, you can see these two tabs, as shown in the following screenshot:
The first step in this workflow is to prepare one block of six houses with all the detail we need. Similarly, you may find it useful to divide or break the scene into smaller and lighter scenes that give you the ability to easily move around and tweak the 3D models.
Then you need to export every single scene using the Export full scene tab. This gives you the opportunity to save a file with the LS5 extension. Think of this process as creating references that you can assemble into a single scene.
Creating an Exterior Scene with Lumion
To import the scenes you export, use the Import full scene tab. Here you can find two options, as shown in the following screenshot:
The Import Scene… option, although it allows you to import the entire scene, is not the best option. Why? Because it doesn't give you the freedom to choose what to import, as the Merge Scene… option does.

The following screenshot shows the options available with the Merge Scene… option:
As you can see, the nature of this feature is far more complex, but at the same time, more flexible than the Import Scene… option. The scene you want to merge is divided into four sections: Nature, Lights, Model library, and Imported
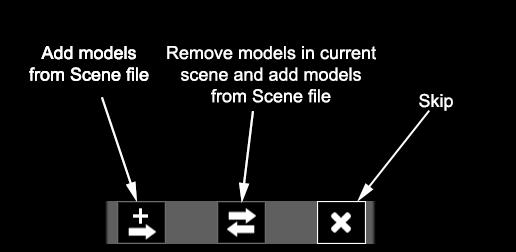
The three buttons next to each category allow you to control what is imported or updated, as shown in the following diagram:
Now you can see why using this technique is one of the best practices for keeping the workflow smooth and problem-free. Lumion even creates another scene called Import as a backup. One word of caution: use layers to control each scene you import or merge, or it will be very difficult to handle all the files.
Another best practice when producing exterior still images or animations is the use of the Landscape menu to control the terrain and textures.
Quick overview – the Landscape menu
When working on an exterior project, the landscape has a big impact on any scene. Landscape refers to all the visible features of an area of land and includes things such as rivers, ponds, roads, animals, and vegetation.
Creating an Exterior Scene with Lumion
The Landscape menu deals with some of the aspects just mentioned that create a beautiful landscape, as shown in the following screenshot:
The Water and Ocean menus are very specific and you will probably only use these two features a couple of times. But what are the best practices for using the Landscape menu for exterior scenes?

Working with the Terrain tools
The landscape is composed of several elements, and Lumion provides the tools for each one. You may feel tempted to immediately sculpt the terrain using the tools available on the Height menu. However, a few aspects need to be taken into consideration in order to know which tools to use and when. Always think about what are you trying to accomplish and what the needs of the project are.
Are you creating a house in the forest with mountains? In that case, the Terrain menu has the better tools to produce those mountains. Are you creating an urban environment? The Height menu is the most suitable for that. Do you need to render a close-up of the building? In that case, the Grass and Paint menus may help most. The best way to approach complex landscapes is by dividing them into sections and starting from the biggest section and moving to the smallest (where, usually, more detail is required).
Landscape types
Looking at the big picture, what stands out when it comes to the landscape you are trying to produce? There are different types of landscapes that include coast, valleys, mountains, plains, and hills. To produce these different landscape types, you will need to combine different tools and techniques. Let's consider the key points to produce some of these types.
Creating a coast using the Ocean and Terrain menus
To create a coast landscape, you need two elements: terrain and ocean. Working with them is not very difficult, and you only need to use two menus initially, as shown in the following screenshot:
The process is very simple: on the Terrain menu, click on the Make mountains button, and then, on the Ocean menu, click on the Ocean on/off button. The Ocean menu is surprisingly simple to use and you can start by tweaking Height in case the ocean is too low or too high. After that, you will be more concerned with the artistic aspect and the mood and feeling you are trying to achieve. The Color preset setting gives you a handle to tweak the look of the water and then a combination of Wave intensity and Turbidity allows you to create something between a wild and paradisiacal ocean.
If you need something quick and already set up for you, use the Island preset scene. From there, you can start sculpting the terrain with tools that you will see in the upcoming sections.

Creating an Exterior Scene with Lumion
Suppose you think that the ocean looks great but are not interested in having mountains in your scene? Let's see which tools to use to sculpt the terrain into something more to your taste.
Creating a valley using the Water and Height menus
A valley is usually a low area between hills and, often, there is a river running through it. In this instance, you may want to leave the Terrain menu and have a look at the Height menu and the different tools available. Open the Height menu and you can see that there are four sculpting brushes available, as shown in the following screenshot:
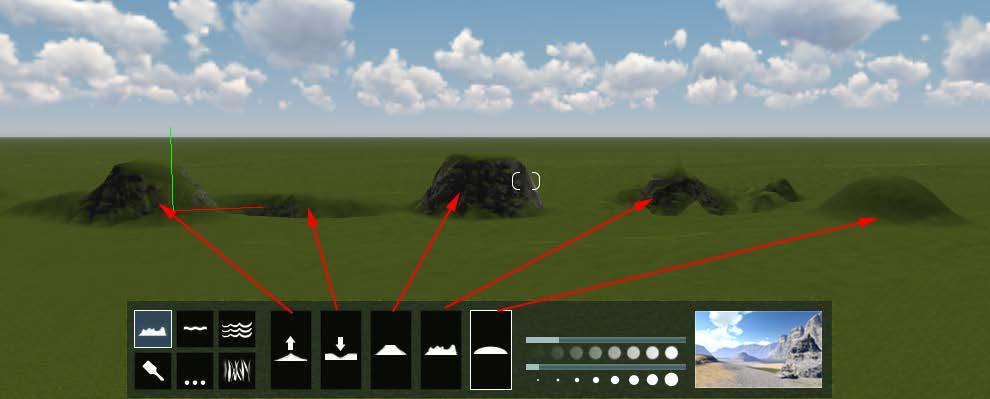
In order to create a valley, you may want to use the Make mountains option under the Terrain menu; then, use the tools available in the Height menu to lower some areas, creating the river route, and smooth the terrain. Although you don't have to use the Make mountains to create a valley, the reality is that, with this option, you will not have to lower the terrain to create the hills.
If your mountains are looking strange, press the F7 key to show high-quality terrain in the viewport.
What about the river? The best option is to use the Ocean menu and then reduce the Wave intensity and Turbidity settings. The next step is to increase the Wind speed value and use Wind direction to make the water run parallel to the river channel.

It is still worth knowing that you can use the Water menu to add different types of water bodies to your scene, as shown in the following screenshot:
After selecting and placing the water body, you can use the Up and Stretch tools to tweak the size and height of the water body.
This may force you to choose between a river with an oceanic look and a river that is almost static with slight undulation. However, the Water menu may prove quite useful if you are looking for a pond or an icy look.
Creating an Exterior Scene with Lumion
Creating a terrain using heightmaps
Eventually, you will come across a project where the terrain needs to be particularly detailed: for example, when you are reproducing a real location in an accurate way. Using the Height menu may not be practical at all, and you are forced to look for help on a terrain map. While working with the Terrain menu, it is possible you noticed the two buttons shown in the following screenshot:

The way you are going to create the terrain or height map is defined first by the level of accuracy you need and next by whether you are trying to replicate a real-world location.
Guidelines to create heightmaps
To start creating this map, there are a few things you need to keep in mind. Firstly, Lumion has limits in terms of terrain, or in other words, the editable parts of the terrain in Lumion occupy a 2048 x 2048 m2 area. Even if you create a texture for a small area, Lumion will stretch the texture to the full extent of 2048 x 2048 meters.
Then, the height map is created by using a range of values between black and white. The colors indicate the following:
• Black: This is equal to a terrain height of 0 meters.
• White: This is equal to a terrain height of 200 meters.
• Grayscale: Each shade of gray is equal to 0.78 meters.
In case you need something higher than 200 meters, you can use 16 bit and even 32 bit images. When using an image of 16 bits, we will increase the height to 400 m, and when using one of 32 bits, we increase it to 600 m.
Tools used to create heightmaps
To create a heighmap manually, you need to use an image editor, such as Photoshop or GIMP. This will require time to create good results, but it gives the most flexibility possible, because using a brush you can literally sculpt the terrain. Since black is equal to 0 meters, it is a good start to fill the texture with the color black and then, using a brush with a low opacity, start to add the white color. Because you are using a brush with a low opacity, let's say 10 percent of opacity, each brush stroke is equal to roughly 20 meters of height.
In order to create a height map, we need to download some texture tools.
Download NVIDIA texture tools for Adobe Photoshop from the following URL: https://developer.nvidia.com/nvidia-texturetools-adobe-photoshop
Download the GIMP DDS plugin from the following URL: https://code.google.com/p/gimp-dds/
Obviously, you will need to check the result constantly in Lumion and see if you are getting the desired results. Lumion supports the following formats to load heightmaps:
• BMP: Windows bitmap
• JPG: Joint Photographic Experts Group
• DDS: DirectDraw Surface
• PNG: Portable Network Graphics
The final step is saving the heightmap as a 32 bit DDS in the 32F format using Nvidia's DDS plugin.
Creating an Exterior Scene with Lumion
Another possibility is to use specialized 3D applications to create these maps. Creating and editing heightmaps may be practical when working with small-scale projects, but things start to get serious when you need high-quality heightmaps. Which 3D application can you use? Fortunately, there are some free and commercial applications that can help you:
• L3DT (free/commercial): Large 3D Terrain (L3DT) is a Windows application for generating terrain maps and textures, and it is intended to help game developers and digital artists create vast high-quality 3D worlds. For more information, visit http://www.bundysoft.com/L3DT/.
• World Machine (free edition/commercial): Powerful and flexible, World Machine combines procedural terrain creation, simulations of nature, and interactive editing to produce realistic-looking terrains quickly and easily. Go to http://www.world-machine.com/ for more information on this.
• Terragen (free edition/commercial): Terragen is very good at generating a ground texture and allows us to create and manipulate highly realistic terrains, both height field and procedural. For more information, visit http://www.planetside.co.uk/.
What if you want a specific real location? There are some places where you can get that information, and the following list provides some of them:
• US Geological Survey: http://www.usgs.gov/
• National Geospatial Intelligence Agency: https://www.nga.mil/Pages/ default.aspx
• British Ordnance Survey: http://www.ordnancesurvey.co.uk/
• Landsat TM: https://lta.cr.usgs.gov/TM
There is another option that is simpler to use-Global Data Explorer. The US Geological Survey (USGS) is a scientific agency of the United States government, and they provide a useful application called Global Data Explorer, which can be used to locate real-world locations and export height maps.
You can find Global Data Explorer via the following link: http://gdex.cr.usgs.gov/gdex/
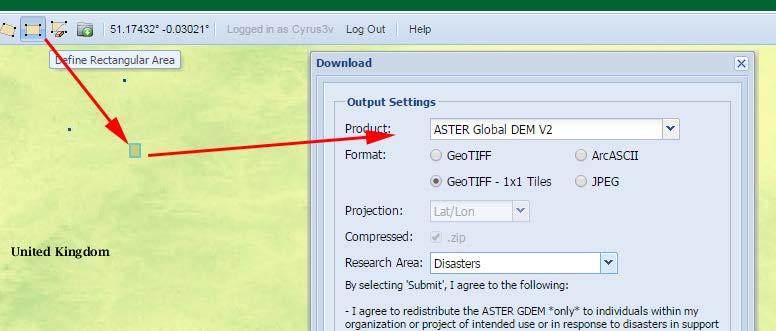
After creating a free account, you can draw a rectangle selection and download the image, as shown in the following screenshot:
It is very important to set Format to GeoTIFF - 1x1 Tiles; otherwise, the images will be tiny or useless. Open the image in an image editor to perform some adjustments, as shown in the following screenshot:
You need to start by adjusting the levels because the image will be very dark and there will be small white dots (errors) in the image; these are not very difficult to fix.

There is another option you can use. Perhaps this is best solution for your project for the reason of being both accurate and at the same time doesn't require much work from your part.
Creating an Exterior Scene with Lumion
Working with imported terrains
On some rare occasions, you may have a terrain provided by the Engineering team, for example Civil 3D. The other possibility is modeling it using an external 3D application.
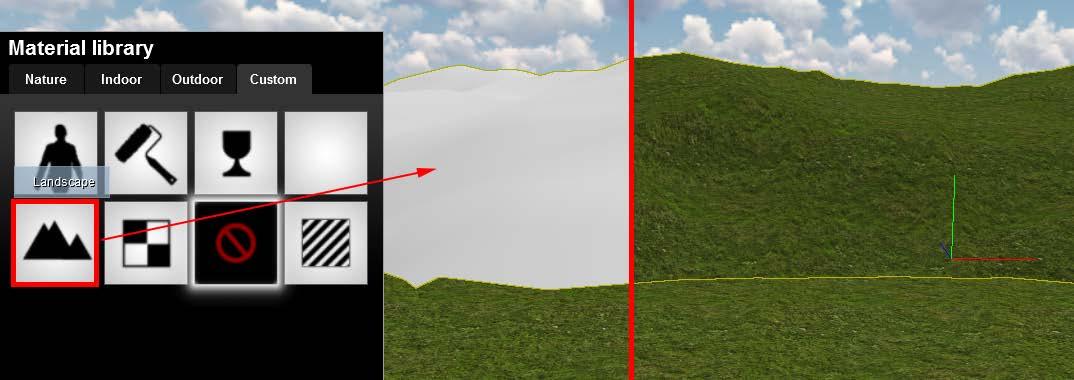
You can use this terrain inside Lumion by exporting it as you would do with another 3D model. Once inside Lumion, you can assign the fantastic Landscape material to this 3D terrain, as shown in the following screenshot:
As you can see, this Landscape material is a fantastic way to easily blend the imported terrain with Lumion's terrain. This material goes even further because now it is as though the 3D model that you imported is part of the terrain, and this means that you can add grass and even paint textures on the 3D model imported. This is a great way to introduce two great features in Lumion.
Scattering elements with the Grass menu
An exterior scene, in most cases, would not be complete without some beautiful pasture. You can open the Green Hills scene under the Examples tab and see how the Grass menu can be used to create (a) neat-looking grass and (b) scattered plants and other elements present in a real pasture. The menu is very simple to use, as you can see in the following screenshot:
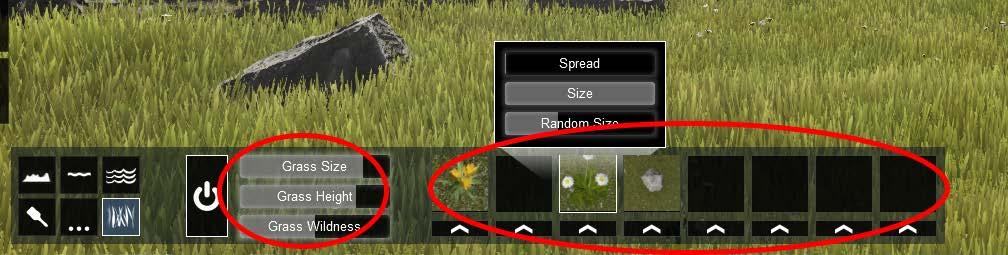
The three grass settings are used to control how the grass looks, but you can add some nifty elements using the thumbnails on the right-hand side. Click on the arrow and select the 3D model to be scattered. However, the grass will appear in the entire landscape, which can create some conflicts with the geometry of the floor. You may end up with grass inside your living room, but there is a quick way to solve that problem.
Choosing the landscape with the Paint menu
The Paint menu is where you can control how the landscape looks and what textures are used. You can change each texture individually, but it's always a good idea to change the landscape type first. As you can see in the following screenshot, there are 20 landscape types:
Also, you can mix textures from different landscapes. The great feature with this menu is that you can actually paint these textures wherever you want, and this can be used to remove grass from particular locations. The following annotated screenshot shows how easy the process is:


Creating an Exterior Scene with Lumion
The first thumbnail shows an icon which indicates that grass will appear where this texture has been used. That means that you can use all the other three textures to paint and remove the grass from specific areas. This is particularly useful when you have a building that was placed on the terrain, and because grass is active, it will appear trespassing the 3D model. It is also useful if you want to create small paths and add more randomness to a garden where, for example, there is less grass around the tree's roots.
Summary
This chapter provided a solid foundation for producing exterior scenes. You learned how to successfully work with the Landscape menu. You also learned that working with complex scenes can be challenging but that this can be tackled by using the Merge scene functionality, which allows you to work with references in Lumion. You learned that the Landscape menu is not simply a menu where you can create an ocean or a river. It can be very powerful by using heightmaps along with four brushes, which let you sculpt the terrain to your needs. Further, you can also use external terrains and blend them neatly with Lumion's terrain, by using the Landscape material. Finally, you saw how to use the Grass menu to create a complex lawn and how to use the Paint menu not only to control the grass in the landscape but also to tweak the look of your terrain.
In the next chapter, you will learn some techniques to create materials that have a big impact on the level of realism. We will have a closer look at Lumion's physically based materials and several ways that you can use materials in Lumion. After that, you will learn how to clean and create your own seamless textures and other maps essential to creating believable materials in Lumion.