7 minute read
Importing and Handling 3D Models

by TD Garden
7. Problem: When you navigate to the 3D model, some surfaces might start to look strange.
Reason: This can happen occasionally when the scene is so complex that it cannot be processed by the graphic card because it runs out of memory.
Advertisement
Solution: Rebooting the PC can help you clean the memory of the graphic card. However, this also has to do with the number of polygons/3D points in the scene. Another possibility is that you have faces overlapping each other. Although the main solution is correct, with this issue inside the 3D modeling package, you can use the Flicker Reduction available in each material for a quick fix.
We only covered some of the most common situations so if you encounter something strange and none of the solutions work, the best course of action is to contact Lumion's team using the official forum. They always do their best not only to help you but, if necessary, create a hotfix for your problem.
Now that you know everything related to importing, let's see how we can place these 3D models in Lumion.
How to place 3D models in Lumion
We are by now familiar with the Place object button available in the Objects menu. So, why do you need to learn more about how to place 3D models in Lumion?
Firstly, don't forget to use layers as you learned in Chapter 1, Getting Ready with Lumion 3D under the section Using Lumion's layers. You are going to benefit from the use of layers at an earlier stage by keeping the project organized, and it will also help you when you shoot your movie.
Secondly, there are some tools that drastically improve the time it takes for you to place 3D models. Next, you will learn two great practices you can use while placing objects; in particular, when you need to place a lot of objects.
10 Copies And Different Sizes
While placing any 3D model, before you click on the scene, you can press and hold the Ctrl and the V keys. The Ctrl key forces Lumion to place 10 copies but the V key creates these 10 copies with random sizes. This is a great way to add randomness to your scene and this attention to detail will make your scene more believable. After all, the world we live in is teeming with randomness where even two snowflakes are not equal.
There is a downside to this that you need to know: when you do this, you don't have control over the area where the 3D model is scattered. However, this downside is a great way to introduce the Mass Placement tool in the model.
Using the Mass Placement tool
This is a new tool that you can find on Lumion 5 and it should be included from version 1 because of the help it provides while working with the big scenes. This tool can pass unnoticed for the first time but you can find it under the Place object button, as shown in the following screenshot:
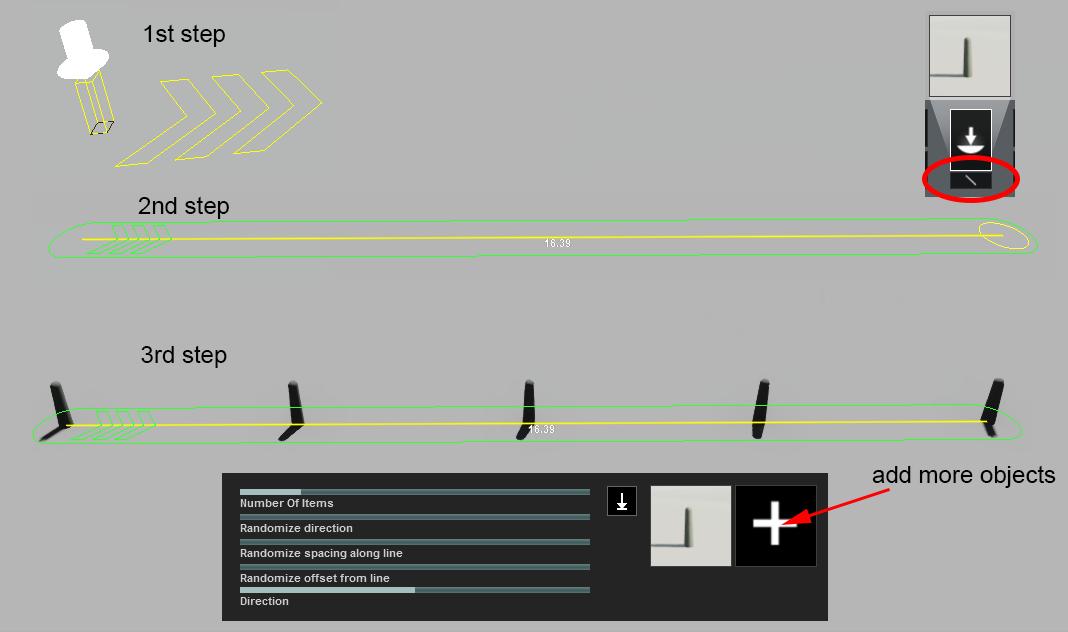
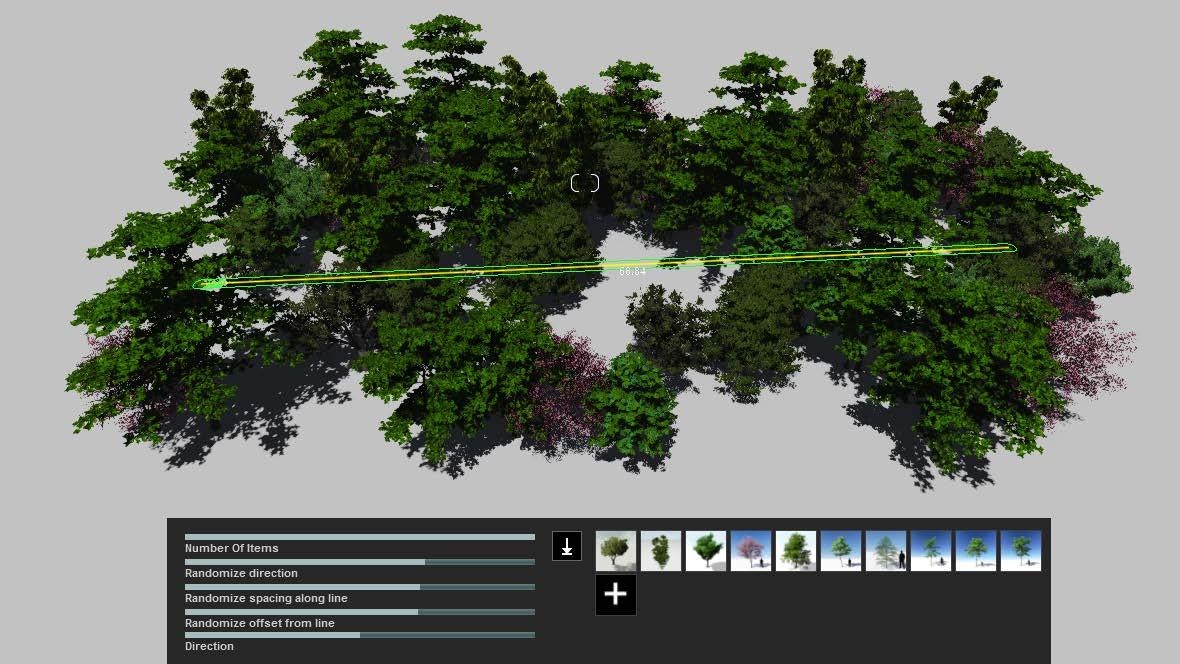
After selecting the 3D model from the library, click on the Mass Placement button that is under the Place object button. As you can see, you can now manipulate the 3D model and the three arrows that control the direction of the path. You have to click on the scene with the left mouse button, drag it, and then click on it again to define the length of the 3D model you need.
Importing and Handling 3D Models
When you do that, a small box appears with several options that help you control how the object behaves on the path you traced. However, the best feature is the button with the big plus sign next to the object's thumbnail. This button lets you add more objects to the path and this gives you the freedom to create a very complex scene, as you can see in the following screenshot, where we used this path to scatter different species of trees and bushes:
The only thing that you need to keep in mind is that once you click on the OK button you cannot go back and tweak the settings, but if you click on the Mass Placement button, Lumion keeps the settings and the objects selected in memory in case you need them again.
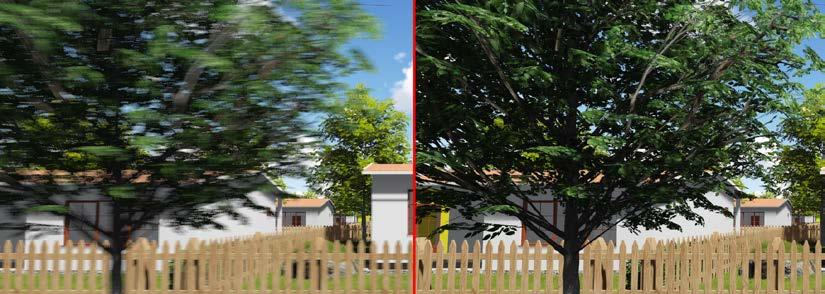
Trees and other plants are 3D models that can make the viewport struggle to keep so much information in real time. Press F9 to show or hide high-quality trees and grass on the viewport.
So, let's move on to the next topic where you will learn a fundamental technique to work with external 3D models and Lumion's native 3D models.
Controlling the 3D models
So far so good but you need to move things around, and the best practice is to use shortcuts or hotkeys to improve the speed when you select 3D models. The keys to control the 3D model are:
• M: This is used to move the 3D model
• L: Press and hold this to scale the 3D model
• R: Press and hold this to rotate the 3D model's heading
• P: Press and hold this to rotate the 3D model's pitch
• B: Press and hold this to rotate the 3D model's bank
• H: Press and hold this to change the height in relation to the ground
Why is the move tool the only one that you don't need to press and hold? This is the tool that is selected by default so in order to access the other tools, you need to press and hold the corresponding key.
Note that you can rotate the 3D model's pitch and bank only when you use the shortcuts.
However, before we jump to the additional best practices, there is something you need to know.
Using filters to select different categories
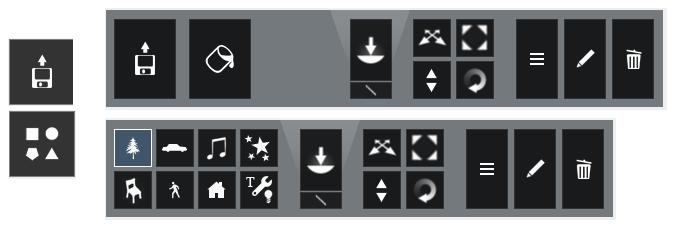
When working with Lumion, the Objects menu is where you can control all the 3D models, including those you import. Managing large scenes can be challenging sometimes because of all the 3D objects in the scene but, inside the Objects menu, you can control the 3D models using two different modes, as shown in the following screenshot:
Importing and Handling 3D Models
The Place mode is where you have access to all the libraries and the possibility to import an external 3D model. However, when you need to control all the different 3D models, things can be confusing. Why? Let me show you why with the use of an example, and for that you need to:
1. Open the Objects menu.
2. Select the Nature category (the first) and place the tree that is selected by default.
3. Select the Transport category (the second) and place the boat that is selected by default.
If you follow these steps, the Transport category is selected and this means that you can move, rotate, or delete the boat. However, try now to do the same thing with the tree. This will not be possible because you don't have the correct category selected but there is a dirty trick you can do to quickly move and rotate the 3D models around even if they are not from the same category.
This is a good practice that you can use all the time and it is really simple: press the F12 key and with the left mouse button, select the object—now you can move the object around. If you need more control, then the best thing to do is to select the appropriate category. Don't forget to press the M key to deactivate the F12 option.
However, now you have the Move mode that goes against all that we mentioned before. With this mode, every model can be selected and controlled independent of their category. To help you with this task, the Filter feature needs to be used so that you don't accidently change certain 3D models. The workflow is very simple, click on each category you don't want to change and they are ignored by Lumion. In the preceding screenshot, only the Import category was selected because we only wanted to control the imported 3D models.
Before we close this chapter, there are a few things you need to learn. After all, you will not be working with small houses in every single project. Time will come when you will have to handle a large project or you may be working on a concept design and there is the need for constant updates.
Handling and importing large scenes
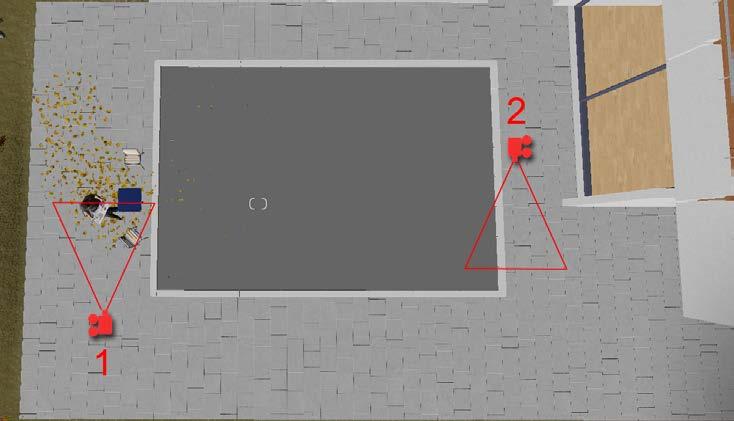
Importing larges scenes can be challenging. Lumion can handle millions of polygons but importing a large amount of geometry in one go can crash Lumion. Consider the project shown in the following screenshot:
Each small rectangle has six houses on it and in the middle we have a nice park surrounded by other buildings. If you try to import so much information in one go Lumion will crash, so you need to "break" the geometry into small sections, as shown in the preceding screenshot. The rectangle shows how we divided the geometry into smaller sections but how can you import all of this geometry and assemble everything together?

The best workflow is to break the geometry into different sections. Don't move the geometry to the 0.0.0 point and export each section individually. Import everything to Lumion and don't worry where you are placing the object. Now select the Move mode in the Objects menu and select 3D model option imported and this will activate the window with the X, Y and Z coordinates, as you can see in the following screenshot:
Importing and Handling 3D Models
This window appears next to the Move mode panel and once you hover the mouse over it, the window allows you to insert values. If you insert a value of 0 in each box, you will start seeing each section being moved to the correct section it belongs to.
Updating 3D models in Lumion
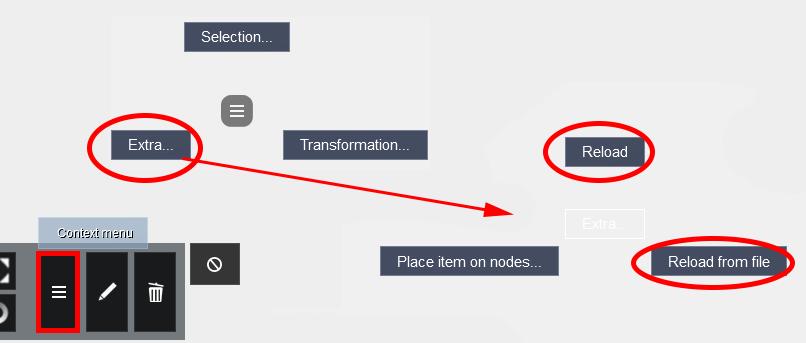
What happens if, after you import a 3D model, a few changes are made? Do you have to import the 3D model again, tweak materials, and recheck the correct location? The answer is No—thanks to Context menu option. When you select Context and click on 3D model you can access three submenus, as you can see in the following screenshot:
A click on the Extra submenu gives you access to two important options: Reload and Reload from file
If you change the 3D model and export it to the same folder with the same filename, you can hit the Reload option and the 3D model will be reimported. On the other hand, if you export the 3D model with a different filename, you need to click on Reload from file which in turn opens a window where you can navigate to the new file to replace the current model.
As you can see, reloading and reimporting 3D models in Lumion is as easy as this. However, you will learn in the next chapters how to make good use of this tool.