

Smartr365 Sales Process Guide (Standard) – Protection
Introduction
This guide demonstrates how to use the Smartr365 platform and ensure that you follow the sales process for protection
This guide will show you steps to follow to ensure that your cases are compliant with the sales process around protection
The basic overview is that the sales process has not really changed. This guide will help you to navigate the sales process using Smartr
In any instance it is important to make you aware that as Smartr365 is linked to the Concert platform and for compliance purposes, you will need to ensure that your case has been correctly input to Smartr365 and is keyed with a right first time approach as, once submitted on Smartr 365, you cannot go back in to make edits to the case.
This guide covers the standard sales process and a further guide will be issued that covers the nonstandard events that may occur, for example: post submission, a rated premium is returned after underwriting or a joint application had had one of the appl icants declined.
Note – This guide does have references to OWS. If you are not familiar with these references, please disregard and follow the rest of the steps.
Contents
Appointment Process
Page 3 – Appointment Process utilising Smartr365 & ConcertHub
End to End Navigation
Page 04 - Standard sales process for Protection
Page 17 - Protection Outcomes Defer Advice / Reject / Proceed
Page 18 – Client Defers the Protection Advice and proceeds later
Page 22 – Client Rejects all the Protection Advice
Page 23 – Client proceeds with protection at same time as mortgage application
Page 29 – Sign up to Submission
Appointment Process for Mortgages AND Protection
Pre-Appointment
First Appointment
Post First Appointment
Second Appointment
• Conduct your Pre-Call and start to complete your fact find within Smartr365 with as much information as is known at this early stage.
• Continue / complete the Fact-Find for both Mortgage & Protection with as much information as is known at this stage.
• Once property details are known along with correct figures etc, update Smartr365 with this new information
• Conduct Sourcing via Sourcing Brain & Solution Builder
• Generate the ESIS and Filters Report from Sourcing Brain and the fully protected protection quotes from Solution Builder and import all back to the case. These will show as 2 different case numbers as they are processed separately through Smartr365 and ConcertHub
• Deliver the mortgage and protection solutions to your clients in the normal way. If your client has deferred the protection advice to a later date, then proceed with the mortgage case only on Smartr365, at this stage
• When your client is ready to fully discuss protection, bespoke your Protection solutions via Solution Builder in Smartr365 using the existing case number already created and based on what your clients decide to accept , import the revised quotes back to your Smartr and add to the case
Post Second Appointment
• Prepare the case for Submission on Smartr365, ensuring ALL information is input to minimise the missing information in ConcertHub
• Set the Protection case to Submitted to Underwriters (if your client is deferring the protection advice to a later date then you will only amend the protection case to Submitted to Underwriters once they have accepted a recommendation from you and you have applied)
• IMPORTANT: Please DO NOT hold on to the mortgage case whil e you wait for a protection outcome, the cases are dealt with separately and you could miss the post offer 7 day deadline for your mortgage SR if you hold this back
• Fully update your protection case in Smartr and send to ConcertHub ONLY when the client is proceeding with some protection advice and you have submitted the application to the provider. Concert is where you will create your SR and fully submit the case
• Package Protection cases in the usual way by attaching ALL documentation to ConcertHub, this includes the fully protected quotes and comparison report AND the quotes and comparison report for any cover you are proceeding with
Important Note: For Mortgage Applications the only documents that you need to add to Smartr365 are the Full Mortgage Application (FMA) and the Mortgage Offer
Keying the Protection Fact find
KEY POINT: When completing the mortgage factfind and sourcing, it is really important that you complete the protection factfind in Smartr365, at the same time and create the fully protected quotes in Solution Builder, then import them back to Smartr365 (more on how to do this is covered later in this guide). Identifying the top 3 needs as a minimum and quoting, regardless of what the client is proceeding with is important as if you don’t do this, the top 3 needs will not be identified in Concert and your SR will be wrong
This is exactly what you would have done in OWS as the protection quotes would always have been created on any mortgage application and then the SR would have been updated to cover what was happening with the protection e.g. Client needs more time / Reject ed advice etc
It is not different in Smartr365, remember that the sales process here HAS NOT changed
Please note that when AQT are checking cases, they are raising queries why providing for dependents is not identified when the clients have children, please see more on how to cover this, later on in this guide
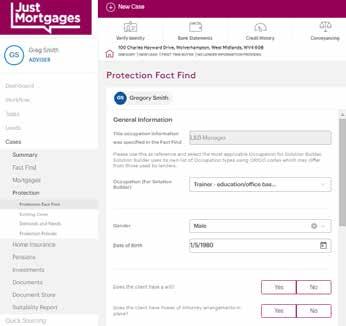
Completing the Protection Fact Find
Click on the Protection tab to pull through the below and populate the information, you will also need to add in the Clients occupation once again here. Once complete click Save.

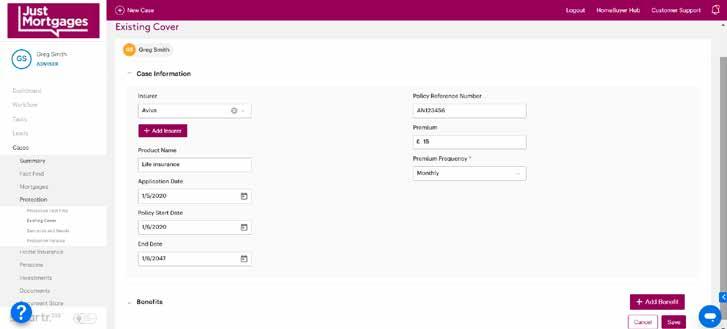
Click on the Existing Cover tab
If there is any existing cover, click Add Existing Cover

Complete the pop ups with the details relevant to Clients existing cover and select Add Benefit to the bottom right of the screen.
Please only add existing cover held, when it comes to employer benefits, select No.
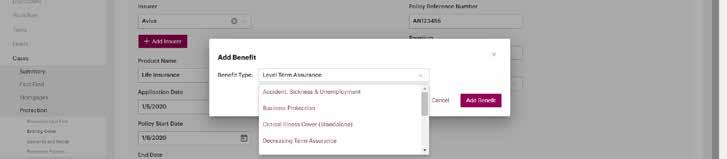
Select the Benefit Type from the dropdown list and click Add Benefit.
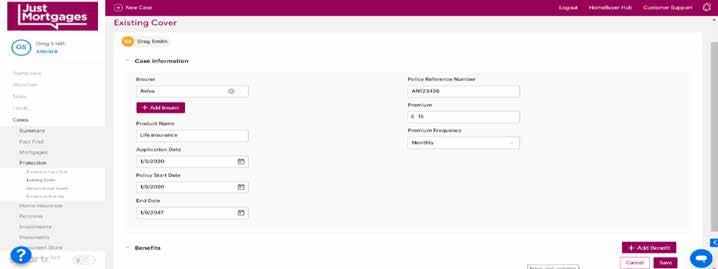
Once saved you can then collapse the Case Information arrow, now open the Benefits arrow to see your keyed benefits.

Click on Save.
You are now presented with the below screen and, if necessary, you can add further client benefits by doing the same actions again.

Move to Demands & Needs and complete the questions.
KEY POINT: These are the same as the top 3 needs on the needs analysis in OWS so should always be answered as YES

In order to create the fully protected quotes, you will need to click on “Add Life Insurance Needs” “Add life and critical illness cover combined needs” and “Add Income Protection Needs”
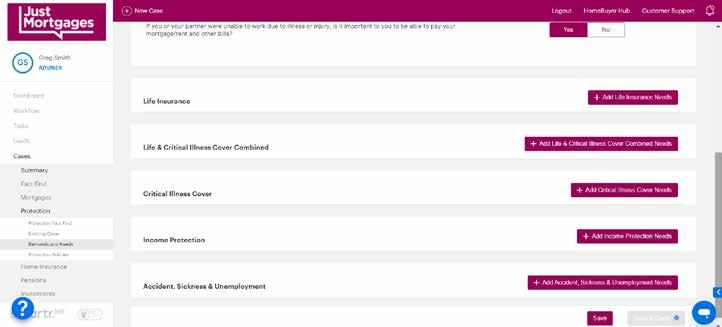
This is where Smartr365 differs slightly from OWS.
The above screen doesn’t yet ask what need is being covered – for example, is it a mortgage need or a dependents need or a standalone additional CIC need ? The screenshots below will show you how to tell Smartr what need you want to cover / quote
Have a look at the drop - down options circled below for life and life and critical illness, this is where you are going to confirm what need will be covered by the quote you are creating

Life / Critical Combined Cover Needs:
KEY POINT: Please note that this is how you key a fully protected mortgage life and CIC quote, if your client is taking a reduced amount of mortgage CIC due to cost, the process is different and you will need to seek guidance on this until a new non-standard protection guide is produced


You will see the option Accelerated / Additional which has an asterisk making it a mandatory field .
• Accelerated = Life or Critical illness (Payout on first event)
• Additional = Life & CIC where the life cover would remain in the event of a critical illness claim.

The initial Income Protection default recommendation should always be for the maximum benefit, payable for the full term, until the client’s retirement age and with a deferred period that mirrors the clients deferred period. See below
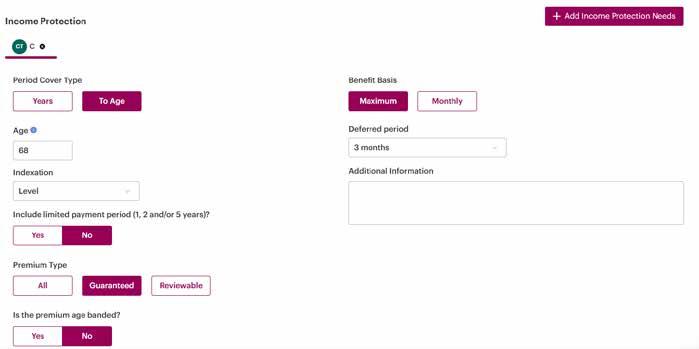
At this stage of the process you are only producing quotes and have not yet presented them to your client. You can keep adding variations to the quotes you want to discuss with the client and add them all to the case documents as noted below. This means that you will have whatever quotes you feel you will need, ready for your client discussion. You can also revisit the quotes later and add further quotes later if the client is deferring the protection advice
Once your quotes are built, you are now able to click on Save & Quote.
A pop up generates asking what you want a quote for, select the applicable lines and you will see the colour band round the edge to confirm this is what you want the quotes for. click Continue.

Now you have the following prompt, select New Case and then click Quote
KEY POINT: PLEASE NOTE THAT YOU ONLY SELECT NEW CASE ONCE, THE FIRST TIME THAT YOU ARE CREATING PROTECTION QUOTES FOR THE CLIENT. THIS WILL ALLOCATE THE CLIENT A PROTECTION CASE NUMBER AND SAVE THE QUOTES TO THAT CASE. IF YOU ARE REVISITING THE QUOTES LATER, YOU WILL ACCESS THIS SAME CASE NUMBER BUT WHEN ADDING REVISED QUOTES FOR THEM YOU WILL SELECT ADD TO EXISTING CASE – IF YOU DON’T DO THIS, YOU WILL HAVE MULTIPLE PROTECTION CASE NUMBERS FOR THE SAME CLIENT
THIS IS THE SAME AS CREATING A NEW ADVICE ID IN OWS FOR THE PROTECTION

Protection Sourcing
You will now be directed to Solution Builder.
This guide is simply to show you how to pull your quotes back into Smartr365 rather than how to use Solution Builder.
Now, via the edit button, edit your products accordingly to capture any changes you make to the Income Protection solution (Term, Deferment period etc).
Do the same thing for your Life Cover solution (Amends to include TPD, WOP or Fracture Cover etc).

If changes need to be made, once complete click on Quote Now.
The below assumes no changes need to be made.
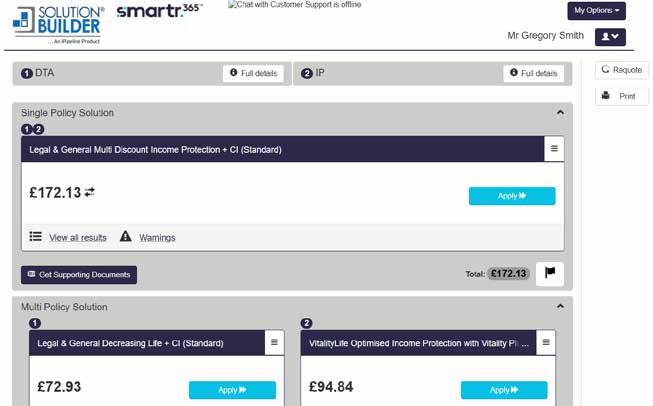
At this stage your solutions should now come through.
Depending on which area of the business you operate in (Employed or Self- employed) will determine whether you have a sole tie with L&G solutions, or a multi-tie with various providers.
This guide has been built using the training platform and pulls through solutions on a multi-tie basis, employed advisers please take note and select L&G for your solutions.
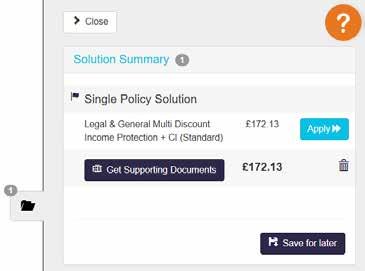
Click on the black flag next to the Total premium.
This adds the solution to the folder on the right, which you need to click on to obtain (and save) your solutions / documents. Once you have done this, click on Save for later.

Now you can navigate back to Smartr365 to pull your quotes through by following the next steps:
Click on View Quotes.
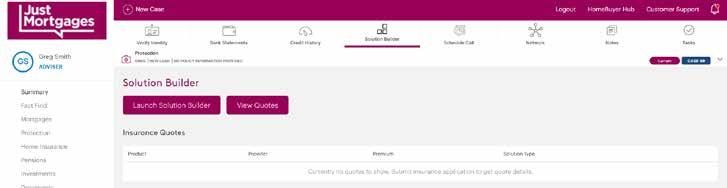
These will now pull through as per the screenshot below. Now click on View Details.

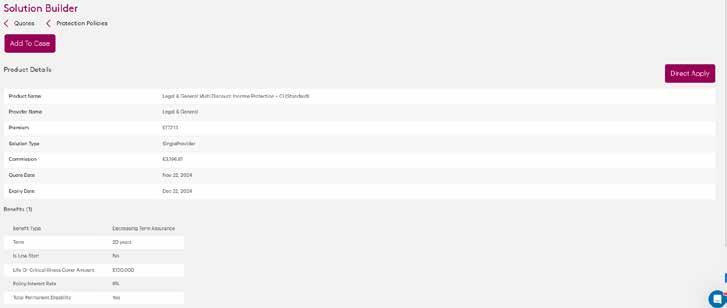
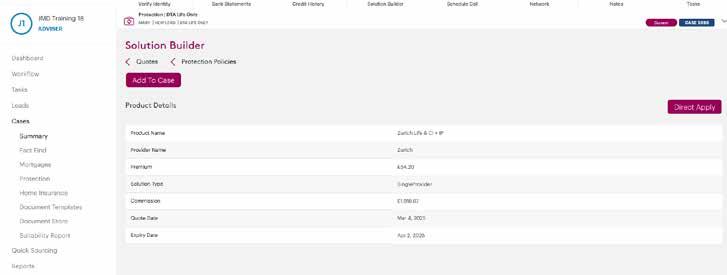
Now you will see a summary of your solutions, you need to add the quotes to the document store.
Click on Add to Case (You are simply adding the quotes at this stage as you haven’t yet presented to the client). You will also see a Direct Apply button which can be used should you wish to progress these quotes via the provider website – you will only use this once you have presented to the client and they have accepted your quote
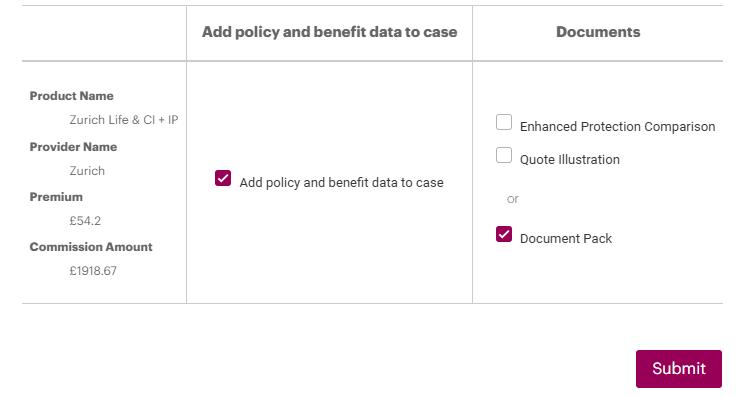
Once you click “Add to case” you will see the pop up below.
KEY POINT: If you are simply creating the quotes for information purposes (eg initial fully protected quotes) then the ONLY box to tick below is DOCUMENT PACK. This will then simply add the quotes to your document store to evidence that you have provided a fully protected quote (Screenshot 1) and then click submit
You would only select “Add policy and benefit data to case” as well as “Document Pack”, for any quotes you are actually proceeding with later (Screenshot 2) and then click submit . More on this later as remember, at this stage you are only creating quotes after the protection factfind
At this stage you may have only produced the fully protected quotes so it is highly likely that you will be just adding the document pack here
Screenshot 1:
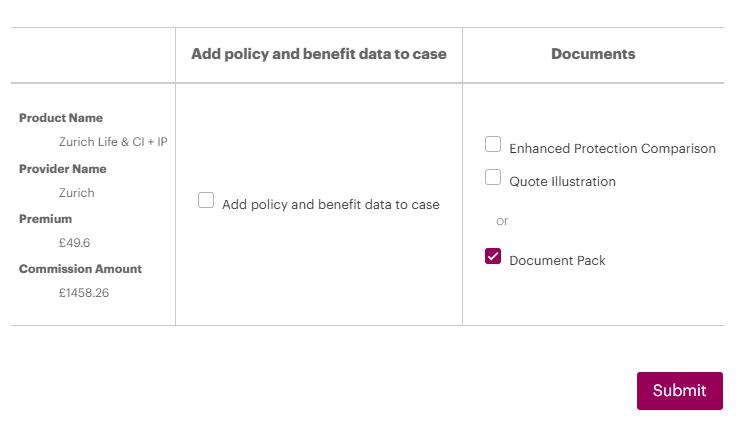
Remember that you are only going to also select “Add policy and benefit data to case” and “Document Pack” for the quotes you are proceeding with and you may not be at that stage yet
Screenshot 2

A green validation message will appear at the bottom of the screen to say this has saved and is generating documents in the background and is your confirmation that the protection quote and comparison report have been saved to the case


As you have only saved the document pack at this stage for the fully protected quotes, they wont appear in the Protection Policies section below as you have not added the data to the case yet. You are only going to add the data to the case when you know what you are proceeding with

The benefit of adding the fully protected quotes as noted above means that every mort gage case will have the fully proptected quotes stored to evidence that you have discussed these.
Once you have completed a full protection factfind and presented the solutions to your client, there are 3 options the client has around protection: (in no particluar order)
Option 1: Client defers the protection advice to a later date eg pending mortgage offer being issued
Option 2: Client rejects all the protection advice
Option 3: Client takes some protection policies at the same time as the mortgage application
The next part of this guide will take you through what to do for each of these options
OPTION 1: Client defers the protection advice
When processing your mortgage case, ensure that the case is fully updated in Smartr and send the case to Concert
Please only click the “Send data to Concert Hub” once. You will then see a new link appear “Click here to redirect to ConcertHub” – see below
When you need to access the case on Concert in the future, use the black link “Click here to redirect to ConcertHub”

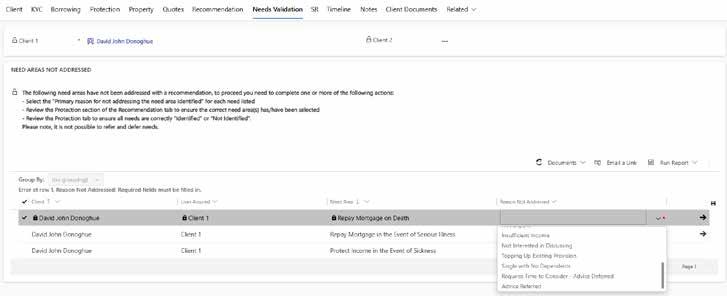
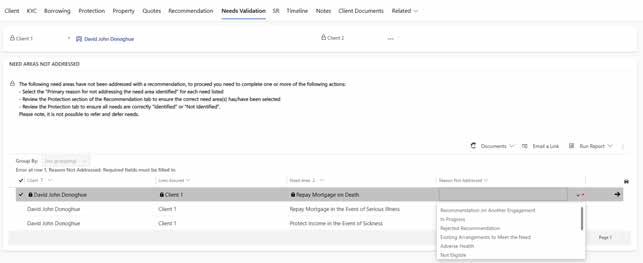
You will work through the Concert screens as normal for the mort gage application and when you arrive at the NEEDS VALIDATION SCREEN, you will select “Requires more time to consider – advice deferred” from the drop down options
This is exactly the same as you would have done in OWS and now you have a mortgage SR that will say the protection advice has been deferred
You should add a copy of the fully protected quotes and the comparison report to the Mortgage Concert Case Documents as evidence (exactly the same as having them in OWS for the same reason)
When your client is ready to discuss protection at that later date, these are the steps to take:
Please note that this only applies if the quotes are still valid, if they have expired, you will need to requote, pull the new quotes back to Smartr and “add data to case” and “add document pack” for any quotes you are proceeding with
If you are proceeding with any of the previous quotes produced (eg fully protected quotes) and they are still valid, you will now need to add them to the case. Remember, at this stage you have only saved the quotes to the document store which is why you now need to add them in order to proceed. See below on how you can do this:
From the summary tab, click on source

You will now see a list of the quotes that have been saved, click on VIEW DETAILS for whichever quote you want to proceed with

You will now see this screen and this is where you can now add the quote you are proceeding with to case
You will see this pop up box and now you need to select “Add Policy and benefit data to case” and “Document Pack”
You are now ready to apply and progress the case through Smartr and into Concert
If you need to produce revised quotes based on the client discussion and budget, please follow the steps below
Amend your demands and needs in the protection factfind to reflect the up to date quotes needed and produce the quotes through solution builder as normal and, as per previous screenshots in this guide. For any quotes you are proceeding with, when you are saving them back to Smartr, select “Add data to case” and “Add document pack” and follow the steps in this guide for processing the case through to Concert
If you are producing revised quotes and are revisiting these with the client, just add the document pack to Smartr, present to the client and follow the steps around adding quotes to the case, when the client has decided and you have completed the provider application and you will also now need to follow the steps for sending the case to Concert

KEY POINT: Please ensure that you add the revised quotes and comparison reports to the Protection Case on Concert
Option 2: Client rejects your advice
Follow the same steps as above for sending the mortgage case to Concert but when you get to the NEEDS VALIDATION SCREEN, you will select “Rejected Recommendation”
You will now have a mort gage SR that confirms the client has rejected your protection advice
You now need to complete the following steps to ensure your cases are compliant: (AQT will check this)
• Obtain the signed protection declaration from the clients and add this to the Concert case documents
• You can send also the declaration via the Smartr Portal and once they acknowledge you can add a screenshot of the portal showing this, no manual form required i f using this method.
• Add the full protection quotes and comparison report to the Concert case documents as evidence (you need these to complete the declaration anyway)

OPTION 3: Client wants to take some protection policies at the same time as the mortgage application
Produce the quotes as noted earlier in this guide and add Document Pack to Smartr, present the quotes to the client and when you know which polciies you are proceeding with, add the policy to the case using the screenshots under Option 1 (Page 19-20)
Send your mortgage case to Concert and select “Recommendation on another Engagement ” for any policy being taken so your mortgage SR will now refer the client to another SR for that need. For any needs not being addressed, you can select the relevant option below eg rejected – See both screenshots below


You can now progress the mortgage case to full submission and then you will immediately return to Smartr and select the connected protection case, ensure that it is fully updated as per the screen shots below and send to Concert.
Now click on Protection Policies at the top of the screen.

KEY POINT: If you only selected “Document Pack” earlier when producing the quotes, you won’t see the policy here as it hasn’t yet been added to the case yet and the documents will only be in the Document store. You will need to access the quote and add to case before proceeding (see screenshots on how to do this under Option 1(Page 19-20)
If you have already selected “Add policy benefit and data to case” The below will appear and you now need to click on the Client line to open it up

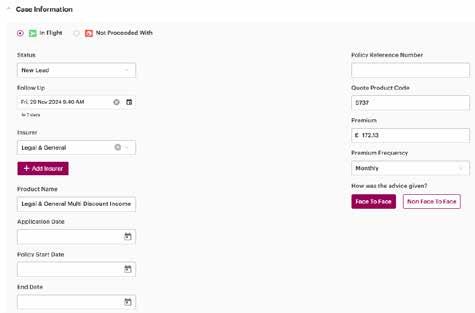
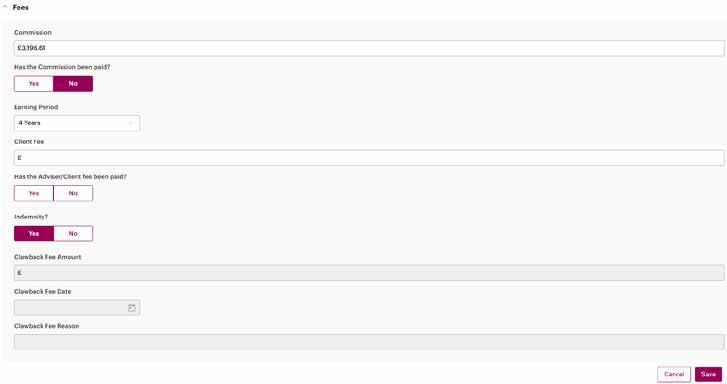
To add the policy that you want to proceed with to the case, click into the case from the above screen and you will see the screen below where you can update the case information/ benefit you are applying for / fees

Input any detail that is required at this stage Ie; Follow up date and How was the advice given
Now move to completing the Benefits and Fees sections.

Click on the each of the benefits line e.g. IP / DTA to open it up.

Complete any sections that are incomplete and change the Benefit Status to Quoted.

Now you see the line below for the next benefit e.g. DTA, repeat the steps as above for this line.

Complete the Fees section in the normal manner and click Save.
Now you arrive back at the Protection Policies page and you need to change the status in readiness for sending this across to ConcertHub.
There are two ways to do this. The first is to click into the Client line once again.
Now move to the Status box, from the dropdown list select Submitted to Underwriters . Click Save.

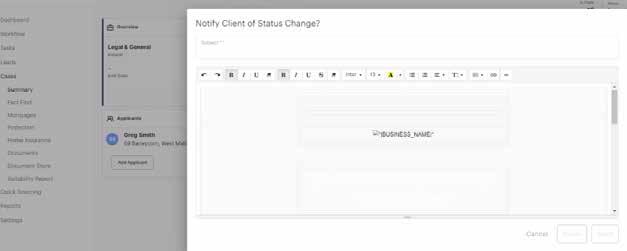
This will now generate your Notify Client of Status Change which you can edit and send to the Client to confirm or cancel

Alternatively you can change the status via the Summary tab. Click on Submitted to Underwriters .

This also generates a Notify of Status Change which you can edit and send to the Client to confirm or cancel
Now this section is complete you will see a Home Insurance tab.

Please note – Paymentshield is not integrated into Smartr365 right now so you would need to complete the sale in ConcertHub.
A separate guide is available via Openwork which can be found on My Learning Space.
At this stage you have generated all of your solutions, and per the Just Mortgages process you will have all of your illustrations ready in order to prepare for your second meeting ‘sign -up’.
Sign-up to Submission
Once the Client has accepted your recommendation and you are now ready to progress the case through to submission, you have a few things you need to do in order to ensure the case is submitted right first time.
This is incredibly important to note as once you have submitted the case on Smartr365 and it has gone through to the ConcertHub to build your Suitability Report, you cannot go back into Smartr and make amendments.
This is why it is so important to get it right first time ahead of submission. Now it is time to upload documents into the document store per the case you are keying.
Once all items are uploaded and you are happy that this case is ready for submission there are some steps you now need to follow.
Again, only submit this if you know it is ready and you are adhering to the right first time philosophy.
Click Summary on the left hand side bar. You will see the below screen Protection cases are represented by a First Aid Kit logo so you can distinguish between a Mortgage and Protection case, as demonstrated below.
Important note – Smartr splits the cases into two separate cases so your protection case needs to be submitted separately to the mortgage case
To submit your Protection case, click on the case number and toggle to the first aid kit logo (Case 59 in this example)
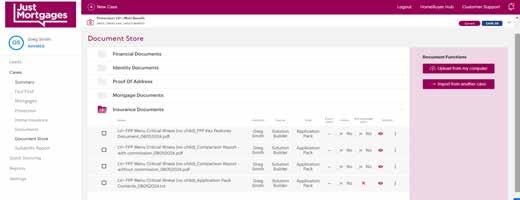
Go to document store via the side bar to the left.
You will see there are items in Insurance Documents

Click on the line in order to see what documents have been pulled through.
Any other items you need attaching to your case, please do so via the Upload from my computer button on the right hand side.
Next, click on Status and from the dropdown list select Submitted to Underwriter.

A Notify Client of Status Change will now appear which you can edit and send to the Client or cancel

Now click on Network and Send data to ConcertHub.

This will process the data and generate the Click here to redirect to ConcertHub hyperlink.

Click on this in order to switch platforms where you can build your suitability reports and package your case per Openwork and Just Mortgages guidelines.
Again, the ConcertHub ‘How do I Guide’ can support you in building your Suitability Report.
Submission
At this stage you have now completed Protection case on Smartr365 and you can move to ConcertHub to start building your Suitability Reports and getting the case ready for submission and / or file review.
We have now reached the end of the Smartr365 best practise guide and this will have shown you how to key an end to end case via this platform compliantly
Additional support guides and videos are available via the Smartr helpdesk.
There are also numerous support materials available on My Learning Space.
We hope you find this guide helpful in supporting you with the protection process.