How to Draw Your RPG Character: Armor, Weaponry & Creature Companions
HOW TO DRAW YOUR CHARACTER ARMOR, WEAPONRY & CREATURE COMPANIONS
CUSTOMIZE YOUR FANTASY CHARACTER STEP BY STEP
CHRISSA BARTON
HOW TO DRAW YOUR CHARACTER ARMOR, WEAPONRY & CREATURE COMPANIONS
CHRISSA BARTON
WELCOME BACK TO THE REALM OF IMAGINATION! 5
CHAPTER 1: CUSTOMIZING YOUR RPG CHARACTER BASICS 7
CHARACTER DRAWING STEP BY STEP 8
DRAWING FABRIC 10
DRAWING & COLORING DIFFERENT MATERIALS 14
COLOR SCHEMES 18
SYMBOLOGY 22
CHAPTER 2: CLOTHING 25
HOW TO DRAW AN OUTFIT ON A CHARACTER 26
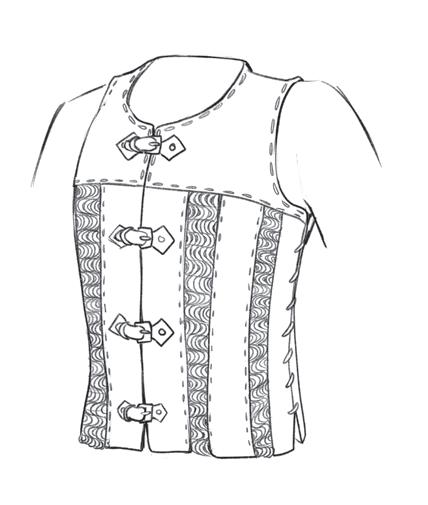
BLOUSES, VESTS & CORSETS 28
& SKIRTS 29
30
34
CHAPTER 3:
ARMOR
41 ARMOR WEIGHT CLASSES 42
AN OUTFIT 44
ARMOR 46
ARMOR 52
ARMOR 56
CHAPTER 4: WEAPONRY 63
MAGIC STAFF 64
66
HAMMER 70 BOW & ARROW WITH QUIVER 73
CHAPTER 5: ACCESSORIES 77
BOOTS 78
SANDALS 81
WIZARD HAT 82
HELMET 84
GLOVES 86
PERSONAL ORNAMENTATION 88
SCROLL 92
BELTS 93
WAIST BAGS 94
POTION BOTTLE 96
LUTE 98
CHAPTER 6: CREATURE COMPANIONS 101
CROWS & RAVENS 102
HORSE 106
WOLF 114
WYVERN 118
OWLBEAR 124
CHAPTER 7: CHARACTERS 129
PALADIN & HER UNICORN 130
HALF-ORC BARBARIAN ASTRIDE HIS WYVERN 136
HALFLING DRUID & HER OWLBEAR 142
ELF RANGER & HIS WOLF 148
DWARF FIGHTER & HIS PONY 154
ELF SORCERER & HER RAVEN 160
WELCOME BACK TO THE REALM OF IMAGINATION!
In my first book, How to Draw Your RPG Character, I took you through the basics of drawing your own fantasy characters. In this second book, we venture beyond the basics of character creation and dive into the intricate details that make your adventurers truly unique. As you expand your artistic journey, you’ll uncover the hidden layers of your characters’ backstories and personalities. The texture of their outfits, the symbols etched into their accessories, and the creatures that stand by their side all weave together to tell a compelling narrative about your character. Every detail adds depth and dimension, and sharing these detailed depictions with your fellow adventurers enhances your storytelling and strengthens the bonds within your party.
Chapter 1 goes over important basics, from a quick refresher on figure drawing to instructions on how to represent and color different materials, like cloth, leather, and metal, and includes fun information you can use to add detail to your character, like symbology.
Chapters 2 through 6 cover outfits, armor, weapons, accessories, and creature companions. It provides step-by-step instructions on how to draw each aspect of a character’s outfit, weapon, accessory, and companion, as well as galleries of additional options that you can use for reference and inspiration to customize your own characters.
Chapter 7 ties everything together, featuring six original adventurers with their unique creature companions. From a fierce half-orc barbarian riding his wyvern steed to a nature-loving halfling druid with her ferocious owlbear, there are plenty of step-by-step instructions and creative ideas to help you add detail and bring your characters to life.
This book will enhance your artistic skills, and, by exploring these exciting details, you will be able to create an incredibly rich backstory for each character and enjoy greater immersion in the world of fantasy RPGs.
Enjoy!
CHAPTER 1
CUSTOMIZING YOUR RPG CHARACTER BASICS
IIn this chapter, we won’t delve into how to draw your characters, aside from a refresher on sketching a basic figure. For comprehensive guidance on drawing faces and bodies of all the races, refer to my first book, How to Draw Your RPG Character: A Step-by-Step Guide to Bringing Fantasy Characters to Life. Here we will cover foundational information that you can refer back to as you learn to draw different types of armor, clothing, accessories, creature companions, and more.
CHARACTER DRAWING
STEP BY STEP
Use this step-by-step process based on simple lines and shapes to start drawing any character. Sketch lightly with a pencil so that the guidelines can be erased or covered up easily when you add more details to your character later.
1. Line of action: Draw a curving line to indicate the general flow of the pose.
2. Angle of the hips and shoulders: Draw one line indicating the angle of the hips and another for the angle of the shoulders. Generally, the hips and shoulders tilt in opposite directions. When a character is standing, the leg bearing the weight will push the hip on that side higher.
3. Torso: Draw a circle touching the line for the shoulders to represent the rib cage, then one below it for the hips/pelvis. Draw the torso by connecting the shoulder and hip angle lines in an hourglass shape.
Flow of pose
Angle of hips
Angle of shoulders
Torso
Rib cage
Hips
4. Stick figure: Draw small circles for the joints of the shoulders and hips. Then draw stick-figure lines for the upper arms and legs. Draw circles for the elbows and knees, and stick-figure lines for the lower arms and legs. Draw a circle for the head and triangle shapes to indicate the hands and feet.
TIP The upper section of each limb should be the same length as the lower section of the limb.
Drawing where the character’s feet meet the floor helps ground your character’s pose.
5. Basic shapes: Build your character using cylinders for the arms, legs, and neck. Base the cylinder’s angle on the limb position and perspective. Drawing with cylinders helps visualize perspective in a simplified way. Draw a line down the middle of the torso (the centerline). This will help keep the body proportions symmetrical. To help visualize the angle of the upper torso, sketch a curved line across the upper torso where the ribs would be located.
Centerline
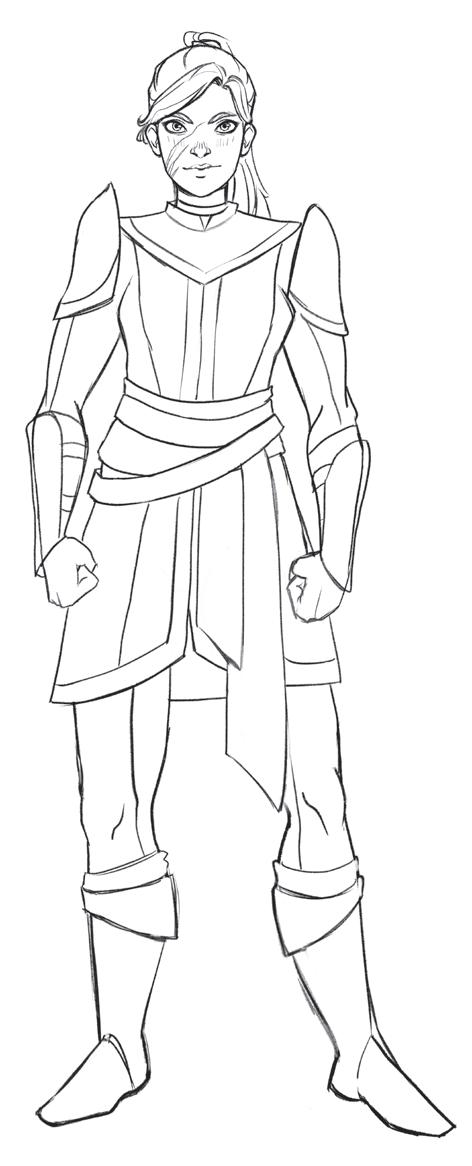
MEDIUM ARMOR
Medium weight classes strike a balance between the heavy-hitting and nimble classes, often wearing a blend of mail, leather, and plate armor. Typically, medium armor lacks a full breastplate in order to avoid excessive weight, especially when combined with chain mail.
1. Draw the base of your character without clothing.
Draw lines running down the jerkin and legs; these delineate the chain mail sections.
2. Sketch the shapes of the armor and clothing over the top of the body.
A fabric sash under the leather belts will add personality and pop once we color the character.
3. Draw the areas of the armor that bump out from the silhouette of the body, then erase any body guidelines that overlap with the newly drawn armor silhouette.
4. Add details like folds in the fabric, belt buckles, and engraved designs in the pauldrons and bracers.
Metal pauldrons
Jerkin
Bracers
Leather boots
Belts
Leather neck guard
How to Draw Simple Chain Mail
1. Draw lines that follow the surface to be covered by it.
5. Draw the chain mail in the delineated areas of the jerkin and breeches.
2. Draw a series of C shapes along each row; the direction of the curve alternates for each row.
3. Darken the Cs away from the light, such as the edges, leaving the center lighter for a highlight.
TIP
Since medium armor is made of a mixture of light and heavy armor pieces, you can also reference examples in those sections as well (pages 46–51 and 56–61).
Chain mail is metal, so it will reflect the surrounding colors— in this case, shades of brown and blue— as will the pauldrons and bracers.
6. Add color. With a mix of leather and metal armor, this character’s color scheme is a balance between warm browns and cool blues.
Detail lines and circle bolts in the breastplate
line pattern in the short jacket
Diagonal crisscross pattern in tunic skirt
5. Finish up with fine details on the belts, clothing, armor, and footwear.
The colors in the clothing should be incorporated in the armor to show its reflectivity.
6. Add color. Since heavy armor is made from metal, a lot of the color choices will fall within the light gray and light blue range. But metal also reflects what is around it, so the colors of the fabric and leather will play an important role. In this case, dark gray, red, and brown should be added to the shadow areas of the armor. (For more info on coloring metal, see page 16.)
Be careful not to add color to areas where you want highlights; you can add sharp highlights with a white gel pen.
Vertical
Draw the belt buckles.
HEAVY ARMOR OPTIONS
You can make your character’s heavy armor outfit unique by mixing and matching different types of armor.
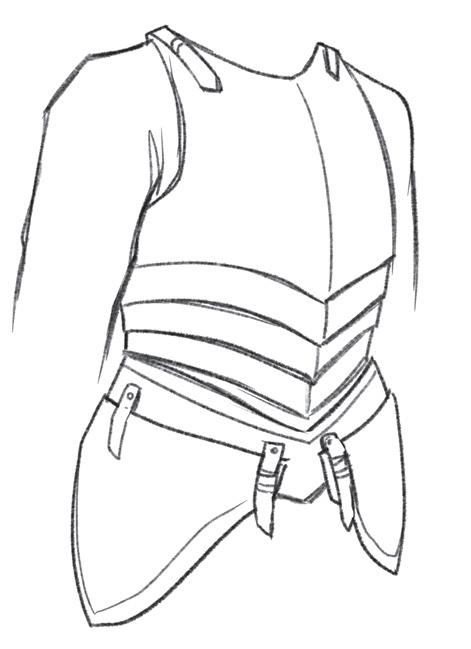
BREASTPLATE
The breastplate is the largest and most protective piece of heavy armor, and its design can make a real statement about your character’s background and personality.
BREASTPLATE FOR A FEMALE CHARACTER
Armor for women should be fitted at the chest and waist for greater comfort.
CHAIN MAIL
Breastplates can be smaller, covering only the chest. In such a case, a chain-mail undershirt can provide additional protection.
ROUNDED CHEST PLATE
This has a rounder shape, to better fit characters with more heavyset builds.
SCALE MAIL
This is a fun alternative to chain mail, the armor replicating dragon scales.
ELEGANT CHEST PLATE
This layered chest plate is a stylish option that also provides extra neck protection because of the piece that extends up above the chest.
HIP GUARDS
For male or female characters, these provide added protection to the hips and tops of the thighs.
LAYERED CHEST PLATE WITH HIP GUARDS
This offers a high level of protection to the torso, hips, and tops of the legs.
NECK GUARD
Overlapping the breastplate, this increases protection of the chest as well as the throat.
CHAPTER 4 WEAPONRY A
An adventuring character needs a weapon. From staffs to blades, and hammers to bow and arrows, there are many options to choose from. In this chapter, we’ll go over how to draw these weapons and why a character might prefer one over another.
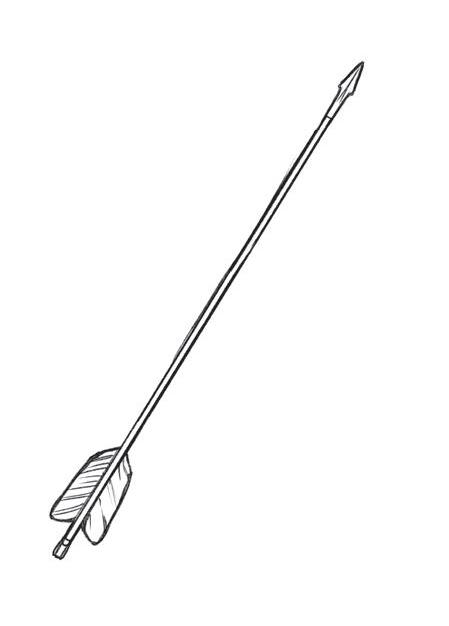
ARROW
1. Draw a long, thin rectangle for the arrow shaft.
3. Add the lines to finish the basic shapes of the fletching and arrowhead.
2. Draw two V shapes close together for the outline of the arrow’s feathers (fletching) and one at the other end for the end of the arrow head. Draw a line outward from there to represent the length of the arrowhead.
4. Erase some notches in the fletching and draw thin lines running through the feathers to add texture.
5. Add color. Most arrow shafts are made from wood, so use brown.The fletching will be red for this arrow. This arrowhead is made of metal, so color it light gray with tints of blue.
Arrow Styles
An arrow can be easily adjusted by changing the shape of the arrowhead and the fletching.
QUIVER
Characters who use a bow and arrow need a place to store their arrows, and that’s where a quiver comes in. Usually made of leather, it is used to hold arrows.
1. When drawing accessories or weapons that are carried on a character, sketch the body out first so that you know where to accurately position the accessory.
2. For the main shape of the quiver, draw a long, angled rectangle that has a slightly curved bottom.
3. Draw the straps.
4. Draw pairs of parallel lines close to each other to create the shaft of each arrow. Close off the end of each arrow with a short line.
6. Connect the angled lines to complete the feather shapes of each arrow.
5. For the fletching, draw angled lines coming out of the sides of each arrow shaft. These should be close to the end of the arrows. As you draw them, decide which ones are in front; these will overlap the ones behind them.
7. Draw curved parallel lines at the top and bottom of the quiver.
8. If you want, add more detail, like decorative stitching and thin lines in the arrow shafts and fletching.
ACCESSORIES CHAPTER 5
II
In this chapter, we’ll go over accessories you can add to complete your character’s outfit. Some are necessary to most outfits, such as footwear and belts, while others are optional, like hats, gloves, and waist bags. We’ll also address personal ornamentation, as well as items that your character might carry along with them while adventuring, like potions, scrolls, and musical instruments.
BOOTS
Most adventurers wear boots because they are a sturdy form of footwear. Use this basic boot as a base and add customization to make it unique for your character.
1. Draw two ovals, one larger for the heel and back of the foot, and a smaller one for the toes and front of the foot. With curving lines, connect them to construct the main shape of the foot/boot.
Oval guideline for heel and back of foot
Oval guideline for toes and front of foot
2. Draw a curving line across the leg and under the knee for the top opening. From that line, give some thickness to the boot with lines that follow the basic shape of the leg until they meet with the top of the foot. Erase any overlapping guidelines as needed.
Draw a line under the bottom of the foot to create the sole.
Basic Shape of a Foot
Understanding the fundamental foot shape from various angles is important because footwear design relies on its structure.
Here is a standing foot seen at different angles for you to use as your reference when sketching footwear for your characters.
Thickness of the boot
ANKLE SHOE
This is a classic medieval style more frequently worn by city dwellers; it is not commonly worn with armor.
SANDALS
LEATHER SHOE WITH LACING
This is a very simple version, suitable for characters who prefer lightweight gear and may be city dwellers, not concerned about protecting their legs from the scrapes common to navigating the wilderness.
BALLET FLAT
This minimalist shoe is suitable for attending formal balls, though some also wear it casually around town. Professions that call for lightweight attire, like monks and wizards, may opt for a ballet flat.
Some characters, especially those in hot climates and certain professions like monks and magic users, choose to wear sandals because they are more lightweight or suit their fashion style. Here we’ll draw a sandal with straps.
1. Start with the basic shape of the foot, then draw lines for the toes, since they will be visible.
4. Draw the straps. This sandal has crisscrossing straps, but you can change their pattern and length to whatever best suits your character.
2. Refine the shape of the toes by drawing the tip of each one. You can indicate the edge of the toenail with a small, curved line.
Tips of toenails Toe strap
3. Draw the sole of the sandal. It should mostly follow the curve of the bottom of the foot.
Draw the thickness of the sandal’s sole.
5. Draw the edges of the straps so they bump out from the silhouette of the foot and leg. Draw the loose end of the strap hanging from the back of the leg.
6. Add color. This leather sandal will be a dark reddish brown. Use a little less color in areas that have shiny highlights, showing wear.
GLOVES
Many characters wear gloves to protect their hands while adventuring and in battle. Most adventure-worthy gloves are made from leather, but they can be fashioned from fabric if the character’s concern is more style than function and protection.
1. Sketch the hand of the character so that you know what kind of pose it is making and the shapes the glove will fit around.
3. Erase the guidelines for the hand so that only the outside glove shape remains. Add details, like stitching and seams.
TIP
The thicker the leather or fabric the glove is made from, the more space there should be between the shape of the glove and the shape of the hand.
2. Draw the shape of the glove around the fingers and wrist, including the cuff.
4. Add color. Use brown, with a lighter hue of it on the wrist cuff and a medium shade for the rest of the glove. Use darker browns to color in the shadows.
TIP
Most adventuring gloves are made from leather, so brown is the most common color, but a wealthy character could pay to have their leather dyed another color.
Cuff
BRACELETS
Since many professions wear bracers, it is less often that characters sport bracelets. However, for those who prefer clothing to armor, like wizards and bards, bracelets are a decorative option.
BEADED BRACELET
This bracelet is made of round beads. It’s not very durable for battle, but enchantments could be stored within the beads.
WOVEN BRACELETS
This kind of bracelet is both decorative and durable for adventuring.
WRIST CUFF
Fashioned from wood or metal, this is a good choice for adventurers because of its durability.
BRACELET WITH INSIGNIA
This simple bracelet has a round token with the symbol of an eye on it, which could indicate the character is affiliated with a spy guild or a magic wielder with the gift of psychic magic. You can customize your own, changing the symbol to reflect your character’s background or allegiance.
ARM CUFF
These can be worn just below the shoulder, offering an interesting and unique way to accessorize an outfit. Designs can be carved into it to fit the character’s style and background.
POTION BOTTLE
Bottles are essential for most adventurers to carry any number of potions, poisons, or even combustibles.
1. Draw the basic shapes of the potion bottle.
Sloping lines for neck
Circle for body of bottle
Slightly curved rectangle for mouth of bottle Cork
Curved rectangle for base of bottle
2. Erase the circle guideline below the bottle’s neck. Draw a curving line in the top of the cork to show its flat top.
3. Draw the contents of the bottle. To show the thickness of the glass, lightly draw a line that follows the interior of the bottle. Draw the bottom of the cork, then the surface of the liquid.
TIP
When choosing a color for the liquid, think about what the potion does. In many fantasy universes, red is a color for a healing potion, green is poison, and orange is an explosive.
Outline the shape of the bubbles in a lighter shade of whatever the color of the liquid is.
Add sharp white highlights to the glass with a white gel pen.
4. Add color. The glass is tinted with very light blue or turquoise, the cork is brown, and the liquid is green. The key to coloring the glass is to decide, before adding color, where the main highlight will be on the bottle, and not to color it in.
BOTTLE STYLES
There are lots of options in size, shape, and decoration of bottles. Some characters might prefer to carry only one type, but most pick up bottles of poisons, potions, oils, and elixirs wherever they can find them, which means they are often carrying a mismatched collection in their packs.
BASIC BOTTLE
This small, plain bottle can easily be stowed in a pack or a pouch.
FANCY ELIXIR BOTTLE
This small bottle is decorative but inconvenient, as it has no flat bottom to sit on. It’s best for stowing in packs or belt pouches.
TALL WIDE-BASE BOTTLE
Because it’s larger, this can hold more liquid, but it’s also bulkier to carry around.
SQUARE-SIDED BOTTLE
This carries more liquid and also fits well in a pack or on a potionmaster’s shelf.
TIP
The shape of the liquid’s surface changes according to the shape of the bottle and how the bottle is being held; here it is shaped like an ellipse.
TIP
Bottle stoppers can be many different shapes, depending on what they are made of or how fancy the bottle is.
ORNAMENTED ROUND BOTTLE
Any glass bottle can be embellished with decorative metalwork. These types of bottles often denote a rare or high-level potion.
LUTE
A lute has similarities to a guitar, but it has more strings and the shape is slightly different. It is a simple instrument to carry, with a strap across the back for traveling, making it a popular instrument choice.
Edge of lute
1. Draw a circle. From the opposite sides of the circle, draw arcing lines up to meet and create a teardrop shape for the body of the lute. From the tip of the teardrop, draw a line on the right that follows the other line down to nearly the bottom of the teardrop. Draw it fairly close to that line, but very gradually increase its distance as you come down. This line defines the edge of the lute and gives it depth.
3. Draw an angled rectangle from just below the top of the teardrop up the centerline to where it makes its angle. Draw another much more angled rectangle from that point to the end of the line.
Centerline
Draw a triangle on the pegbox.
Draw a circle for the sound hole.
Draw a rectangle for the bridge.
Pegbox guideline
Neck guideline
2. Starting at the tip of the teardrop, lightly draw a centerline down through the lute, but slightly offcenter, as the lute is at an angle. Continue that line upward for the neck, then angle it to the right for the pegbox.
Draw a parallel line for the side of the pegbox, closing it at the end.
Draw a horizontal line to create a thin rectangle.
4. Erase any overlapping guidelines. Draw the basic interior details.
CREATURE COMPANIONS CHAPTER 6
S S
ome characters are accompanied by creature companions on their adventures. They can assist in battles, spy, and fetch, and, depending on the size, be mounts. Characters with an affinity for animal handling and communication, like rangers and druids, are more likely to have a creature companion, but other professions can acquire them, too, based on background, story, and skill development. We’ll go over some of the most common iconic companions, including the clever crow and the ferocious wyvern.
CROWS & RAVENS
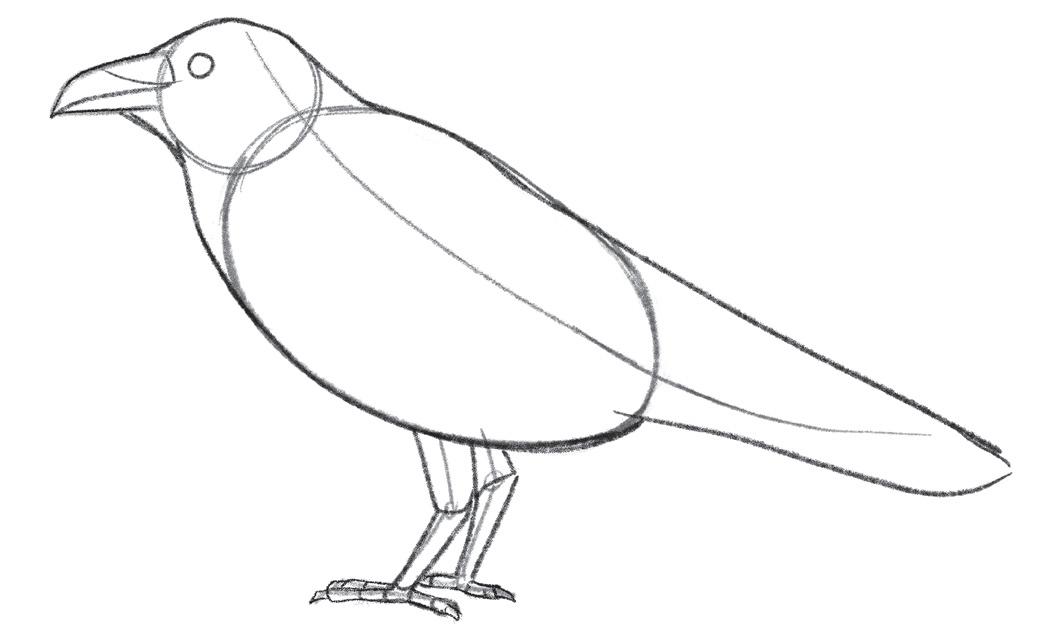
Birds are useful companions because of their keen eyesight and ability to fly and also be inconspicuous. This makes them good spies and messengers. Some birds, like crows and ravens, have high intelligence and are in tune with magic and the spirit realm.
1. Draw a swooping line of action to use as a guide for the general flow of the bird’s body. Draw a circle for its head and a large oval for the body.
TIP
Typically larger birds will have more elongated bodies, while smaller songbirds will be rounder.
3. Draw the outline of the body; first, connect the head to the body, then draw the basic shape of the tail feathers. Draw the shape of the legs and the claws.
2. Draw guidelines for the legs, feet, and beak.
4. Draw the shape of the wing and guidelines for the layers of feathers. Erase any overlapping guidelines.
Wing Anatomy
Knowing the basic structure of a bird’s wing is very helpful when trying to draw one. Here you can see the basic joint and muscle structure of a wing.
Drawing a Bird in Flight
1. Draw the basic shape of the bird using ovals for the head and body, and lines for the legs and top of the spread wings.
2. Following the stick-figure guidelines, draw the shape of the body, wings, and tail feathers. Draw lines separating the feathers.
3. Erase the guidelines and draw feather details.
13. Refine the character’s outfit. We will add bracers as well as details like belt buckles, folds, and clasps, and flesh out the unicorn’s saddle and bridle. Adjust the shape of the sword by making the blade slightly curved, with jagged edges. Add the basic shape of the unicorn’s forelock and mane, then the reins from the bridle to the paladin’s right hand (hidden behind the unicorn’s body).
TIP
You can add interest and history to your character by including details like scars. This paladin has one on her cheek.
14. Add final details. Use thin lines to draw designs on the metal armor pieces and the saddle blanket. Draw lines following the edges of the leather pieces of the saddle and belts for a finished look. Curving lines in the unicorn’s forelock, mane, tail, and horn add interest.
Bracer Mane
Forelock
15. Add color. Use a mixture of grays and desaturated (less vivid and tending toward gray) blues for the armor. Leave the parts that are meant to be shiny free of color. Color some red into the shadows of the armor to show that it is reflecting the color of the doublet. For the paladin’s white hair and the unicorn, use light cream and grays to color the shadows. You can tint some of the shadows slightly blue, pink, or cream to add a bit more liveliness. Leave the areas that are not in shadow free of color.
HALF-ORC BARBARIAN ASTRIDE HIS WYVERN
The barbarian in this section has trained a ferocious wyvern to use as a mount to ride and use in battle. A full-grown wyvern can carry a character on the ground and in flight.
1. Draw the wyvern first in order to know where to place the rider. Draw two circles, one large (for the chest) and one small (for the haunches), and connect them.
TIP
2. Draw a line from the large circle curving up to the right for the neck and one curving left and down from the top of the small circle for the tail. Because it is flying, its body and neck are angled up slightly.
Since this wyvern is in flight, its feet are dangling instead of flat on the ground.
3. Draw the basic shapes for the legs: two long ovals for the upper legs, circles for the ankle joints, and distorted rectangles for the lower legs and feet.
4. Add guidelines for the wing bones, using circles to represent the joints; the circle within the chest circle is where the wing joins the chest. Draw the circle for the head and a rectangle for the muzzle.
Haunches
15. Add color. This wyvern is a mixture of red and dark brown. Because of his bear cape and leather armor, this barbarian wears mainly brown colors. His trousers are dark gray with reinforced brown leather sections on the upper inner thighs. Use light gray for the head of his weapon and the metal belt buckles.
9. Draw the owlbear’s toes and claws. Shape its feathers and fur, adding texture and definition.
10. Draw the final details using fine lines. Add more folds to the outfit and trim the edges of the belt, corset, shoes, and bracers. Add definition to her hair with thin lines. Add curving lines to her staff. Add a few lines to each leaf on her skirt. For the owlbear, add further definition to its fur and feathers; add pupils to the eyes.
11. Add color. Druids typically prefer earth tones, and this one is also wearing a lot of leather, so the palette is largely greens and browns. Use lime green for the glowing light around the staff’s head, and browns, oranges, and reds for most of the owlbear, coloring the lighter parts with cream and very light browns. Keep the brown fur around the glowing area lighter to maintain the magical effect. Our druid’s orange-red hair and scarf complement the color scheme. Use cream for her shirt and shade it with a very light brown or dark cream color.
TIP
If a character is standing in front of a companion or object, you can draw a thicker outline to distinguish the character from whatever is behind them.
12. Erase the body guidelines that overlap the outfit, then add more detail to both outfits. This can include crisscrossing laces on the ranger’s chest plate and pauldrons, stitching in the trousers, and folds in the cape. For the wolf, draw lines that follow along the edges of the armor for a decorative trim.
The edges of his cloak are worn from use.
13. Add final details: little swirls through the ranger’s hair for his curls and thin lines to draw trim along the edges of his armor, similar to the wolf’s armor.
Layer dark blues and greens to color the cloak dark teal, perfect for melting into the night.
Color the sleeves with maroon to add a pop of color.
For shiny parts of the leather, like the highlight on the boots, use a white gel pen.
TIP
Use separate strokes when coloring the fur of the wolf for a more textured effect.
14. Add color. Rangers and rogues benefit from being stealthy and often wear dark colors to help blend into the shadows. This ranger’s leather armor will be dyed black, so use dark gray with a tint of blue to color in the armor, boots, belts, bag, bracers, and breeches. When coloring, start with a lighter gray, then layer in darker gray and blue to build up the shadows. The wolf has a gray color pattern. See page 117 for more on coloring wolves.
DWARF FIGHTER & HIS PONY
Equine companions can vary in size, and for shorter races, such as dwarves, halflings, and gnomes, a pony can be a more convenient steed for adventuring.The fully armored dwarf fighter wielding a battle axe in this section rides his trusty pony.
1. Start with the pony, which will be posed looking at the viewer from a bit of an angle. To set up the proper perspective, draw two slightly overlapping circles and connect them at the top and bottom with curving lines.
Shoulder
2. Add ovals for the pony’s shoulder and thigh. Draw stick-figure legs, with circles for the knees and ankles and the basic hoof shape.
3. Draw the pony’s head facing straight at the viewer, a circle for the forehead and a smaller one below that for the nose. Connect them on the left and right with curving lines. Sketch a curving guideline for the eyes across the larger circle and one down the length of the head for the centerline. Draw the pony’s neck with a line that connects the top of the head to the top of its back.
Guide for chest
Guide for hindquarters
Thigh Knees Ankles Hooves
Guide for forehead
Guide for nose Centerline
Eyeline
2. Flesh out the body by connecting the gaps between the shapes, and sketch the basic facial features.
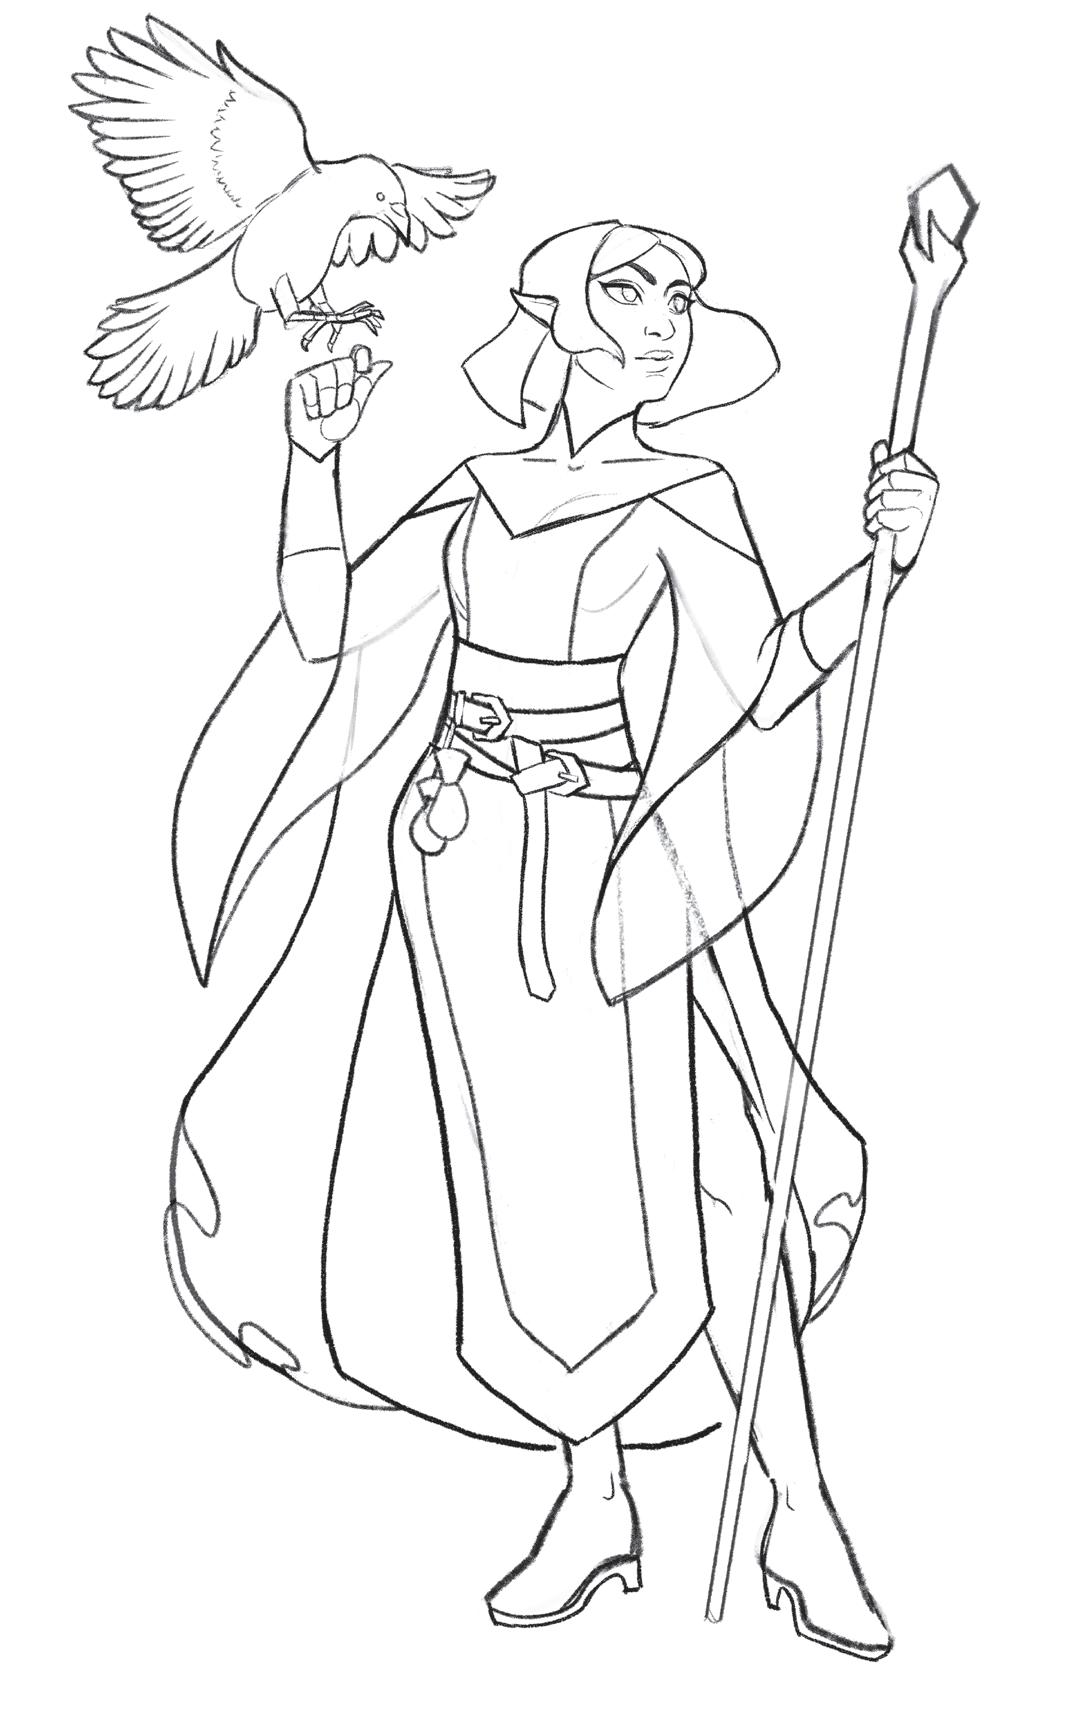
3. Erase the body guidelines. Draw the outline of the sorcerer’s hair. Draw lines along the edges of the wings and the tail of the raven to delineate the feathers.
4. Sketch in the basic shapes of the clothes. Add some curving details along the base of the staff head so it looks like the wood of the staff is holding the crystal in an organic way. Draw the ends of the raven’s feathers and erase overlapping guidelines.
5. Draw long, open sleeves. Add belt buckles and a couple of simple pouches tied to her belt. Draw a wavy line along the bottom of her cape for pipe folds. Add heels to the boots.
Using thin lines, draw small feathers along the raven’s body.
6. Finish the pipe folds and erase any overlapping guidelines. Add details like embroidery and trim to the robe and the outline of the magic energy swirling around the top of the staff. Further refine the hair and facial features. Use thin lines to draw wood details running through the staff and short, thin lines for ridges inside the crystal.
Very lightly outline swirling magic energy around the crystal.
Pipe folds
To color the magic, start with a light lime green for a soft glow around the head of the staff. Then color in the core of the swirls before using a medium green to color the outer swirl shapes.
TIP
Depicting a character with their clothing and hair looking windblown adds flow and motion to the drawing, even if the character is standing still.
7. Add color. This character has an affinity for necromancy, so she prefers to wear dark green; the gold accents hint at a noble background. Use brown for the leather items. For the raven, use a mixture of dark grays with a tint of green or blue. Start with the lighter colors, then use the darker colors to layer in the shadows. Note that the ends of the feathers are a bit lighter. For any small sharp highlights, use a white gel pen.
outfits. see also specific articles of clothing bards, 26–27 color combinations, 19–20 on different body types, 55 fabric, 10–13 layering, 44–45 light versus dark colors, 18 nonfabric materials, 14–17 symbols on, 23 warm versus cool colors, 19 owlbears, 124–127, 142–147 owls, 105
All rights reserved. No part of this publication may be reproduced or used in any form or by any means—graphic, electronic, or mechanical, including photocopying, recording, or information storageand-retrieval systems—without written permission of the publisher.
The written instructions, illustrations, and projects are intended for the personal, noncommercial use of the retail purchaser and are under federal copyright laws; they are not to be reproduced in any form for commercial use. Permission is granted to photocopy for the personal use of the retail purchaser.
Names: Barton, Chrissa, 1991– author.
Title: How to draw your RPG character : armor, weaponry & creature companions : customize your fantasy character step by step / Chrissa Barton.
Description: New York : Get Creative 6, [2025] | Includes index. Identifiers: LCCN 2024057808 | ISBN 9781684620883 (paperback)
Subjects: LCSH: Drawing—Technique—Juvenile literature. | Video game characters in art. | Fantasy in art. Classification: LCC NC825.V52 B37 2025 | DDC 743/.8979693--dc23/eng/20241230
LC record available at https://lccn.loc.gov/2024057808
ISBN 978-1-68462-088-3
To all the dreamers who find comfort and escape in the world of fantasy adventures. May this book inspire you to create your characters and always find the courage to chase your own epic tales!
ACKNOWLEDGMENTS
I want to express my deepest gratitude to my husband, Ryan, for his unwavering support and for keeping me grounded as I juggle far too many projects.
Thank you to my parents and family for believing in my art. I wouldn’t be where I am today without your encouragement.
To my publisher, Mixed Media Resources, and the incredible creative team that used their talent and passion to bring this project to life. I’m especially grateful to my editor, Pam Kingsley, whose knowledge, professionalism, and flexibility have been key to shaping this book.
To my online community, especially my amazing supporters on Patreon, I am deeply grateful for your support. It is thanks to your inspiration and hunger for learning that I began making tutorials that teach art. Without you, a project like this would not have been possible. Your belief in my work drives me to create and push boundaries.
Finally, to the readers of this book: I hope it will be a valuable resource for you, helping you take your characters—and your storytelling—to the next level. Happy drawing!
ABOUT THE AUTHOR
CHRISSA BARTON is an independent artist, streamer, and the author of How to Draw Your RPG Character: A Step-by-Step Guide to Bringing Fantasy Characters to Life. Her experience ranges from AAA game development to character-driven illustration.
Drawing has been a lifelong passion for Chrissa, dating back to her childhood, when she would often be found doodling drawings of elves and fairies in the margins of her math homework. Her passion has since evolved into a deep-seated desire to inspire and teach others, offering knowledge and advice to creatives of all ages and backgrounds. In addition to her illustrations, Chrissa creates online drawing tutorials and resources to help others pick up a pencil and tap into their own creative potential.
Chrissa’s love for fantasy characters and stories has been a constant source of inspiration throughout her life and career. As a teen, she discovered fantasy RPGs and was hooked on the joy of bringing characters, worlds, and adventures to life. When she’s not busy drawing or creating video game magic, you can find her curled up with her cat immersing herself in a good fantasy book.
Level Up and Learn the Secrets to Drawing Unforgettable RPG
Fantasy Characters
In How to Draw Your RPG Character, fantasy illustrator and game artist Chrissa Barton taught you how to draw all manner of characters, from elves and half-orcs to paladins and bards. Armor,Weaponry &CreatureCompanions lets you take your visualization over the top with easy-to-follow tutorials and over 500 step-by-step illustrations for customizing your fantasy character and making it uniquely your own.
Inside you will learn in detail how to draw:
• All weights of armor, including for animal companions
• Swords, daggers, war hammers, axes, bows and arrows, and magic staffs
• Robes, cloaks, and accessories like wizard hats, helmets, jewelry, and potion bottles
• Symbology to communicate lineage or allegiance
• A magical bestiary of wyverns, owlbears, wolves, ravens, and horses
Take your campaigns and storytelling to the next level and bring your characters to life!