4 minute read
Camouflage of a fluorotic change in the enamel with superimposed post-orthodontic decalcifications


CASE 1. 1
Camouflage of a fluorotic change in the enamel with superimposed postorthodontic decalcifications.
Advertisement
Prof. Dr. Michael Knösel
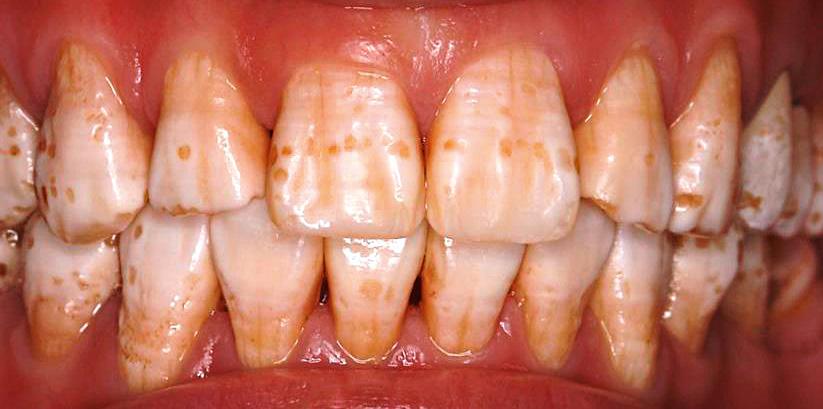
• Fig. 1


• Fig. 2 • Fig. 3 Fig.1-3: Initial situation: Enamel fluorosis with superimposed post-orthodontic decalcifications.
A 16 year-old patient presented with a request for visual improvement of the anterior esthetics impaired by irregularly distributed whitish enamel spots. A treatment performed elsewhere with fixed orthodontic devices (multi-bracket (MB) devices) was completed roughly one year before; in the course of this treatment four premolars were removed and the gaps closed. The subsequent retention of the final result was performed with fixed retainers in the upper and lower jaws, which were in situ at the time of presentation. In a visual and tactile examination the whitish opaque spots were diagnosed, because of their striated appearance without sharply defined edges, as fluorotic change in the enamel, visible in a varied distribution on all present teeth, and, in the case of the premolars in particular, very clearly including the occlusal surfaces. Furthermore, under closer examination and after drying, it was possible to identify a border around the area that was previously covered by the bracket bases of the MB device, in particular on the maxillary canines and lateral and central incisors. Moreover, striated changes could also be seen underneath the former bracket bases. The suspicion that the patient has an enamel fluorosis with superimposed post-orthodontic decalcifications is consistent with the information provided by the patient in relation to a worsening of the spotting during the MB treatment.

• Fig. 4: Use of a hand-made micro-abrasive slurry of roughly 15% HCl/pumice powder (acid-pumice technique) with a polishing cup at low rotational speed.

• Fig. 6: Drying with Icon-Dry. • Fig. 5: Application of Icon-Etch for two minutes.


• Fig. 7: Result after etching with Icon-Etch five times.
The patient had previously found information on potential forms of treatment on the Internet and volunteered a strong desire for infiltration treatment to improve the dentofacial esthetics. Together with the patient, the scope of the treatment was determined: treatment of the changes in enamel in the esthetically relevant areas of teeth 15-25 (with teeth 014/024 missing) and 33-43. For successful treatment of pronounced fluorotic enamel changes and also deep WSL, the literature describes micro-abrasive slurries comprising roughly 15% HCl/pumice powder (acid-pumice technique) [1-4]. Because using an infiltration technique exclusively was deemed difficult given the initial situation (enamel fluorosis with superimposed post-orthodontic decalcifications, and some microcracked enamel structures as on tooth 12), it was decided to proceed with a combined method to improve the result of the fluorosis infiltration: The HCl acid gel contained in the infiltration kit and pumice powder (Ernst Hinrichs Dental, Goslar) were used to prepare a slurry to selectively pre-treat areas with deep fluorotic changes. This was done by carefully working on the affected teeth 15-25 and 33-43 with a polishing cup and the slurry at a low rotational speed. After the slurry was rinsed away, the infiltration treatment followed, with the HCl gel applied to the affected enamel areas and left for two minutes in each case. Applying a rubber dam, in particular in the area of the lower incisors, often prevents conditioning and infiltration of the areas near the gingiva; this measure was therefore deliberately avoided. After the gel was rinsed away, drying was performed in each case with the ethanol contained in the kit. Drying with ethanol is vital for achieving the capillary effect required for infiltration; it also makes it possible to assess the esthetic result that can be expected. This assessment was performed together with the patient; in this case, the HCl steps were repeated five times to prepare the enamel surfaces sufficiently to achieve the desired esthetic result. This was followed by infiltration; the infiltrant was left for three minutes and subsequently light-polymerized. A second infiltrant application was performed, which is recommended with a reaction time of one minute to compensate for the composite polymerization shrinkage, followed by further light-curing and polishing of the infiltrated enamel areas. After infiltration, a significant masking was apparent, deemed highly satisfactory by the patient, of both the fluorotic enamel areas and the enamel areas decalcified by the orthodontic treatment.

• Fig. 8 • Fig. 9


• Fig. 10 Fig: 8-10: Significant masking after infiltration, deemed highly satisfactory by the patient, of both the fluorotic enamel areas and the enamel areas decalcified by the orthodontic treatment.
Key Learnings
• Icon infiltration treatment can get satisfactory esthetic results on the patients suffering from both post-orthodontic decalcifications and fluorosis. • In order to remove the well mineralized enamel surface layer, Icon-Etch gel can be combined with microabrasion pumice and can even be used for more than three times. • Icon-Dry can predict the esthetic result after Icon-Infiltrant. This assessment should be performed together with the patient.
References
1. Welbury RR, Carter NE. The hydrochloric acid-pumice microabrasion technique in the treatment of post-orthodontic decalcification. Br J Orthod. 1993;20:181–185 2. Croll TP, Cavanaugh RR. Enamel color modification by controlled hydrochloric acid-pumice abrasion. I. Technique and examples. Quintessence Int. 1986;17:81–87. 3. Murphy TC, Willmot DR, Rodd HD. Management of postorthodontic demineralized white lesions with microabrasion: a quantitative assessment. Am J Orthod Dentofacial Orthop. 2007;131:27–33. 4. Akin M, Basciftci FA. Can white spot lesions be treated effectively? Angle Orthod. 2012;82:770–775.)