SEPTEMBER 2022
HERITAGE PHOTOGRAPHY
HERITAGE PHOTOGRAPHY
Journal of the Archaeology and Heritage Group
SEPTEMBER 2022
Editor David Bryson FRPS heritage.editor@rps.org
Advisory Editor Eric Houlder LRPS
Advertising enquiries David Bryson heritage.editor@rps.org
Archaeology & Heritage Group Committee Members
Mike Glyde Chair
David Bryson FRPS Heritage Photography editor heritage.editor@rps.org
Amanda Miller LRPS Secretary heritagesec@rps.org
Amanda Schonhut Treasurer heritagetreasurer@rps.org
Jim Souper ARPS
Shaun Parkes LDPS
Published by the Archaeology and Heritage Group of the Royal Photographic Society, September 2022.
Copyright in all text and photographs is held by the credited authors, or as otherwise stated. No part of this publication may be reproduced, transmitted or stored in any form without prior written permission of the Publisher.
Print ISSN 0958-0565
Online ISSN 2632-3346
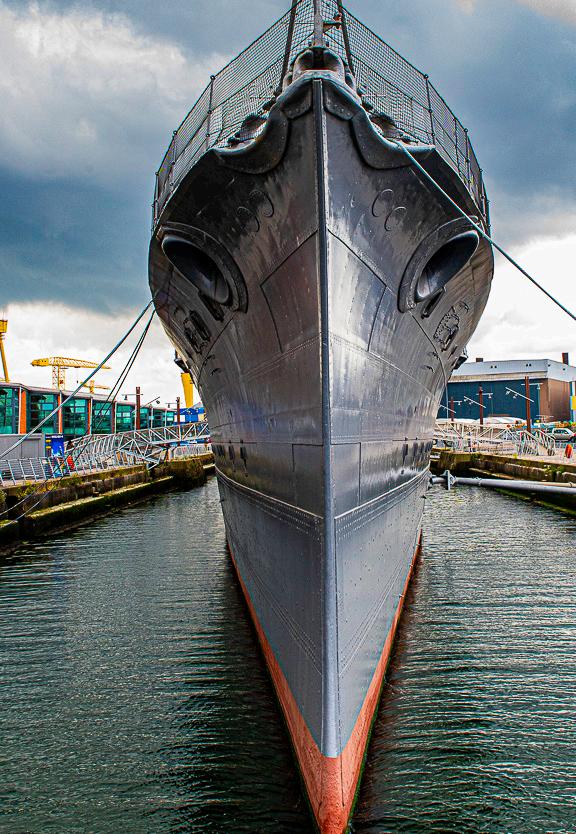
Front cover photograph
HMS Caroline
Shaun Parkes LDPS
Back cover photograph
Rufford Abbey, Nottinghamshire
Michelle Yates ARPS
EDITORIAL
3 Perspective: Photographic Heritage DAVID BRYSON FRPS
FEATURES
4 Chair’s Chat: Exhibition Making silent heritage Speak.
MIKE GLYDE
5-6 Pathways through history: Lens ball Photography
MICHELLE YATES ARPS
7 Where do stops come from DAVID BRYSON FRPS
8-19 Cameras over the period 1850 to present
ROBERT GALLOWAY LRPS
20-29 HMS Caroline: Last survivor of the battle of Jutland.
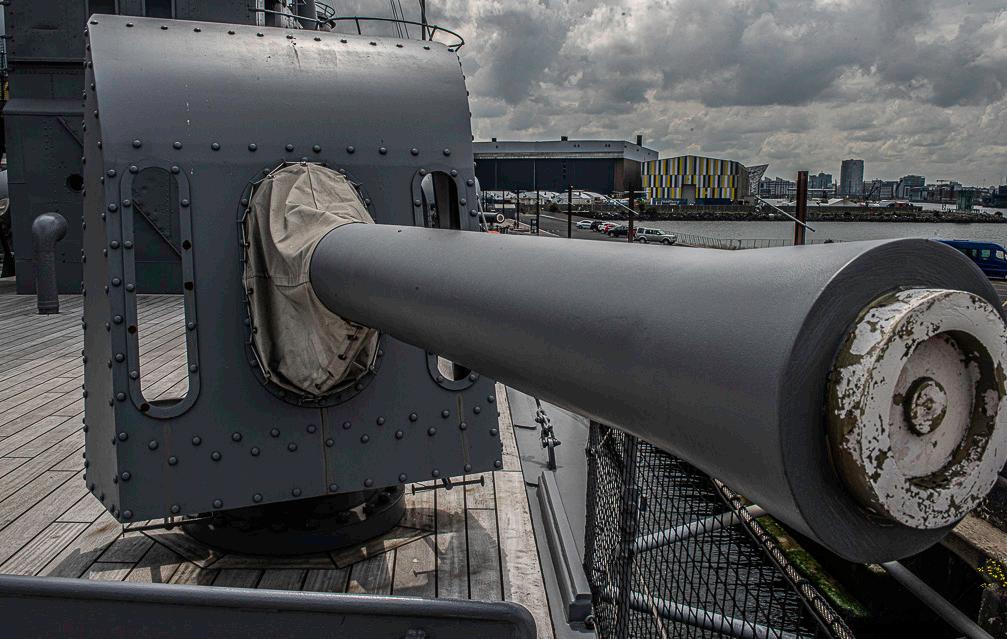
SHAUN PARKES LDPS
5 8
Projecting Heritage Images
30-31
CONTENTS
ERIC HOULDER LRPS 20 30
Perspective: Photographic Heritage
DAVID BRYSON FRPS
The photography of heritage subjects has been around for a long time. Since the advent of photography photographers have chosen to record places and events that have become part of our heritage.

Indeed without early photographs we wouldn’t know about some aspects of our heritage. As cameras and technologies have developed and changed over time so Heritage Photography and its use has increased and our capabilities have likewise grown in their use.
Michelle Yate’s article looks at her use of the optical properties of a lens ball to look at past histories from a different perspective.
Robert Galloway through looking at his personal camera collection shows us how technology has progressed and how it is now part of our photographic heritage.
In a short piece David Bryson looks at the historical origin of stops part of our everyday photographic terminology.
Shaun Parkes then covers a military treasure HMS
Caroline the last surviving ship from the Battle of Jutland.
Finally Eric Houlder takes a personal perspective on presenting heritage to an audience.
The next theme for the next issue will be around photographs submitted for the exhibition “Making Silent Heritage Speak” organised by Mike Glyde, see more about this in the Chair’s chat.
Please remember that more articles for publication are very welcome. As always I can only publish from the work that is submitted to me. If you would like to get feedback and submit stories/ideas of photographs for the journal please contact me by e-mail. heritage.editor@rps.org
E-mail Reminder
Do add your e-mail details to your RPS profile so we contact you through the RPS’s Broadcast system.
Facebook
Our private facebook group is at https://www. facebook.com/groups/rpsah
3 EDITORIAL
Elgar’s Birthplace, Broadheath, Worcestershire.
Chair’s Chat: Exhibition making silent heritage speak
MIKE GLYDE
Illustrating the overlooked elements of our historic environment a new photographic exhibition by the Royal Photographic Society’s Archaeology & Heritage Special Interest Group
As we ease out of the pandemic, its time to reinvigorate the AHSIG. We have a formal plan, that we are working on delivering, including broadening our reach to heritage photographers as well as increasing the support and development of our members. We are first and foremost a photographic group not a heritage one, and we must ensure that we showcase our images as much as possible. To that end we are preparing a new members exhibition that for the first time includes digital projected images, not just prints. We hope that this will encourage more of our members to take an active roll in the group. Below are the details of how you can submit your images for our exhibition. Lets see your best work!
Our landscapes, villages, towns and cities are all shaped by past people’s actions, from agricultural management, ceremonial sites, domestic and industrial constructions, defensive structures, through to transportation, law and order and education. The list is near endless. We are familiar with many such sites, but there are far more parts of our past that are overlooked, whether due to scale, location, popularity, or general lack of awareness. Our 2022 photographic exhibition will try to bring these no less important sites to the fore.
I am also excited to tell you that the exhibition will be premiered at RPS House, in Bristol, the home of the Royal Photographic Society, and that an exhibition catalogue will be produced for visitors to take away.
SubmiSSion deadline iS october 31S t 2022
Prints Colour or black and white
You can send us a straight print unmounted, and we shall add it to a mount. However, these will be of the following standard window size. A small fee
of £2.50 will be required which is probably cheaper than sending a pre mounted photo.
Mounts are 50cm x 40cm and are Ice White, with the following print window sizes.
• A3 (11-3/4” x 16-1/2”)*
• A4 (8-1/4” x 11-3/4”)
• 280mm x 280mm (11” x 11”) Square
• 380mm x 180mm (15” x 7”) Narrow Landscape
Therefore, your print will need a border that is slightly larger than the window to allow for mounting, so please bear this in mind before sending prints.
*If you have a photo that does not fit the above window size, then you will need to send it pre mounted on a 50cm by 40cm Ice White mount.
Projected Digital Images (PDI) Colour or B&W
Maximum dimensions 4096 pixels high by 2400 pixels. Images must be saved as jpg, using either sRGB or AdobeRGB colour space.
Each image, whether print or PDI will need to be accompanied by the following information.
- Your name and any RPS distinction
- Country or County where you are based
- A title for your piece
- A 50-word description of your piece, saying what the subject is, etc.
- Summary of technical detail
Even if you are submitting a print, please also provide a digital copy so it can be included in the catalogue. Please send digital files to the A&H Secretary heritagesec@rps.org
A label will be produced for prints, and equivalent text box will accompany the PDIs.
Prints, unmounted and mounted to be sent to Mike Glyde, The Milking House, Bull Hill Astley, Worcestershire DY13 0RT chair.heritage@rps.org
EDITORIAL
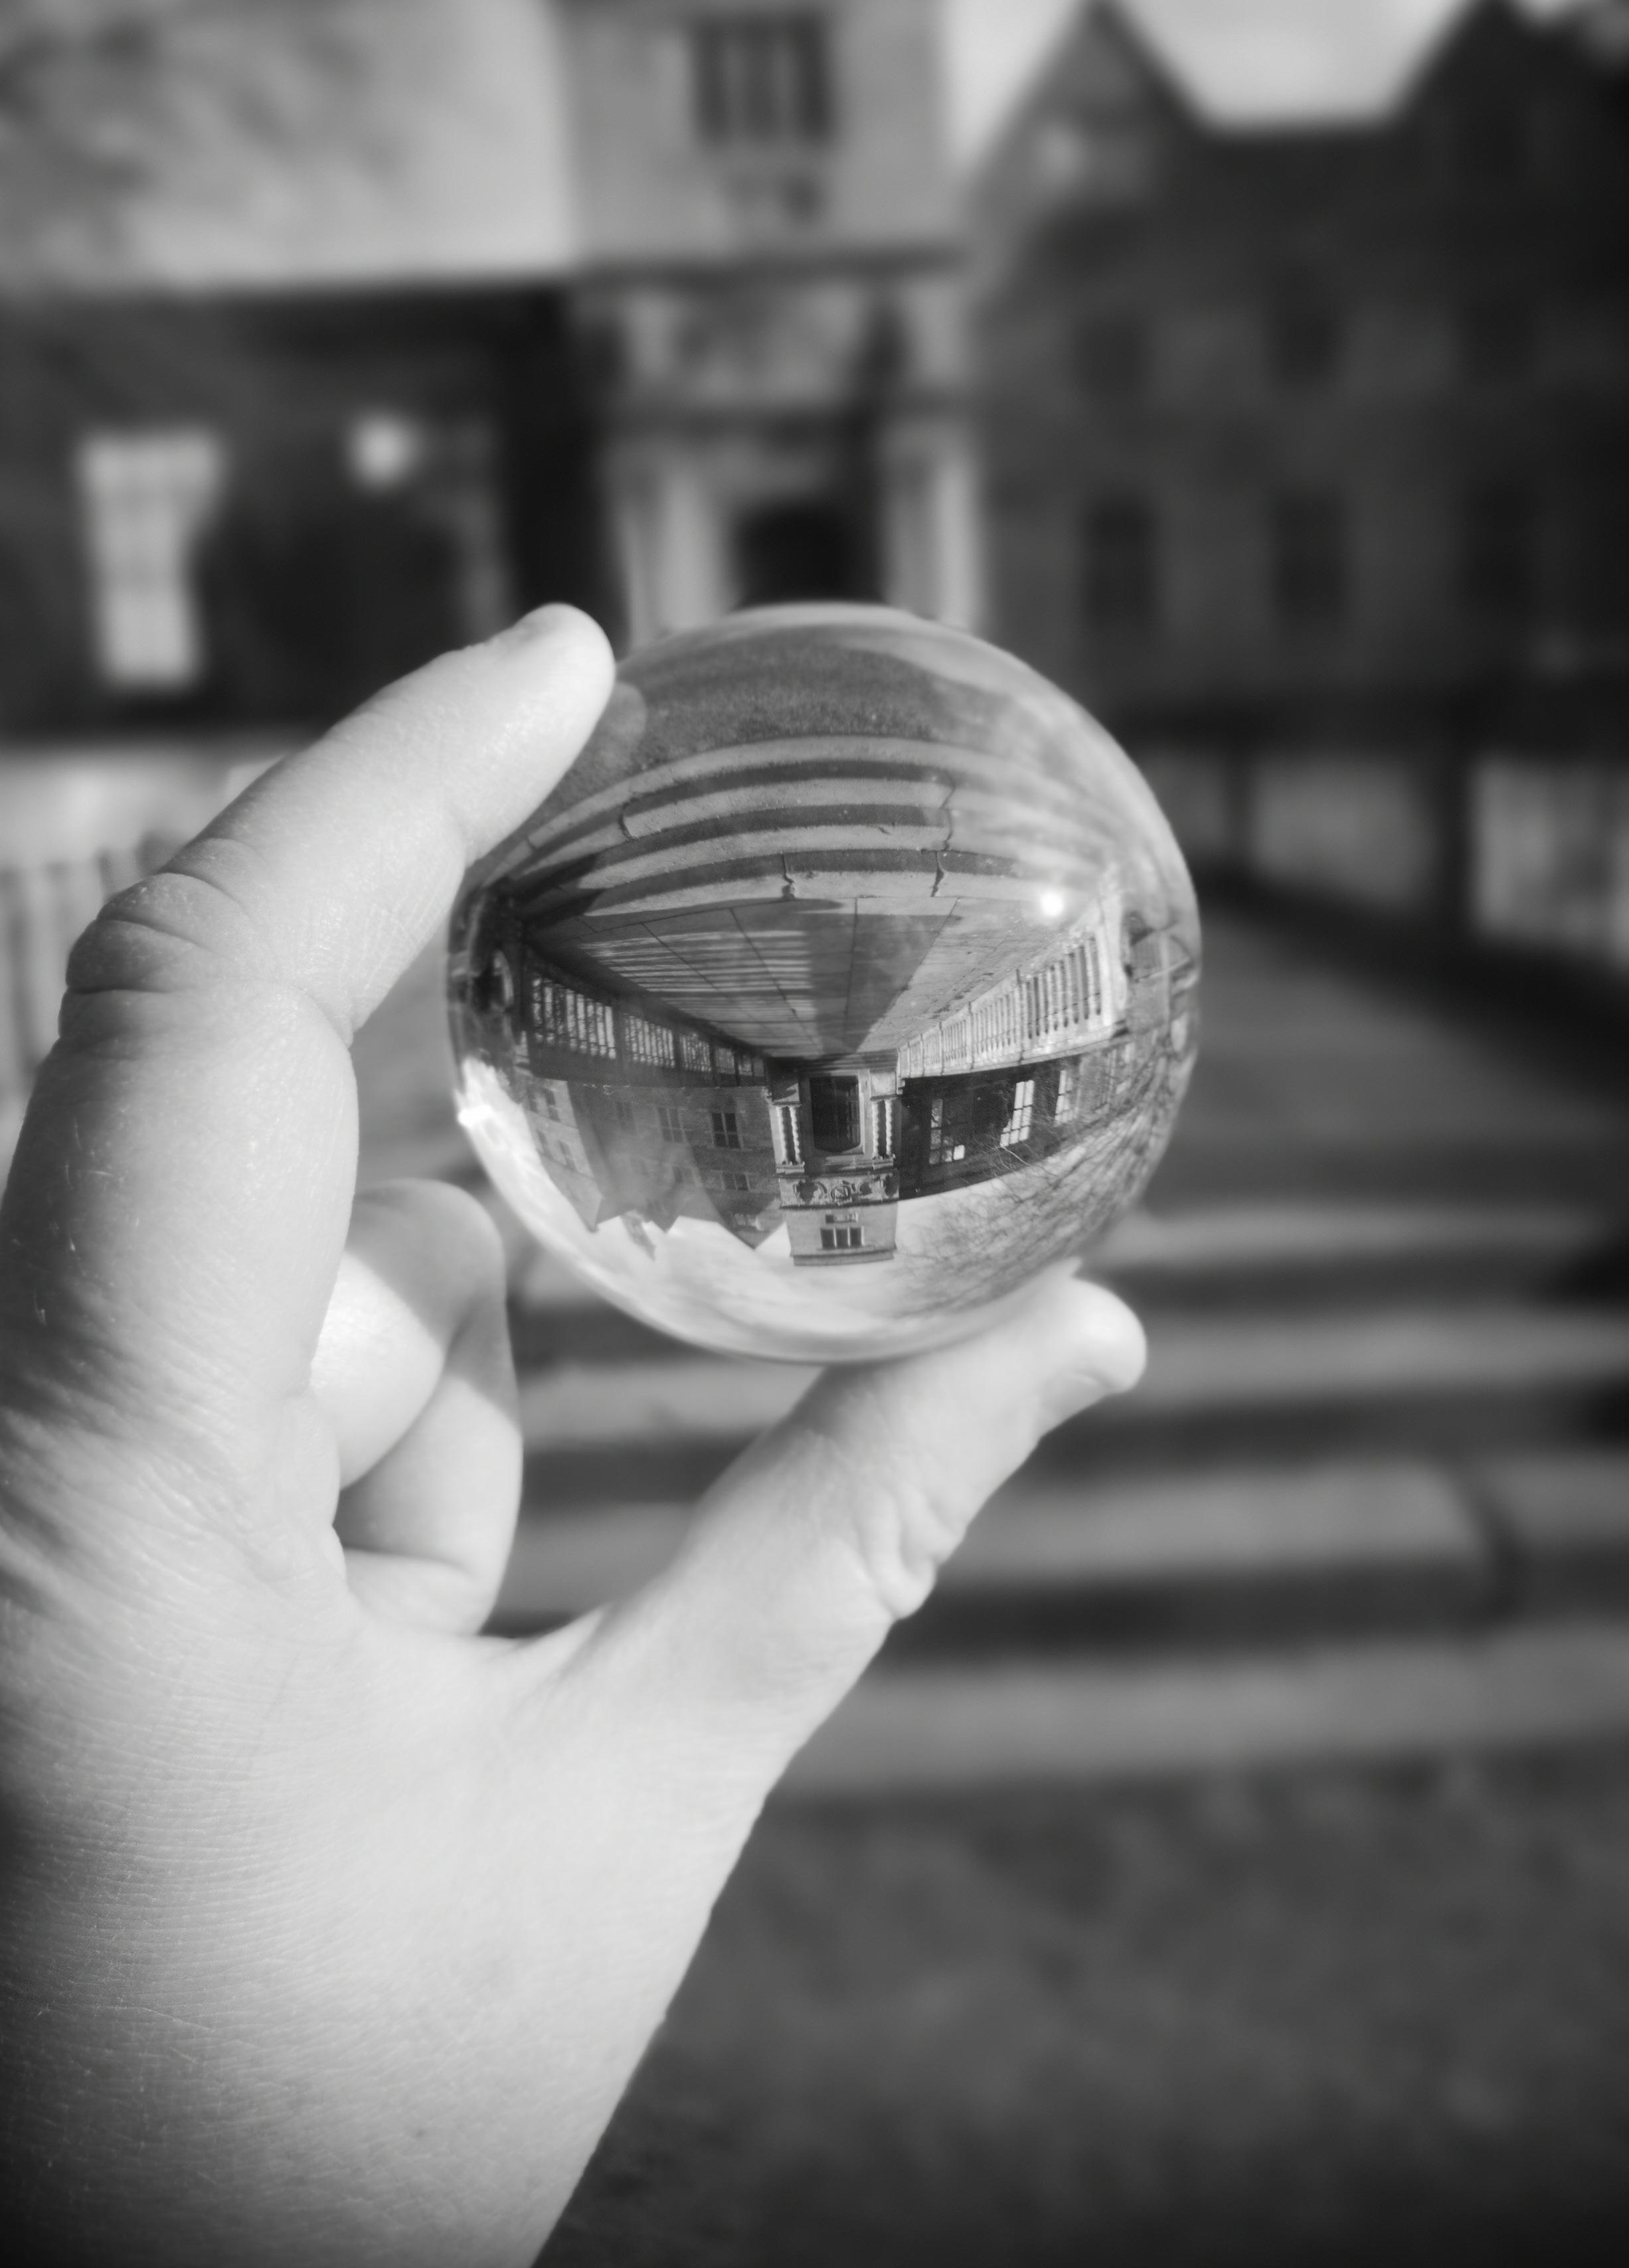
Pathways through historyLens ball photography
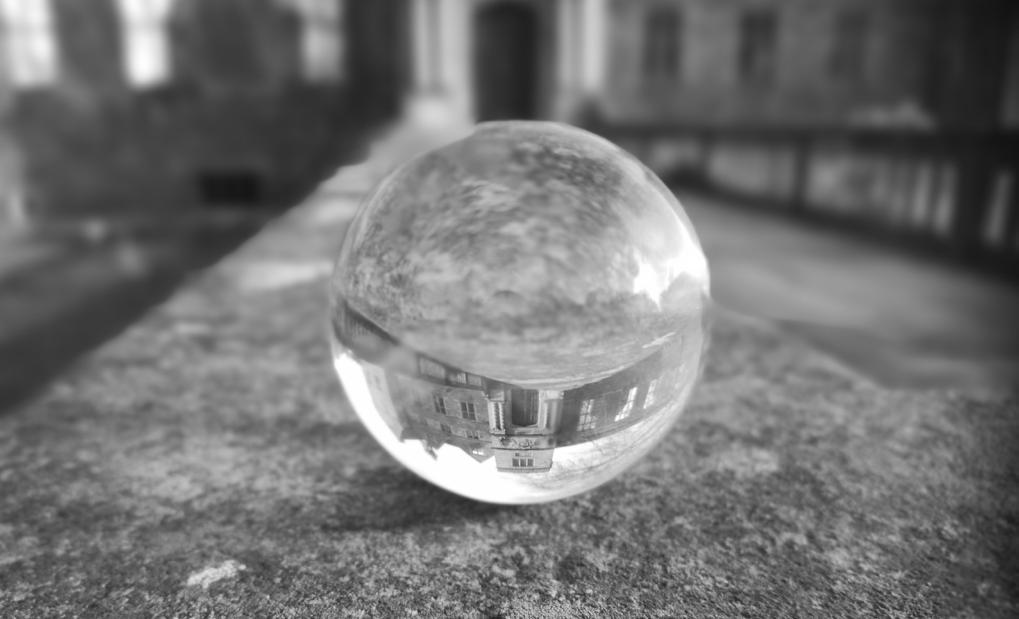
A Lens Ball is a crystal ball but given the name Lens Ball in Photography. It captures the perspective of the subject differently allowing the viewer or audience to experience the images like they are in another world.

MICHELLE YATES ARPS
ALens Ball allows for creative techniques to be used due to the nature of the optics of ball being used as a tool in photography.
The lens ball places the subject upside down whilst outside the ball remains upright and out of focus. The photographs continue on from my own exploration and experimentation of Phone Photography over the past three years. A project that now has several parts to it. It is a project that originally started out with exploring the black and white option on my phone and seeing how it captured the detail of heritage subjects. It moved on in August 2021 to explore capturing a disused used colliery railway. In September
and October 2021 it expanded further by using phone photography lenses, such as a Fish-eye and Kaleidoscope to see how the perspective of capturing heritage subjects changed. Nature has also been captured alongside a heritage subject of an abbey. The experimentation of capturing Heritage Photography through a Lens Ball is recent as they are photographs taken in 2022 and hopefully as the year goes on more heritage subjects will be captured in this way to see how they change. I hope you like my new photography.
Lens balls are relatively inexpensive to try compared to fish eye lenses. https://photographycourse.net/ lensball-photography/#
5 FEATURE
This image captures Rufford Abbey in Nottinghamshire in February 2022. The Lens Ball has captured it through its optics and flipped it upside down. A different way of capturing and seeing local heritage.

 This image captures Rufford Abbey through the Lens Ball without the interference of my own hand. The Lens Ball was placed on the wall and focused through with the camera.
This image captures the lake surrounded by trees through the Lens Ball. Right in the distance is the walkway people take to walk by the lake and see more heritage of the site. The Lens Ball adds a layer of creativity to the photographs and the black and white adds to the detail.
This image captures Rufford Abbey through the Lens Ball without the interference of my own hand. The Lens Ball was placed on the wall and focused through with the camera.
This image captures the lake surrounded by trees through the Lens Ball. Right in the distance is the walkway people take to walk by the lake and see more heritage of the site. The Lens Ball adds a layer of creativity to the photographs and the black and white adds to the detail.
Where do stops come from?
Photographers tend to talk about stops rather than precise changes in aperture so changing from f/16 to f/8 increases exposure by 2 stops.
DAVID BRYSON FRPS
The first of Robert Galloway’s photographs of cameras on page 8 shows a lens which uses Waterhouse stops as well as a collection of stops. Stops were invented by John Waterhouse of Halifax, England in 1858; previously lenses had to be unscrewed to change aperture, whereas Waterhouse stops with suitable lenses or attachments could be slotted in and out of lenses as needed.

Thankfully nothing we have to use these days as photographers with apertures changed at the touch of a dial; but we still talk about stops when discussing changes needed for better exposures.
Working with stops is a very useful way to explain changes in exposure, for example when it comes to High Dynamic Range Imaging (HDRI). We can use multiple exposures to capture highlights and shadow detail in different images, then combine (or ‘stack’) those images into one. Rather than specifying apertures for the individual exposures, we can say “plus or minus 5 stops or 8 stops”, whichever is suitable for the subject.
7 FEATURE
A selection of Waterhouse stops together with a small leather carrying case.
Cameras over the period 1850 to the present.
This is an account of the features of the cameras I have used since 1948, five film cameras and five digital. I hope the former may be of interest to members who only know of digital cameras and may provide happy reminiscence for older members. The cameras are listed by name and the year when I acquired them.
ROBERT GALLOWAY LRPS.
Preamble: 19th Century Bellows Camera.

Before discussing the cameras I have used I refer to an old ancestor which was given to me in 1950 and was probably then a century old (photo. 1). There is a ground glass screen on the back on which the image can be focussed by moving the lens back and forward smoothly using the brass knob of the screw drive towards the front of the camera base. The lens has a focal length of 10 inches, an aperture of choice (f8 to f32) can be slid vertically into the lens barrel and a lens cap can cover the lens. Pictures are taken on a photographic glass plates 61/2 X 43/4 inches which are stored in light tight plate holders, one of which is shown
lying beside the camera. A plate holder can be slid onto the back of the camera in place of the ground glass screen. A feature of note, typical of mid-19th century cameras, is that the lens does not have a shutter to control the exposure. The sensitivity of the photographic plates was so low that the exposure could be controlled simply by removing and later replacing the lens cap!
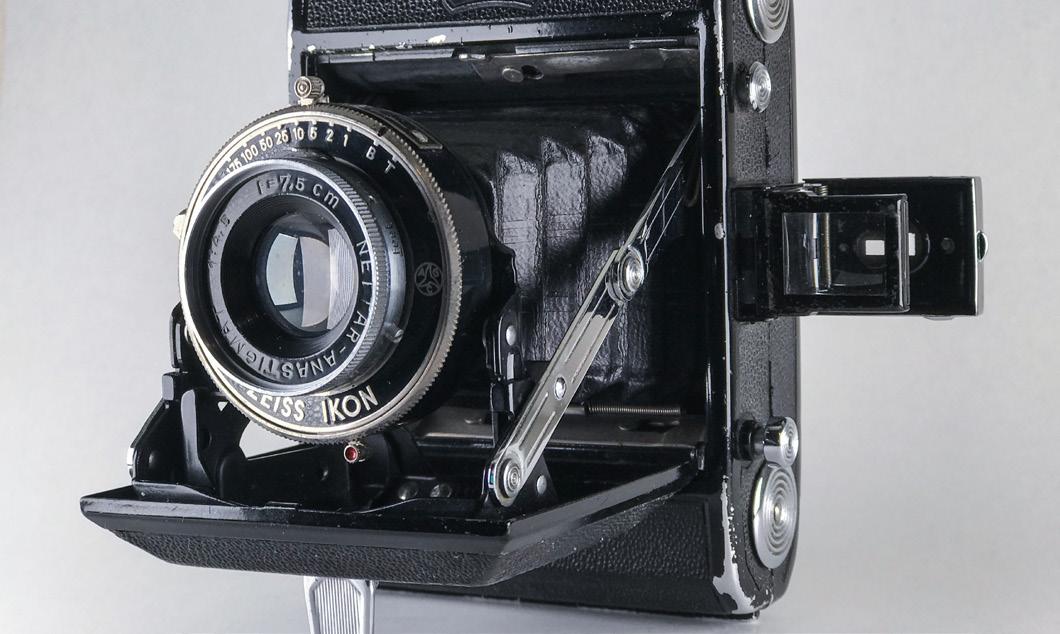
Zeiss Ikon, 1948.
The camera is of a bellows construction (photo.2left) and can fold into its self (photo.2right) to provide secure protection of the fragile working parts.
The lens is 75 mm focal length, f4.5 adjustable down
FEATURE
1. Mid-19th century bellows camera, half-plate size, the lens has a slot for Waterhouse stops seen in front of the camera.
9
3. King’s College University of Aberdeen. A modern scan of an original photograph taken with the Zeiss Ikon and printed 61/2 x 81/2 inches in 1950.
to f32; the focus scale ranges from 4 to 30 feet + infinity; the mechanical shutter speed ranges from 1 s to 1/175 s and the shutter must be activated before each use. All settings are made manually based on the judgement of the photographer: I carried a small notebook in which to record the settings and so hoped to learn from successes and frequent failures.
The Zeiss Ikon uses 120 size roll film on which it gives 16 negatives, each 6 cm x 4.5 cm. Initially only black and white film was available and the highest sensitivity was about 100 ASA (100 ISO).


The camera has a tripod screw and the standard cable release of the time could be screwed onto the shutter to operate it remotely. Now in the digital
 2. Left, The Zeiss Ikon, 1948, of bellows construction and entirely manual operation open ready for use. Right, The Zeiss Ikon closed for protection of sensitive parts.
4. Picadilly Circus London. First colour transparency taken by the Zeisss Ikon in 1956, shown here is a modern scan of a colour print made from the original transparency.
2. Left, The Zeiss Ikon, 1948, of bellows construction and entirely manual operation open ready for use. Right, The Zeiss Ikon closed for protection of sensitive parts.
4. Picadilly Circus London. First colour transparency taken by the Zeisss Ikon in 1956, shown here is a modern scan of a colour print made from the original transparency.
age we no longer have a simple remote control device like the cable release which can fit most cameras, I regard this as an unfortunate loss.
My Zeiss Ikon was a present on my 14th Birthday and was much used for 16 years until the shutter ceased to work reliably. Interest and enjoyment also came from doing my own film developing and printing until colour dominated my photography.
How well did the Zeiss Ikon camera work? Photo. 3 shows a present day digital scan of a black and white photograph of King’s College, University of Aberdeen taken and printed at 61/2 by 81/4 inches in 1950 (my first heritage photograph?).
In 1956 I started to use colour transparency film as illustrated by photo 4. This originated from a colour transparency from which an A4 colour print was made about 20 years later and the print was digitally scanned recently for the photograph. We should realise that the Zeiss Ikon camera was not produced for professional photographers and that the originals for the scanned photos. 3 and 4 are about 70 years old’
sensitivities ranging from 25ASA (ISO) to 160ASA (ISO) for colour transparencies and 80 ASA(ISO) for colour print film.
The Exacta Varex lasted for 7 years until the shutter broke down.

Photo. 6 is a recently made digital copy of a colour transparency made with the Exata Varex in 1965.
Exacta Varex IIB, 1964.
This is a single interchangeable lens reflex camera (photo. 5), shown with the Zeiss Tessar 50 mm f2.8 lens. This combination cost £80! All settings are still made by the judgement of the photographer although the focus is observed on the viewing screen. I had two additional lenses, a Zeiss Sonnar 135 mm f4 and a Mayar Lydith 30 mm f3.5.
The camera can be mounted on a tripod, can take a standard cable release and can trigger an electronic flash gun.
I added a Weston Master Exposure Meter to my accessories. The Exacta Varex used 35 mm film with
Minolta Dynax 500si super, 1974.

This is a single lens reflex camera (photo. 7) which is much more sophisticated than its predecessor. It still uses 35 mm film but is battery operated and had interchangeable zoom lenses, 28 – 80 mm f4 / 5.6 as in photo. 7 and also 70 – 210 mm f4,5 / 5.6.
In addition to manual camera settings, the battery supported automatic operations, auto focus and auto exposure with a selection of programme modes including Aperture priority and Shutter priority, and had a built in flash.
This is clearly a step forward with a film camera with
many of the facilities that we now take for granted in a digital camera, indeed it later became the basis of Minolta’s first fully digital camera.

11
5. Exacta Varex IIB, 1964, an SLR using 35 mm film.
7. Minolta Dynax 500si super, 1974.
8. Derelict farm buildings in a Scottish Highland Glen
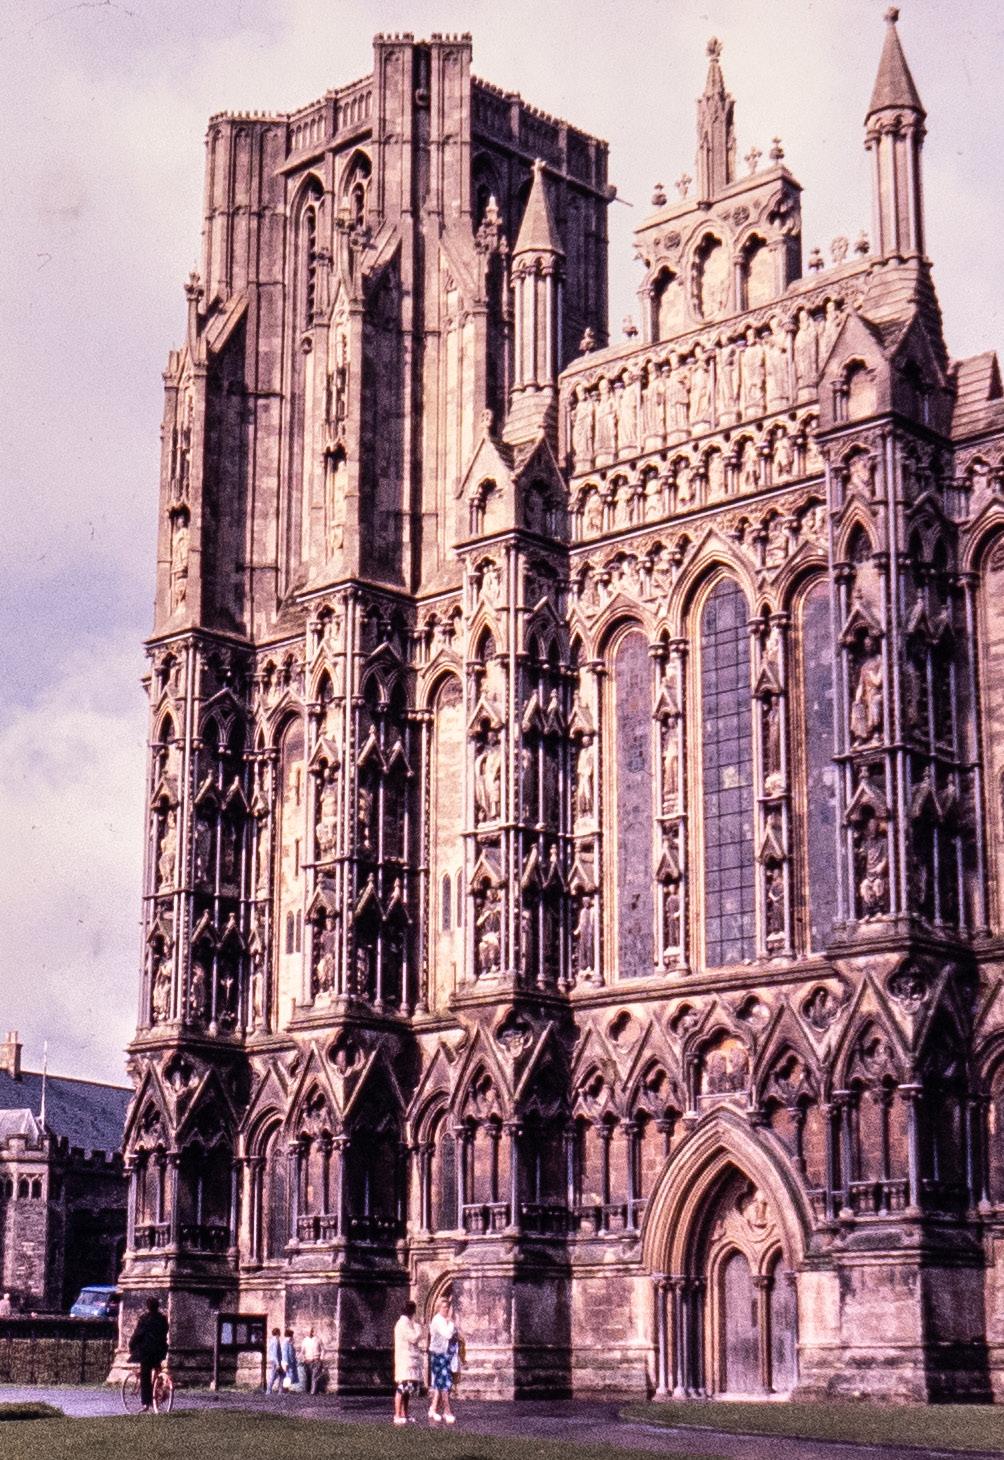 6. Wells cathedral, copy of colour transparency obtained using the Exacta Varex IIB in 1965.
which produces negatives or transparencies 13 mm by 17 mm. Because of this small size prints were usually no larger than 5x7 inches, although I usually made colour transparencies. Photo. 10 compares the sizes of 110 and 35 mm transparencies. 110 size film cameras had a popularity in the 1970’s.

The camera has a 26 mm f2 lens (field of view similar to 52 mm lens with 35 mm film) with aperture, focus and shutter speed set manually and with an over exposure warning lamp in the viewfinder.
A small flash unit can be fitted to the shoe on top of the camera and a standard cable release can be fitted
Remote control of this camera now required a cable specific to the make of camera.
Photo. 8 shows a digital scan of a colour print dating from 1980 obtained using the Minolta Dynax camera. The derelict farm buildings have an interesting history which I learned from a local octogenarian who had lived in the glen all his life. The quality of the stonework suggests to me that the buildings probably date from about 1890. Until early in the 20th century the building on the left housed milk cows and the other building housed

milk churns, horse and cart which delivered milk to houses throughout the area. By 1914 the farming here was changing to sheep which could roam the hills behind. The trees only came after 1964 when this part of the estate was purchased by the Forestry Commission.
Unlike my previous cameras the Minolta Dynax did not stop working, but went out of use as I moved to digital photography.
There is absolutely no trace of remains of the roof of the long stable building to the left, so we may surmise that it was probably dismantled to replace the roof of the neighbouring farmhouse which had been burned down and fallen down, in 1914.
Canon 110 ED, 1975.

The Cannon 110 ED is a particularly compact camera (photo. 9) measuring 142 mm wide, 56 mm deep and only 29 mm thick. This was achieved by using 110 size film which is only 16 mm wide and
The shutter stopped working after about 12 years.
Ricoh GR1, 1996.
Seeking a replacement pocket camera, models using 35 mm film had become available from which I selected the Ricoh GR1 (photo. 12) which was described as a “high end” autofocus compact camera. It is very similar in size to the Canon 110 ED and a little less in weight, has a 28 mm f2.8 lens with Aperture priority auto exposure, electronic shutter

13
Photo. 11 shows a photograph of a projected image.
9. The Canon 110 ED, 1975.
10. A comparison of the sizes of a 110 film transparency and a 35 mm film transparency.
11. A photograph of a projected 110 size transparency of a Victorian mansion by Loch Lochy taken with the Canon 110 ED in 1978.
12. The Ricoh GR1, 1996.
speeds from 2 s to 1/500 s and built in flash. An example of a scanned print from 2004 is shown in photo. 13.

The Ricoh GR1 has not yet broken down.
FujiFilm FinePix E550, 2005.
effective pixels (12.3 million recorded pixels) and a sensitivity of ISO 80 to 800. The lens is a zoom of focal length range equivalent to 32.5 -130 mm on a 35mm film camera, f2.8 / 5.6. Manual or auto shooting with a choice of many shooting modes, built in flash and rear 2 inch LCD monitor with 154000 pixels. The shutter speed ranges from 3 s to 1/2000 s. Auxiliary add on lenses can extend the wide angle and the telephoto range.
The performance of the FujiFilm FinePix E550 is illustrated in photos. 15 and 16. The camera is still functional.

Sony A100, 2007.
My first digital camera (photo. 14) is of pocketable size, which has a 1/1.7 inch sensor with 6.3 million
Greater versatility came with the Sony A100 (photo. 17) which had been developed from Minolta cameras and with which my Minolta accessories could be used. The Sony A100 is a single lens reflex camera for which there are interchangeable lenses; it has a C-size sensor (10.2 effective mega pixels), ISO 100 to 1600, shutter speed range 30 s to 1/4000 s, a wide range of manual and automatic settings. It has a built in flash which can provide wireless control of a remote flash unit.
A sample photograph is provided in photo. 18. The camera is still functional and is used occasionally.
Sony SLT A77, 2013.
The Sony SLT A77 (photo. 19) provided an improved range of facilities and higher resolution in it’s C size sensor of 24.1 mega pixels. A 90 mm macro lens and a 50 to 500 mm Zoom were added to my lens collection. Photo.20 provides a sample image.
 13. A scanned colour print taken using the Ricoh GR1 in 2004, a time when tent-like roofs to buildings were fashionable. This example is of the Sony Centre in Berlin.
17. The Sony A100 DSLR, 2007.
14. The FujiFilm FinePix E550, 2005.
13. A scanned colour print taken using the Ricoh GR1 in 2004, a time when tent-like roofs to buildings were fashionable. This example is of the Sony Centre in Berlin.
17. The Sony A100 DSLR, 2007.
14. The FujiFilm FinePix E550, 2005.
15
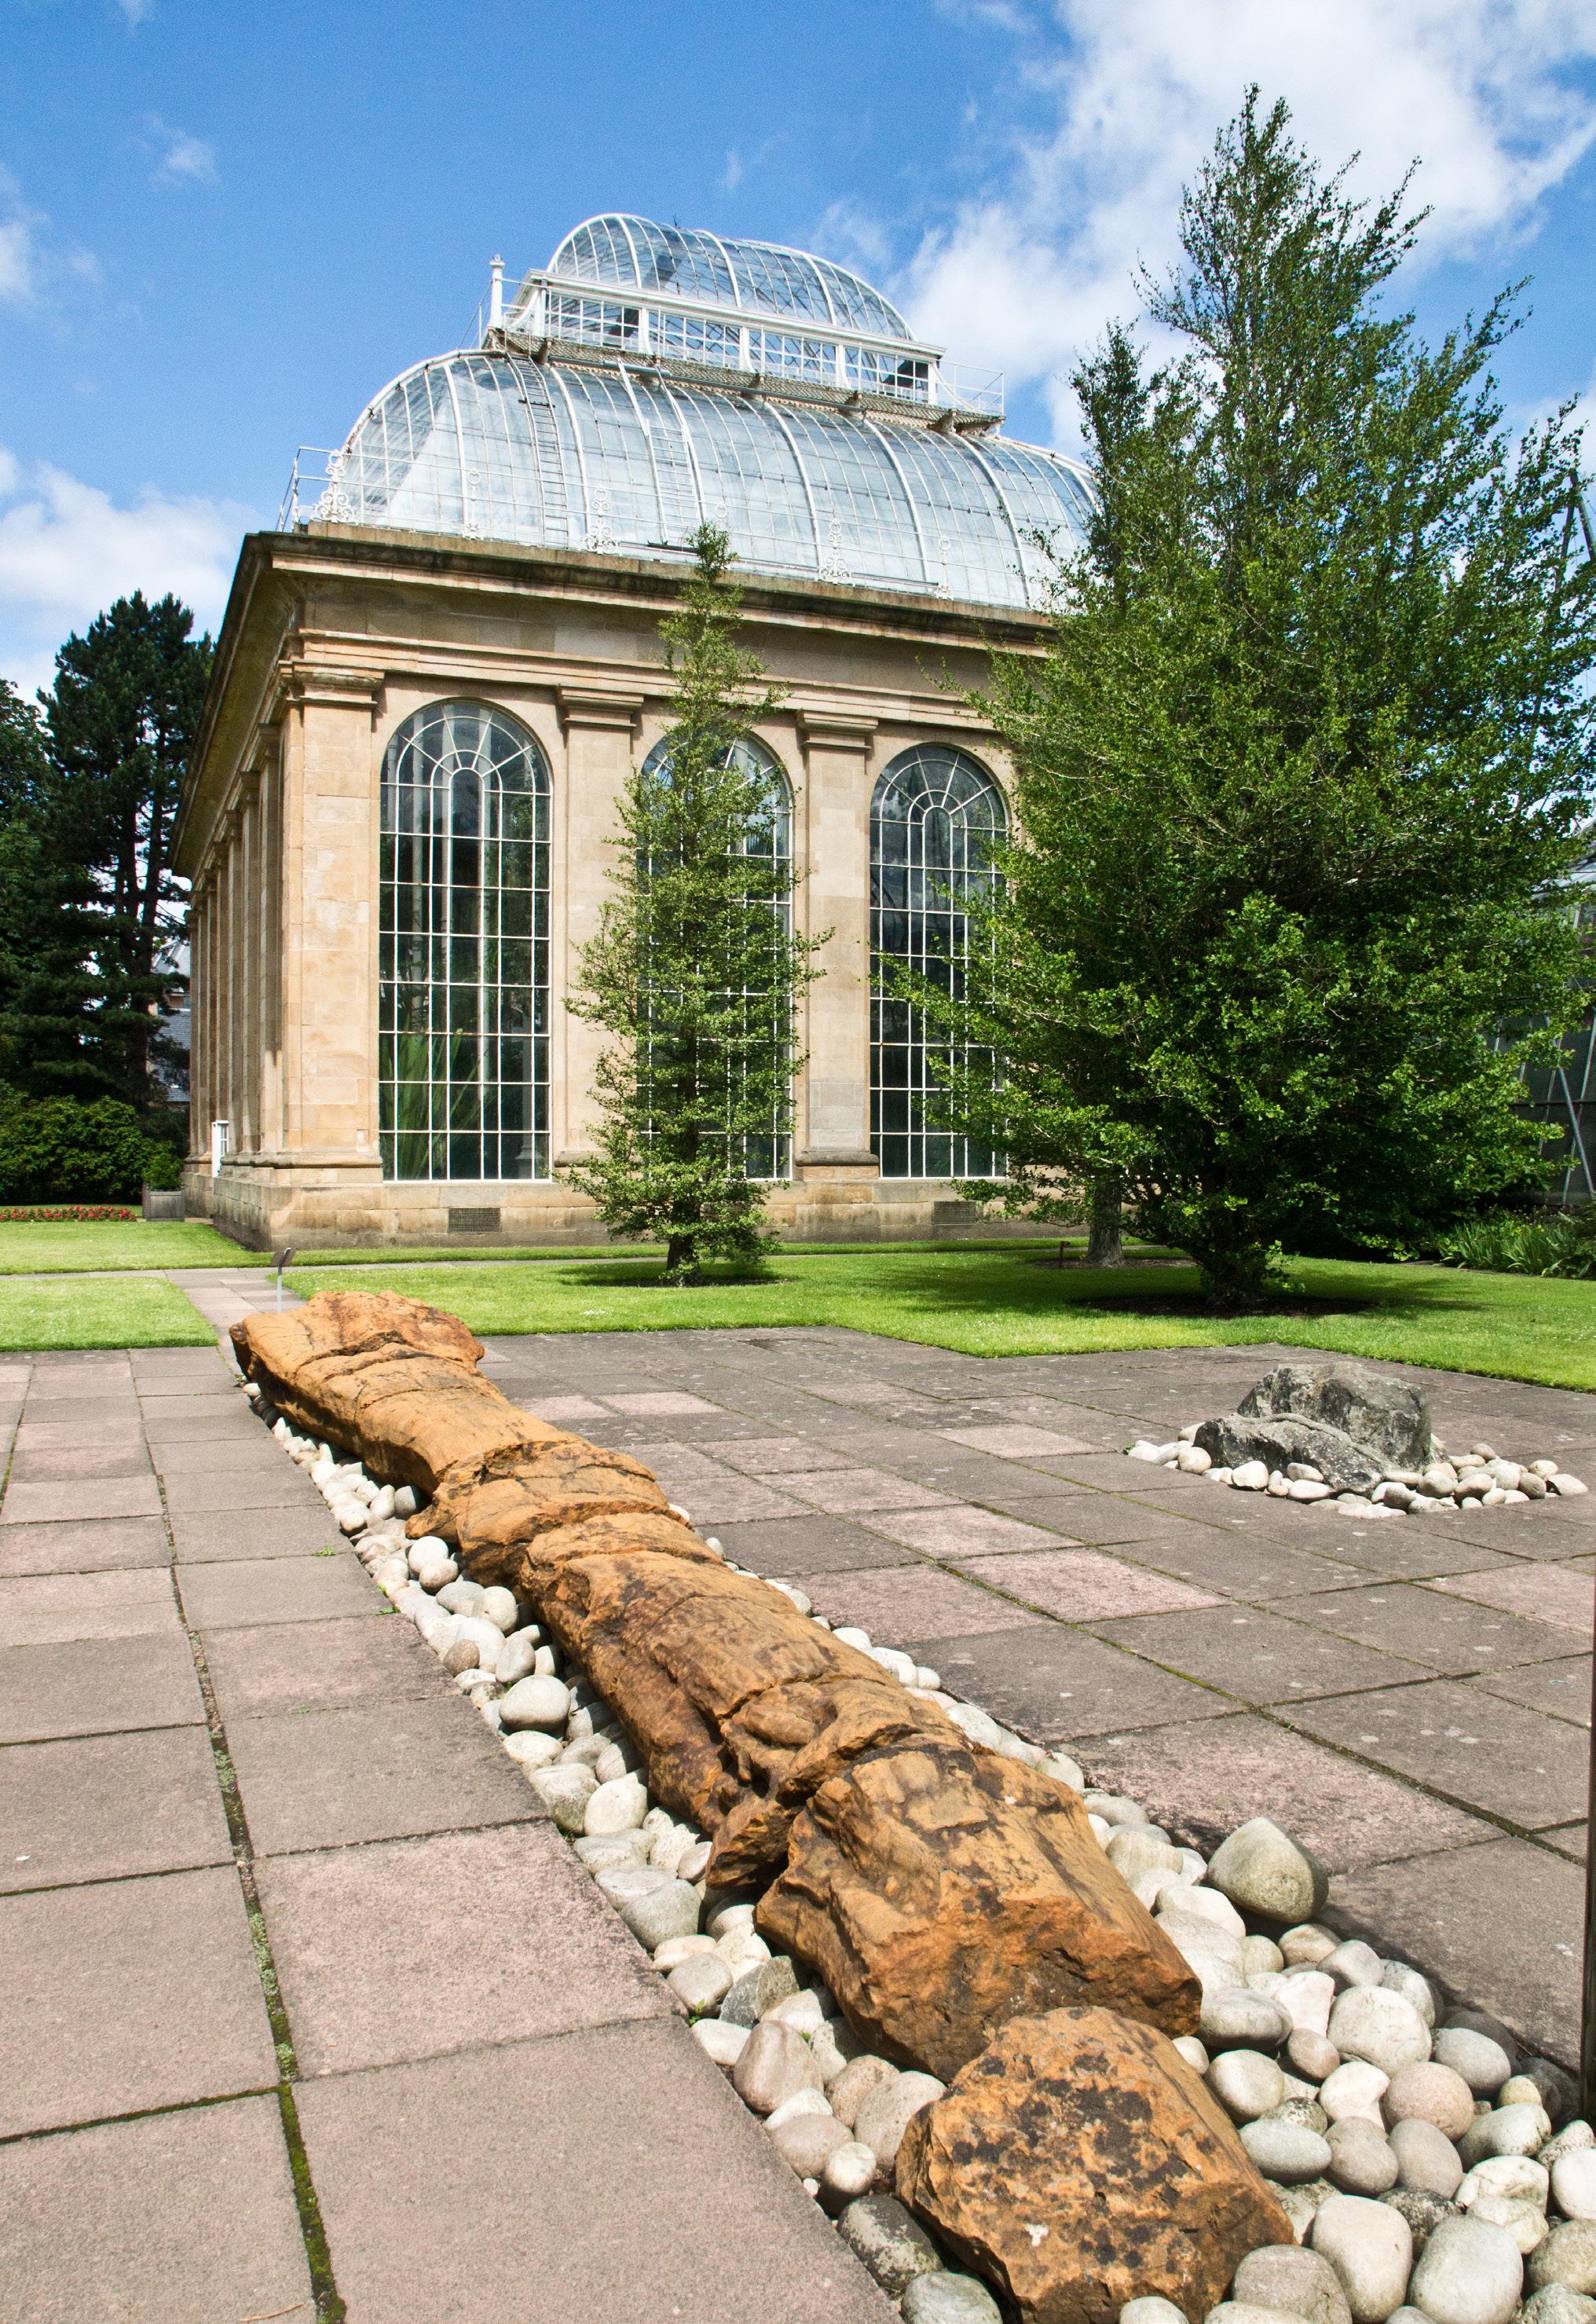
20. Victorian Glass House with fossilised tree trunk in foreground, Royal Botanic Gardens, Edinburgh.


 19. The Sony SLT A77, 2013.
16. Amsterdam Opera House scanned from an original 2006 print taken with the FujiFilm FinePix E550 camera.
18. Turin Piazza Castello scanned from a 2007 colour print taken with the Sony A100.
19. The Sony SLT A77, 2013.
16. Amsterdam Opera House scanned from an original 2006 print taken with the FujiFilm FinePix E550 camera.
18. Turin Piazza Castello scanned from a 2007 colour print taken with the Sony A100.
17
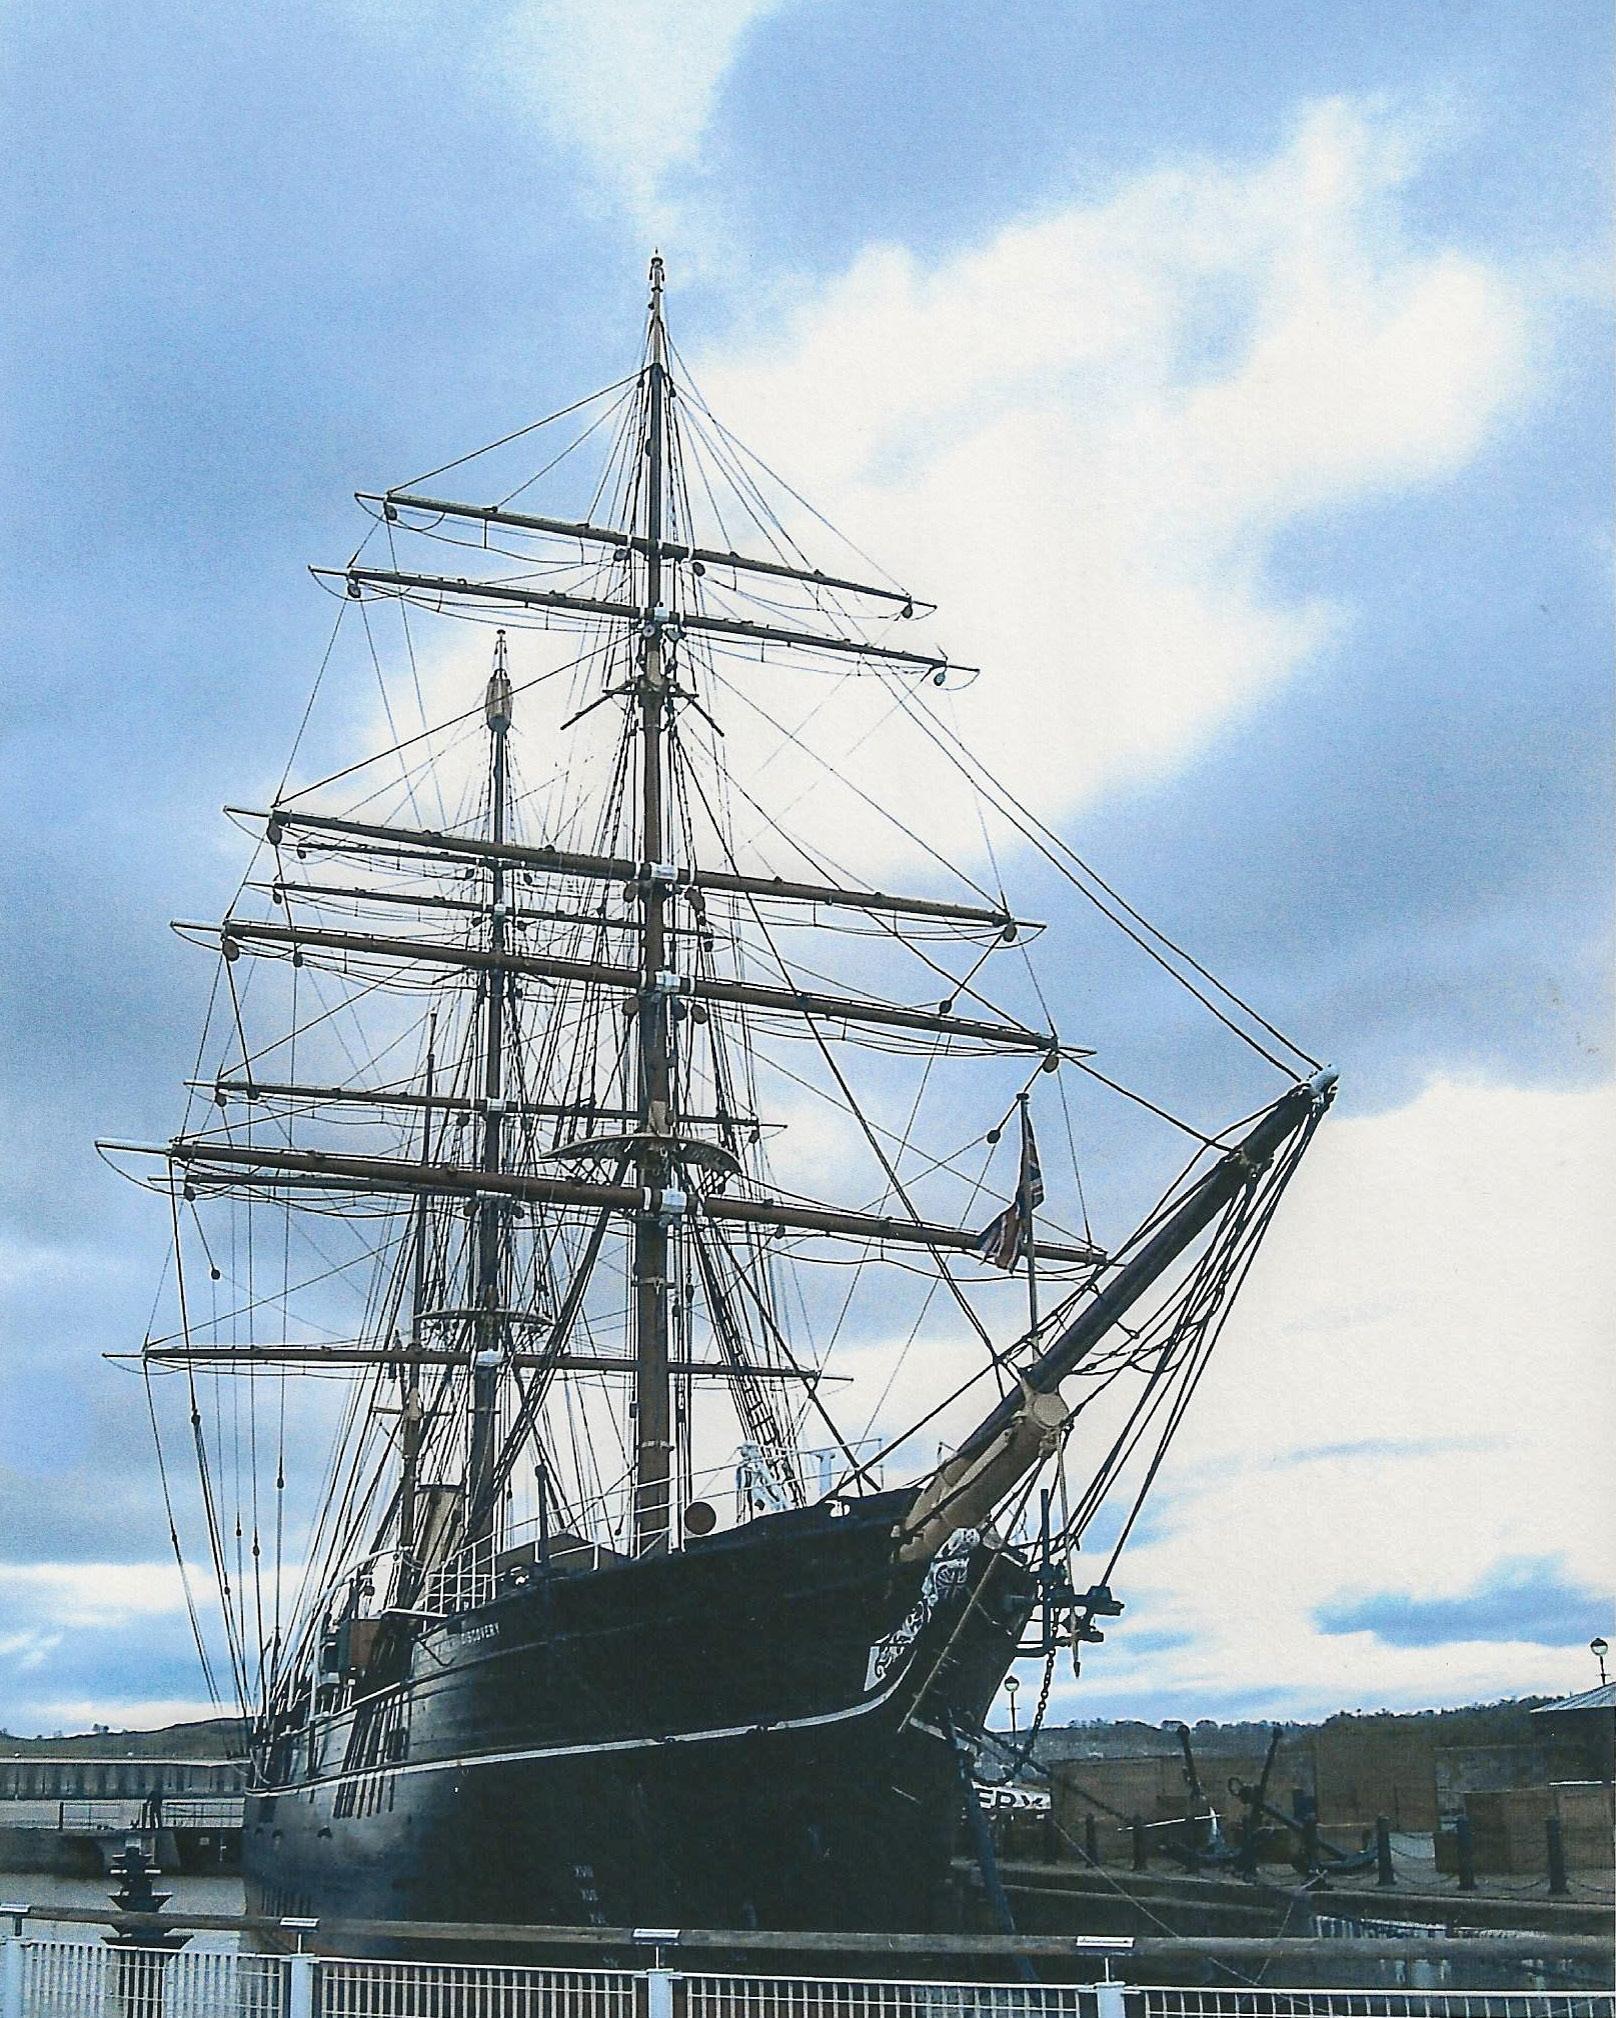
15. Scot of the Antarctic’s ship Discovery in Dundee, scan of 2005 print taken with FujiFilm FinePix E550 with wide angle auxiliary lens.
I liked this camera very much until it broke down beyond repair, but fortunately I was able to find a second hand replacement after two months. It is still in use.
Sony Compact RX100VI, 2018.

For a convenient pocketable camera I moved to the Sony Compact RX100VI (photo. 21) which has a Zoom (24 to 200 mm) but not interchangeable lens and otherwise is of comparable quality to the Sony SLT A77.
A sample image is in photo. 22.
Sony A7RIV, 2021.
My most recent camera has a full frame 60 mega pixel sensor, Sony A7RIV Photo. 23.
An example of an image is in photos. 24 and 25.
 21. The Sony Compact RX100VI, 2018.
22. Edinburgh as Athens of the North, the memorial to the Crimean War on Calton Hill in reproduction of the Parthenon, photographed in 2019 using the Sony Compact RX100VI.
21. The Sony Compact RX100VI, 2018.
22. Edinburgh as Athens of the North, the memorial to the Crimean War on Calton Hill in reproduction of the Parthenon, photographed in 2019 using the Sony Compact RX100VI.
iPhone
Finally I should not ignore ubiquitous iphone cameras, although I am an infrequent user. The occasional use which I have found for the wide angle lens on my iphone 7+ is for close up images when it’s 4mm focal length can give a good depth
of focus even when the automatic system uses a wide aperture, f1.8. All the photos of small cameras above (Photos. 2, 5, 7, 9, 12, 14, 17,19, 21, 23) were taken with my iphone and show the lens of the camera at distance of about 15 cm with a depth of field continuing backwards for about a farther 10 cm.

19
23. My most recent camera, the Sony A7RIV, full frame 60 mega pixel, 2021.
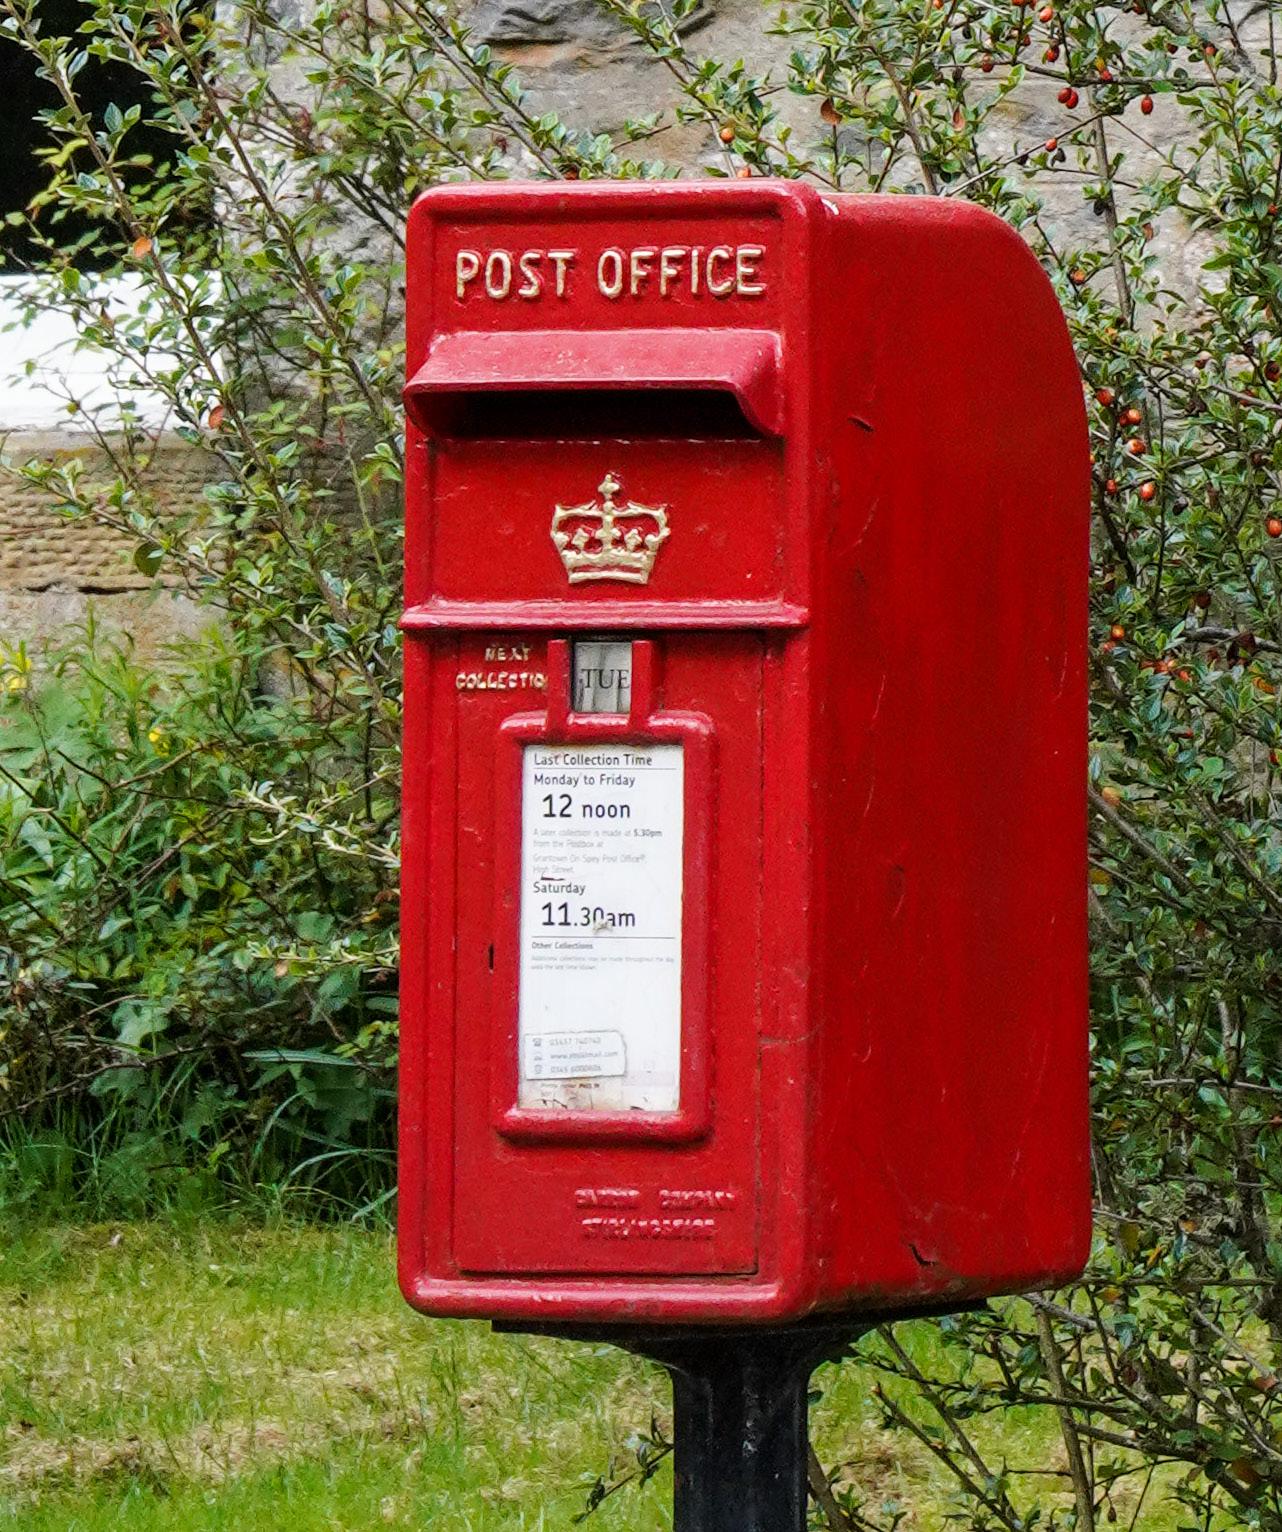
24. Post office red in the village of Feshiebridge, taken in 2021 with the Sony A7RVI. An advantage of this being a 60 mega pixel image is shown in photo. 25.
25. The letterbox from photo. 24 enlarged 30 times.
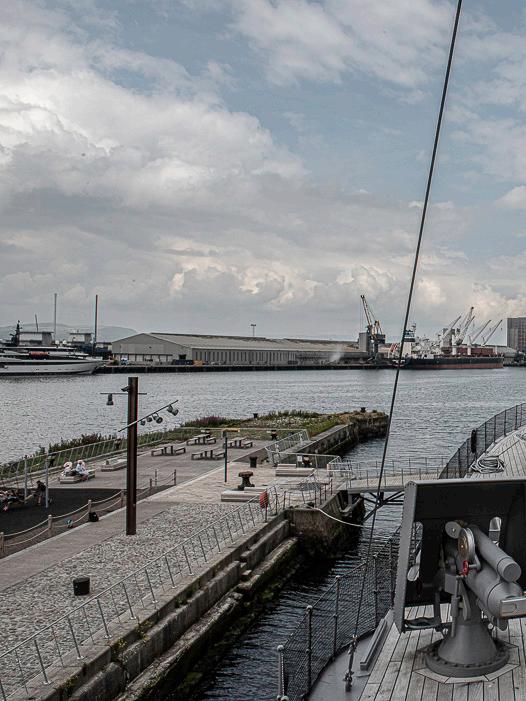
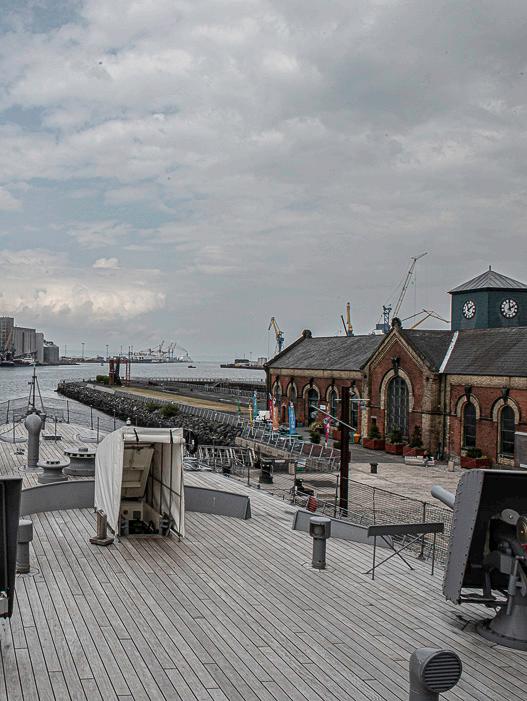
HMS Caroline: last survivor of the battle of Jutland
HMS Caroline was a Royal Navy, C-Class Light Cruiser. The last of a long line of ships to bear the name HMS Caroline, she was built in Cammel Laird’s shipyard in Birkenhead; her hull was laid down in January 1914, and she was launched on 29 September 1914, completed and commissioned on 4 December 1914. With a gross tonnage of 3,750 tonnes, she is 446 feet long and 42 feet wide.
SHAUN PARKES LDPS
Other Rank’s Mess
Caroline was at the cutting edge of technology at the time, and still holds the record for the fastest build time of any modern warship at just 9 months. She was fitted with the latest in modern guns and gunnery control systems, the latest radio communications systems, and the latest in boiler technology. She could also reach speeds of 30 knots, and so was one of the fastest warships afloat.
She served during the First World War seeing active combat at Jutland and was utilised as an administrative centre during the Second World War.
At the time of her final decommissioning in 2011, HMS Caroline was the second oldest ship in the Royal Navy, only HMS Victory being older. She was modified and served as a Headquarters ship for the Royal Naval Reserve in Belfast (Alexandra Dock). She later underwent an inspection and following repairs to her hull, she was opened to the public as a museum ship on 1st July 2017, still at Alexandra Dock (in the Titanic Quarter at Belfast).

First World War Service
Caroline served mainly in the North Sea during the
FEATURE
21
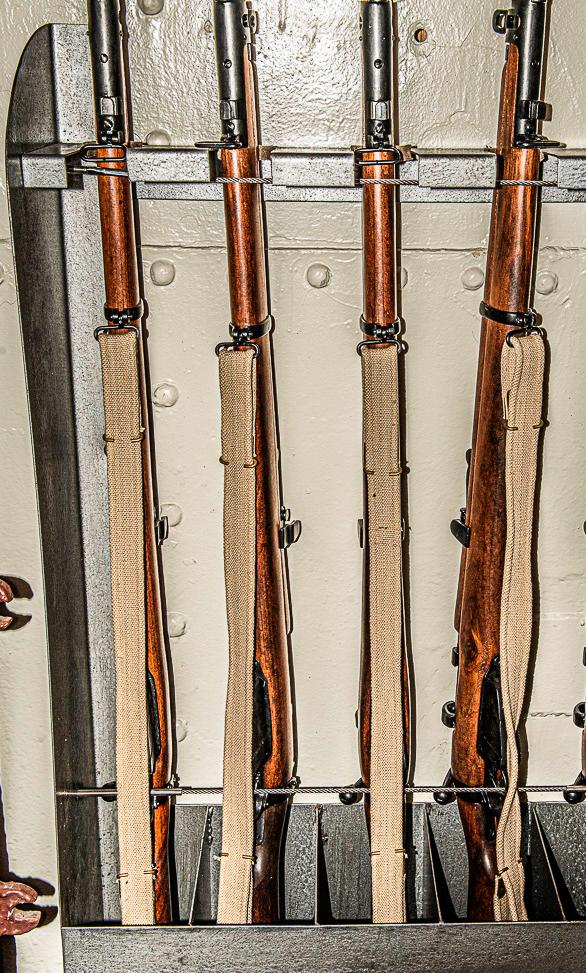
Rifle Rank – Lee Enfield
 View from port side of Bridge
23
Great War, joining the Grand Fleet at Scapa Flow in the Orkney islands, where she served as leader of the 4th Destroyer Flotilla. From February to November 1915 Caroline was part of the Grand Fleet’s 1st Light Cruiser Squadron, moving to the 4th Light Cruiser Squadron in early 1916. As part of this Squadron, and under the command of Captain Henry R. Crooke, Caroline participated in the Battle of Jutland 31 May-01 June 1916. In 1917 Caroline was fitted with a ‘flying off platform’, from which Royal Naval Air Service, and later Royal Air Force, aircraft were launched to intercept German airships over the North Sea.
The Battle of Jutland
The Battle of Jutland was fought between the Royal Navy’s Grand Fleet under Admiral Sir John Jellicoe and the Imperial German Navy’s High Seas Fleet commanded by Vice Admiral Reinhard Scheer. It was the only full-scale clash of battleships in World War 1, and was fought off the North Sea coast of the Jutland Peninsula (Denmark). There had been a period of avoidance of direct naval confrontation after the Battle of Dogger Bank in January 1915. The British had been happy to largely prevent the German High Seas Fleet from taking to the open sea and threatening the British trade routes, whereas the Germans were not eager to meet the Grand Fleet in open battle.
Eventually the Germans decided to lure out, trap, encircle and destroy a significant portion of the Grand Fleet, partly to break the Royal Navy blockade of Germany and partly to allow German naval vessels access to the Atlantic.
Due to earlier capture of German naval codes however, the Royal Navy learned of the Germans’ plans and Jellicoe led the Grand Fleet into position before the Germans were actually ready.
There followed a largely indecisive battle, which both sides would claim as victories. The battle revealed weaknesses in British munitions, explosives and fuse technology, the Germans largely scoffing at the inefficiency of the older technology. Had the Royal Navy kept abreast of developments in naval armaments, they would undoubtedly have sunk many more German ships. Ultimately the British succeeded in their aim of denying the Germans access to the UK and to the Atlantic, but the Germans sank more ships than the British. Eventually the German Imperial Navy realised that direct fleet-to-fleet actions were not going to be successful and turned to all-out submarine warfare.
Royal Navy reviews of the battle generated serious disagreements, basically polarising opinions based on support of either Jellicoe or Beatty; even now debate over their performance and indeed the actual significance of the battle, continues to this day.
Interwar Years
After the First World War, Caroline remained part of the 4th Light Cruiser Squadron. In June 1919 the Squadron was posted to the East India Station. In February 1922, Caroline was temporarily placed in reserve, coming out of reserve in February 1924 to become the headquarters and training ship for the Ulster Division of the Royal Naval Volunteer Reserve at Belfast. As an HQ and training ship, Caroline, was stripped of her weaponry and some of her boilers by the Belfast shipyard Harland and Wolff.
As was common at the time, Caroline’s removed guns were used with those of other decommissioned cruisers to augment coastal and port defences of the Treaty Ports. The Treaty Ports were three deep water ports in the Irish Free State (now the Irish Republic), at Lough Swilly in County Donegal, Berehaven in County Cork, and Queenstown (now known as Cobh) in Cork Harbour. The reason for the Treaty Ports was the recent experience of the British in combatting the German Navy’s U-Boat (Unterseeboot or submarine) campaign during the First World War, and the real fear that it might recur in the future, hence the need for ports to base antisubmarine vessels with access to the Atlantic covering the west and south approaches of Ireland as well as Ulster. The Treaty Ports were returned to Ireland in 1938.
Second World War and Post World War 2
For the duration of World War 2, Caroline remained in port as the Royal Navy’s Belfast HQ. Belfast was one of the ports used by RN warships involved in escorting the Atlantic and Arctic convoys, notably the 3rd Escort Group. As Belfast’s importance grew as a naval base and HQ, Caroline rapidly ran out of capacity and various buildings were also occupied, with eventually several thousand sailors sported the HMS Caroline cap tally. Such buildings included Belfast Castle, and the Belfast Customs House. Other facilities included under the aegis of Caroline included a depth charge pistol and ‘Hedgehog’ repair workshops.
(Hedgehog was an anti-submarine warfare weapon, which fired a battery of 24 spigot mortars in front


25
Officers’ Wardroom
Port Forward Gun – Front View

 ‘Port side - bridge with tripod mast holding director control for the guns.
Port Side – Gun and Lifebelt
‘Port side - bridge with tripod mast holding director control for the guns.
Port Side – Gun and Lifebelt
27
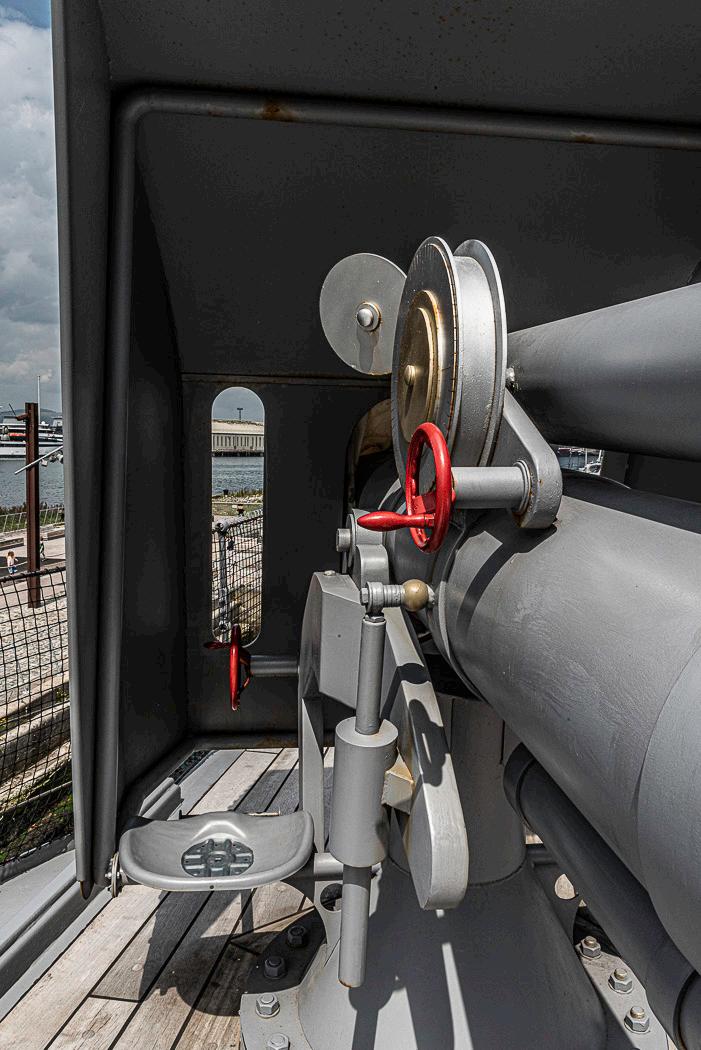
Port Forward Gun - Gunner’s View. HMS Caroline carried 4 x 6 inch guns (and 2 x 3 inch anti-aircraft guns)
of the vessel when attacking a U-Boat head-on. Hedgehog was different to a depth charge in that it was fitted with a contact fuse which detonated when it hit a hard surface, e.g. the hull of a submarine. Hedgehog was much more effective (statistically) then depth charges.)
Caroline was also the unit which administrated the Fleet Air Arm personnel stationed at Belfast Harbour airfield (also known as Sydenham) which operated under the control of RAF Belfast. Eventually the airfield passed to Royal Navy control and was commissioned (in 1943) as HMS Gadwall. After the War, Caroline once again reverted to being a Royal Naval Volunteer Reserve (RNVR) establishment, and was the RNVR’s last afloat training base. In 1951, Caroline underwent a refit at Harland and Wolff’s shipyard.
In December 2009, the Royal Naval Reserve Unit moved ashore and recommissioned as the shore establishment HMS Hibernia. (RN shore establishments are sometimes referred to as ‘stone frigates’.)
On 31 March 2011, HMS Caroline, the last surviving warship from the Battle of Jutland, was ceremonially decommissioned with full Naval pomp and ceremony, and her ensign was formally laid up in St Anne’s Cathedral in Belfast.
HMS Caroline Museum
Upon decommissioning, Caroline was placed under the care of the National Museum of the Royal Navy at Portsmouth, whilst various schemes were mooted as to what to do with Caroline. These ranged from completely restoring Caroline to WW1 appearance, including restoring her 6 inch and 4 inch guns and removing the large deckhouse from her midships, and moving her to Portsmouth. In 2012 those plans were confirmed, but in October 2012 the Northern Irish Government announced that the National Heritage Memorial Fund had pledged £1million to help to restore Caroline in Belfast and that, therefore, Caroline would indeed remain in Belfast.
Further funding was secured with a grant of £845,000 from the Heritage Lottery Fund, supporting the conversion work as a museum, with a further grant of £12 million to turn Caroline into a visitor attraction in time for the centenary of Jutland in 2016. Caroline still retains some 85% of her original construction, and is now largely configured as she was during the Battle of Jutland in 1916. This conservation work included the reinstallation of her large guns and torpedo tubes.
The original features include the living quarters, engine rooms and turbines, the compasses and telegraphs on the bridge, and the Captain’s cabin, senior officers’ cabins and sick bay.
HMS Caroline was opened to the public as a museum ship in June 2016. She is still moored in the Titanic Quarter of Belfast, in Alexandra Dock, and remains a vitally important part of the National Museum of the Royal Navy and of our naval heritage.
About the author.
Shaun Parkes is 59 years old and lives in Lincolnshire. Married with an adult daughter and 3 granddaughters, he is from an RAF family, is a keen photographer and enjoys reading military history. As ‘third generation RAF’ he held a Commission in the Training Branch of the RAF Volunteer Reserve, retiring as a Squadron Leader in 2018, and was an instructor and Staff Officer with the Air Training Corps for over 34 years. He still volunteers; as a Committee Member on the Archaeology and Heritage Special Interest Group, as the Distribution Co-ordinator for Heritage Photography journal, and as the Military Heritage Co-ordinator; as resident photographer for the local park run at Belton House in Grantham; and as a club photographer for Lincoln Rugby Club, especially team photographer for the Ladies Rugby Team. Holds the photographic distinction LDPS (Licentiate of the Disabled Photographers Society) and is currently a student on an MA (Photography) course.


29
Side
Port
21-inch torpedo carried by HMS Caroline to attack enemy ships. HMS Caroline carried 4 x 21-inch torpedo tubes.
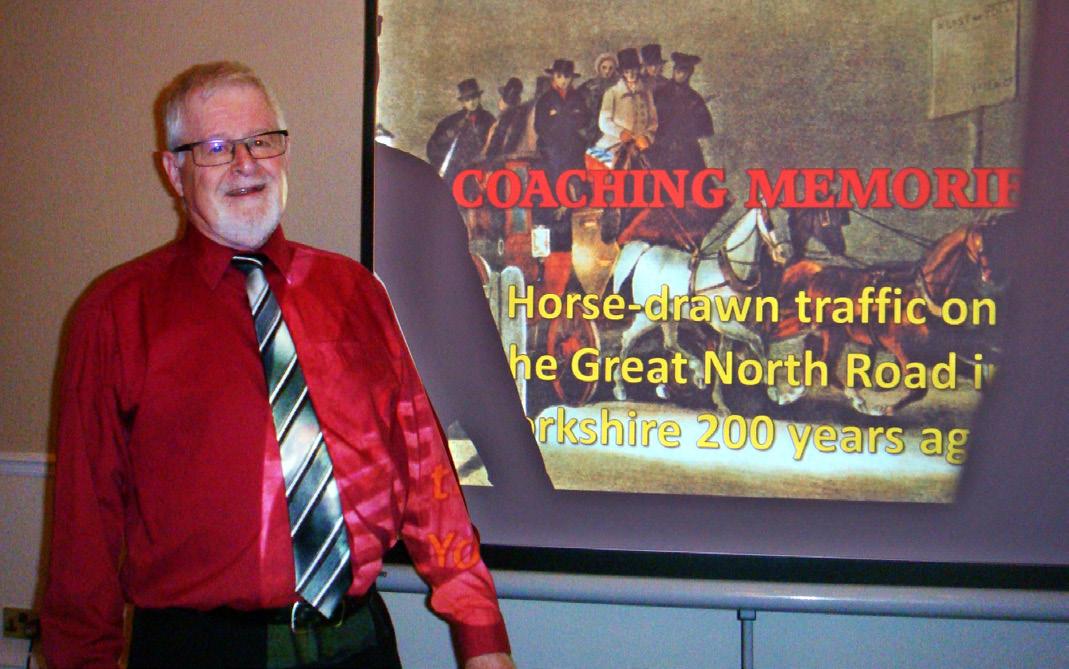
Projecting Heritage Images
I have been attending conferences, lectures and illustrated talks since 1957. Two years later, I shot my first colour slides and determined to begin giving talks.
ERIC HOULDER LRPS
Author prsenting “Coaching Memories” Credit: Friends of Harrogate Museum

To begin with I read a lot of magazine articles on slide projection, and researched early literature on magic lantern presentation. I was quite lucky in this regard as at one point I had a reader’s ticket for the British Museum library which I put to good use. It is surprising how useful the older techniques were. Our Victorian forebears realised that the best background for projected images was dead black; it still is! They also preferred a proper blackout, especially for colour: it still is preferable! At 81, I am still an inveterate lecture goer. Some lectures have remained in my memory like the two described below. They epitomise the best and the worst of projection:
One of the best took place in the ‘50s. The speaker was an academic from a top university - Leeds. He was actually a grammar school contemporary of
my father! He sat behind an Aldis push-pull slide projector and had half a dozen slides in a small yellow box (remember those?). Each slide was used several times, to illustrate a different point each time. He faced the screen, but his voice was completely audible all over the room, and the slides were good. Everyone went away informed, entertained, and more knowledgeable. He was truly a professional.
A more recent presentation involved another academic from the same university. He stood half facing his audience whilst a series of PowerPoint slides was projected from an inadequately-powered projector on to a small screen. Each slide contained nothing but text, and the speaker simply read it out. This was a most unsatisfactory meeting. Even had the projector been adequate, the talk could not have been improved except by a complete re-think
FEATURE
and replacement of the images. Your audience deserves better than this, so if you have been asked to give an illustrated talk the hints below should help. You should at least avoid the problems outlined above.
SLIDE BASICS
There is still a lot to be said for slides. Photographic magazines have imparted instructions for slide presentations for as long as slides have been used. I have added to this corpus on several occasions, but the basics still need to be emphasised, as every day another nervous tyro begins to put together a talk. Firstly, you need a decent projector, which in fact means a Kodak Carousel or derivative - with a spare bulb to hand. These machines are distinguished by having a metal-based horizontal magazine for 80 or 140 slides. Few other slide projectors have the requisite power or stamina. A remote control is desirable, with an extension cable or infrared remote if necessary. When it comes to slides, they must be of good quality neither too light nor too dark, with straight horizons and vertical buildings – no dizzying sloping churches! No more than 100 images per show please. Title, intermediate titles, maps, diagrams and a closing slide should be made – I gave instructions for this in the’70s, so no excuses. Nowadays, all can be easily produced on the computer and printed; A4 is a useful size. Most modern film cameras will focus close enough to copy maps and diagrams. Just set the ISO to 2/3 of the actual film speed before beginning.
Slides need a really good blackout even with a powerful projector. I once had to cancel a presentation at a local organisation, as the room was just not dark enough for slides even with my Ektalite machine; they have since forgiven me - I hope! Still with slides, they come in vertical or horizontal formats, so a square screen is needed, and of course a decent laser-pointer, not the pathetically weak instruments I have seen built into pens. The type which will down a jumbo-jet should only be used if you are familiar with its use, and are unlikely to blind the audience and passing traffic. Avoid facing the screen when speaking, and at all costs, avoid reading from notes. The images themselves should act as prompts.
POWERPOINT BASICS
Assembling a PowerPoint (or lookalike) show is gratifying and quite easy when you become used to the process. Before beginning, assemble all the illustrations in one folder on your computer desktop. Edit each image for brightness, sloping horizons, keystoned images, poor colour etc. in an editing program. If your images are a mixture of horizontal and vertical, create a square format template to begin with. Otherwise choose the default 4-3 proportioned template; this is perfect for nearly all digital camera formats. Whilst selecting a format you must choose a background
colour, and this where the novice always comes a cropper and the problem is caused by PowerPoint itself. The program allows a wide choice of background, oblivious of the fact that projected photographs always look better against a black background. Any other background dilutes the colours. (The converse is true of Prints in a light room, which always look better with a white, cream, or neutral background.) Another point to watch here is the style of change; I was once made dizzy by a show in which the changes simulated pages turning – very unpleasant for those on the front row! An instant change or a medium dissolve is perfectly adequate, and more professional. Up to 150 images is usually sufficient. Remember to create a main title which includes your name, with intermediate titles and a closing one. Maps and diagrams are often better reversed to a negative image, which avoids dazzling the audience; look for solarise in your editing software. Names, dates, and even mugshots can be added as fly-ins. Adding sound and movie-clips is possible, but more difficult, so leave this until you are more competent. When all is finished, save it onto a memory stick as a PowerPoint Show.
To project your PowerPoint you need a laptop – I use an old one – and a projector. The latter must have sufficient power, but as with slides a good blackout helps. The type designed for home projection is rarely adequate. Look at the projectors used by visiting speakers, and ask them about their satisfaction – or otherwise. Older projectors accept their input via VGA sockets, but later ones use HDMI. A simple adaptor is available quite cheaply from good computer shops. A presenter is essential, and they start at about £12. They come in two parts: the sender, and the handset, which usually has a laser-pointer incorporated. You plug the sender into a USB on the laptop, and hold the handset at your position in the front; a line of sight is generally desirable for most presenters, but I find all mine work well when bounced from the screen or even the ceiling. On first use, the presenter has to install its software on the host machine, so allow a few minutes for this.
Several spare batteries for this and any separate laser should be to hand. Spare digital projector bulbs are rarely carried today, when the lamps have such a long life with screen warnings of eventual failure. When I suggested to my wife that I should carry a spare bulb, she asked how long they were supposed to last, and how much they were. I replied, “About 4000 hours and £100” She then closed the argument by saying sweetly, “... and how old are you, Eric?”
Digital projectors nearly all have settings to correct the image for keystoning, so a low table rather than an old-fashioned high stand is desirable. Learn how to use this setting before you need to. Nothing looks as bad as keystoned images in a digital presentation. Good Luck!
31
 Rufford Abbey, Nottinghamshire through the Lens Ball, MIchelle Yates
