10 minute read
Panels and process - not just for distinctions

joe houghton
Dublin-based Joe Houghton takes many great shots, but that’s just the starting point for producing a great panel of images.
Are panels a part of your normal creative expression with your photography? Or are they something you primarily associate with ‘getting your L’ or other distinctions? Are they a ‘dark art’ you haven’t really explored as yet - something that you maybe see more advanced photographers doing but which seem a bit of a challenge? If you’d like to come along for a few minutes with me today, I’d like to share my image making process, and explore the idea of using panels as an added step to our normal workflow as photographers, of any experience level, when making our images. An added experience which - I find - adds another dimension to my thinking and appreciation of the images I make.
For many years now I’ve made it a practice to become more conscious of the process and flow of making my images. Perhaps as I get older and appreciate time passing more, this is a natural progression?
kit choice
The first stage of this process for me is planning for a shoot, and by shoot, I mean any kind of photographic outing, be it a walk in the park with Penny and the children, a day out to the coast for long exposure work, a night walk with students or even a client shoot. What lens(es) will I take, what kind of images do I plan to make today? I almost never leave home with more than 2 lenses anymore - gone are the days when I loaded up a heavy backpack with all my gear ‘just in case’. But I may need my tripod, some filters and a remote release for instance, or I may not. Nowadays I find myself being far more intentional and accepting of the constraints that my choice of lens and equipment bring to the shots I can capture. I find that my inner eye is more sharply focused when I have self-imposed constraints such as shooting with just a 50mm prime, or a wide angle 12mm.
The shoot
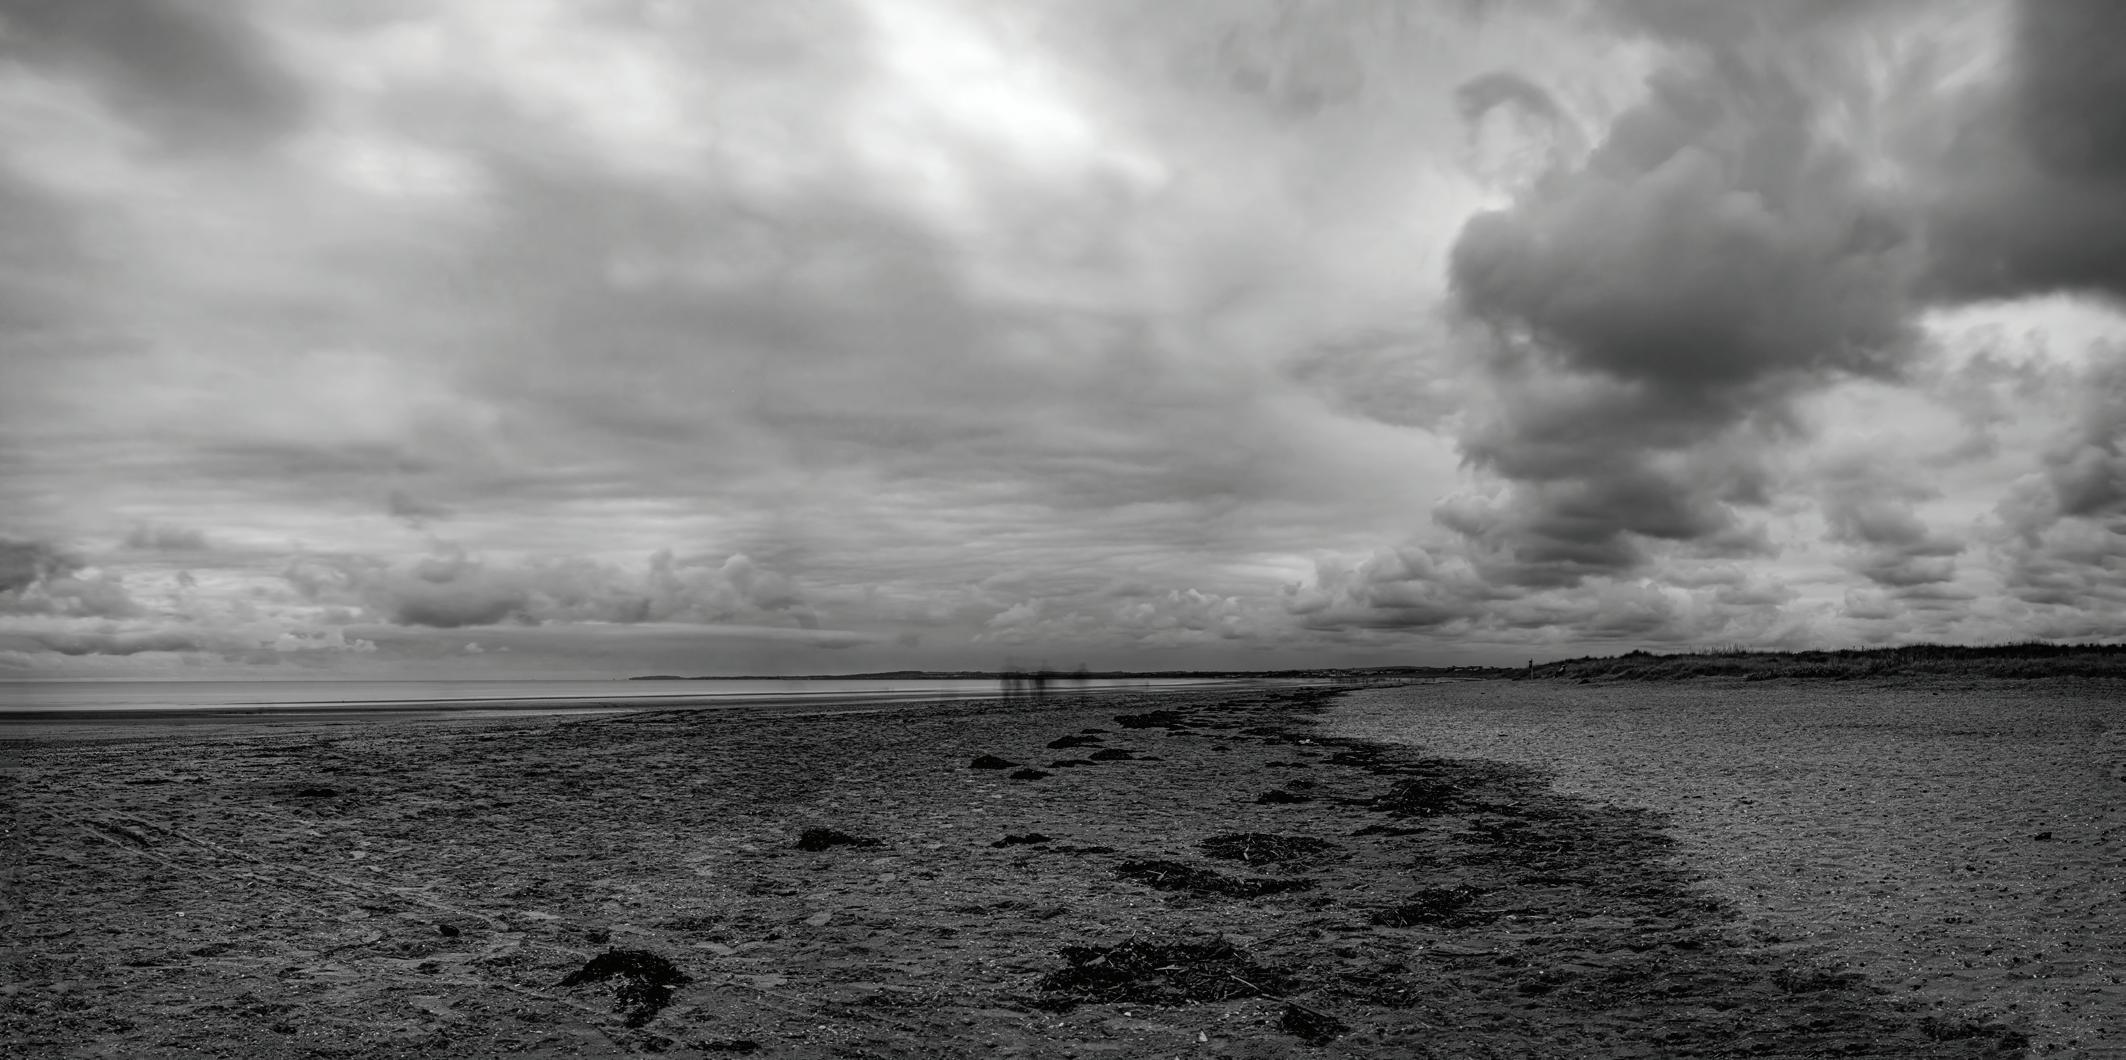
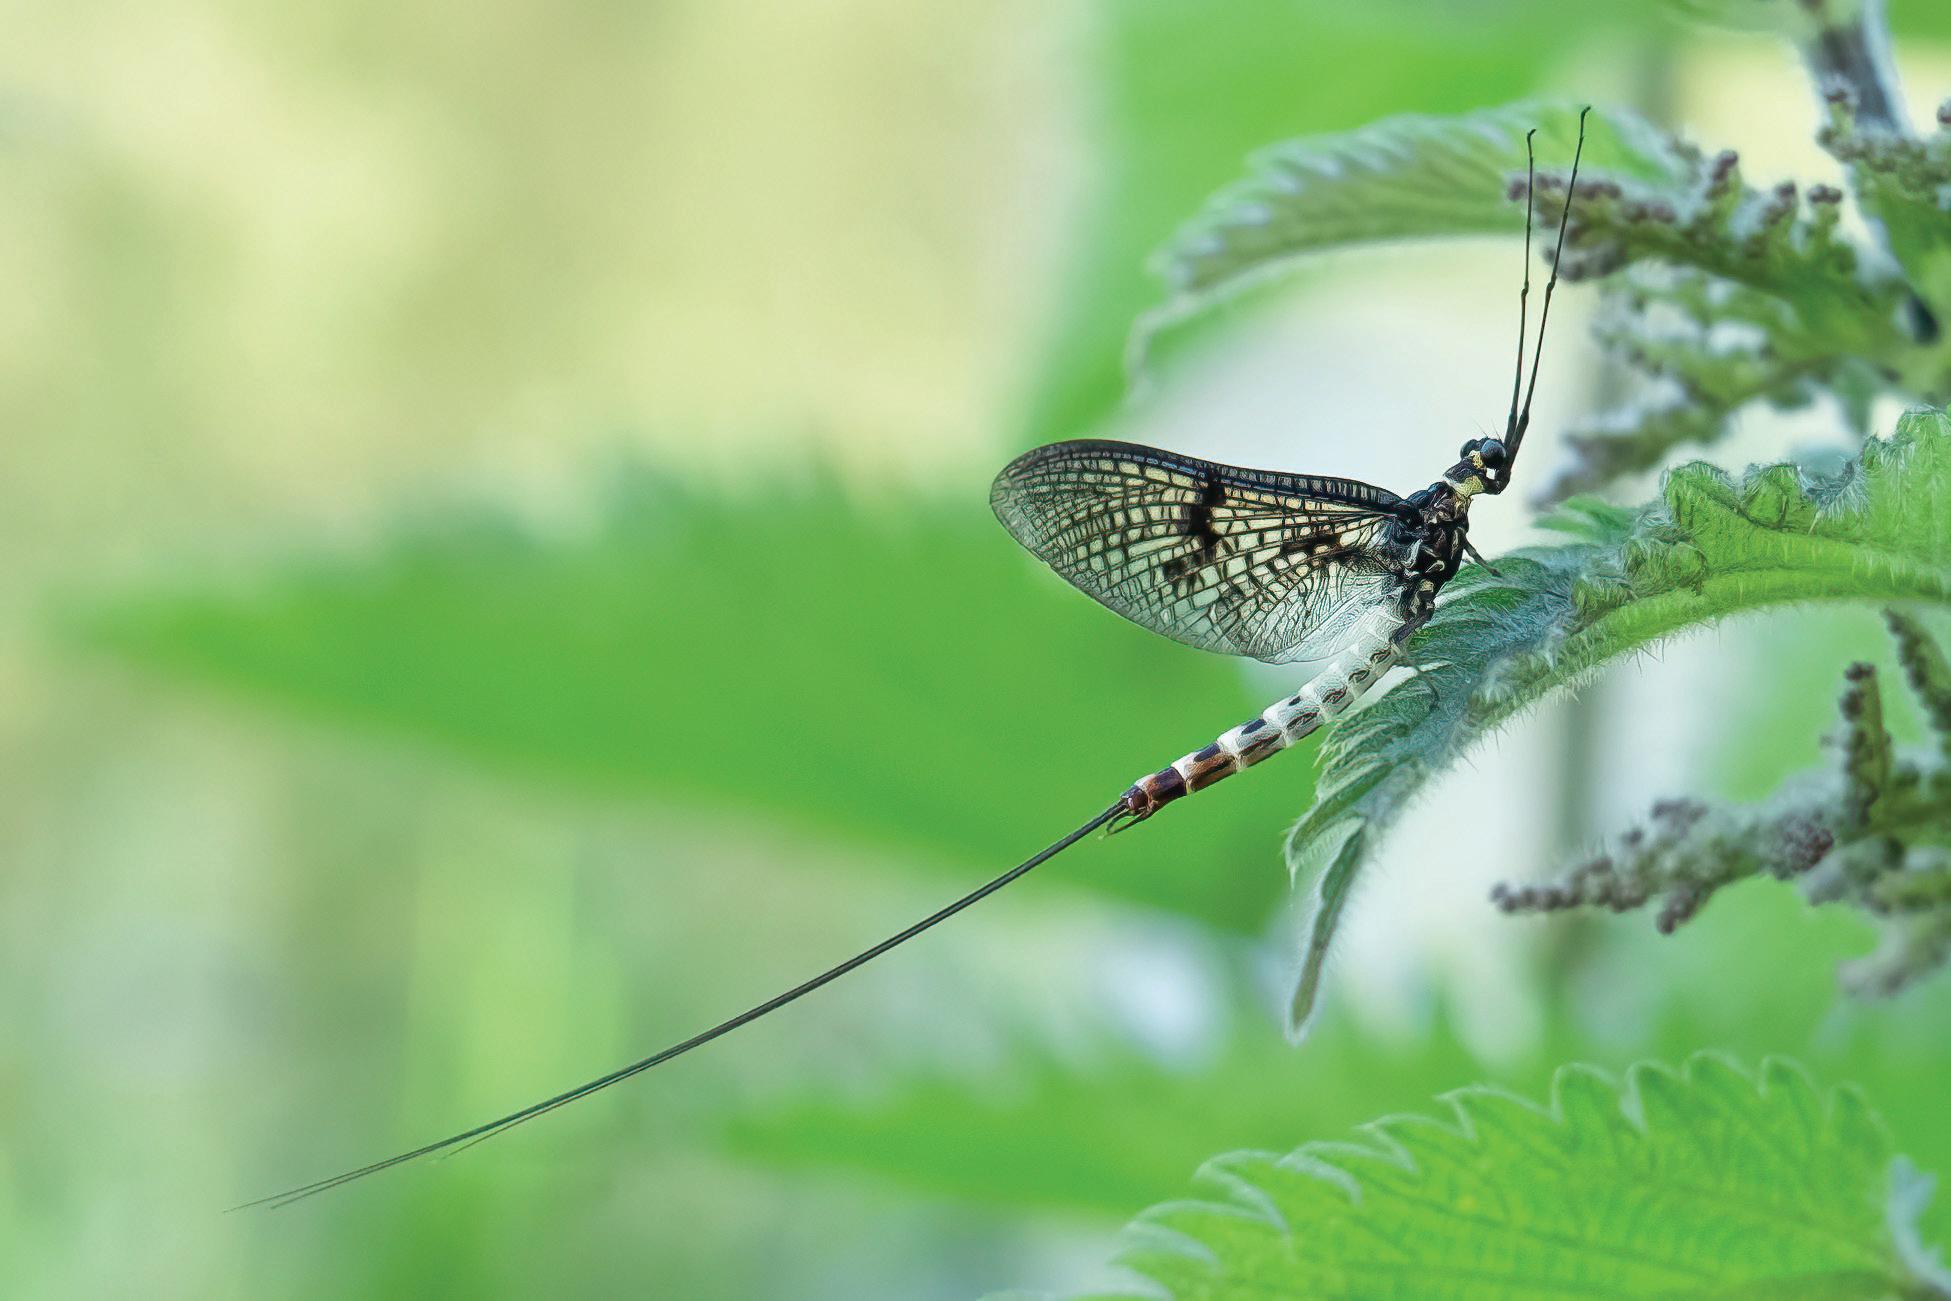
The next stage of the process is being out actually shooting. I strive to ‘see’ the scenes around me with the focal lengths in mind of the lens I have mounted, mentally processing the views and seeking compositions which will work within the field of view of the lens. And even if I’m using a medium or long lens, there’s always the possibility of shooting a panorama series if a particularly enticing vista opens up, that needs a wider angle than I brought. Mornington vista (top) is a panorama of 11 vertical 27mm shots taken handheld with a 1/3 overlap then stitched together later in Lightroom. And the same goes for close-ups - zooming with your feet is an underused skill these days for many used to superzooms. The mayfly (above) image from last year was shot with a 27mm lens - not what you would go out with if planning to shoot such tiny creatures. Being aware of the possibilities in the next stage of the image making journey also allows you to be creative when out with your camera.
post-processing
And that next stage is of course, post-processing. I’m one of those people who loves post-processing, which is probably why a good number of the talks I give to clubs around the world are on Lightroom and other software. It’s really useful to understand the capabilities of the various programmes we have access to these days, be it Lightroom and Photoshop - the workhorses of most people’s processing - or newer tools like Affinity, Luminar, NIK and Topaz. Knowing what these tools can bring to your post-processing enables you to make decisions when capturing the shot so you can then take maximum advantage of the post-processing. One example of this is shooting big buildings. Leaving more space around them than you might initially want to is a good practice. If your verticals are keystoned - as is often the case - the process of applying the verticals corrections in post means that you tend to lose areas from the outside of your frame as the image is distorted. In my shot in Notre Dame (next page, top) that I took in 2009, notice how we lose the chandelier on the left once the columns have been made vertical. I can almost hear the purists grumbling about ‘getting it right in camera’! But I don’t have a tilt-shift lens, and perhaps only have a few minutes here on a day out with the children, so shooting wide, knowing
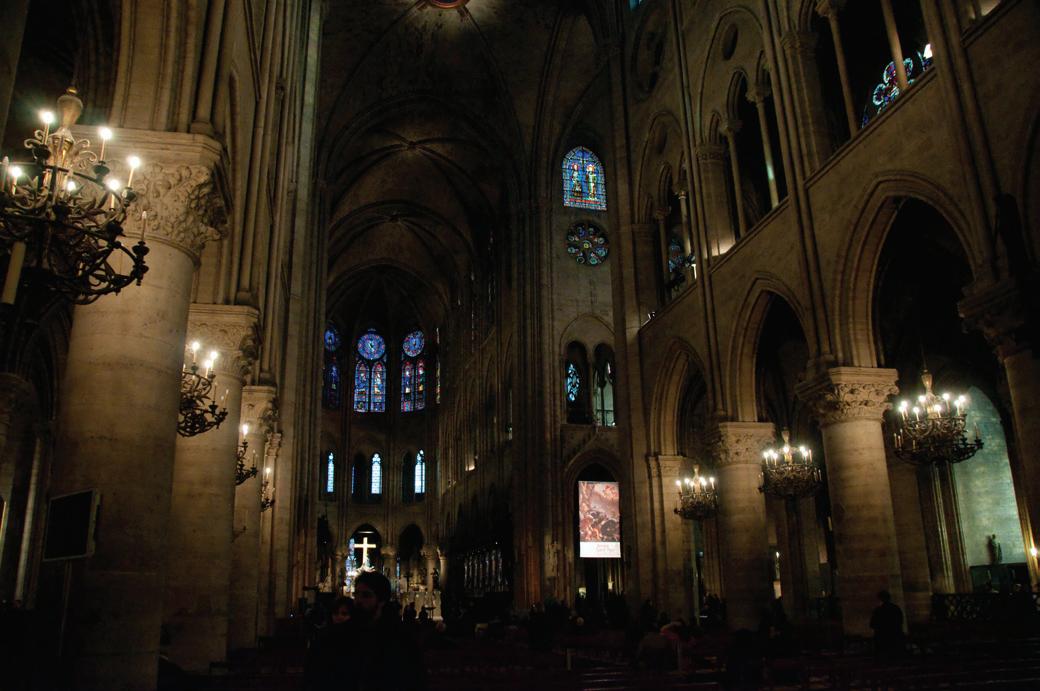
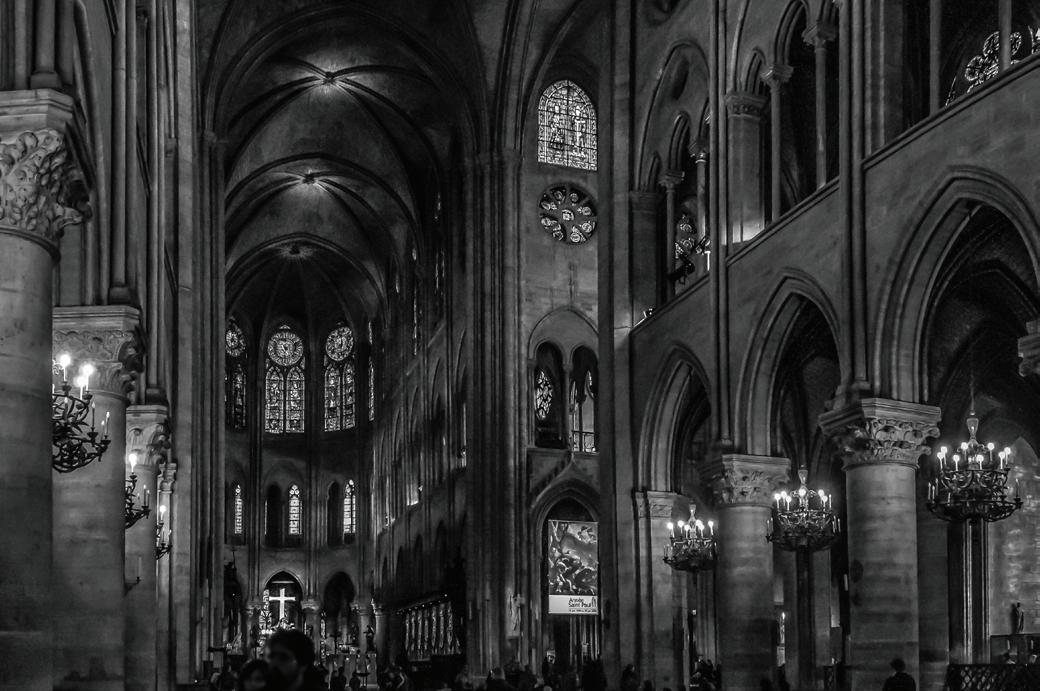
Notre Dame interior 2009 - original shot (left) and after post-processing (right) Nikon D300, 18mm, 1/30th sec @ f/4, ISO 3200
I will have the ability later to crop or fix means I get a shot that otherwise I wouldn’t.
I went out on a hide shoot last November. Ireland in November is generally pretty dark, and so to get acceptable shutter speeds to capture birds in flight or jumping pine martens you have to use ISO settings of 6400 or even higher, certainly with my relatively slow Tamron 150-600 f/5.6-6.3 lens. Bringing these images back into Lightroom, you might initially think - too noisy, no good, and consign them to the bin. But advances in software in the areas of noise reduction, sharpening and upsizing have been significant in the past couple of years. Topaz, OnOne, DXO and NIK all offer excellent options for improving and resizing images, which mean that your ‘unusable’ shots now have far
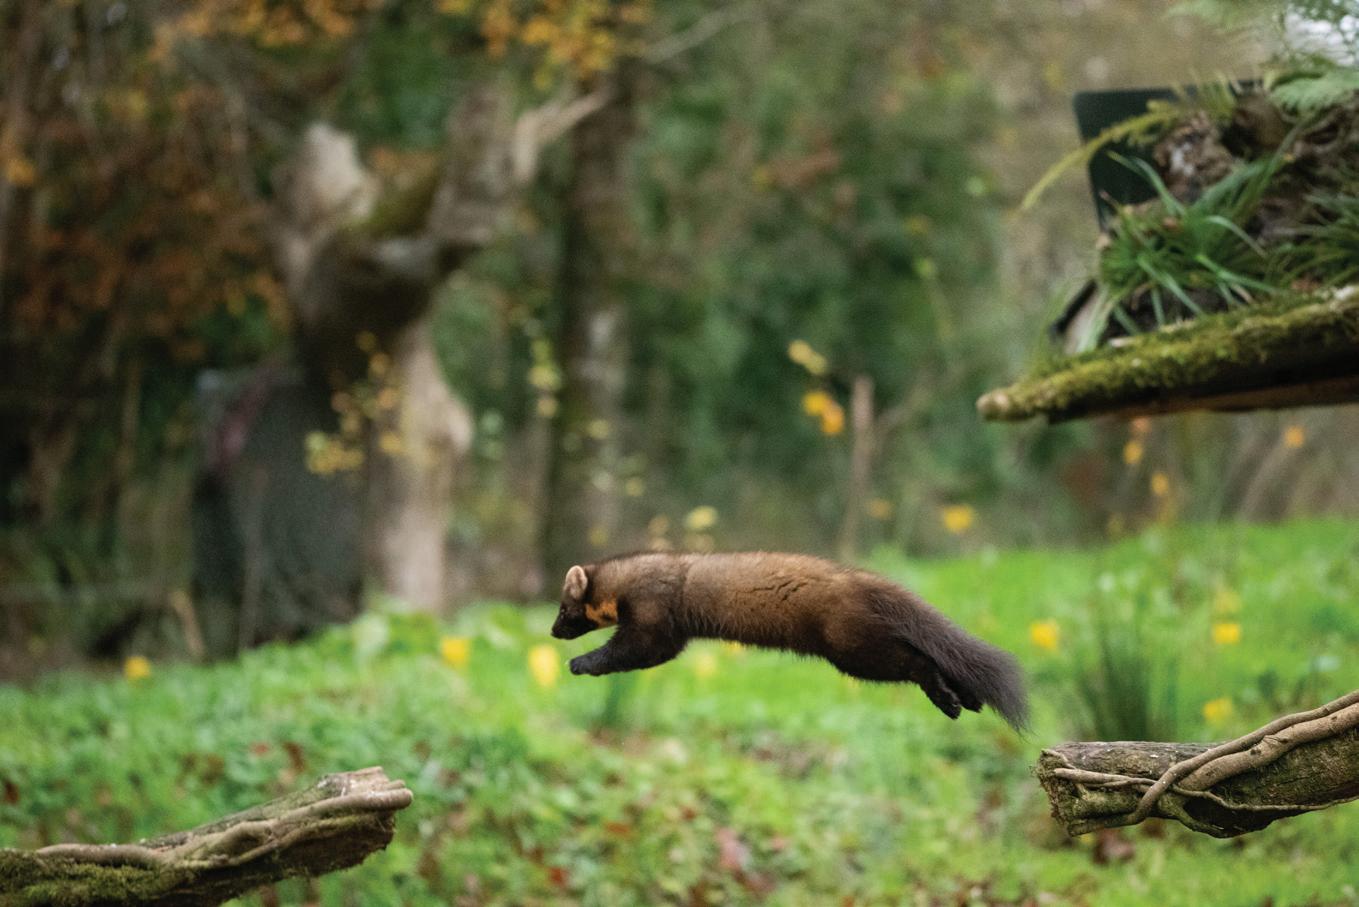
Pine marten leap - note the noise Nikon D810, 1/2000th @ f/5, ISO 8000
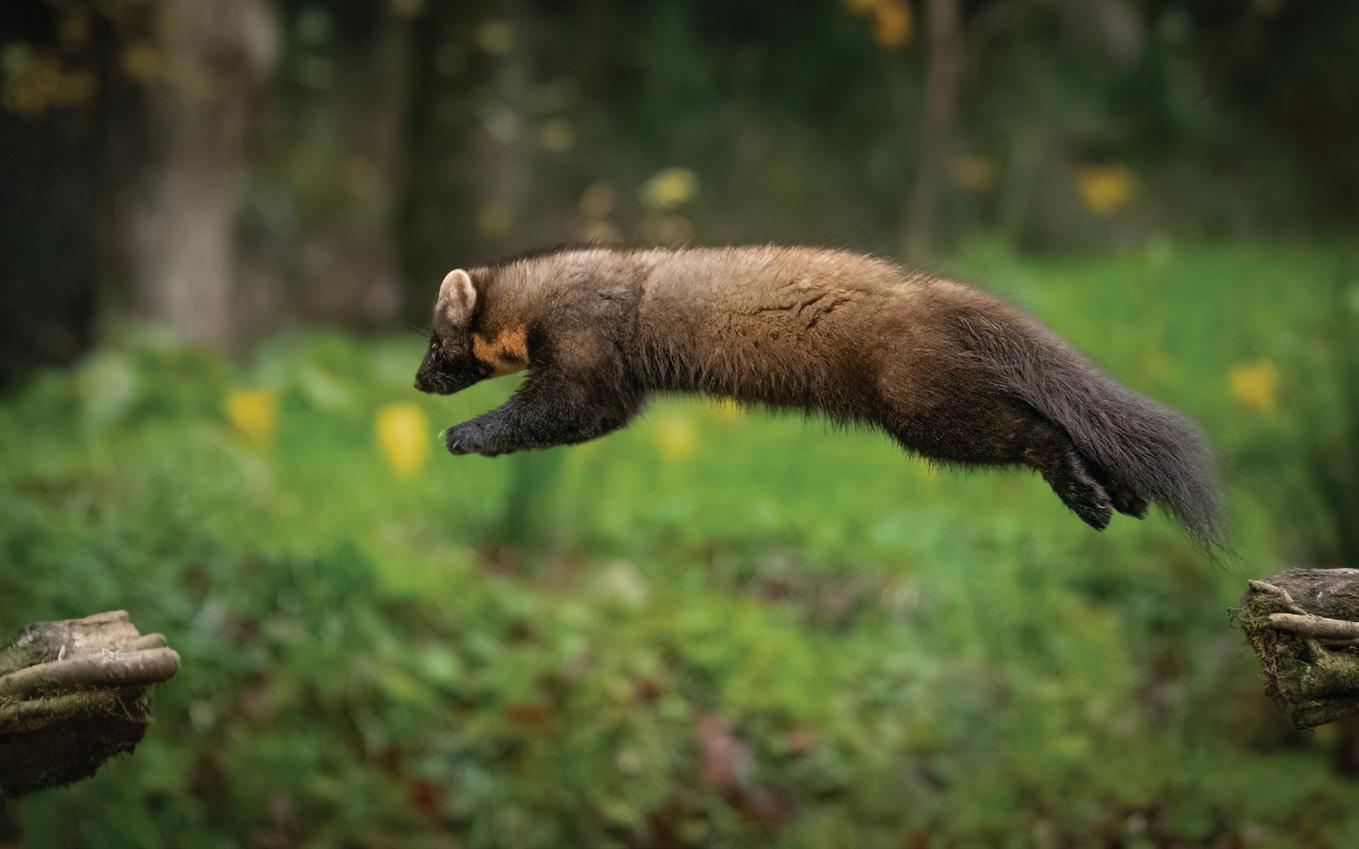
Pine marten leap after Topaz AI Sharpen and resizing Nikon D810, 1/2000th @ f/5, ISO 8000
greater potential for being made into final images of a high enough quality for club or competition entry. I’ve even created a new talk on the whole process using that hide shoot set as the basis for the evening, showing the whole workflow from import, choosing candidates and then editing using Lightroom and Topaz to produce clean, noise free images. And this is where most people’s workflow ends, with their finalised individual images, which are then consigned to the vaults of their hard drive, or perhaps used as club or competition entries or more likely, social media posts. How many images these days end up in physical form as prints, or photo books I wonder - probably very few?
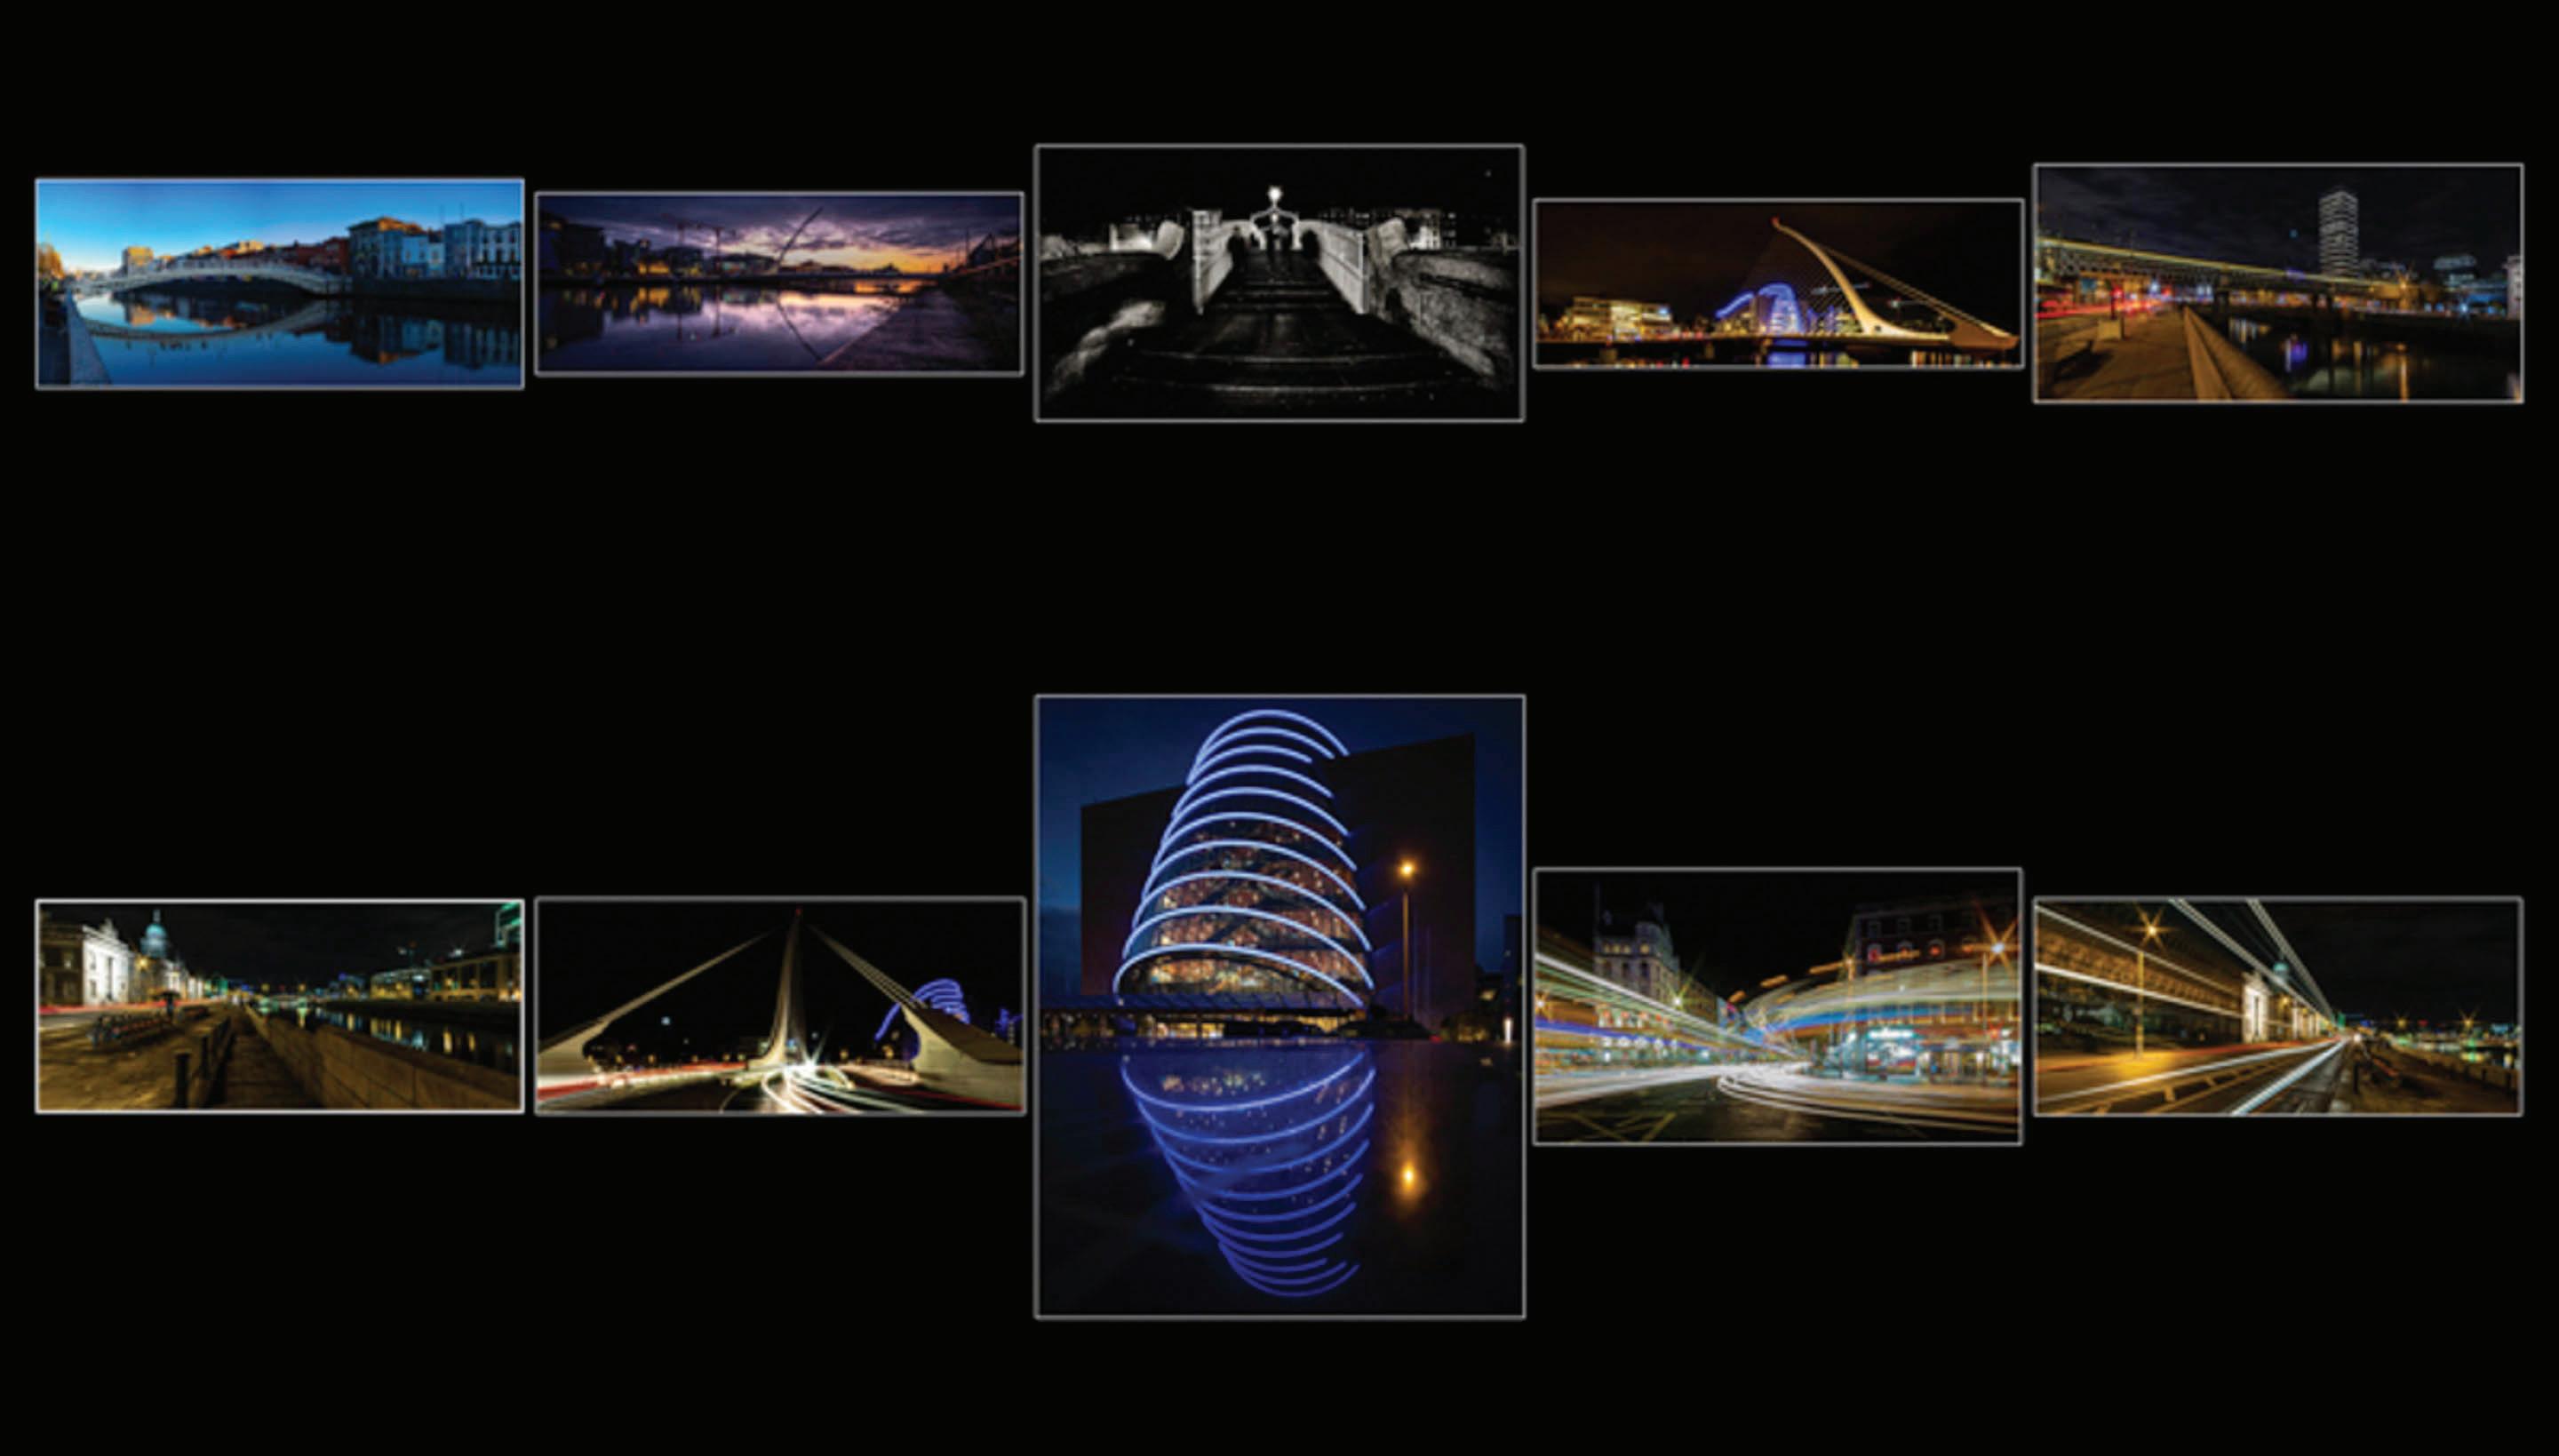
Creating a panel
I’d like to persuade you to add another stage to your workflow. Assemble the ‘keepers’ from your shoot - the ones you have marked as ‘good’. They may have been processed, or not - sometimes images come out of the camera perfect - they don’t all need manipulation!
Why?
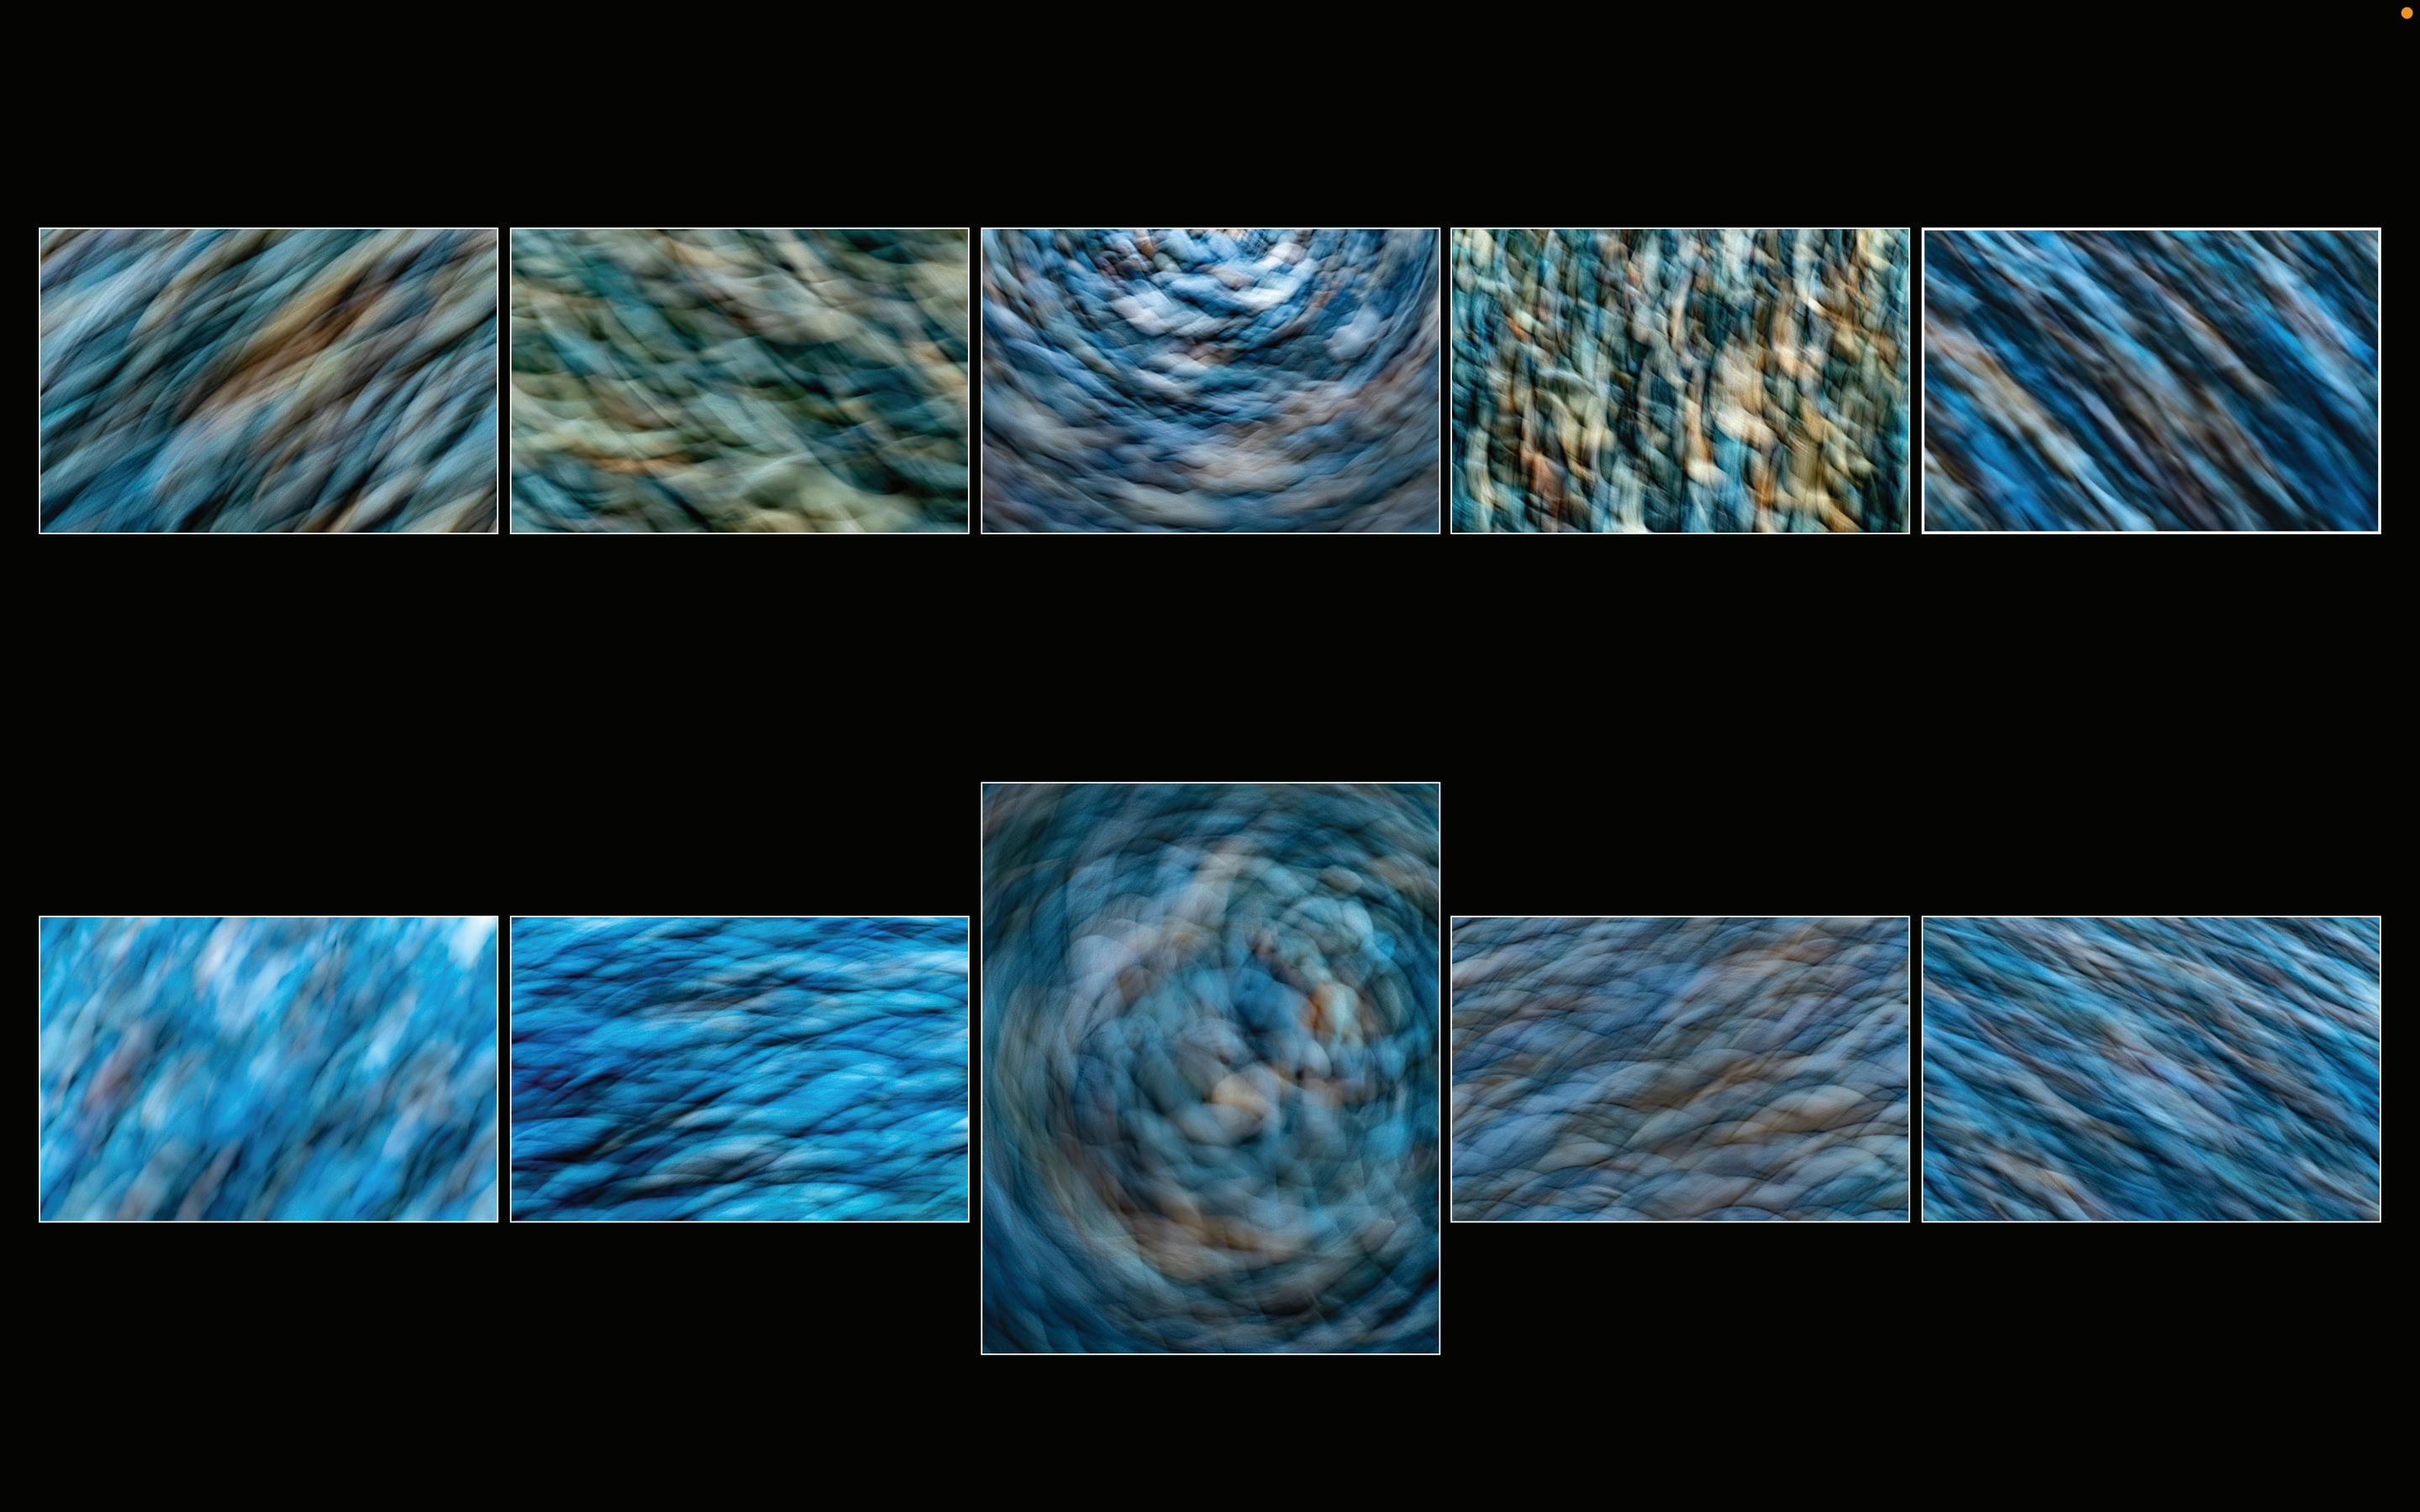
Let’s start with the why before I take you through the how… In my Pebble textures panel (above), the individual images are wonderful. They are your expression of that moment, that scene, and each stands alone as a fragmentary memory. A panel can be more than this. Because a panel consists of multiple images - it could be 3 (a triptych), it could be 15 or even more - you can convey more. More story perhaps, or more depth of detail. A deeper exploration of a theme, or a feeling, expressed in multiple images which together sit and cohere. I like to think of the final panel almost as an image in its own right - and many of my panels are added into my rotating screen-show on my computer, so when it kicks in, they appear, reminding me of the day and the varied scenes I found myself in. A panel can - as in the case of the distinction panels - show that you are capable of achieving a level of work across a number of images, but that is by no means the only reason to put one together. Many times I create a panel to tell a story - of a party, or a walk, or a day in a special place. I can mix different format images, even colour and mono, and offer a deeper representation that any single image might do alone. And mentally, the act of creating a panel gives me the chance to spend time with the individual shots assessing them in a different way. Sometimes my ‘best’ image doesn’t make it into the panel because it doesn’t fit well with others from my collection. I am able to reflect on the whole shoot experience, to meditate on the coherence and flow of the images as I attempt to present a set pleasing to the eye. This is, for me, one of the highlights of my whole process.
How?
This next bit is how I organise my panel in Lightroom. You could also print out small versions of your images and do this on a tabletop - that also gives a lovely, tactile sense of your photos which can be a wonderful feeling too. But for speed and efficiency, I normally do u

Halloween panel
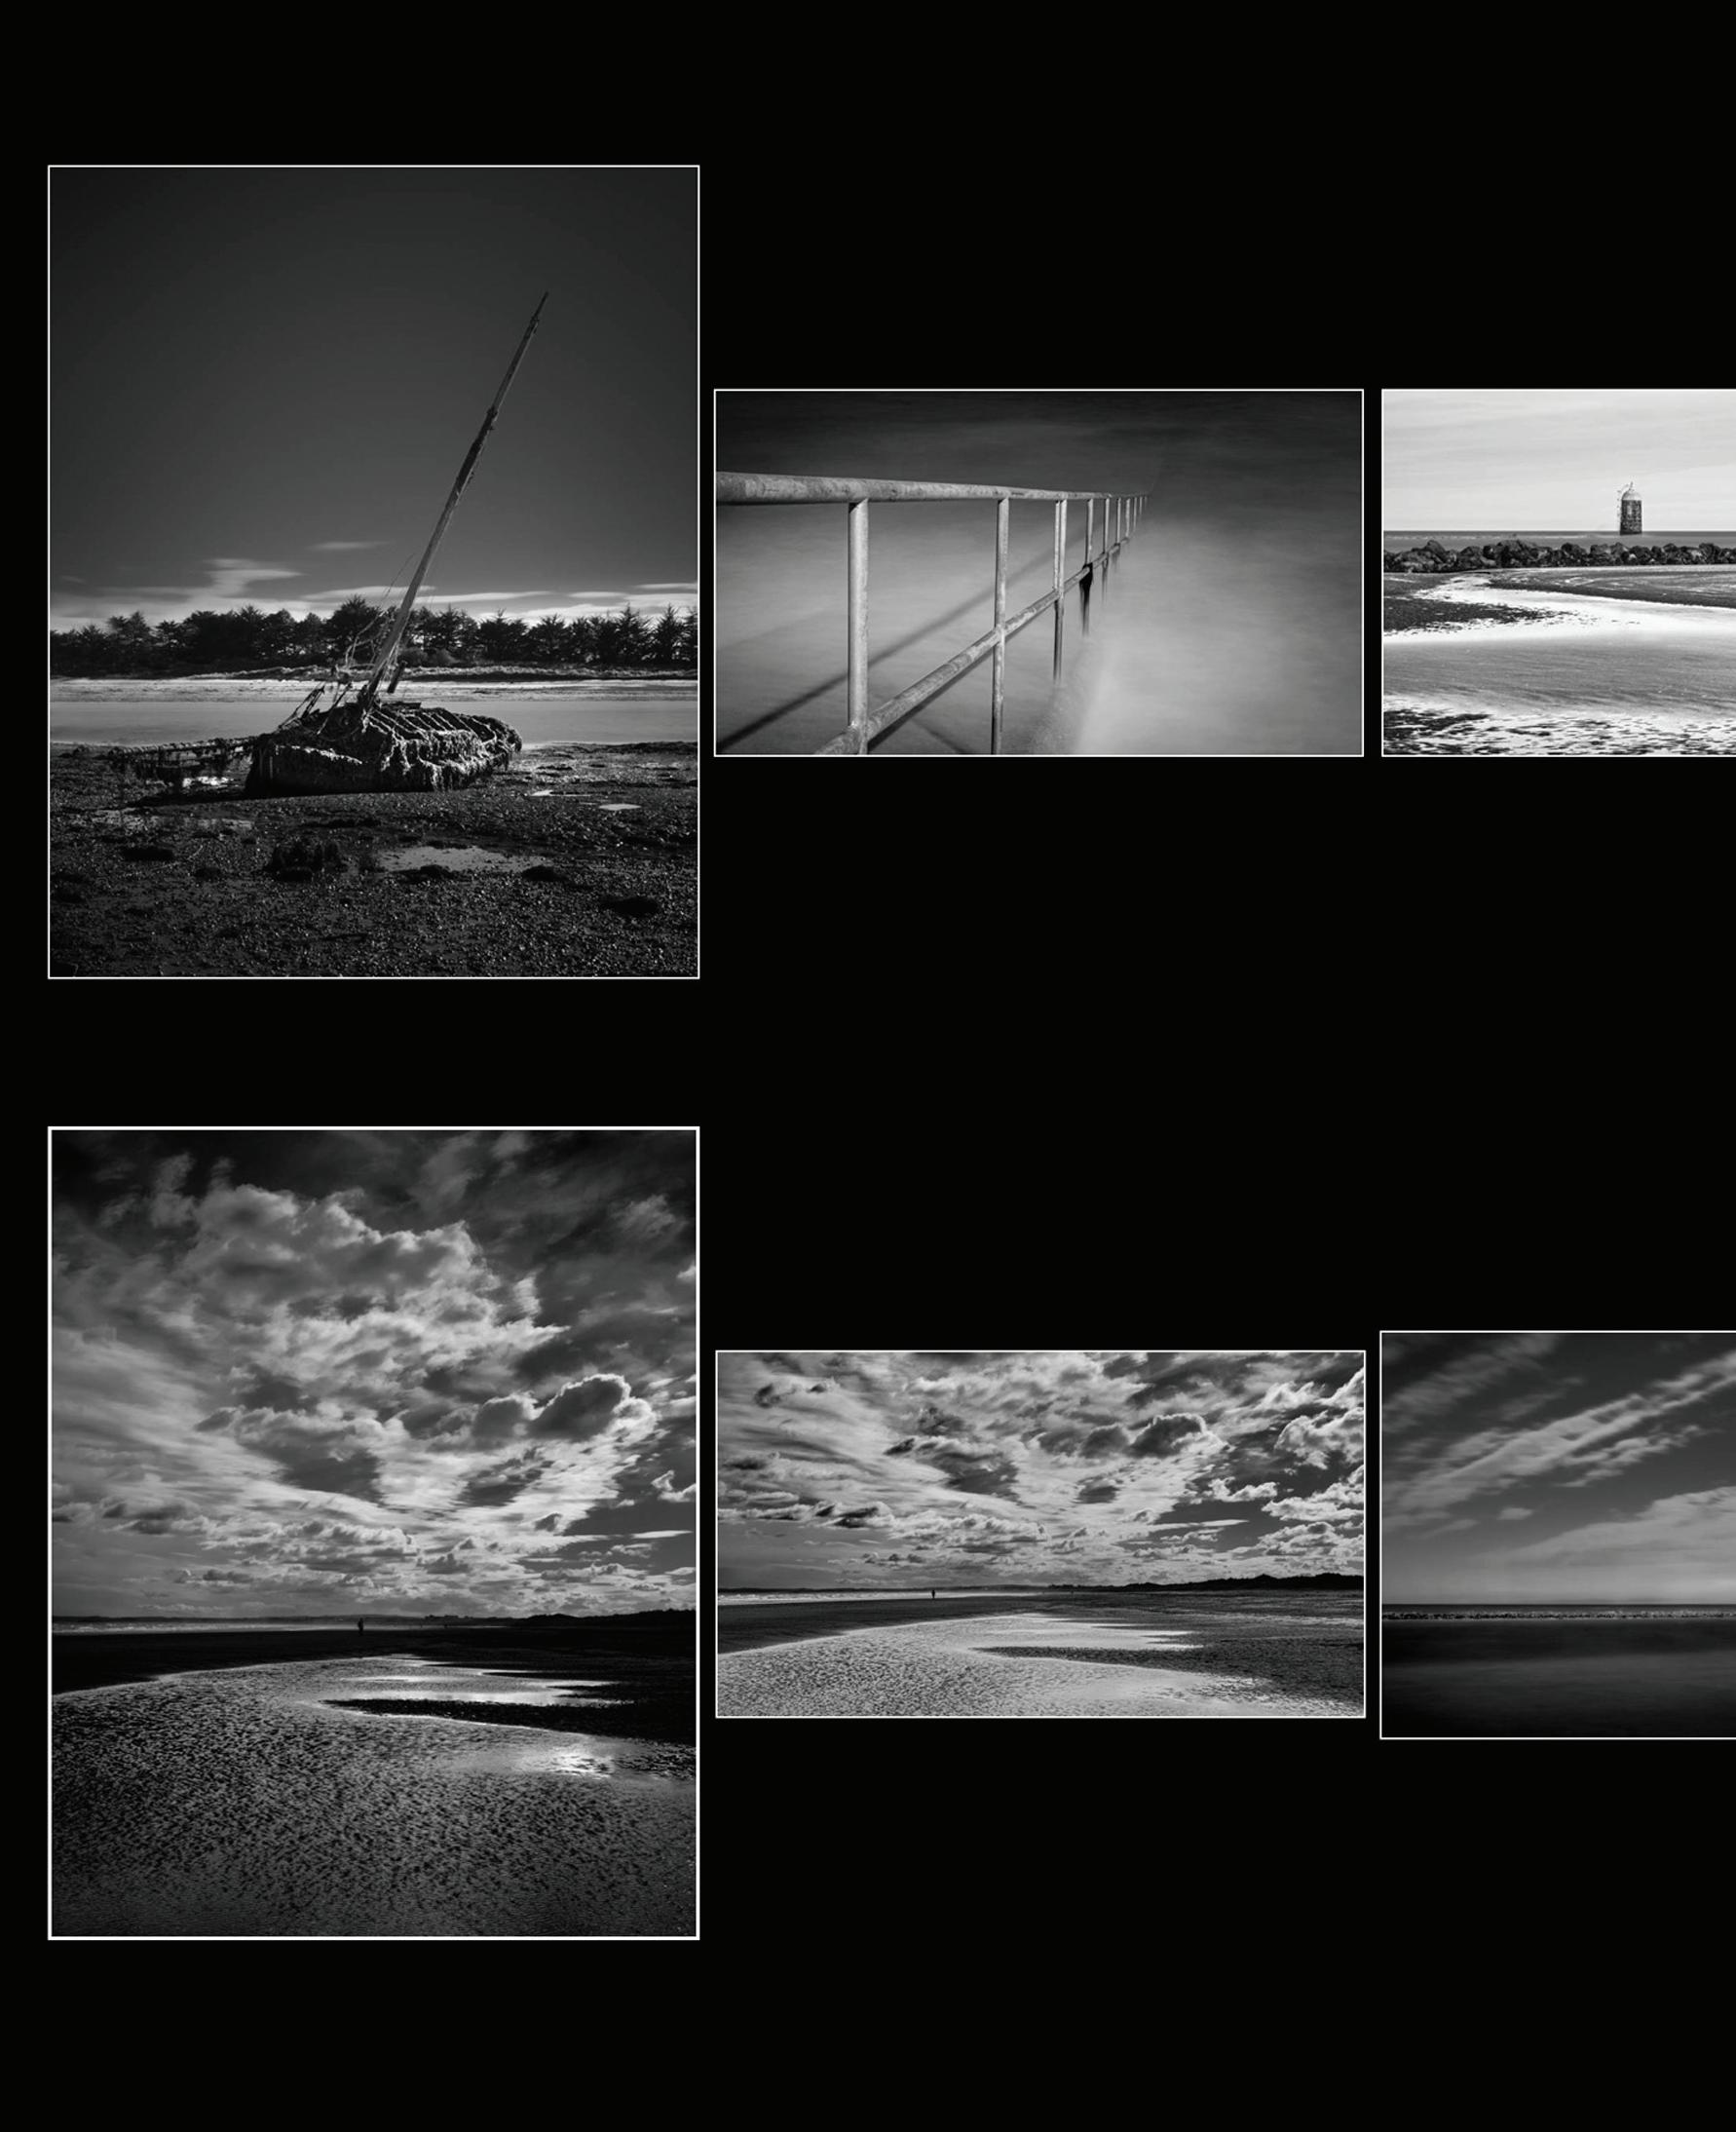
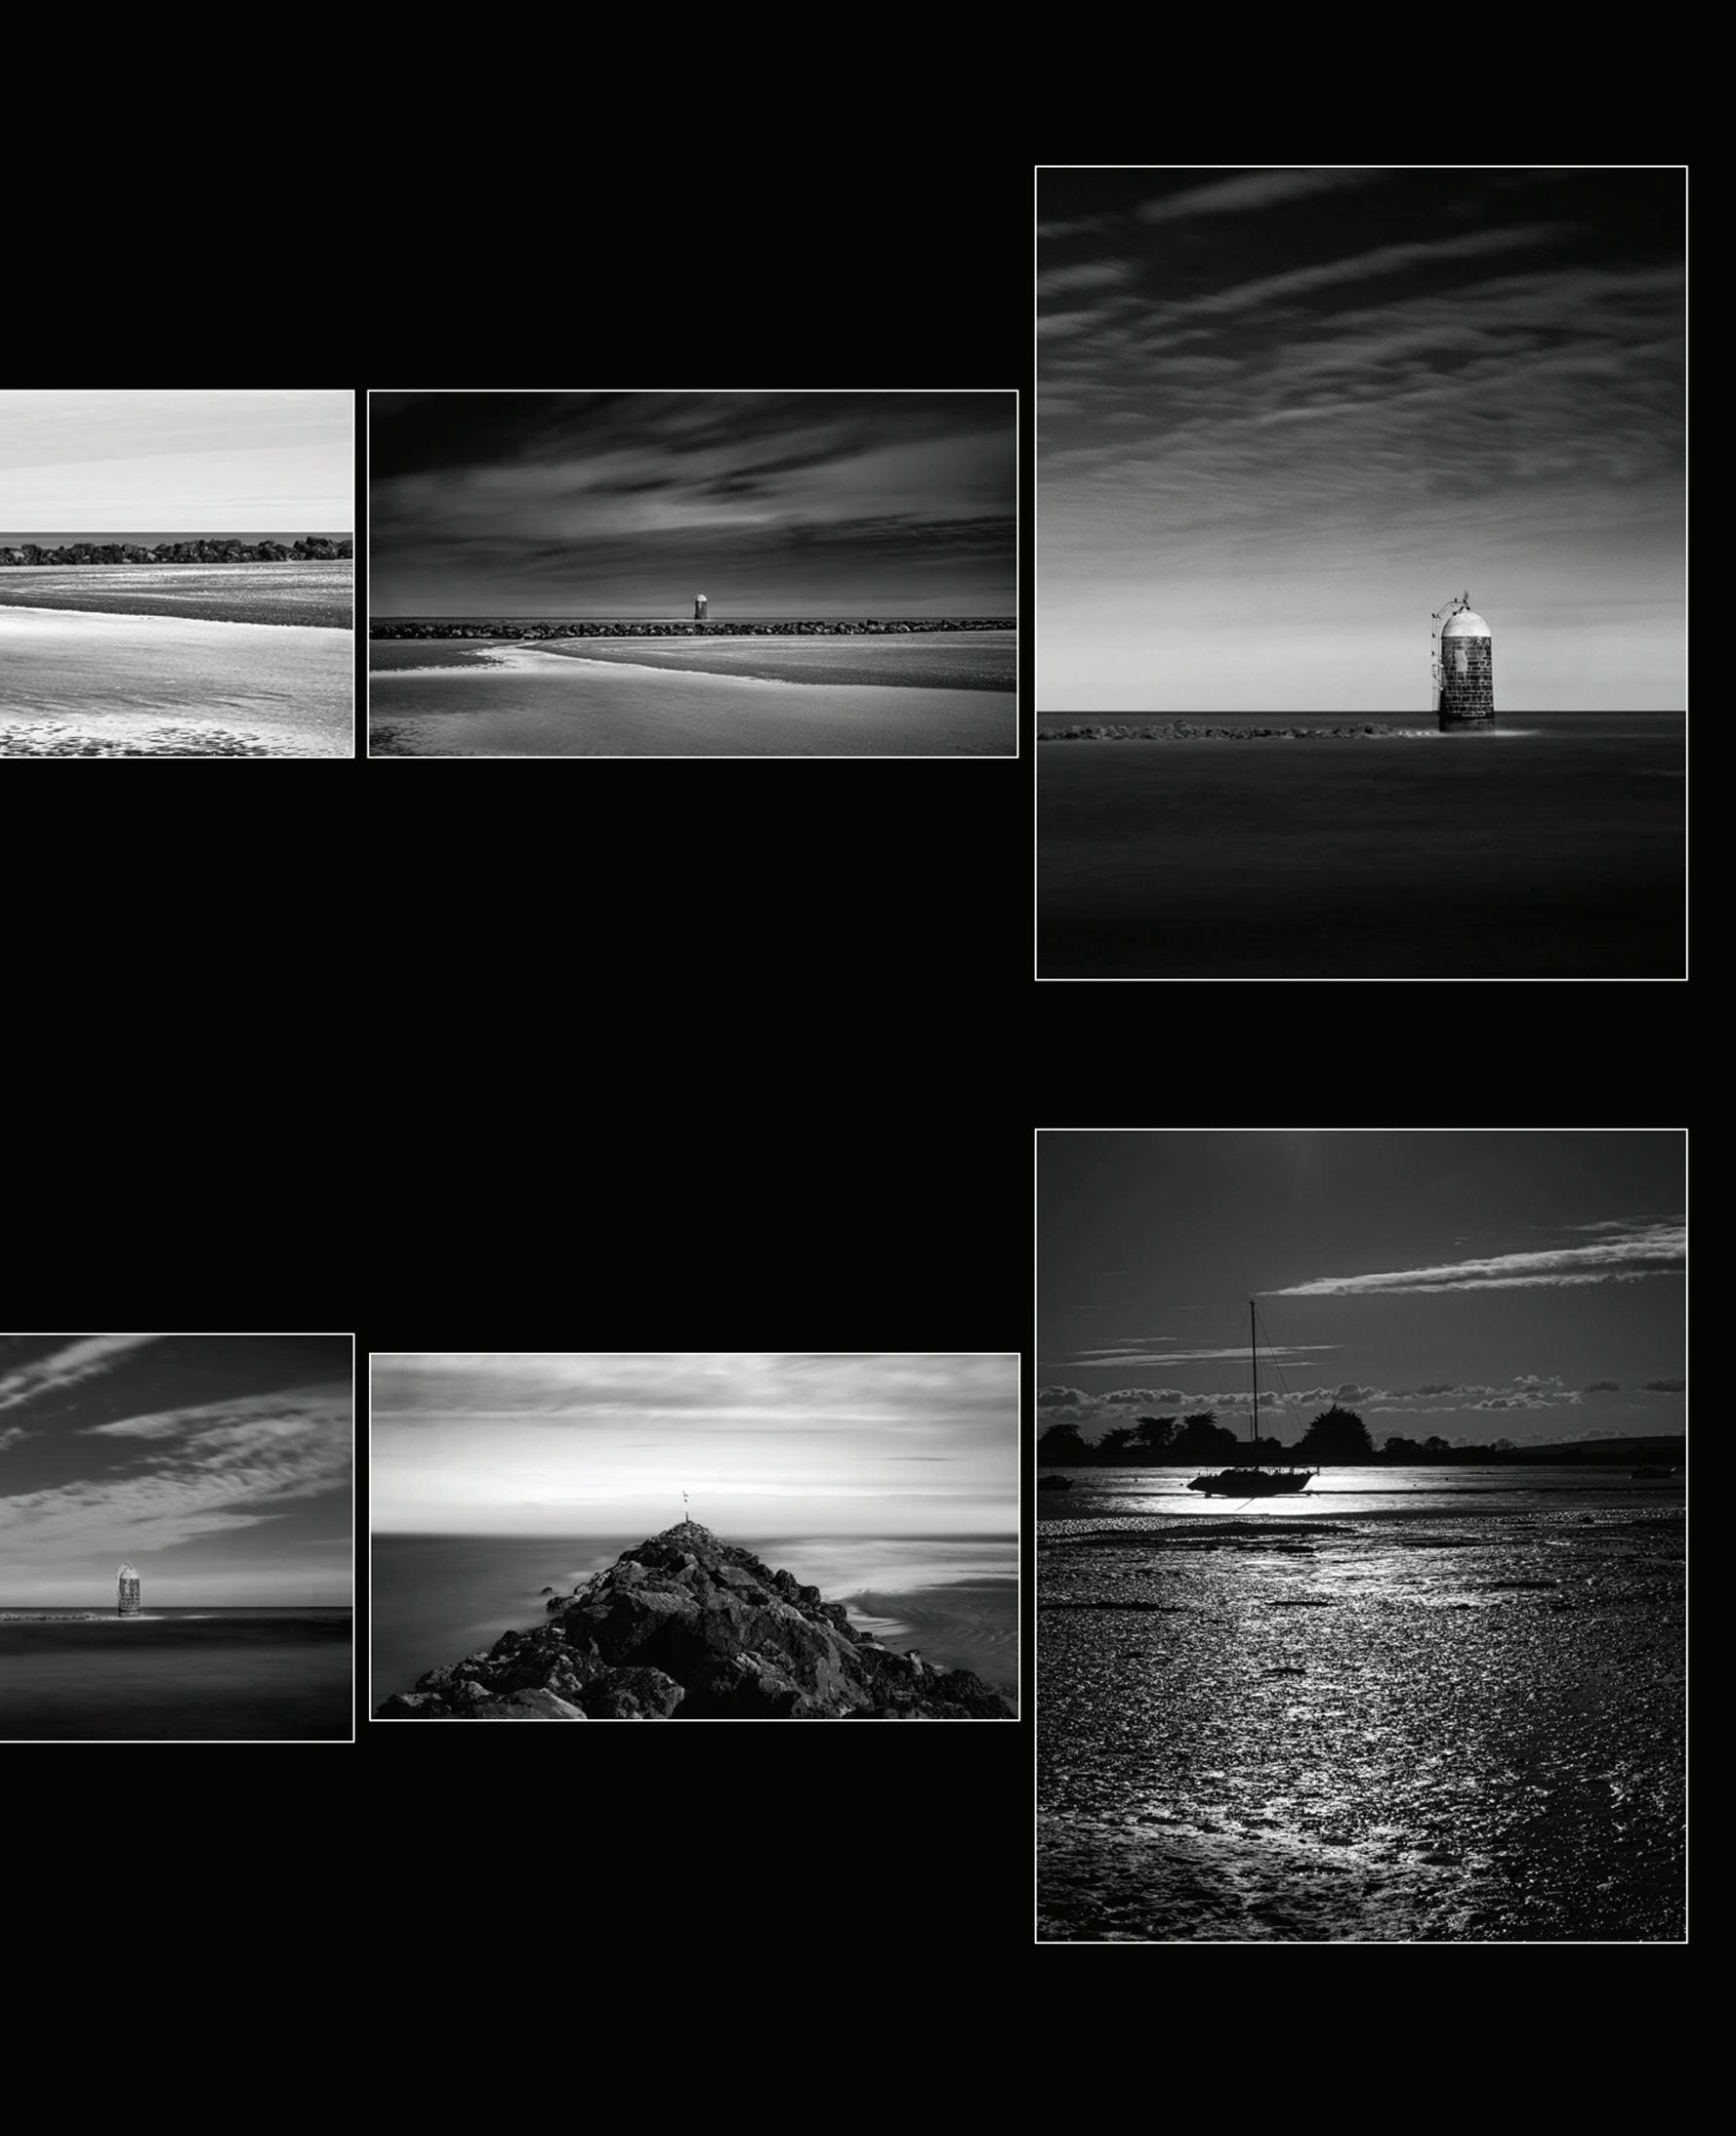
the following in Lightroom. First select all of the 2-star images in the folder. I use the stars to rate images in the folder - 1 star is an image I like which may be edited up. 2 stars is an edited (or not) ‘finished image’ that I’m happy with. 3 stars and up are club, salon or portfolio standard. So, I select all my 2-star images - the ones which I’m happy with from the day. There may be a handful, there may be many more - it depends on the day. I create a collection in Lightroom and add all these images into it. A collection allows me to re-arrange the images into whatever order I want - generally the images in the import folders can’t be organised in this manner. Next, I go into the collection and highlight all the images (Ctrl/ Cmd+A). Then I go into Survey mode. This places all the selected images on screen together. Maximise the screen area that the images have to sit in by closing other windows and turning off other Lightroom elements. Press the L key twice to close Lightroom elements (press L again to bring them back, Shift + TAB restores all your panels). I now have my images all showing on a black background, each with a narrow white border. I can drag them around, trying different positions to see what works best. I can also remove an image from the view by hovering over the image and pressing the ‘X’ which appears in the bottom right-hand corner. That doesn’t delete the image, or remove it from your collection, it just takes it out of the selected set that you are arranging into this panel. Re-arrange and remove until you have a set of images sitting together in a panel order that you are happy with. My last stage here is to take a screenshot of my panel and save it with the panel images. Job done!
Conclusion and further explorations…
Panels are a wonderful means to presenting your work, which for many, don’t seem to be an integral part of the normal workflow. I hope that my musings might encourage you to try a panel or two - maybe from an existing set of images you already have. The RPS DIG South-East region has kindly allowed me to run several series of workshops where 10 people at a time come on a 3 x 2hr set of online sessions each 2 weeks apart to go through this process. Sharing and exploring your images in the company of like-minded people has proved to be a very rewarding and illuminating journey for all concerned in the three sets we’ve run so far - do contact Melanie Chalk at digse@rps.org if you would like to join one of these or be put on a waiting list for future sessions l
ABoUt tHe AUtHoR
Joe Houghton is a member of the RPS, Edinburgh PS in Scotland, Palmerstown CC in Ireland, the HCPS in South Africa and a founding member of MyPhotoClub.co.uk. He delivered Nikon’s training in Ireland for 12 years, and now offers camera club talks around the world via Zoom on many topics. His website and details of all his talks and 1-to-1 tuition via Zoom can be found at houghtonphoto.com.


