Essentials:
A Step-by-Step Guide 1st Edition Coutinho
Visit to download the full and correct content document:
https://ebookmass.com/product/roblox-lua-scripting-essentials-a-step-by-step-guide-1 st-edition-coutinho/
Roblox Lua Scripting Essentials
A Step-by-Step Guide
Christopher CoutinhoRoblox Lua Scripting Essentials: A Step-by-Step Guide
Christopher Coutinho Mumbai, Maharashtra, India
ISBN-13 (pbk): 979-8-8688-0025-2
https://doi.org/10.1007/979-8-8688-0026-9
Copyright © 2023 by Christopher Coutinho
ISBN-13 (electronic): 979-8-8688-0026-9
This work is subject to copyright. All rights are reserved by the Publisher, whether the whole or part of the material is concerned, specifically the rights of translation, reprinting, reuse of illustrations, recitation, broadcasting, reproduction on microfilms or in any other physical way, and transmission or information storage and retrieval, electronic adaptation, computer software, or by similar or dissimilar methodology now known or hereafter developed.
Trademarked names, logos, and images may appear in this book. Rather than use a trademark symbol with every occurrence of a trademarked name, logo, or image we use the names, logos, and images only in an editorial fashion and to the benefit of the trademark owner, with no intention of infringement of the trademark.
The use in this publication of trade names, trademarks, service marks, and similar terms, even if they are not identified as such, is not to be taken as an expression of opinion as to whether or not they are subject to proprietary rights.
While the advice and information in this book are believed to be true and accurate at the date of publication, neither the authors nor the editors nor the publisher can accept any legal responsibility for any errors or omissions that may be made. The publisher makes no warranty, express or implied, with respect to the material contained herein.
Managing Director, Apress Media LLC: Welmoed Spahr
Acquisitions Editor: Spandana Chatterjee
Development Editor: James Markham
Project Manager: Jessica Vakili
Cover image designed by rawpixel.com on Freepik
Distributed to the book trade worldwide by Springer Science+Business Media New York, 1 New York Plaza, Suite 4600, New York, NY 10004-1562, USA. Phone 1-800-SPRINGER, fax (201) 348-4505, e-mail orders-ny@ springer-sbm.com, or visit www.springeronline.com. Apress Media, LLC is a California LLC and the sole member (owner) is Springer Science + Business Media Finance Inc (SSBM Finance Inc). SSBM Finance Inc is a Delaware corporation.
For information on translations, please e-mail booktranslations@springernature.com; for reprint, paperback, or audio rights, please e-mail bookpermissions@springernature.com.
Apress titles may be purchased in bulk for academic, corporate, or promotional use. eBook versions and licenses are also available for most titles. For more information, reference our Print and eBook Bulk Sales web page at http://www.apress.com/bulk-sales.
Any source code or other supplementary material referenced by the author in this book is available to readers on GitHub (https://github.com/Apress/Roblox-Lua-Scripting-Essentials). For more detailed information, please visit https://www.apress.com/gp/services/source-code.
Paper in this product is recyclable
To my unwavering pillars of support and inspiration, this book is dedicated to my beloved parents, wife, and daughter whose unwavering encouragement and boundless love have been the guiding stars of my journey into the world of Roblox scripting. Your belief in my dreams has been the foundation upon which I’ve built my passion for game development.
In the world of Roblox scripting, where lines of code become adventures, and virtual worlds come to life, your love and support have been the ultimate power-up.
With all my love and appreciation,
ChristopherCoutinho
v About the Author ��������������������������������������������������������������������������������������������������� xiii About the Technical Reviewer ���������������������������������������������������������������������������������xv Acknowledgments �������������������������������������������������������������������������������������������������xvii Introduction ������������������������������������������������������������������������������������������������������������xix Chapter 1: Introduction��������������������������������������������������������������������������������������������� 1 What Does This Book Require? ����������������������������������������������������������������������������������������������������� 2 About Lua �������������������������������������������������������������������������������������������������������������������������������������� 2 Installing Roblox Studio ���������������������������������������������������������������������������������������������������������������� 3 Roblox Studio Templates ��������������������������������������������������������������������������������������������������������������� 4 Exploring Roblox Studio’s Editor ��������������������������������������������������������������������������������������������������� 5 Scene View: Camera Movement���������������������������������������������������������������������������������������������������� 7 View Selector �������������������������������������������������������������������������������������������������������������������������������� 9 Setting Up the Coding Workspace ����������������������������������������������������������������������������������������������� 11 Creating Your First Lua Script ����������������������������������������������������������������������������������������������������� 11 Saving and Publishing Your Project��������������������������������������������������������������������������������������������� 15 Reopening Your Project ��������������������������������������������������������������������������������������������������������������� 17 Summary������������������������������������������������������������������������������������������������������������������������������������� 18 Chapter 2: Working with Parts ������������������������������������������������������������������������������� 19 Part Primitives����������������������������������������������������������������������������������������������������������������������������� 19 The Transform ����������������������������������������������������������������������������������������������������������������������������� 21 Pitch, Yaw, and Roll ��������������������������������������������������������������������������������������������������������������������� 23 Global vs� Local Coordinate Space ���������������������������������������������������������������������������������������������� 24 Translating (Moving) a Part ��������������������������������������������������������������������������������������������������������� 26 Scaling a Part ������������������������������������������������������������������������������������������������������������������������������ 28 Table of Contents
Table of ConTenTs
vi Rotating a Part ���������������������������������������������������������������������������������������������������������������������������� 30 Studs: Roblox Unit of Measurement �������������������������������������������������������������������������������������������� 31 Translation Snapping ������������������������������������������������������������������������������������������������������������������ 32 Rotation Snapping ����������������������������������������������������������������������������������������������������������������������� 34 Collisions ������������������������������������������������������������������������������������������������������������������������������������� 35 Anchoring Objects ����������������������������������������������������������������������������������������������������������������������� 36 Commenting Your Code ��������������������������������������������������������������������������������������������������������������� 37 Summary������������������������������������������������������������������������������������������������������������������������������������� 38 Chapter 3: Variables, Scope, Arrays, Operators, and Conditionals ������������������������� 41 Basic Lua Data Types ������������������������������������������������������������������������������������������������������������������ 41 Variables and Literals������������������������������������������������������������������������������������������������������������������ 43 Naming Variables in Lua ������������������������������������������������������������������������������������������������������������� 46 Variable Declaration and Initialization����������������������������������������������������������������������������������������� 47 Variable Scope ���������������������������������������������������������������������������������������������������������������������������� 51 Tables, Arrays, and Dictionaries��������������������������������������������������������������������������������������������� 55 Operators (Unary/Binary) and Operands ������������������������������������������������������������������������������������� 59 Assignment Operator ������������������������������������������������������������������������������������������������������������������ 60 Arithmetic Operators ������������������������������������������������������������������������������������������������������������������� 61 Compound Assignment Operators����������������������������������������������������������������������������������������������� 62 Relational Operators ������������������������������������������������������������������������������������������������������������������� 63 Length Unary Operator ���������������������������������������������������������������������������������������������������������������� 64 Concatenation Operator �������������������������������������������������������������������������������������������������������������� 65 String Coercion ��������������������������������������������������������������������������������������������������������������������������� 66 Escape Sequences ���������������������������������������������������������������������������������������������������������������������� 67 Conditionals �������������������������������������������������������������������������������������������������������������������������������� 69 Logical Operators ������������������������������������������������������������������������������������������������������������������������ 73 Operator Precedence and Using Parentheses ����������������������������������������������������������������������������� 78 Summary������������������������������������������������������������������������������������������������������������������������������������� 80
vii Chapter 4: Loops ����������������������������������������������������������������������������������������������������� 83 While Loops��������������������������������������������������������������������������������������������������������������������������������� 83 Infinite Loops ������������������������������������������������������������������������������������������������������������������������������ 84 Repeat…Until Loop ��������������������������������������������������������������������������������������������������������������������� 85 Numeric For Loop������������������������������������������������������������������������������������������������������������������������ 86 Generic For Loops ����������������������������������������������������������������������������������������������������������������������� 88 Nested Loops ������������������������������������������������������������������������������������������������������������������������������ 93 Breaking Out of a Loop ��������������������������������������������������������������������������������������������������������������� 95 Continue Statement of a Loop����������������������������������������������������������������������������������������������������� 97 Summary������������������������������������������������������������������������������������������������������������������������������������� 99 Chapter 5: Objects, Data Types, and Properties ���������������������������������������������������� 101 Roblox Parts and Objects ���������������������������������������������������������������������������������������������������������� 101 Object Hierarchy Navigation������������������������������������������������������������������������������������������������������ 102 Roblox (Luau) Additional Data Types ����������������������������������������������������������������������������������������� 103 Manipulating Parts: Vector3 Data Type�������������������������������������������������������������������������������������� 106 Changing the Position of a Part ������������������������������������������������������������������������������������������� 106 Scaling a Part Using Multiplication �������������������������������������������������������������������������������������� 107 Moving a Part Using Lerp ���������������������������������������������������������������������������������������������������� 108 Computing Distance Between Parts ������������������������������������������������������������������������������������ 110 Manipulating Parts: Cframe Data Type �������������������������������������������������������������������������������������� 112 Offsetting a Part ������������������������������������������������������������������������������������������������������������������ 113 Rotating a Part ��������������������������������������������������������������������������������������������������������������������� 115 Moving a Part in a Specific Direction ���������������������������������������������������������������������������������� 116 Part Rotation to Face Another Part – (1) ������������������������������������������������������������������������������ 117 Part Rotation to Face Another Part – (2) ������������������������������������������������������������������������������ 121 Parenting a Part to Another Part ������������������������������������������������������������������������������������������ 125 Color3 Data Type ����������������������������������������������������������������������������������������������������������������������� 126 Instance Data Type �������������������������������������������������������������������������������������������������������������������� 127 Enum Data Type ������������������������������������������������������������������������������������������������������������������������ 128
of ConTenTs
Table
viii Random Data Type �������������������������������������������������������������������������������������������������������������������� 131 Properties of Parts (Objects) ����������������������������������������������������������������������������������������������������� 133 Summary����������������������������������������������������������������������������������������������������������������������������������� 138 Chapter 6: Functions and Events �������������������������������������������������������������������������� 139 Functions ���������������������������������������������������������������������������������������������������������������������������������� 139 Invoking a Function ������������������������������������������������������������������������������������������������������������� 140 Function Parameters ����������������������������������������������������������������������������������������������������������� 140 Function Return Values �������������������������������������������������������������������������������������������������������� 141 An Arbitrary Number of Parameters ������������������������������������������������������������������������������������ 142 Anonymous Functions ��������������������������������������������������������������������������������������������������������� 143 Events ��������������������������������������������������������������������������������������������������������������������������������������� 144 Touched Event ��������������������������������������������������������������������������������������������������������������������� 146 Changed Event��������������������������������������������������������������������������������������������������������������������� 149 ClickDetector�MouseClick Event ������������������������������������������������������������������������������������������ 153 MouseButton1Click Event ���������������������������������������������������������������������������������������������������� 154 PlayerAdded Event��������������������������������������������������������������������������������������������������������������� 156 ChildAdded and DescendantAdded Events �������������������������������������������������������������������������� 159 Other Miscellaneous Event �������������������������������������������������������������������������������������������������� 161 Event-Driven Programming ������������������������������������������������������������������������������������������������������� 162 Script vs� LocalScript ����������������������������������������������������������������������������������������������������������� 164 BindableEvent ���������������������������������������������������������������������������������������������������������������������� 165 RemoteEvent ����������������������������������������������������������������������������������������������������������������������� 168 RemoteFunction ������������������������������������������������������������������������������������������������������������������ 172 BindableFunction vs� RemoteFunction �������������������������������������������������������������������������������� 176 Summary����������������������������������������������������������������������������������������������������������������������������������� 177 Chapter 7: Roblox Services ���������������������������������������������������������������������������������� 179 Roblox Services ������������������������������������������������������������������������������������������������������������������������ 179 Workspace Service �������������������������������������������������������������������������������������������������������������� 181 ReplicatedStorage Service �������������������������������������������������������������������������������������������������� 182 Players Service �������������������������������������������������������������������������������������������������������������������� 184
Table of ConTenTs
ix UserInputService ����������������������������������������������������������������������������������������������������������������� 185 Tween Service ��������������������������������������������������������������������������������������������������������������������� 188 ProximityPrompt Service ����������������������������������������������������������������������������������������������������� 191 RunService �������������������������������������������������������������������������������������������������������������������������� 193 SoundService ���������������������������������������������������������������������������������������������������������������������� 199 Lighting Service ������������������������������������������������������������������������������������������������������������������� 202 ContextActionService ���������������������������������������������������������������������������������������������������������� 205 TeamsService ���������������������������������������������������������������������������������������������������������������������� 209 TeleportService �������������������������������������������������������������������������������������������������������������������� 211 PhysicsService �������������������������������������������������������������������������������������������������������������������� 214 Summary����������������������������������������������������������������������������������������������������������������������������������� 223 Chapter 8: Task Library and Module Scripts �������������������������������������������������������� 225 Threading in Roblox Luau ��������������������������������������������������������������������������������������������������������� 225 Task Library and Threading ������������������������������������������������������������������������������������������������������� 226 The Task�delay(time, function) Method �������������������������������������������������������������������������������� 226 The Task�spawn(function) Method ��������������������������������������������������������������������������������������� 227 The Task�wait(seconds) Method ������������������������������������������������������������������������������������������ 228 The Task�defer(function) Method ����������������������������������������������������������������������������������������� 229 The Task�cancel( ) Method ��������������������������������������������������������������������������������������������������� 231 Module Scripts �������������������������������������������������������������������������������������������������������������������������� 236 Summary����������������������������������������������������������������������������������������������������������������������������������� 245 Chapter 9: Understanding Players, Characters, and Humanoids in Roblox ���������� 247 The Roblox Player ��������������������������������������������������������������������������������������������������������������������� 247 Player Properties, Methods, and Events ������������������������������������������������������������������������������ 249 Connection to Characters ���������������������������������������������������������������������������������������������������� 251 Common Use Cases ������������������������������������������������������������������������������������������������������������� 252 The Roblox Character ���������������������������������������������������������������������������������������������������������������� 256 Character Components and Design ������������������������������������������������������������������������������������� 256 Character Properties, Methods, and Events ������������������������������������������������������������������������ 256 Table of ConTenTs
x Character and Humanoid Relationship �������������������������������������������������������������������������������� 259 Common Use Cases ������������������������������������������������������������������������������������������������������������� 260 The Roblox Humanoid ��������������������������������������������������������������������������������������������������������������� 263 Humanoid Properties, Methods, and Events ������������������������������������������������������������������������ 264 Integration with the Character and Player ��������������������������������������������������������������������������� 266 Common Use Cases ������������������������������������������������������������������������������������������������������������� 267 Hierarchy Structure ������������������������������������������������������������������������������������������������������������������� 275 Relationships: Player, Character, and Humanoid ����������������������������������������������������������������������� 277 Summary����������������������������������������������������������������������������������������������������������������������������������� 277 Chapter 10: Raycasting ���������������������������������������������������������������������������������������� 279 Definition and Purpose of Raycasting ��������������������������������������������������������������������������������������� 279 Common Applications in Game Development ��������������������������������������������������������������������������� 279 Overview of Raycasting in Roblox ��������������������������������������������������������������������������������������������� 280 The Ray Object �������������������������������������������������������������������������������������������������������������������������� 280 Basic Raycasting ����������������������������������������������������������������������������������������������������������������������� 282 Calculating Intersection Points ������������������������������������������������������������������������������������������������� 284 Raycasting with Filtering ���������������������������������������������������������������������������������������������������������� 287 Creating a Proximity Sensor for NPCs ��������������������������������������������������������������������������������������� 290 Pathfinding in Roblox ���������������������������������������������������������������������������������������������������������������� 293 Summary����������������������������������������������������������������������������������������������������������������������������������� 303 Chapter 11: Tables and Object-Oriented Programming ���������������������������������������� 305 Tables ���������������������������������������������������������������������������������������������������������������������������������������� 305 Object-Oriented Programming �������������������������������������������������������������������������������������������������� 306 Encapsulation ���������������������������������������������������������������������������������������������������������������������� 306 Inheritance �������������������������������������������������������������������������������������������������������������������������� 307 Polymorphism ���������������������������������������������������������������������������������������������������������������������� 308 Abstraction �������������������������������������������������������������������������������������������������������������������������� 309 Meta-Tables ������������������������������������������������������������������������������������������������������������������������������ 309 __index �������������������������������������������������������������������������������������������������������������������������������� 312 __newindex ������������������������������������������������������������������������������������������������������������������������� 314
Table of ConTenTs
xi Classes �������������������������������������������������������������������������������������������������������������������������������������� 316 Summary����������������������������������������������������������������������������������������������������������������������������������� 323 Afterword �������������������������������������������������������������������������������������������������������������� 325 Index ��������������������������������������������������������������������������������������������������������������������� 327 Table of ConTenTs
About the Author

Christopher Coutinho is a game developer with an impressive seven-year track record in the domain of virtual reality (VR) development. As the visionary founder of Game Works, a cutting-edge game development studio based in Mumbai, he has honed his expertise in creating immersive virtual reality experiences.
His contributions extend beyond the commercial sphere; he has also played a pivotal role in shaping the next generation of game developers. He has been an instrumental educator, sharing his knowledge and insights in video game development through platforms like iDTech, a division of Emeritus. His teachings span popular game engines such as Unity and Roblox. Additionally, Christopher has taught a specialized program on augmented/virtual reality (AR/VR) design created by the NYU – Tandon School of Engineering, for iDTech. His blend of hands-on experience and pedagogical prowess positions him as a leading figure in the contemporary gaming landscape.
xiii
About the Technical Reviewer

Dr. Tiow Wee Tan is an Associate Professor at the Game School, Inland Norway University of Applied Science (INN), Norway. He also serves as the Course Leader for the Augmented and Virtual Reality Add-On Program at the Game School.
Before joining Game School at INN in 2019, Tiow Wee received his BSc (Hons.) in Computer Science (Software Engineering) from the University of Greenwich, UK, an MSc in Computer Vision, Visual, and Virtual Environments from the University of Leeds, UK, and a PhD in Bi-manual Interaction within Virtual Environments from the University of Salford, UK. After completing his PhD, he worked as a Post-Doctoral Research Assistant at the Materials Science Center, University of Manchester, UK, and later pursued a career as a Senior Lecturer and Course Leader for the Computer Games Technology course at Manchester Metropolitan University, UK.
Tiow Wee’s research interests encompass the development of XR (extended reality) for cross-disciplinary enterprise applications. In the past, he has also been involved in neural networks and artificial intelligence (AI) for gaming. Currently, his research focuses on emotion and personality AI, with an emphasis on representing emotion traits through facial expressions for digital learning in VR. Additionally, Tiow Wee is conducting research on realistic interactions with physical objects within VR environments. His primary research areas of focus include
1. Use of AR and VR technology in game engines
2. Development of hybrid versions of augmented and virtual reality for applications in healthcare, art, and tourism
3. Utilization of deep learning algorithms for predicting micro-facial expressions and their integration into simulations and games
4. Exploration of human cognitive issues integrated into neural network systems in the context of human-computer interaction environments
xv
Acknowledgments
Writing a book is never a solitary endeavor. It takes the collective efforts, encouragement, and support of many individuals to bring a project like this to fruition. I would like to express my heartfelt gratitude to those who have played a pivotal role in making Roblox Lua Scripting Essentials: A Step-by-Step Guide a reality.
First and foremost, I want to extend my deepest appreciation to the Roblox community. Your passion for game development and Lua scripting has been a constant source of inspiration. Your questions, feedback, and enthusiasm have shaped the content of this book.
I am immensely thankful to the talented Roblox developers whose work has enriched the platform and provided valuable insights for this book. Your contributions to the Roblox ecosystem are truly remarkable.
To my dedicated editor and the publishing team, thank you for your guidance, patience, and expertise in helping me refine and polish this manuscript. Your commitment to excellence has made this book a better resource for readers.
I want to acknowledge the mentors and teachers who have shared their knowledge and expertise in Lua scripting and game development. Your guidance has been instrumental in shaping my own understanding and skills, which I now pass on to others through this book.
To my family and friends, thank you for your unwavering support and understanding during the long hours of writing and research. Your encouragement has kept me motivated throughout this journey.
Last, but certainly not least, I want to thank the readers of this book. Your interest in learning and mastering Lua scripting for Roblox has driven me to create a resource that I hope will help you achieve your game development goals.
Writing this book has been a rewarding experience, and I am grateful to everyone who has been a part of it. I hope Roblox Lua Scripting Essentials: A Step-by-Step Guide serves as a valuable companion on your journey to becoming a skilled Roblox developer.
With deep appreciation, Christopher Coutinho
xvii
Introduction
Prologue
In the boundless universe of digital creation, game development is one of the most vibrant and exciting frontiers. It is a realm where imagination meets reality, where pixels and code blend to create worlds as real as our dreams. And in this world, the Roblox platform shines like a beacon, inviting creators from all walks of life to embark on an extraordinary journey.
The joy of creating, the thrill of problem-solving, and the satisfaction of sharing one’s creation with others are no longer confined to the experienced few. Roblox opens the gates to everyone, regardless of age or experience, and within these pages lies the map to navigate this wondrous landscape.
Who Is This Book Written For?
Whether a hobbyist, an educator, a student, or simply curious, this guide is for anyone eager to step into the universe of Roblox development. It’s a tool, a mentor, and a friend for those who have the spark to create, imagine, and explore virtual worlds. You don’t have to be an expert; all you need is the will to learn.
What You’ll Learn
This guide is your compass as you
• Dive into Lua: Explore the foundational concepts that power Roblox Lua scripting.
• Master Roblox Studio: Unlock the capabilities of this incredible creative tool.
xix
• Hone your skills: Learn to write scripts that breathe life into your games.
• Design with purpose: Learn the principles to make your game resonate with players.
What Is Required for This Book?
Embark on this adventure with:
• A computer: The vessel to navigate the Roblox universe.
• Internet connection: Your gateway to resources, updates, and community.
• A Roblox account: Your passport to creation and publication.
• A thirst for knowledge: Experience is not required, only a passion for learning.
How to Use This Book
Travel at your pace, starting at the very beginning, or leap to sections that intrigue you. This book adapts to your journey, providing a comprehensive guide to your success. In the realm of programming, hands-on practice is often the most effective path to mastery. Engaging directly with the code, experimenting with each listing, and applying what you’ve learned through practical exercises are central to this book’s approach. Roblox Lua Scripting Essentials: A Step-by-Step Guide is designed as a hands-on resource to enrich your learning experience, allowing you to read about and actively practice and internalize the essential concepts of Lua scripting within Roblox. Your journey through these pages will be an interactive exploration, providing a tangible and immersive understanding of the subject.
xx
InTroduCTIon
Downloadable Content
Enhance your ease of learning with the downloadable scripts available at the Apress GitHub link for this book [https://github.com/Apress/Roblox-Lua-ScriptingEssentials] – a treasure trove to deepen your understanding and skill.
Roblox Lua Scripting Essentials: A Step-by-Step Guide is not merely a book; it’s a voyage into a universe where your creativity reigns supreme. As you turn these pages, you take the first step on a thrilling journey of creation, learning, and infinite possibility. Welcome aboard, dear developer. Here’s to your triumph and joy as you unearth the wonders of Roblox Lua scripting!
xxi
InTroduCTIon
CHAPTER 1
Introduction
Welcome to the exciting world of Roblox game development!
Roblox is an unparalleled behemoth in entertainment platforms, offering a unique gaming and game creation fusion. Boasting a staggering user base of over 200 million active monthly participants, Roblox is a fertile ground for aspiring and seasoned developers to breathe life into their visions and craft triumphant games, commonly called experiences. The beauty of this creative platform lies in its accessibility; players worldwide can indulge in these captivating experiences without any financial burden. With a wealth of invaluable resources and an expansive, supportive community of developers from diverse corners of the globe, stepping into the Roblox game development scene unveils unparalleled opportunities that resonate in a league of their own.
In this chapter, you will delve into the fundamental aspects of creating immersive experiences on the Roblox platform. We’ll begin by guiding you through the installation process of Roblox Studio, the powerful toolset that enables developers to bring their visions to life. Next, we’ll explore the convenience of Roblox Studio Templates, which provide a solid foundation for your projects. As you become familiar with the Roblox Studio Editor, I will demonstrate how to navigate and utilize its various features effectively. Discover the art of camera movement using the W, A, S, D, E, Q, and F keys and right mouse button to enhance your editor interactions. Embrace the heart of Roblox development as you delve into the world of Lua, a powerful and extensible scripting language. To ensure a smooth workflow, I will help you set up your coding workspace, empowering you to write your first simple Lua script and bring interactivity to your creations. Finally, I will guide you through saving and publishing your projects, enabling you to share your future creations with the vast Roblox community. Embark on this journey, and soon you’ll craft engaging experiences that captivate players worldwide. Let’s begin!
© Christopher Coutinho 2023
C. Coutinho, Roblox Lua Scripting Essentials, https://doi.org/10.1007/979-8-8688-0026-9_1
1
What Does This Book Require?
To follow along with this book and learn the art of creating Roblox experiences, you’ll need to have Roblox Studio running on either a MacBook or a Windows machine. Once your game experience is published, it can be enjoyed across many platforms, including IOS, Android, Mac, Windows, and Chrome.
About Lua
Lua is a versatile and efficient procedural scripting language known for its lightweight nature and high performance. The core of Lua, including the virtual machine and interpreter, is implemented in C, providing a solid foundation for the fast execution required by gaming experiences.
Lua boasts an approachable and concise syntax as a programming language, making it relatively simple for developers of various skill levels. With just 21 keywords, Lua maintains a compact and straightforward structure, contributing to its readability and ease of understanding. Its syntax bears a resemblance to natural language, which further enhances its user-friendliness.
One notable implementation of Lua can be found in the game development platform Roblox, where it is employed as “Luau.” Luau is an evolved version of Lua, originating from Lua 5.1, and enriched with additional functionalities specific to the Roblox ecosystem. This adaptation provides developers with enhanced capabilities and tools for crafting immersive gaming experiences.
Lua’s true strength, however, lies in its extensibility. Programmers can leverage Lua’s flexible design to introduce various programming paradigms, such as objectoriented programming (OOP), despite the language’s lack of built-in object support. This adaptability empowers developers to tailor Lua to their needs, making it an ideal choice for various applications.
This scripting language offers a powerful yet accessible platform for various projects, while its extensibility unlocks a wealth of creative possibilities. With its C-based implementation, user-friendly syntax, and adaptability, Lua stands out as a compelling language choice for developers seeking efficiency and versatility in their software endeavors.
2
Chapter 1 IntroduCtIon
Installing Roblox Studio
Evolved by the burgeoning concept of the metaverse, Roblox transcended its roots as a gaming platform and embraced a more expansive vision. This transformative shift redefined the very essence of the Roblox experience: games evolved into encompassing “experiences,” and players morphed into empowered “users.” In the ensuing sections, you shall delve into the realms of Roblox Studio dedicated to forging these wondrous experiences.
To embark on your creative journey with Roblox Studio (the application where you will create all your experiences), you must first download and install it.
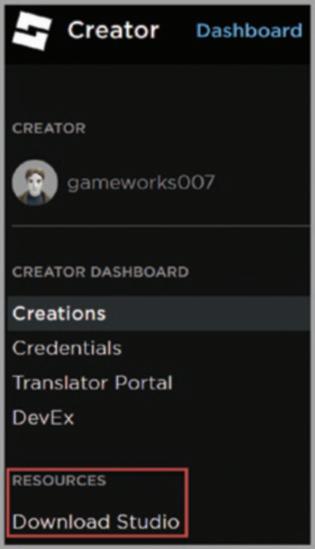
First, visit the official Roblox website at www.roblox.com/develop, and create an account or log in if you already have one.
Once you’re logged in, navigate to the “RESOURCES” section on the left (Figure 1-1), and click “Download Studio.” This will prompt you to download the Roblox Studio executable to your hard drive. After downloading, run the installer and follow the onscreen instructions to complete the installation process. Once installed, Roblox Studio should automatically launch.
3
Chapter 1 IntroduCtIon
Figure 1-1. Dashboard
Roblox Studio Templates
With Roblox Studio launched and the Roblox Studio Home Screen (Figure 1-2) open, click the “New” button to access the “All Templates” tab, which serves as the starting point for creating your game experiences. If you already have a primary theme in mind for your game experience, check the “Theme” tab for predefined templates that align with your vision. For instance, the Castle template could be a suitable starting point if you create a game set in the “Medieval” era. The “Gameplay” tab lists interactive templates like “Combat,” allowing players to wield pistols and swords. These templates provide valuable insights into object creation, script implementation, and overall game experience design.

For learning Roblox Lua scripting in this book, the “Baseplate” template is sufficient. It includes a spawn point for the player and a flat floor base. Select the “All Templates” tab, and click the “Baseplate” Template to launch the Roblox Studio Editor (Figure 1-3). The Roblox Studio editor allows you to create, modify, and test your game experience.
4
Figure 1-2. Roblox Studio Home Screen
Chapter 1 IntroduCtIon
Exploring Roblox Studio’s Editor
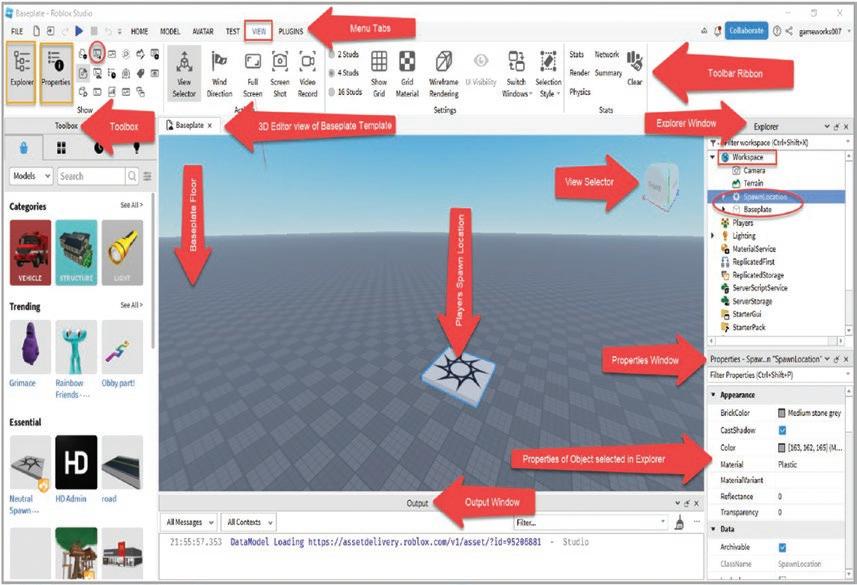
You will notice several menu tabs at the top of the Roblox Studio Editor, with the “VIEW” tab currently selected. The Toolbar ribbon changes based on the selected tab.
The “Explorer” window on the right side provides access to every object and system within your game. Objects introduced into your world, such as the “Spawnlocation” depicted within the 3D view of your world, all reside within the “Explorer” window as children of the “Workspace” object. The Baseplate represents the floor in your 3D world and can also be found within the “Explorer” window as a child of the “Workspace” object. All these entities, “Baseplate,” “Spawnlocation,” “Workspace,” “Camera,” “Terrain,” etc., are referred to as objects within your game. The “Workspace” that holds these objects is referred to as the Parent object, and the objects, “Baseplate,” “Spawnlocation,” “Camera,” and “Terrain” that are all contained within this “Workspace” object, are referred to as children of the “Workspace” object.
5
Chapter 1 IntroduCtIon
Figure 1-3. Roblox Studio Editor
The “Spawnlocation” object (Figure 1-3) is the position in the world at which the player character starts at – (spawns at) when your game is launched.
Beneath the “Explorer” window is the “Properties” window, which allows you to modify the properties of selected objects. For example, selecting the “Spawnlocation” game object in the “Explorer” window lets you manipulate its properties, such as “BrickColor,” “Size,” etc. From the following figure, you will note that within the “Explorer” window, the “Spawnlocation” game object has been selected (highlighted), so it’s this “Spawnlocation” game object properties that are now available for you to manipulate within the “Properties” window. You can change the behavior or look of an object by manipulating its properties. With the “Spawnlocation” game object selected in the hierarchy, locate its “BrickColor” property within the “Appearance” category of the “Properties” window. Click the “BrickColor” property name within the “Properties” window, and a color picker dialog appears. Hover your mouse over the hexagonal grid of colors and note that within the 3D view of your world, the “Spawnlocation” object changes color. Select a color by clicking it to assign it to the “Spawnlocation” object. Scroll down within the “Properties” window until you locate the “Transform” category. Expand this category using the chevron, should you need to, so that the “Size” property is visible. You will note that this “Size” property comprises X, Y, and Z, which determine the width, height, and depth of the “Spawnlocation” object, respectively. Change the X and Z values to 24 and the Y to 10. You will note that your “Spawnlocation” object width and depth have doubled, and its height has increased tenfold. Object properties can be adjusted using the “Properties” window or Lua code, offering powerful customization options.
The “Toolbox” window on the left-hand side of the editor provides you with Assets (free and paid) that you could add to your game experience. You won’t need this “Toolbox” window currently, so you can click on its “Close” button to close it, allowing you additional screen space within the 3D view of your world. Should you want to open the “Toolbox” window or any other window you may have closed accidentally, you can do so by selecting the “VIEW” tab, and within its “Show” section, locate the icon of the window you want opened and click it.
In the Roblox Studio Editor, the “3D Editor View” is the window located at the center, accessible through the “Baseplate” tab (Figure 1-3). It offers a view of the world under construction, which I will call the “Scene View” or “Scene.” Navigating within the “Scene View” involves using the W, A, S, D, E, Q, and F keys and the right mouse button to reposition the camera. The following section discusses how these key presses and mouse actions facilitate camera movement within the Scene View.
6
Chapter 1 IntroduCtIon
Scene View: Camera Movement
The camera movement within the Scene View can be controlled using the mouse and the W, A, S, D, E, Q, and F keys on the keyboard, allowing you to navigate and explore the 3D environment. I advise you to try out each key press.
1) W or ↑ key: Pressing the W or ↑ key moves the camera forward, allowing you to move toward objects or explore different areas within the scene.
2) S or ↓ key: Pressing the S or ↓ key moves the camera backward, letting you move away from objects or change your position within the scene.
3) A or ← key: Pressing the A or ← key moves the camera to the left, enabling you to strafe leftward and change your viewpoint.
4) D or → key: Pressing the D or → key moves the camera to the right, allowing you to strafe rightward and alter your perspective.
5) E key: Pressing the E key moves the camera upward, enabling you to gain a higher viewpoint or explore elevated areas.
6) Q key: Pressing the Q key moves the camera downward, allowing you to lower your viewpoint or explore lower areas within the scene.
7) F key: Pressing the F key focuses the camera on a selected object or model within the scene. When you select an object or model in the “Scene View” using the mouse or other selection tools, pressing the “F” key automatically centers the camera on the selected item, ensuring it becomes the focal point of your view. To focus the camera on the “Spawnlocation” game object within the scene, select it by clicking it within the “Scene View” window or in Explorer. Once selected, a blue outline will indicate its selection. Pressing the “F” key with the “Spawnlocation” game object selected will center the camera on it, making it the focal point within the “Scene View.”
7
Chapter 1 IntroduCtIon
This feature is helpful when working on a specific object within your world that you want to zoom in and center the camera on quickly. It saves time and provides a more convenient way to inspect and edit specific objects within a complex scene without having to manually move and pan around within the scene to locate the particular object, especially when there are several similar-looking objects, as you could have several spawn locations within your game that all look alike.
Mouse actions provide essential ways for navigating, selecting, and manipulating elements while building and designing game experiences.
Here are the key mouse actions available within “Scene View” of the Roblox Editor, and I advise you to try each one:
1) Left-click: Left-clicking an object in “Scene View” or within the “Explorer” window selects the object. Once selected, you can move, rotate, or scale the object using the appropriate tools.
2) Right-click: Right-clicking an object in “Scene View” or the “Explorer” window opens a context menu with various options related to the selected object, such as copying, pasting, duplicating, deleting, Zoom, etc.
3) Click and drag: Clicking and dragging an object in “Scene View” allows you to move it to a different location within your 3D world.
4) Scroll wheel: Using the scroll wheel on your mouse enables you to zoom in and out within “Scene View.” Scrolling forward zooms in, while scrolling backward zooms out.
5) Shift + left-click: Holding down the Shift key while leftclicking multiple objects allows you to select multiple items simultaneously. This is useful for grouping objects or applying changes to various elements simultaneously, such as changing property values common to these multiple selected objects.
6) Ctrl+ left-click (Cmd + left-click on Mac): Holding down the Ctrl (Cmd on Mac) key while left-clicking allows you to add or remove individual objects from the current selection.
7) Ctrl + A (Cmd + A on Mac): Pressing Ctrl + A (Cmd + A on Mac) selects all objects within the “Scene View.”
8
Chapter 1 IntroduCtIon
8) Click and drag with right mouse button: Clicking and dragging with the right mouse button held down lets you rotate the camera around the scene, providing a different viewing perspective.
9) Click and drag with middle mouse button (mouse wheel): Clicking and dragging with the middle mouse button (mouse wheel) held down lets you pan the camera in “Scene View,” shifting the view horizontally and vertically without changing the camera’s distance from the objects.
Using these keys and mouse action combinations allows you to freely navigate your 3D world in the Roblox Editor, providing you with better control and flexibility while building and exploring your game world.
View Selector

The “View Selector” available within the “Scene View” of the Roblox Studio Editor (Figure 1-4) is a user interface element that provides quick access to different views and perspectives of the 3D environment. It is located at the top-right corner of the “Scene View” and is represented by icons.
The “View Selector” aims to allow developers and designers to switch between different viewing modes and camera perspectives, providing flexibility and convenience during the creation and editing process. Listed as follows are the different views accessible through the “View Selector” and their uses:
9
Chapter 1 IntroduCtIon
Figure 1-4. View Selector Gizmo
1. Perspective view: This is the default viewing mode and provides a realistic 3D perspective of the scene, allowing you to naturally navigate and interact with objects. Should you want to return to “Perspective View” from any other views, rotate the camera around within “Scene View” by clicking and dragging the mouse with its right mouse button held down.
2. Top view: Clicking the chevron icon for the “Top View” switches the camera to a top-down view, allowing you to look directly down on the scene and at the upper surface of objects within the scene. This view is helpful for precisely positioning objects on the ground plane and getting an overall scene layout.
3. Bottom view: Clicking the chevron icon for the “Bottom View” changes the camera to a view looking up from the ground plane. It is useful for precisely positioning objects on the ground or on top of other objects and inspecting their underside surface.
4. Front view: Clicking the chevron icon for the “Front View” changes the camera’s perspective to face the front of the scene. It helps align objects along a specific axis or to obtain a front-facing view of the scene, allowing you to view the frontal surface of objects in the scene.
5. Back view: Clicking the chevron icon for the “Back View” switches the camera’s perspective to face the back of the scene. It helps view objects from behind, resulting in a rear-facing view.
6. Right view: Clicking the chevron icon for the “Right View” sets the camera to view the scene from the right side. This view is valuable for aligning objects along the right-left axis or for a side view of the scene, where you can view the right surface of objects.
7. Left view: Clicking the chevron icon for the “Left View” sets the camera to view the scene from the left side. This view helps align objects along the right-left axis or for a side view from the opposite direction, where you can view the left surface of objects in the scene.
10
Chapter 1 IntroduCtIon
The “View Selector” gizmo streamlines the workflow in Roblox Studio by providing quick access to different camera perspectives, which is especially valuable when positioning and aligning objects, adjusting the layout, and inspecting the scene from various angles. It allows creators to work efficiently and ensures they have the flexibility to visualize their 3D world from different viewpoints during the development phase.
Setting Up the Coding Workspace
To begin coding, you need access to the “Script Editor” and the “Output Window” within Roblox Studio. In this section, you will set up the “Output” Window, and in the next section, you will look at a “Script Object” and the “Script Editor.”
The “Output Window” lets you view messages and any errors plaguing your code. This output window is not open by default, so you need to explicitly open it within Roblox Studio by following the steps listed:
1) Click the “VIEW” tab (Figure 1-3). If you accidentally closed any window and need to reopen it, you can do so from the “VIEW” tab. This “VIEW” tab is used to manage open or closed windows.
2) You will find a whole list of icons in the “Show” section of the “VIEW” tab. Hover over each icon until you locate the icon titled “Output.” It should ideally be the second icon within the first row of icons in the “Show” section. Click this icon to have the “Output” window display itself at the bottom of the 3D Editors – “Scene View” window (Figure 1-8). This icon works as a toggle, so clicking it again will cause the “Output” window to disappear.
Creating Your First Lua Script
Within Roblox, your Lua code must reside within a “Script,” an object like other objects you have encountered in the Roblox Editor. Scripts can be inserted directly into objects within your world, becoming a child of the concerned object. By attaching scripts to Parts (a type of object), creators can create interactive objects, trigger events, and gameplay mechanics. Roblox’s basic primitive building block is called a “Part.” A Part is fundamental to constructing a 3D environment in Roblox games and experiences.
11
Chapter 1 IntroduCtIon
The primary and most common type of primitive “Part” (object) is the standard “Block” part. It is a simple cuboid shape with six faces (front, back, top, bottom, left, and right). Developers can resize and scale it to build various complex objects and structures within the game world. The other different primitive “Part” (object) types that provide unique visual and physical characteristics are the following:
1) The “Sphere” is a “Part” (object) that represents a circular shape. Developers can adjust their radius to create spheres or round objects in the game world.
2) The “Wedge” is a “Part” (object) that has a triangular crosssection, forming a wedge-like shape. It helps create slanted surfaces, ramps, steps, and other angular objects.
3) The Corner “Wedge” “Part” (object) is like the “Wedge” part but is specifically designed for creating corner pieces or angles in structures.
4) The “Cylinder” is a “Part” (object) with a circular cross-section, forming a cylindrical shape. Developers can adjust their height and radius to create objects like pillars, tubes, and rounded surfaces.
Roblox also has some non-primitive parts (objects) such as a Seat, Vehicle Seat, Union, etc. In this section, you will create a new basic standard cuboid “Part” (object) and insert a “Script” object into it as its child.
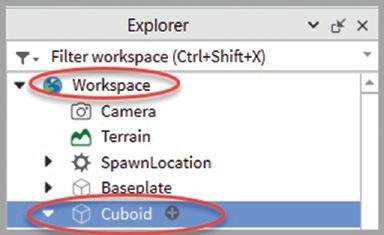
Select either the “HOME” tab or the “MODEL” tab within the Roblox Editor. Locate the “Part” button, which on the “HOME” tab is located within the “Insert” section, and the “MODEL” tab is located within the “Parts” section. Click the chevron at the bottom of the “Part” button to expand it. You will note that it contains all the primitive objects we discussed above. From this drop-down, select “Block,” you will note that a cuboid block has been dropped into the center of the world, most likely on top of your “Spawnlocation” object. Select this “Block” part in the “Scene View,” and drag it to either the left or the right side of the “Spawnlocation” object to ensure that it’s not sitting atop your “Spawnlocation” object. In the “Explorer,” you will notice that a new “Part” object has been added as a child of the “Workspace” object. With the “Part” object selected, either right-click it and select “Rename” from the context menu that pops up, or press the “F2” key on your keyboard to rename this block part. Rename it to “Cuboid” (Figure 1-5). It is essential to rename objects appropriately within your world so that you may access them easily when you need to.
12
Chapter 1 IntroduCtIon
With the “Cuboid” object selected in the “Explorer” window, hover over it with your mouse pointer until you notice a plus icon. Click this plus icon (Figure 1-5), and from the menu that pops up, select “Script” to add a “Script” object as a child of the “Cuboid” object. You will note that a new “Script” tab has now opened in the Roblox Editor besides the “Baseplate” tab and has been populated with a single line of Lua code, the print function. Select the “Script” object in the hierarchy and press the “F2” key to rename this “Script” object. Rename it to “Cuboid_Script” (Figure 1-6).
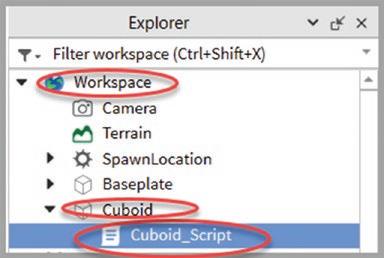
Tip If you close the Script editor tab, you can reopen it by double-clicking the concerned Script object (Cuboid_Script) within the explorer window.
13
Figure 1-6. Renamed Cuboid Script object
Chapter 1 IntroduCtIon
Figure 1-5. Cuboid object – plus icon
The “Cuboid_Script” tab has been populated with the default Roblox script “print” function (Figure 1-7) that will print the string “Hello World” to the “Output Window” when this script runs. To run this script, select the “HOME” tab, and locate the “Test” section that contains the blue triangular “Play” button. Click the chevron situated at the bottom of the “Play” button to expand it and select “Run,” which could also be executed by pressing the “F8” function key on your keyboard. Within the “Output” window, you will notice that the string “Hello World!” has been printed with the name of the script that contained the print function displayed (Figure 1-8). Click the red “Stop” button to stop playing the experience. You can return to the “Script” code by clicking on the Cuboid_Script tab.

The “Run” button allows you to test your code without loading your character avatar, while the “Play” button would have loaded your character avatar into the world. Congratulations on creating your very first Lua script!
14
Figure 1-7. Print function
1 IntroduCtIon
Figure 1-8. String “Hello World!” displayed in the Output window
Chapter
Note any changes made to objects in your world during play testing using “run” mode won’t persist when you stop playtesting. By default, when you exit “run” mode, the changes you made during runtime will not be saved to the game experience.
a “string” is a data type representing a sequence of characters. It can hold any combination of alphabets, numbers, and symbols, making it a versatile data type for handling text-based information. Chapter 3 will teach you about the “string” data type.
a “function” is a chunk of code that can be referred to by a name (such as “print”) and can be executed at any time. In Chapter 4, you will learn about functions.
Saving and Publishing Your Project
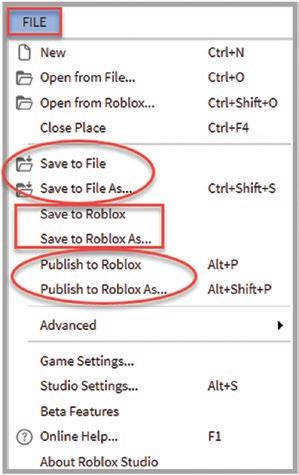
As Roblox doesn’t auto-save your projects, you must save your progress regularly to avoid losing your work. When your game experience is ready for the world, you can publish your creation for others to enjoy.
Within the Roblox Editor, on its menu bar, click “File,” which is located at the top left corner. From the menu that pops up, you will note four different “Save to” menu items (Figure 1-9). Selecting either “Save to File” or “Save to File As…” allows you to save your Roblox experience to your local drive as a “.rbxl” file. The “Save to File” menu item allows you to retain the template name when you save your Project to your local drive, while the “Save to File As…” menu item allows you to rename your Project, giving it the name of your liking. Of course, you could always overwrite the default template name provided within the “Save As” dialog when using the “Save to File” menu item selection.
15
Chapter 1 IntroduCtIon
The menu items “Save to Roblox” or “Save to Roblox As…” (Figure 1-9) allow you to save your Roblox experience to Roblox Servers in the cloud. Your Project is saved to a secure place on a Roblox Server and is not accessible to the public.
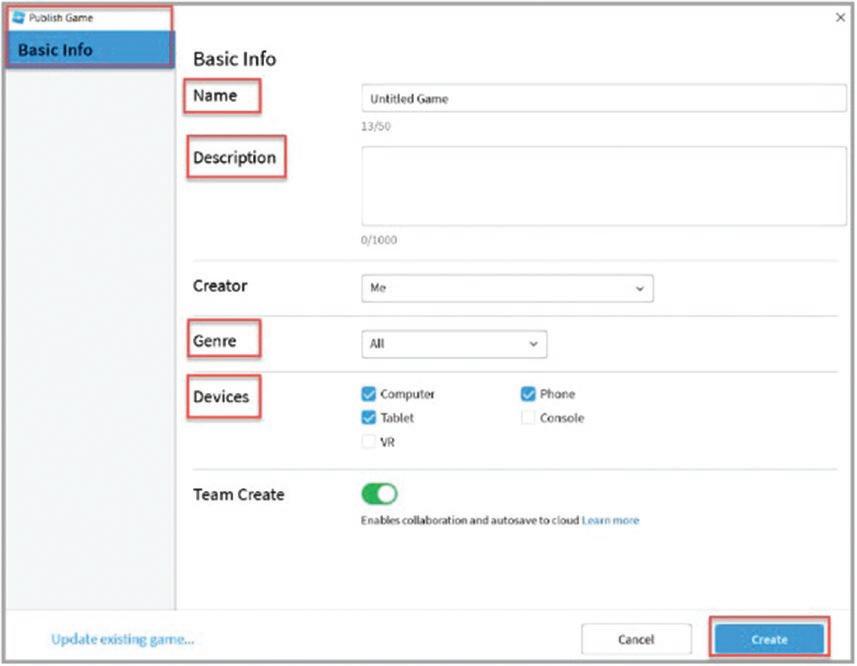
Once you are satisfied with the game experience you have created, you would want to make it available to the public, for which you need to publish your Project to Roblox. The menu items “Publish to Roblox” or “Publish to Roblox As…” (Figure 1-9) allow you to publish your creation to the Roblox community. Selecting “Publish to Roblox” brings up the “Publish Game – Basic Info” window (Figure 1-10), where you need to provide your game experience with a Title, Description, Genre, and list of devices on which your experience can be played. Once these details are complete, click the “Create” button.
You can finally close your Roblox experience by selecting the menu item File – Close Place (Figure 1-9), which closes the Roblox Editor and returns you to the main Roblox Studio Home Screen.
16
Figure 1-9. Saving, publishing, and closing the project
Chapter 1 IntroduCtIon
Reopening Your Project
To reopen the Project you have been working on, locate it within Roblox Studio’s Home Screen (Figure 1-2) by clicking “Recent” within the sidebar and then clicking your projects thumbnail available within the “Recent Games” tab. If you publish your experience to Roblox, it will be available by clicking on “My Games” within the sidebar.
17
Figure 1-10. Publish Game – Basic Info window
Chapter 1 IntroduCtIon