

CAUTION
Read
This appliance is suitable for commercial use, for example in hotels, schools, hospitals, factories, shops, offices and rental businesses.
1.Configuration:
2.Main specifications
Inlet diameter:
Rated
Supply
Rated
Packing
3.Assembly
3.1 Installation
3.1.1 Installing caster

1
Installing caster: place the base plate upside down and install the four casters in holes provided. ,fasten the screws (M6X16)securelyusing screw driver as shown in fig. 1.
3.1.2 Installing motor pedestal

Installing motor pedestal: Place the base plate side up, and place the motor pedestal on the base plate aligning holes on motor pedestal with holes on base plate, fasten with hex bolt M8X12 using spanner as shown in fig.2.
3.1.3 Installing collector body with motor

Fig. 3
Installing collector body with motor: Place the motor on the motor pedestal aligning the holes on the motor base with the holes on the motor pedestal. Insert hex head bolts M8X30, and place washers and nuts on bolts, then tighten hex nuts using spanner; fasten the collector body on the base plate with hex head bolts M8X12 using spanner as shown in fig.3.
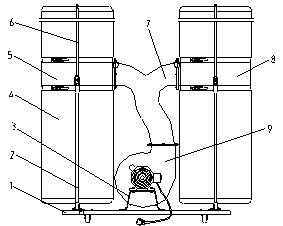
3.1.4 Installing three ways pipe

Fig.4
Installing three ways pipe: place the packing on the outlet of collector body, then install the three ways pipe to the collector body. Insert screws M8X12, and tighten the nut using spanner as shown in fig.4.
3.1.5 Installing collector

Fig. 5
Installing collector: Install the two collectors and packing to the three ways pipe
with screws M8X12, then fix the bracket 1 on the base plate using bolts M8X16 and nuts. At the last fix the bracket 1, and bracket 2 to the collector using screws M8X10 as shown in fig.5.
3.1.6 Installing filter and collector bags, and four-way pipe

Installing filter and collector bags: Placing the filter and collector bags over the up and lower openings of collectors, and secure them with the belt hoops as shown in fig.8. Attach the four-way pipe to the collector body with M6X10 screws.
3.1.7 Attach the dust collector to a properly grounded outlet
Plug power cord into a 400V properly grounded type outlet. Now, the dust collector is ready to work.
4. Safety instructions for dust collector
4.1 Always wear safety goggles when working. Everyday eyeglasses have only impact resistant lenses, they are not safety glasses
4.2 If operations are dusty, wear a dust mask with the safety goggles.
4.3 Keep the work area clean. Cluttered areas invite accidents.
4.4 To avoid accidental starting, make sure switch is in “OFF” position before plugging in outlet.
4.5 Do not wear loose cloth and jewelry (rings, wrist watches). Tie back long hair.
4.6 Remove adjusting keys and wrenches from the tool before turning it on.
4.7 Keep all visitors a safe distance from the dust collector. Make sure bystanders are clear of the machine especially while it is running.
4.8 Before use, check each part to see that the lock parts are tightened securely, and moving parts are agile and steady.
4.9 Never leave tool running and unattended.
4.10 The appliance must be disconnected from its power source during cleaning or maintenance and when replacing parts or converting the appliance to another function, the plug must be removed from the socket-outlet.
5. 5.Mantenance
5.1 The dust collector must be disconnected from its power source before cleaning, maintaining, or replacing accessories such as vanes
5.2 Follow instructions for lubricating and replacing accessories, and use only recommended accessories.
5.3 Do not force the machine or attachment to do a job for which it was not designed.
5.4 Do not use power tools in damp or wet locations. Keep your work area well illuminated.
5.5 Never use the machine in explosive atmosphere (around paint, flammable liquids, etc.).
5.6 If repair is needed for the machine, the repair must be done by a qualified technician.
6.Suggests for safety
6.1 This machine must be grounded while in use to protect the operator from electric shock.
6.2 Plug power cord into a properly grounded type outlet.
6.3 This dust collector is not suitable for picking up hazardous dust
6.4 The dust collector is for dry use only and is not to be used or stored outdoors in wet condition.
6.5 Keep your proper footing and balance at all times. For best footing, wear nonslip footwear.
6.6 Regularly examine the supply cord for damage, such as cracking or ageing. If damage is found, replace the cord before further use.
6.7 Only replace the supply cord with the type specified in the instruction manual.
6.8 If the supply cord is damaged, it must be replaced by the manufacturer or its service agent or a similar qualified person in order to avoid hazard.