


Before we start using the machine, we perform a visual inspection of all cables and tubes for air supply and water circulation. On the back side of the industrial chiller (the unit responsible for actively cooling the CO2 tube), there is an indicator for the optimal water level in the system, which should be checked before starting the machine.
The operating water temperature in the cooling system should be between 5°C and 30°C. It is recommended to use distilled water for the reservoir, and if we encounter low outdoor temperatures, it is advisable to use antifreeze to prevent ice formation in the tube—something we must never allow to happen.


We inspect the mirrors which are transmitting the laser beam and we ensure that their surface is clean, free of dust, or any type of darkening (caused by the smoke generated during cutting). If cleaning is needed, we use alcohol (Ethanol) with a concentration between 70% and 98% and carefully wipe them with cotton swabs. The mirrors should never be touched with fingers.

1. Exit for the light beam after being reflected by the first mirror.
2. Second reflecting mirror.
3. Third reflecting mirror.
4. Orange line represents laser beams travel dirction.


We start the machine by releasing the red emergency stop button labeled Main Switch, and by pressing the green button (Laser Switch), we supply power to the CO2 tube, enabling its functionality.

A next-generation system for laser engraving and cutting control, developed by RD Co., Ltd. It features high hardware stability and a user-friendly 5” TFT display. The system includes functions for controlling the movement of all axes, storing large-capacity files and data, a laser power control interface with adjustable dual-channel settings, USB-drive compatibility, and the ability to communicate with a computer via USB 2.0 or Ethernet, where the system automatically detects and establishes the communication mode.

The first step in creating our design is to draw it and assign cutting/engraving parameters in the appropriate software.
The primary software for setting parameters and preparing drawings for processing on this machine is RDWorks
Supported File Types:
Vector formats: DXF, AI, PLT, DST, DSB, and others.
Bitmap formats: BMP, JPG, PNG, MNG, and many more.
System Requirements:
Recommended OS: Windows (any version after Windows 7,).
Minimum Requirements: 1GB RAM, i586 Pentium-class CPU.
Optimal Requirements: Windows10, 4GB RAM, I3 CPU
Upon launching the software, we are greeted with the main workspace, as well as:

• Main Menu Bar Contains all main functions of the software.
• Graphical Attributes Bar
This section contains the main commands for graphical operations, including:
- Positioning the drawing on the workspace
- Adjusting size and proportions
- Setting the processing order
- Other essential design modifications
• System Menu
This menu includes the most commonly used commands from the main menu for quick access.

• Alignment Options Bar
This bar provides tools for aligning and positioning objects precisely on the workspace.
• Main Panel for Parameters and Operations
This panel is where the core operations of the machine are managed. It includes:
- Active movement of axes
- Homing the machine
- Setting up origin point
- File transfer and connection settings
- Layer organization
- Setting parameters for cutting/engraving
• Layer Sorting Panel
In this section, you can:
- Select colors/layers

- Assign the processing order of parameters for different layers

• Drawing and Shapes bar
This toolbar contains the most commonly used tools for preparing designs, allowing for flexible work on the project.
• Creating Project Files
RDWorks saves projects into .rld files. This gives us the option to set up serial production for any type of vector file, the first step is to import the file

The machine operates by processing vectors. DXF format files contain information about the vectors (lines), and this file type will be used to perform the processing of the design. When preparing the drawing in engineering software such as AutoCAD, SolidWorks, CorelDraw, etc., it should be saved or exported in DXF format.
RDWorks is compatible with DXF and AI formats, and it also supports other extensions such as: .ai .dxf .plt .dst .dsb .pnt .bmp .gif .jpg .jpeg
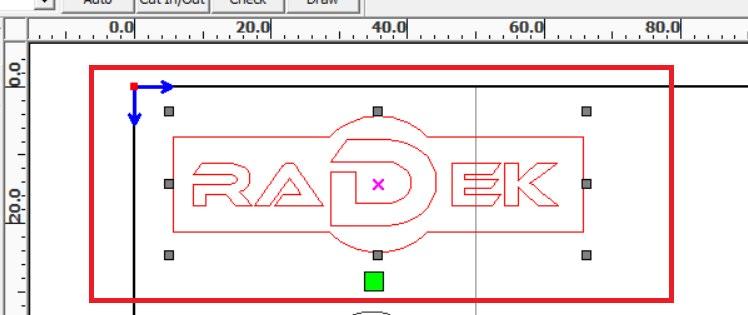
After attaching a file using the import option, select the drawing with the mouse to assign parameters. When the object is selected, there will be 8 points around its perimeter, and an “X” indicator at the center.
In the workspace panel, we set the basic working parameters:
Cutting speed (mm/s)
Laser power (%)
For laser power, it’s necessary to determine both the minimum and maximum power levels. These parameters help ensure optimal performance during the cutting process.

These two parameters are crucial in the material processing process. Depending on the type of material being processed, we set different parameters.
Movement speed (Speed in mm/s) determines how fast the laser head will move along the predefined path (vectors). The slower the movement, the more time the laser beam has to stay in contact with the material, leading to a deeper penetration. For instance, if we run two identical lines with 15% power, one at 20mm/s and the other at 10mm/s, the line run at 10mm/s will have a twice as deep cut because the laser beam has more time to interact with the material and remove more of it.
Laser power is the other crucial parameter, determining the percentage of maximum power from the CO2 tube that will be used for the operation.
Once the parameters are set, we can begin the processing in the control panel. If the laser is connected to the computer via USB cable, we have direct control over the process and can start it by clicking on the “Start” button located in the Work window, under the Laser Work section. If the laser is not connected to the computer, we can save the prepared file to a USB stick using the SaveToUFile option, and then start the processing directly from the laser’s control unit once the USB stick is inserted.


Reset – Resets the entire system.
Start/Pause – Starts or pauses the processing.
Pulse – Actively generates a laser beam while the button is pressed.
Stop – Stops the processing or the movement of the axes.
Focus – Automatically adjusts the laser focus.
Menu – Access user and factory settings as well as other adjustments.
Frame – Displays the boundary of the work area.
File – Manages files from the USB stick or internal memory.
Origin – Sets the relative starting point.
Power – Adjusts the laser power.
Shift – Button for special functions.
Speed – Sets the movement speed of the laser head (cutting speed).
Esc – Stops the process or exits any menu.
Enter – Confirms selection.
Pointers – Activates manual movement for all axes.
Z+ - – Adjusts the height of the bed.
– Backspace or delete button.
• Area for Graphical Display: Displays the entire drawing for processing and the path of the laser head.
• Working Parameters: Shows the file name/number, speed, maximum power, etc.
• Coordinates: Displays the coordinates of the X, Y, and Z axes.

• Layer Parameters: Information about the layer parameters in the file, such as maximum or minimum power, cutting speed, and others. Only when the system is inactive can we double-click on the layer, and only then can users change the layer’s parameters and save the changes.
• Running Status: Displays the current status of the machine, which can be Idle, Run, Pause, or Finish.
• Running Progress Bar: Shows the work status and the duration of the process for processing the part.
• File Dimension: Displays the dimensions of the file based on which the part will be processed.
• Net Status: Displays the status of the Ethernet connection. When the network connection is successful, the icon appears.

When we press the Menu button, a window will appear with options for detailed adjustment of all working parameters, controller settings, as well as an option to set multiple origin points.
In the user parameters window, we can adjust all advanced functions for cutting, engraving, origin position, focus, movement speed during operation, and many other settings.


These advanced parameters allow settings for all the fine details during the manufacturing process, such as acceleration and deceleration when moving the axes during operation or from a resting position. With proper adjustment of these parameters, we are guaranteed perfect results and excellent resolution during cutting or engraving. Below is an example showing incorrect parameter settings and their effect on the final output.

The appearance of waviness during cutting is a phenomenon that points to incorrect parameters for acceleration and deceleration speeds of the axes. When the movement speed is too high or when working on small details (with a very high speed), the motors attempt to compensate for the set parameters, resulting in waviness where it should not be present. The head and the axes of the machine have a certain momentum during movement, and because of that, the machine compensates with precise motor control. The recommendation is to reduce the speed (Acceleration) in User Parameters.


Relative Origin Point + -
In the “Origin Set +” window, we can find settings for adjusting the origin point and setting up multiple origin points on our workpiece.


In the File menu, we have access to all the files, their management, and transfer between USB (Udisk+) and the machine, as well as checking the processing boundaries (frame), processing time, and additional information.
1. Please do not look directly at the laser light.
2. Handle the machine within a controlled area.
3. Untrained individuals should not use the machine.
4. Close off the area around the laser path in case the laser escapes.
5. Try to avoid the same height between the laser head and eye contact.
6. Pay attention to ventilation and exhaust gases in the laser processing area.
7. Check the water chiller to see if it can expel water every time after starting the machine. It is forbidden to start the machine when water cannot exit the chiller.
8. The water in the chiller should be full. The water temperature should be around 15-35℃. If the temperature is too high, the water should be replaced. It is better to use purified water to avoid contaminants. The circulating water should be changed regularly (every week).
9. Since the machine contains a laser and high pressure, unprofessional workers should not disassemble the machine without authorization.
10. The reflective mirrors and focal lens should be cleaned with special paper. Check if the mirrors and lenses are dry before using them again.
11. Pay attention to the protection of the laser light exit window. Avoid smoke and dust from contaminating the surface of the exit window during operation (and when adjusting the laser path). The exhaust system must be equipped. If the exit window is contaminated, the laser energy will be impaired. The exit window can be carefully cleaned with cotton or silk fabric soaked in absolute alcohol. It is necessary to ground all parts of the machine and computer to avoid machine damage and injuries caused by static electricity.
12. The exhaust fan must be turned on while the machine is working to prevent contamination of the mirrors and lenses.
13. The water in the laser tube should be drained in winter to avoid the tube cracking from freezing.
14. When the machine is working, the operator must pay attention to the operation, especially when engraving or cutting materials with a high organic composition and high laser power output, in case of fire. Untrained individuals are prohibited from handling the machine. Operators should inspect the working conditions at all times.
15. Operators should not leave the machine when it is working to avoid unnecessary losses.
16. The crossbeam should not be pulled by hand. The machine should be placed in areas where there are no obstacles or harmful effects such as pollution, strong electricity, strong magnetism, etc.
17. Power supply voltage: the laser will work unstably due to fluctuations in the input voltage; if it exceeds the limit, the electrical system will be permanently damaged. Therefore, please install a power stabilizer of at least 5000W to avoid damage to the device and circuit from voltage fluctuations, and ensure stability.
18. Do not press the buttons forcefully. Please press gently to avoid damaging the buttons.
19. In case of damage or fire, immediately turn off the power.
20. Please do not use the machine when the humidity is over 80%, as this will affect the lifespan of the machine and damage the electronic components.
1. Replacing water in the chiller: (It is recommended to replace the water weekly)
Note: Before the laser tube operates, check if the water in the tube is full. It is forbidden to use low-quality circulating water, as it can seriously affect the laser power and shorten the laser tube’s lifespan. The water temperature should be 15-30℃. If the temperature exceeds 30℃, please replace the water (the correct method to change the water is to replace hot water with cold water) or turn off the machine to cool the water.
2. Cleaning the exhaust fan:
After a long time, the exhaust fan will accumulate dust. Open the exhaust fan box, remove the two pipes, and clean the dust from the fan.
3. Cleaning the optical mirrors and lenses:
Users can clean the first and second mirrors directly with lens paper or cotton and medical alcohol, gently from the center to the edge, being careful not to rub with rough material. Please carefully clean the reflective mirror while it is on the machine; otherwise, the radiation path must be readjusted. The third reflective mirror and the focal lens should be removed from the laser head for cleaning. Carefully unscrew the lens tube from the laser head, then blow away the surface dust and gently wipe with alcohol-soaked cotton. Reassemble after cleaning. Check if the mirrors are dry before using them again.
• Gently clean the mirrors; do not damage the surface coating.
• Handle carefully while cleaning.
• Do not clean back and forth, or with rough materials. Use circular movements and cotton swabs, as damaging the film on the mirror surface will reduce laser power.
• The absorbing cotton can only be used once! Please do not leave any cotton or residue on it.
4. Cleaning the guide rails:
The guide rails should be cleaned every two weeks and lubricated. Cleaning materials: cotton fabric and lubricating oil. How to clean the rails: Move the laser head to one end of the rail and clean the rail with cotton fabric, then apply a little lubricating oil. Move the laser head from one end of the rail to the opposite end and check if the oil is evenly distributed.
5. Tighten the bolts and couplings:
After a certain period, the bolts and coupling may loosen, affecting the stability and mechanical movement of the machine. Tighten the bolts and coupling every two or three months to ensure the machine operates normally.
6. Bearing maintenance:
Use a soft cloth to wipe the dust off the bearing, inject oil into the bearing, and slowly rotate it.
7. Laser tube maintenance:
The laser tube should avoid generating cross-contamination that could cause water leakage. If there is incrustation, clean it with 20% diluted hydrochloric acid.
Light Path: The light path is made by reflection with reflectors and focusing with the focal lens. The focal lens will not distort, but the possibility of distortion with the three reflectors is high, as they are fixed by mechanical parts. Therefore, we recommend customers to check the light path before working.
8. Laser power supply:
The laser power supply used must be within the basic limits (i.e., the maximum current should not exceed 35 mA).
9. Water requirements for the chiller:
The water should be purified (distilled) or high-purity water. The water temperature in the chiller should be 15℃-30℃. If the temperature is too high, please allow time for the industrial chiller to reach the desired temperature.
The water flow should be 2L-4L/min. If it is too much or too little, the laser spot quality and laser power will be affected. The chiller should be full of water; otherwise, the tube cannot be cooled properly.