


INTELLIGENT
MANUAL 600W 1200W V2.2
RS 600 & RS 1200 POWER STATION &
INVERTER USER

TABLE
1-2 DISCLAIMER & TIPS FOR SAFETY 3-4 TIPS FOR SAFETY CONTINUED & SPECIFICATIONS 5-6 ILLUSTRATIONS & CHARGING / DISCHARGING 7-8 SWITCH ON/OFF - WIRELESS CHARGING - USB OUTPUT - LED LIGHT 9-10 AC OUTPUT / DC OUTPUT & SOLAR CHARGING 11-12 TROUBLE SHOOTING FAQ & GENERAL QUESTIONS AND ANSWERS 13-14 PROTECTION/MAINTENANCE & AFTER SALES INSTRUCTIONS 15-16 WARRANTY & USER INFORMATION Scan for product set up
OF CONTENTS
DISCLAIMER
Before using this product, please read the user manual. After reading, please keep the user manual in a safe place for future reference. If this product is not handled correctly, you may cause serious injury to yourself or others, or the product or surrounding property may result in damage.
When using this product, it is understood that you have accepted all the terms and contents of this manual. The manufacturer shall not be liable for any losses caused by the user not using the product according to the “User Manual”.
In compliance with relevant laws and regulations, the manual and all related documents of this product are subject to change without notice.
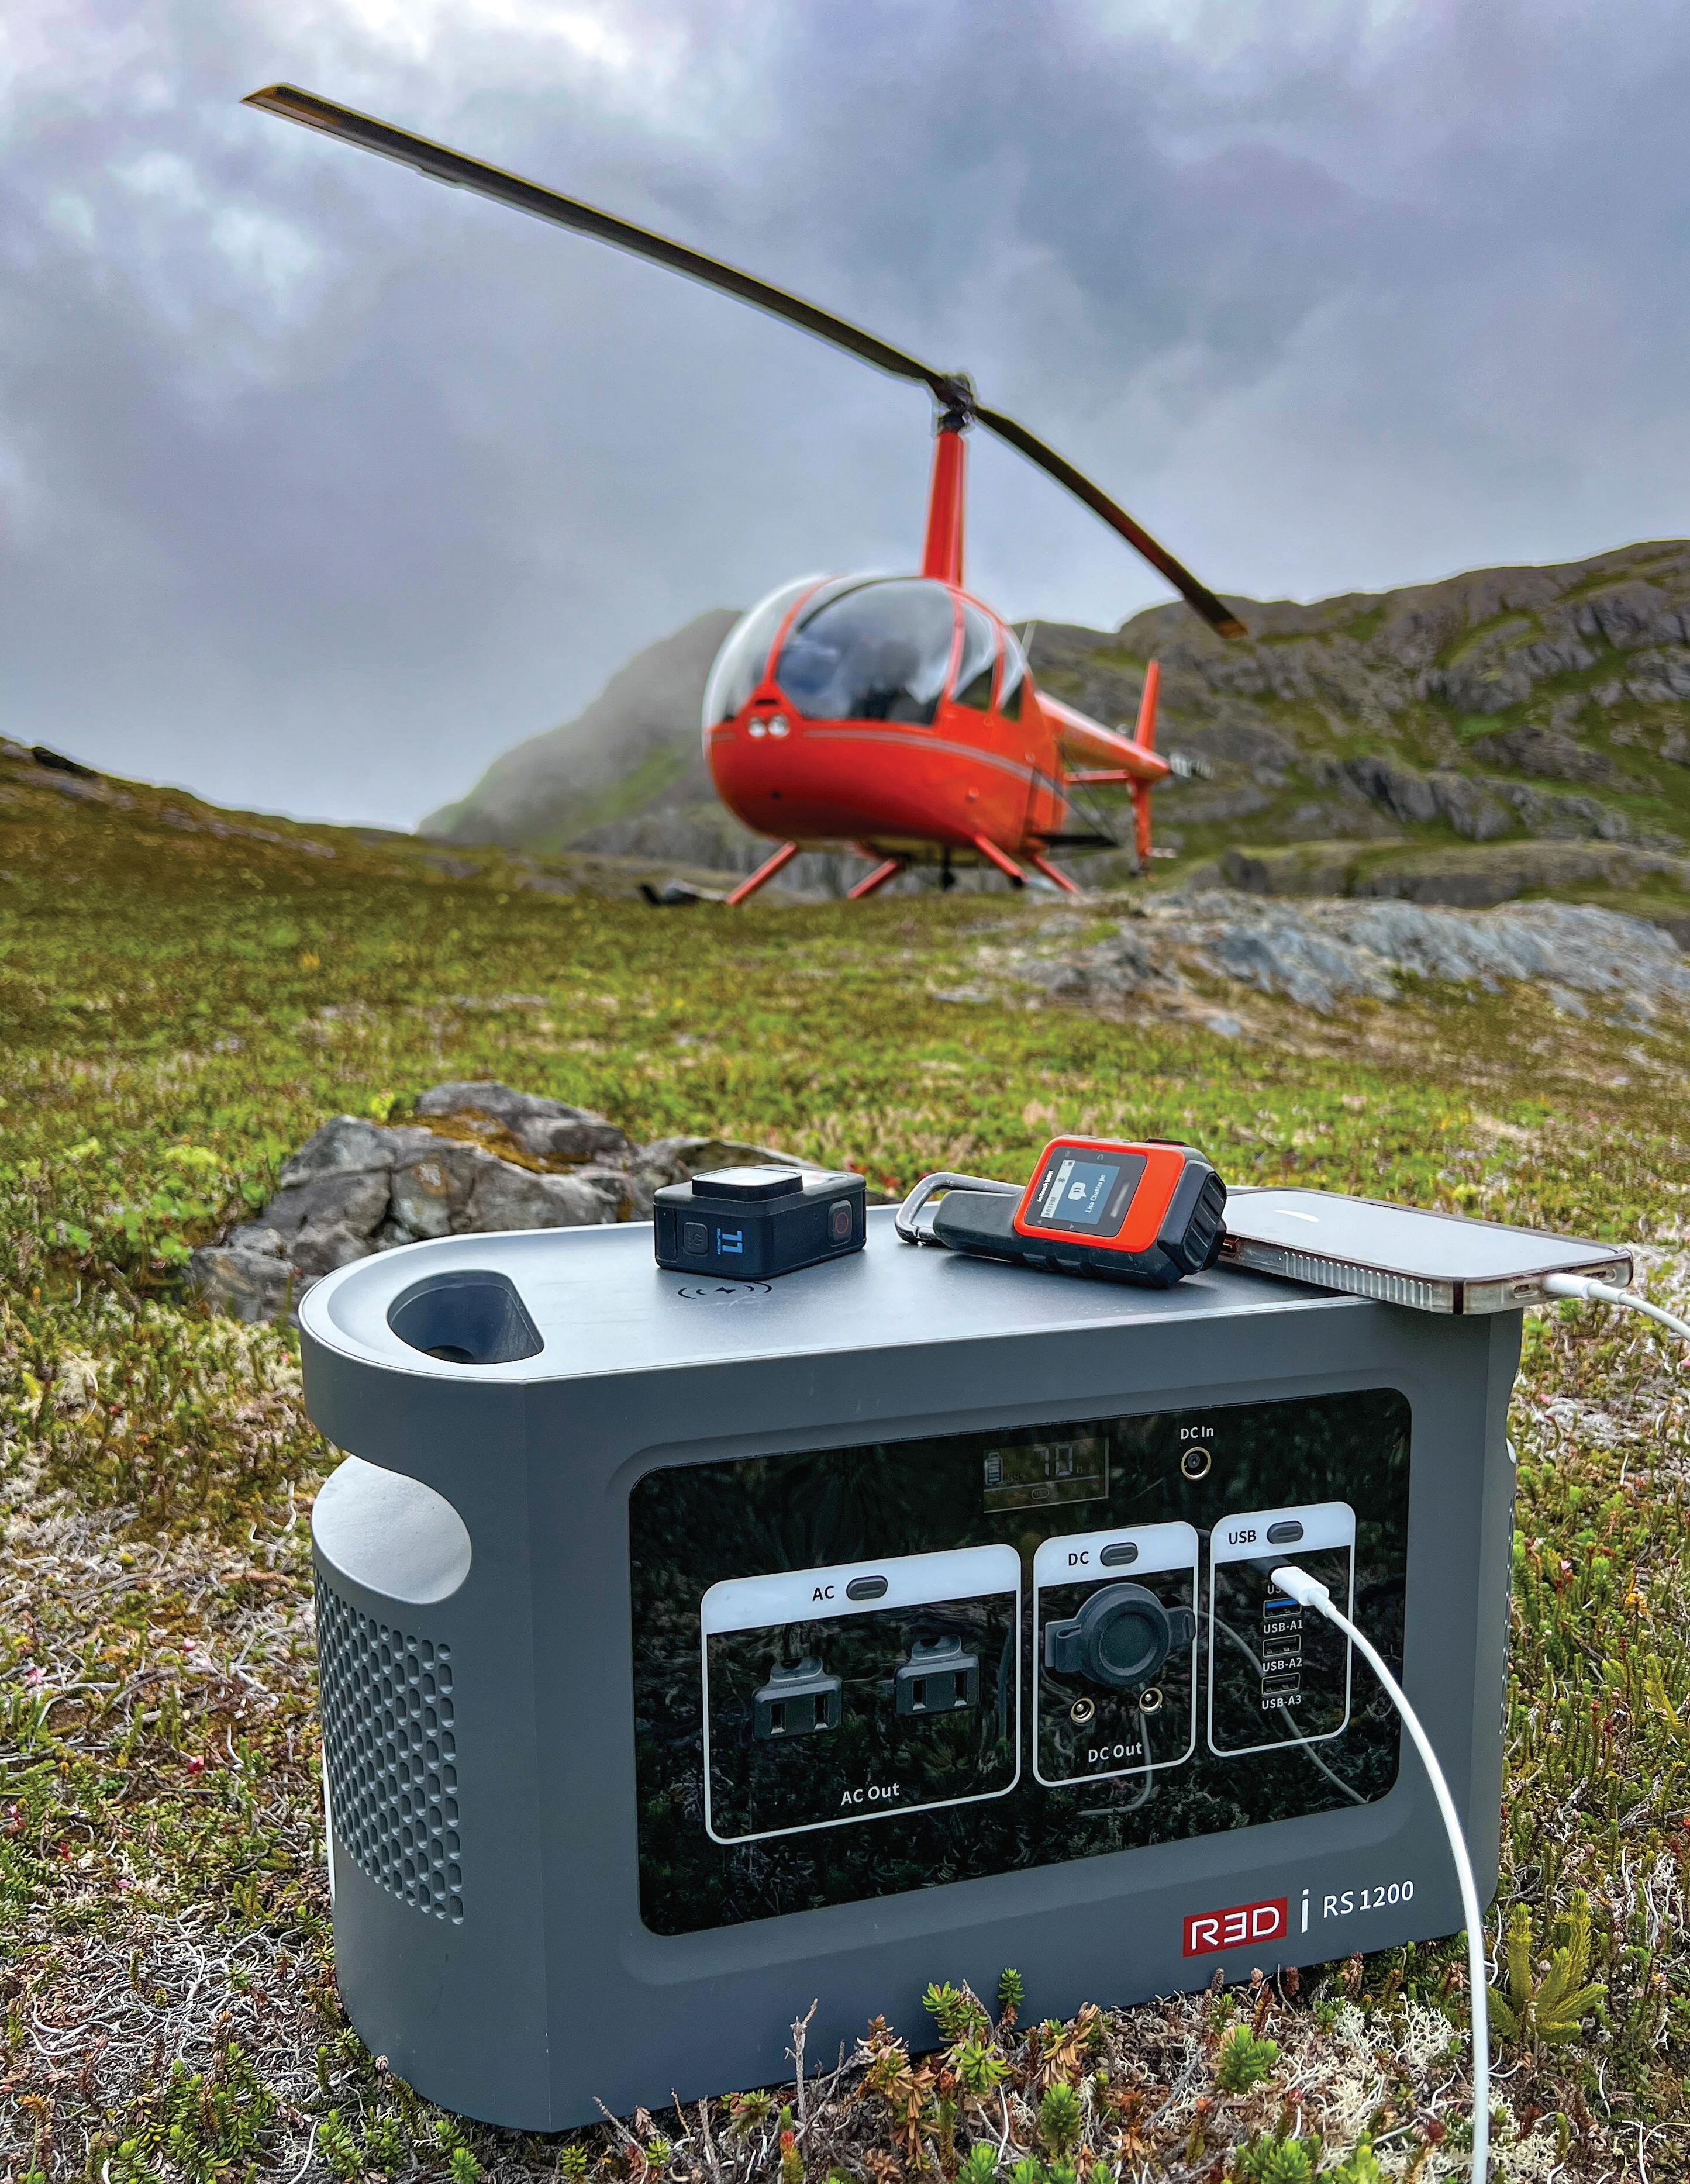
This product has multi-port AC output and DC output functions, which are compatible to charge mobile phones, laptops, cameras, TVs, chargers, game consoles, Media players, power tools, and other equipment.


RS600
100-240V 50~60Hz 2.5A Max output: 26V 7A 180W 100-240V 50~60Hz 1.7A Max output: 19V 1.7A 65W RS1200
RS600/RS1200 1
PACKAGING
5.5 Barrel
6.5 Barrel 110V Wall Adapter User Manual
TIPS FOR SAFETY
1. This product is not intended for use by children.
2. Before using this product, please remove all outer packaging and untie cables.
3. Please do not disassemble this product. If maintenance is required, please contact customer service for help.
4. If this product has been dropped, or damaged, do not operate the product and contact customer service as soon as possible.
paper, cardboard, etc. When the device is running, please keep away from items that are easily affected by high temperature, such as blankets, pillows, mattresses, etc.
8. Do not expose the product to any liquid. Do not immerse the product in water or get it wet. Do not use this product in rain or humid environments. Please see temperature).
9. This product becomes hot during use and must be properly ventilated. Please ensure that there is at least 7.5 cm of space around the product.
10. When using this product, please follow the operating environment temperature in this user manual. If the temperature is too high, it may cause the battery to malfunction. If the temperature is too low, the performance will be reduced. If the product has a peculiar smell during use, power off immediately and place it in an open space for observation. Contact customer service before further operation.
11. Do not block the fan during use or leave the product in an airless or dusty space.
12. Do not use this product in an environment with strong static electricity or a strong magnetic field.
14. The AC output of this product is 220V. Do not insert your hands or foreign objects into the AC sockets.
15. Do not short-circuit the output of this product.
16. This product provides a power supply during operation. Do not overload this product, as it may result in damage to the product, the user, and/or the environment.
17. Do not operate this product with a damaged power cord or plug. If damaged, replace the power cord or plug immediately.
18. Please charge this product with the supplied power charger only.
19. Please choose original R3Di solar panel charging according to the electrical parameters specified in this manual.
20. To reduce the risk of electric shock, turn off and unplug the product before performing any maintenance or cleaning.
TIPS FOR SAFETY CONTINUED
3


this QR code to visit r3di.com for more information.
SPECIFICATIONS Scan
ILLUSTRATIONS
*The AC socket, AC output voltage, and frequency of this product will vary per country and/or regions.

*Switch off screen display when not in use.
1. Screen
2. DC Charging Socket
3. AC Switch

4. AC Charging Socket
5. Car Charging Port
6. DC Output Port

1. Battery/Status
2. Power Percentage

3. Discharge Time
4. High-Low Temperature Protection Warning
5. AC Output
6. DC Output
7. USB Output

8. Wireless Charging
 7. DC Switch
8. USB Switch 9. USB-C 10. USB-A1 & A2 11. USB-A3 13. LED Light 14. Wireless Charger
7. DC Switch
8. USB Switch 9. USB-C 10. USB-A1 & A2 11. USB-A3 13. LED Light 14. Wireless Charger
1 2 3 4 5 6 10 11 12 13 14 7 8 9
Screen display - power in
5
Screen display - power out
CHARGING
1. While the product is turned off, insert the power charger into the DC charging port. All the symbols on the display will light up, and the percentage of power will be displayed on the battery status symbol.


2. You can use the USB-C port for charging the device with 100W input.
3. The DC charging port and the USB-C port can be charged at the same time.

4. After the product is fully charged, the battery will display 100%, and it will automatically shut down after 30 seconds.
5. Once fully charged, unplug the power charger or USB-C charging cable.
6. When the product is in use, the screen will display the remaining percentage of power.

*We recommend charging the product after opening, as it may not come with a full charge.
* To maintain and prolong the performance and health of the battery, we recommend keeping the charge above 20% at all times.
*When the high and low temperature protection warning symbol appears on the display, please suspend use, and shut it down immediately.
DC Input USB Type-C Input
SWITCH ON/OFF
1. To turn the product on, press the LED switch. Hold for up to 10 seconds.
2. To turn the display off, hold the AC switch or press any of the DC/USB buttons.
3. To turn the product off, press and hold the LED switch for 5 seconds.
USB OUTPUT
1. To switch on, short press the USB switch, turn on the USB output, and the screen will display the USB.

2. Plug the USB-A cable into the USB-A port and get started.
3. Plug the USB-C cable into the USB-C port and get started.
4. After use, short press the USB switch shortly, turn off the USB output, and unplug the USB cable.
*The product will automatically turn off when the USB “no-load” output exceeds 6 hours.
600W 96% 110V 600W 448Wh 110V~60Hz 600WMax AC Output Sine Wave Output LiFe Po4B attery Chemistry PD 100W Fast Charge Input &O utput Charging TYPE-Cª (Can Recharge in 4H ours) 18WQ C3.0 USB Type-A 12WU SB Type-A 10 Electricity Bidirectional Inverter Highest Constant Output Wide Voltage Output 7
WIRELESS CHARGING
1. After turning the product on, long press the USB switch to turn on

2. Place your device in the top marked position for wireless charging. The charging position may need to be adjusted appropriately for different devices.
3. After use, long press the USB switch to turn off wireless charging.
4. When the wireless charging output has been idle for more than 6 hours, it will automatically turn off.
LED LIGHT
1. After booting, press the LED switch to turn on the LED light.
2. Continue to press the LED switch to change between settings:
*If the LED light is continuously on for more than 12 hours, it will automatically turn off.

 LED Light
USB Output Wireless Charging
LED Light
USB Output Wireless Charging
AC OUTPUT
1. Press and hold the LED switch for up to 10 seconds to turn it on.
2. Hold the display screen for 30 seconds, then it will automatically shut down.
3. Press and hold the LED switch for 5 seconds to shut down.
*If the power is less than 5%, the AC output will turn off.
*If the output is idle for more than 6 hours, it will automatically turn off.
*Press the AC switch 3 times to switch the frequency 50Hz/60Hz.
*Turn off the AC output when not in use to save energy.
*Do not connect other AC power sources to the AC outlet of this product.
*Do not plug the power charger into the AC outlet of this product.
*When the AC output is short-circuited or the load electrical power load exceeds the AC output power of this product, the protection function of this product will be triggered. Please eliminate the short circuit or remove the electrical function.
9
2X AC Output 10A/110V
DC OUTPUT
1. After starting up the product, short press the DC switch to turn on the DC output, and the display will display “DC”.
2. Connect the DC power equipment in the Off state to the DC output port, and then turn it on for use.
3. Connect the DC power equipment in the Off state to the car charger output port, and then turn it on for use.


4. After use, short press the DC switch to turn off the DC output and remove the electrical equipment.


SOLAR CHARGING (Optional) Not Included
expose this product to direct sunlight or humid environments.)

2. Connect the output accessory cord of the solar charging panel to the 5.5/6.5mm DC charging port to start charging your device.
3. After charging is complete, please unplug the solar panel from the DC charging port.

SOLAR CHARGING DC Input
XT60 male of adapter XT60 female of solar panel
Adapter *Sold/shipped separately
Solar panel Cable
Problem 1. There is no response when the product is turned on, and there is no output from DC, USB, AC, and LED lights.
Solution:
- Remove all electrical devices, charge for 5-10 minutes, and restart the machine.
- Please make sure that the product is currently being used within the normal temperature range.
Problem 2. The product can be turned on, but the corresponding output
Solution:
- Check if the power of the product is too low.
- Check whether the output power of the electrical equipment is higher than the product’s output power. if so, remove the load, and restart the machine.
- Check whether there is a short circuit between the output port and the electrical device and restart the machine after removing the device.
Problem 3. The product shuts down unexpectedly during use.
Solution:
The activation of the internal protection system causes the product to shut down. Events that may cause the activation of the protection system include overcharge, low or no charge, high temperature, low temperature, overcurrent, and short circuit. To solve the problem quickly, please remove all electrical equipment, keep the product temperature within the normal temperature range, and charge the product for 5-10 minutes. At the same time, check whether the electrical equipment is faulty. Then reboot.
TROUBLESHOOTING & FAQ
11
Problem 4. The product cannot be charged.
Solution: charging range of this product.
- Check whether the current device has activated temperature protection because the temperature is too high or too low.
GENERAL QUESTIONS AND ANSWERS
Q: How long can the product be stored?
A: With a full charge, it can be stored for 6 months. It is recommended that it is taken out and charged once every three months.
Q: How long does it take to fully charge the product?
A: When using the equipped power charger and 100W USB-C to 90%.
Q: Can the product be used while charging?
A: This product supports charging while using. When the output power is greater than the charging power, the battery power will decrease, and when it is reduced to a low power state, the output will be turned off.
Q: Does the product have temperature protection?
A: It will be protected when the internal temperature is higher than 55°C when charging, and it will be protected when the internal temperature is higher than 60°C when in use.
Q: Will the product automatically shut down?
A: When the product is used without load, the corresponding output function will be turned off after 1 hour; it will automatically shut down after all output functions are turned off.
GENERAL QUESTIONS AND ANSWERS (continued)
Q: Can the product be used to start a car?
A: The product cannot be directly used to start the car. However, an additional charging cable can be selected to charge the car’s starter battery. Generally, after charging for 5-10 minutes, the car can be started.
PROTECTION AND MAINTENANCE
- It is recommended to use or store this product in an environment of 20°C to 30°C, away from water, heat, and other metal objects. below -20°C.
- 1% after use, please charge it to 60% before storing. If the battery is left idle for damage to the battery and shorten the service life of the product.
AFTER SALES INSTRUCTIONS
Dear Adventurer, thank you for using the R3Di products. We provide after-sales service as follows:
R3Di warrants to the original retail purchaser of the Products, that should this Product or part thereof during normal consumer usage and condition, be proven to be defective in material or workmanship that results in product failure authorize any person to assume for us, any other liability in connection with the sale of our products.
13
- Valid proof of purchase must be issued by the sales unit at the time of purchase. cards will not be replaced.
- If the product fails due to non-human factors, the user can go to the customer service center for free maintenance within the warranty period with the warranty
During the user’s use, those who meet one of the following conditions are not covered by the warranty:
- Warranty expired.
- Damage caused by product drop or water immersion during use. lightning strike, etc.)
- Damage caused by use not in accordance with the requirements in the instruction manual.
WARRANTY
Dear Adventurer,
Thank you for using the R3Di products. In order to serve you better, after
Please scan this QR code to register this device for your warranty.


AFTER SALES INFORMATION CONTACT support@r3di.com r3di.com r3di.com Follow on Facebook Follow on Instagram Scan for product videos 15

11 2X 110V~60Hz 10A 1200W MaxA C Output Sine Wave Output LiFePo4B attery Chemistry 1200 W 1200W Bidirectional Inverter 96% 110V Wide Voltage Output 1008Wh Electricity Highest Constant Output 600W 96% 110V 600W 448Wh 110V~60Hz 600WMax AC Output Sine Wave Output LiFe Po4B attery Chemistry PD 100W Fast Charge Input &O utput Charging TYPE-Cª (Can Recharge in 4H ours) 18WQ C3.0 USB Type-A 12WU SB Type-A 10 Electricity Bidirectional Inverter Highest Constant Output Wide Voltage Output

