ASSEMBLY & QUICK START GUIDE


WARNING: READ MANUAL. Read the separate Owner’s Manual and Assembly and Quick Start Guides before assembly or use. Failure to comply with warnings and instructions can lead to serious injury or death. Save the manual and assembly and quick start guide for future reference.
The user assumes the responsibility for the risk of injury or death as a result of riding or using QuietKat products. It is the responsibility of the user to know and obey all local laws, rules, and regulations regarding the use of electric assisted bicycles.

Bicycling is a dangerous activity. Crashing on an ebike, even at low speed, can result in serious injury or death. Always ride within your limits.
QuietKat is designed for riders 16 years of age or older. Adult supervision is required for any operator under the age of 18. Never allow a child to alter the settings of your QuietKat or to ride without adult supervision.
QuietKat ebikes are designed for ONE (1) rider only.
Always wear a helmet when you ride. Motorcycle or bicycle helmets can be appropriate for use on an e-bike. Choose a helmet that meets local regulations for use in the type of riding you intend to do. We recommend choosing a helmet that has the most head coverage.
Always obey all laws, rules, and/or regulations regarding the use of electric assisted bicycles.
Proper maintenance is required. Failure to maintain your QuietKat and keep your bike in proper operating condition can lead to an accident resulting in property damage, injury, and/or death.
If your bike has the ability to change classes:
- Always come to a complete stop before changing classes
- It is the responsibility of the rider to ensure he/she is following local and state laws regarding ebike class.
Risk of Electric Shock – Following Battery Care and Charging instructions carefully Turn off battery before performing any repairs or maintenance. Any turning of the cranks will cause the motor to engage, which could result in injury.

Always inspect that the bike is in proper working condition and that all components are undamaged before each ride.
Ebikes are heavier than normal bikes and may require increased stopping time at the same speed than a normal bike. QuietKat recommends become familiar with all aspects of the bike (mounting, steering, breaking, etc.) before heading out on a ride.
Do not touch any moving parts of the ebike.
Do not ride faster or more aggressively than the conditions permit, or beyond your ability.
Do not ride at night or under low visibility conditions without proper lighting and safety practices. Headlights, tail lights, and reflective tape or clothing are recommended if riding in low light or at night.

Riders must have the physical coordination, reaction time and mental capacity to ride and manage traffic, road conditions, sudden situations, as well as respect and obey the local laws governing bicycle and electric bicycle use.
If you have an impairment or disability, consult your physician before riding any bicycle.
CHOKING HAZARD: Small parts. Keep away from children 3 years and below. Adult assembly required.
CAUTION: Failure to comply with the following instructions can result in serious injury.
Other personal safety items highly recommended are gloves, wrist, elbow, knee/shin, and eye protection. Failure to use appropriate safety equipment can increase the risk of injury.
Avoid baggy or loose clothing while operating your QuietKat.
Always wear closed toe shoes while riding an e-bike.
Long hair, loose clothing or loose items worn by the rider must be secured to prevent interference with moving parts or the surroundings.
Do not exceed the weight limit. Exceeding the weight limit may significantly reduce performance and/or render the vehicle unstable and/or exceed the capability of the brakes and other control devices. Exceeding the weight limit may cause structural damage not covered by the warranty. Specific model weight limits can be found on www.quietkat.com.
Be aware, some parts such as brake rotors can become extremely hot during use. Avoid contact with these components until properly cooled.
Do not submerge this vehicle in water.
The rider should be securely seated on the unit ready to ride before turning the power on.
If you need to walk the bike, you can press and hold the (-) button on the keypad. Holding the (-) button will engage the motor at a walking pace to make it easier to walk alongside the bike in tricky terrain. If you have any questions about the proper care and maintenance of this vehicle consult your dealer/ distributor or contact QuietKat Customer Service.
Because it is impossible to anticipate every situation or condition which can occur while riding, this manual makes no representation about the safe use of the bicycle under all conditions. There are risks associated with the use of a bicycle which cannot be predicted or avoided, and which are the sole responsibility of the rider.
Class Guidance:
Some QuietKat Ebikes have the ability to change classes. These class parameters are defined below. When the ebike reaches maximum speed based on the chosen class, the motor will no longer assist, but the bike may still accelerate due to pedaling or gravity.
3 LYNX ASSEMBLY & QUICK START GUIDE 2 LYNX ASSEMBLY & QUICK START GUIDE
CLASS MODE CLASS I PEDAL ASSIST PEDAL ASSIST PEDAL ASSIST + THROTTLE PEDAL ASSIST + THROTTLE CLASS IIV CLASS III UNLIMITED MODE MAXIMUM SPEED 20 MPH 20 MPH 28 MPH N/A MOTOR MODE ASSEMBLY VIDEO INSTRUCTIONS
TOOLS, HARDWARE, COMPONENTS
MATERIALS REQUIRED

Multi-tool – Included (4mm, 5mm, 6mm, 8mm wrenches)
13mm/15mm Pedal Wrench - Included
8mm Open End Wrench – Included
Standard bicycle grease
8mm Hex Wrench, 5mm Hex Wrench
Torque wrench – Optional
Shock collar spanner wrench – Optional
Included Hardware
Front Fender - 1
• 2 M4*10 bolts,
• 2 M4*12*1 washers
• 1 M4*10*2 THICK black washer to be placed in rear hole location between fender and fork crown


Rear Fender - 2
• 2 M5*10 bolts
• 2 M5*14*1.5 washers
Headlight - 3

• 2 yellow zinc M5*35 bolts
• 4 yellow zinc M5*14*1 washers
• 2 yellow zinc M5 lock-washers
Rear Rack - 4
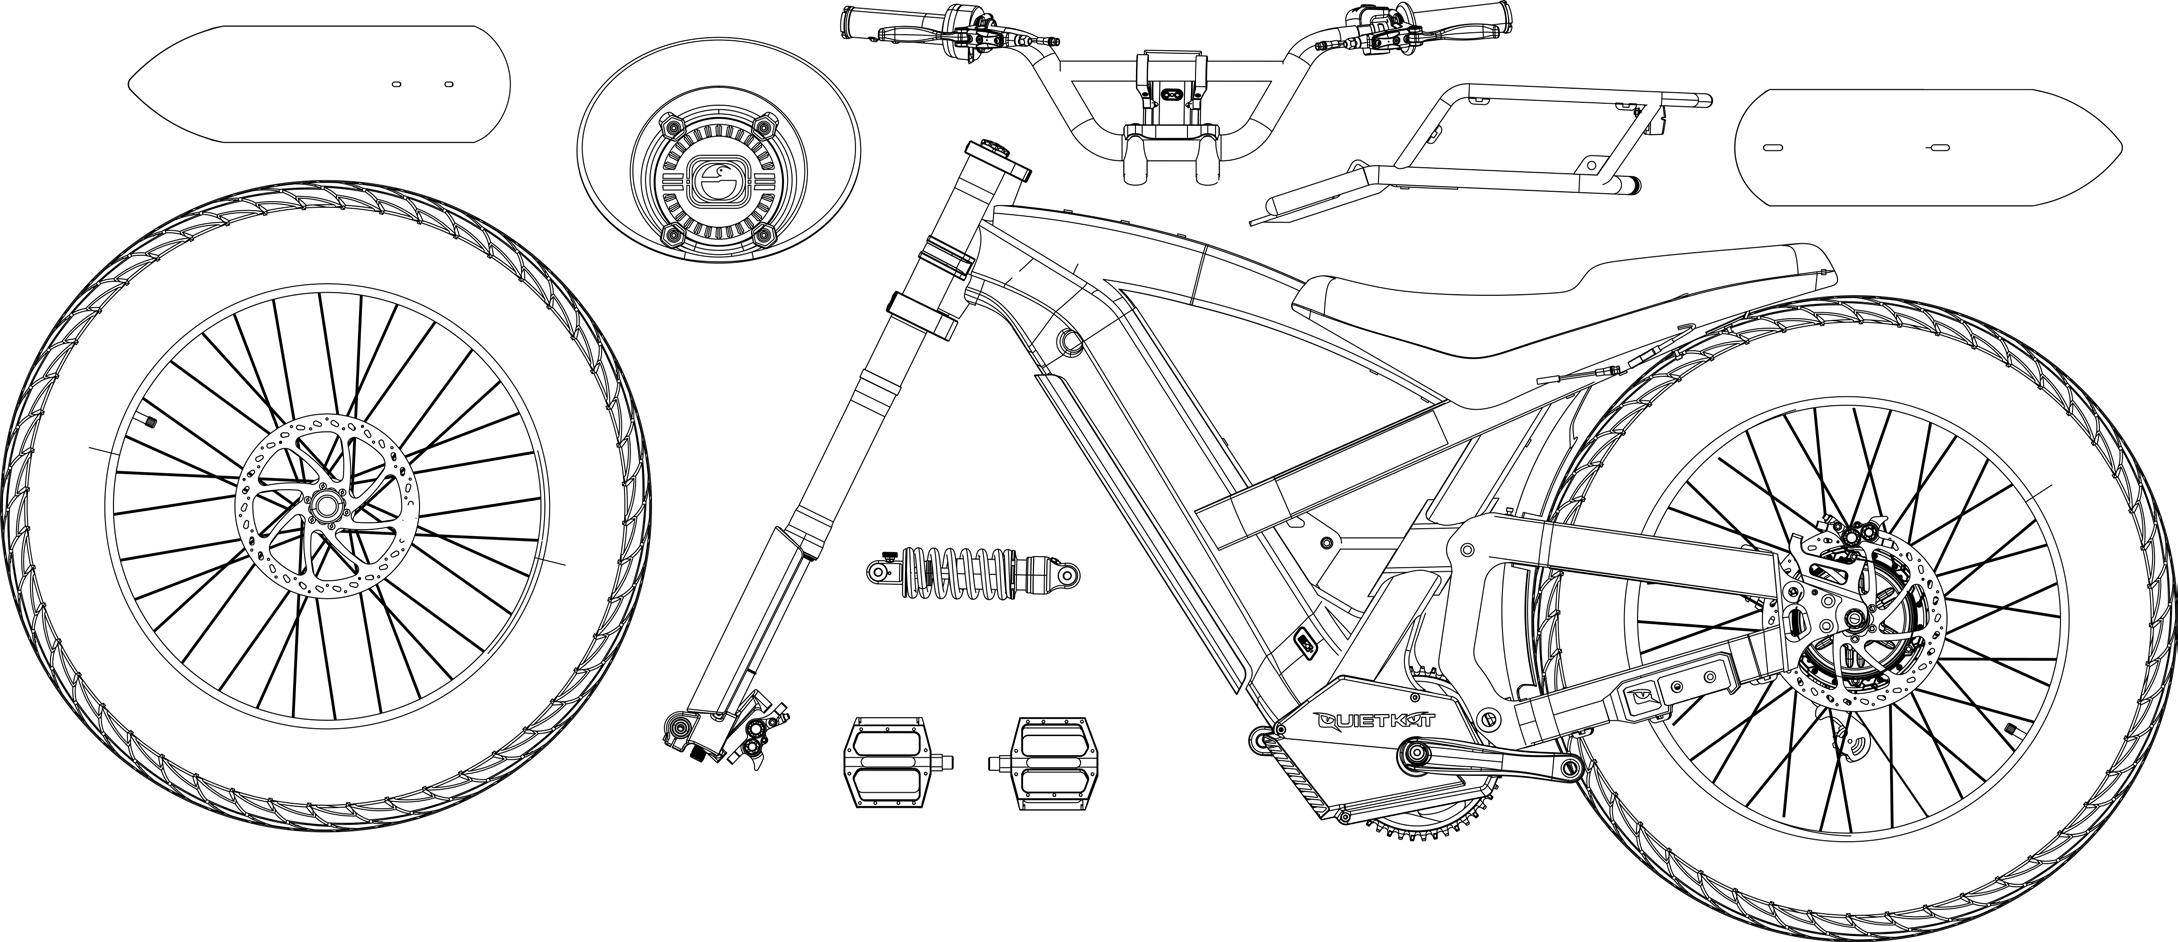
• 6 M5*16 bolts,
• 6 M5*14*1.5 washers
Handlebar - 5


• 2 M10*30 bolts,
• 2 M10*20*1.5 washers
ASSEMBLY VIDEO INSTRUCTIONS
5 LYNX ASSEMBLY & QUICK START GUIDE 4 LYNX ASSEMBLY & QUICK START GUIDE
STEP 1 UNBOXING
Carefully remove the bike from the box.
Use caution when opening the box as there may be staples exposed
It is easier to clip the zip ties attaching the front wheel to the bike and remove the front wheel from the box first.
Take out all of the accessories, battery box, the accessory box, the charger and other miscellaneous parts before removing the bike. Remove all packaging from the bike.
Note: leaving the plastic fork saver on will be helpful for now
Be careful not to scratch the bike or damage hydraulic brake lines or electrical cables while removing zip ties and packaging.
STEP 2 INSTALL HANDLEBARS
Place the bike on a flat, level surface.


The stem should be on the handlebars already
Ensure that the handlebars are oriented correctly and that no cables are twisted or kinked.


Insert the 2 M10 bolts with washers into the underside of the top fork crown and hand tighten with 8mm hex tool.
Note: Once the front wheel is on, the handlebars will be fully adjusted to user preference.

7 LYNX ASSEMBLY & QUICK START GUIDE 6 LYNX ASSEMBLY & QUICK START GUIDE
STEP 3 INSTALL REAR SHOCK
Place a rag between the front and rear triangle.


Remove the upper and lower rear shock mount bolts.

Note that the suspension will compress fully as you take these bolts out Remove the aluminum tube shock spacer.
Clip the zip ties holding the bushings together and be careful not to separate any of these parts.
Insert the front shock mount bolt and tighten by hand.
Lift up on the front of the bike to line up the rear shock mount with the rear eye of the shock.

Note: a buddy will make this step much easier
Insert the rear shock mount bolts and tighten by hand.

Torque both front and rear bolts to 18Nm with multi-tool.


Insert the coil shock with the red knob facing up and towards the front shock mount.

9 LYNX ASSEMBLY & QUICK START GUIDE 8 LYNX ASSEMBLY & QUICK START GUIDE
STEP 4 INSTALL REAR RACK
Line up the 6 holes on the extended part of the rack underneath the seat with the 6 corresponding rivet nuts under the seat on the frame. Insert the 6 M5 bolts with washers and hand tighten with 4mm multi-tool. Once all bolts are hand tight, torque to 8Nm.


Route the brake light cable along the guide(s) and plug into the connector under the seat.
11 LYNX ASSEMBLY & QUICK START GUIDE 10 LYNX ASSEMBLY & QUICK START GUIDE
STEP 5 INSTALL HEADLIGHT
Fully remove the nuts from the back side of the fork clamps on the headlight.

Insert the male tab into the largest setting on the female portion of the clamps and hand tighten the nuts.

The clamps should be as high as possible on the fork arms.

Once properly positioned, torque the bolts to 6Nm.


Route cabling between the right fork arm and the head tube.


Plug in all connectors to the main wire harness – all connectors are color coded and shaped such that you cannot mate the wrong connectors.

13 LYNX ASSEMBLY & QUICK START GUIDE 12 LYNX ASSEMBLY & QUICK START GUIDE
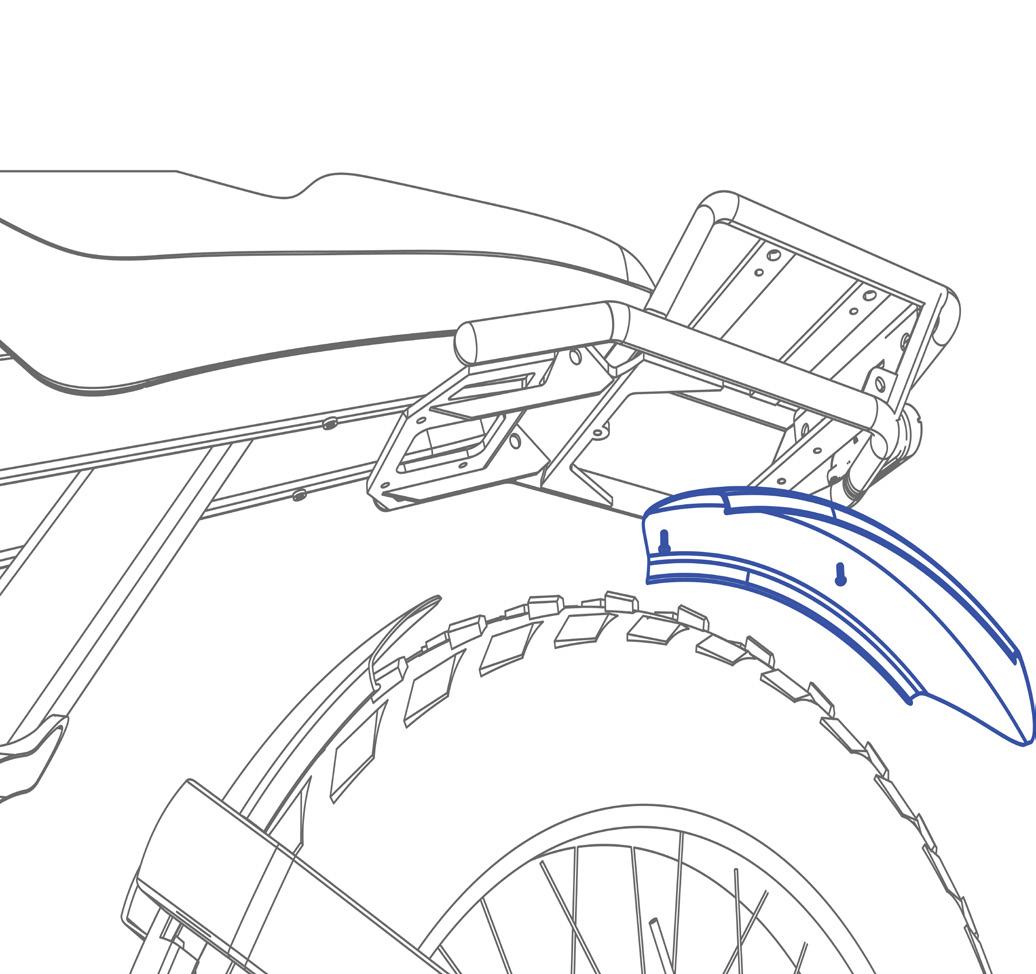
STEP 6 INSTALL FENDERS
FRONT
Orient the front fender with the pointed side forward and line up the two holes in the bottom of the fork crown with the two holes in the fender.
Before inserting the M4 bolts, insert thick black steel washer above fender and under the fork crown. This will be a spacer for the fender to orient it properly.
Insert the two M4 Bolts with large washers into the under side of the fender and hand tighten with a 3mm hex tool.


Once hand tight, torque to 4Nm.
STEP 6 INSTALL FENDERS
REAR
Insert 2 M5 bolts up through fender into rack and hand tighten with 4mm hex tool.
Once hand tight, torque to 4Nm.


15 LYNX ASSEMBLY & QUICK START GUIDE 14 LYNX ASSEMBLY & QUICK START GUIDE
STEP 7 INSTALL FRONT WHEEL
Remove the plastic fork axle saver if you have not already.
Loosen and remove the end cap on one side of the axle.
Loosen, but don’t remove the 4 M5 pinch bolts on the front of the axle with 4mm hex tool.
Push the axle out from the side with the removed end cap.
Note you may need to GENTLY tap the axle out using a hammer and the 8mm hex tool.
Remove brake caliper spacer.
Insert the front wheel with the disc brake rotor in the caliper side of the fork.

Insert the axle and, ensuring the axle end cap is flush to the dropout, re-insert the axle end cap.


STEP 8 INSTALL PEDALS
Apply a small amount of grease to the pedal threads (not included).
CAREFULLY look at the end of the pedal threads. There should be an “L” or an “R” stamped.


Insert and hand tighten the corresponding pedal to the corresponding side of the bike. Note that the L side pedal is reverse thread (counter clockwise to tighten).
Using a 15mm pedal wrench, tighten pedals to 40Nm.
Tighten the axle end cap to 10Nm
Slowly tighten the 4 pinch bolts at the front of the axle alternating side and bolt until all are at 8Nm.
17 LYNX ASSEMBLY & QUICK START GUIDE 16 LYNX ASSEMBLY & QUICK START GUIDE
STEP 9 ADJUST COCKPIT
Pump the tires up to 15-20psi
While seated on the bike, slightly loosen the stem pinch bolts.
Adjust the angle and position (fore/aft) of the handlebars to your preference.


Retighten all the bolts and torque to the stem pinch bolts to 10Nm. Torque the stem mount bolts under the top fork crown to 20Nm.
Adjust the angle of the display, control pad and brake levers so that everything is comfortable and easy to reach and see.
Note: display and control pad bolts should only be hand tight. Over tightening will snap plastic.
Note: brake lever adjustment bolts should be torqued to 6Nm.
Adjust the angle of the headlight as needed so it doesn’t blind oncoming traffic, but you can still see as far as possible.


Note: It is up to the user to comply with all rules of the road.

STEP 10
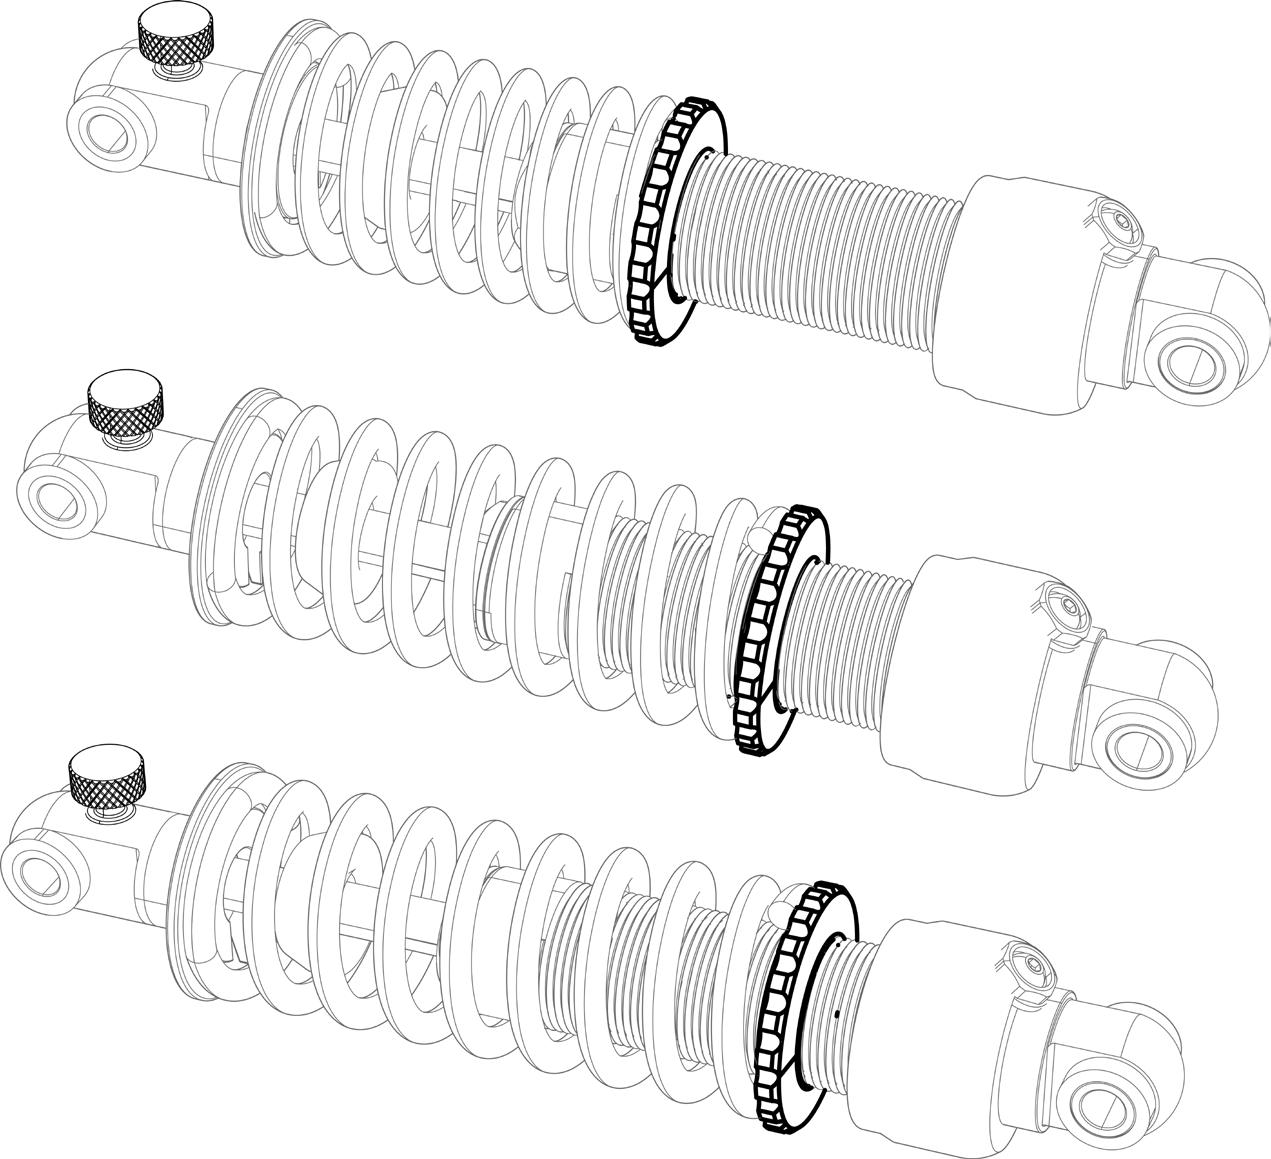
ADJUST REAR SUSPENSION PRELOAD (OPTIONAL)


The bike will be set from the factory to an estimated preload assuming a user weight of around 180lbs

The rider will sit down putting as little weight as possible on the ground.
Have a buddy roughly measure the amount of shock stanchion exposed.
Using the table below, adjust the shock preload by turning the preload collar. Clockwise as seen from front to rear is tighter.
Don’t tighten preload collar more than 5 turns. If sag is still to high, consult your local bike dealer for a stronger spring.

Don’t loosen preload collar less than 1 full turns. If sag is still to low, consult your local bike dealer for a weaker spring.
19 LYNX ASSEMBLY & QUICK START GUIDE 18 LYNX ASSEMBLY & QUICK START GUIDE
STEP 11
ADJUST FRONT SUSPENSION COMPRESSION (OPTIONAL)


Have a buddy stand at the front of the bike facing the rider on the bike. The buddy will clamp the front wheel between their legs and hold the handlebars to keep the rider upright.
The rider will push down into the fork a few times with decent force then GENTLY sit down.
The buddy will measure the amount of stanchion exposed.
Use the table at right to adjust the compression damping.

STEP 12
ADJUST FRONT SUSPENSION REBOUND (OPTIONAL)
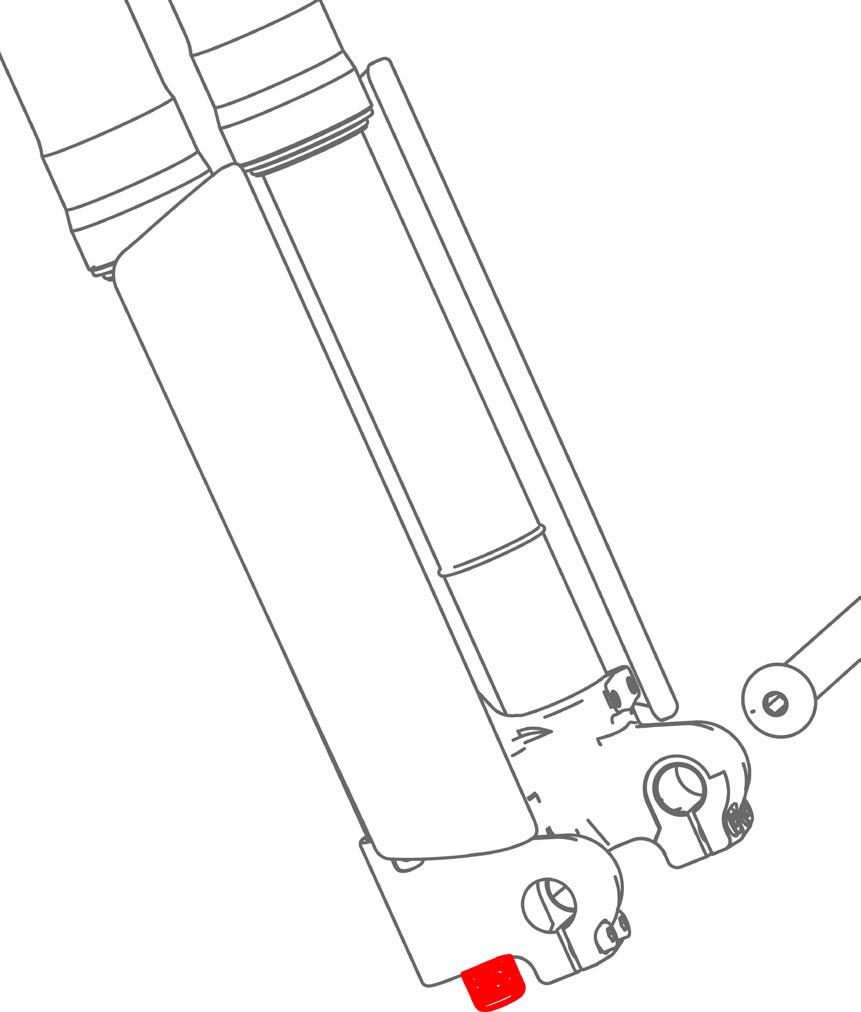
If you are riding on rough terrain and feel that the suspension is not performing as you would hope, the rebound can be adjusted to tune how quickly the fork responds to bumps.


Using the table below, tighten or loosen the rebound adjust knob on the bottom of the right fork leg.
Clockwise if looking up at the knob is tight.
21 LYNX ASSEMBLY & QUICK START GUIDE 20 LYNX ASSEMBLY & QUICK START GUIDE
INSERTING THE BATTERY
The battery will be packaged separately. Remove the battery from the packaging.
Using a key from the accessory box, insert into the key slot on the top left side of the downtube.
Turn the key all the way counterclockwise.
Insert the battery bottom first with the terminal side (shown at right) down and the cover towards the outside of the bike.

REMOVING THE BATTERY
Turn the key all the way counterclockwise.


Place one hand underneath the battery.

Turn the battery release knob at the top of the underside of the downtube until you hear a click. It should be about a quarter turn.
Once the bottom is inserted angle to top into the frame until you hear a click.


Turn the key clockwise until you hit a hard stop and can remove the key.
Note: do not ride the bike with the key inserted.
If the battery doesn’t easily come out, you may have to gently pry the cover towards the ground to remove.
Note: the orientation of the wheel and any additional accessories may require adjustments to remove the battery.
23 LYNX ASSEMBLY & QUICK START GUIDE 22 LYNX ASSEMBLY & QUICK START GUIDE
POWERING ON AND ADJUSTING DISPLAY
The Lynx is equipped with VPO™ Firmware allowing you to adjust the class based on the terrain you are riding.
In order to power on display, hold the power button on the control pad for approximately 5 seconds, until you see “QuietKat” appear on the display.
To enter into the display settings, push and hold the “+” and “-” button at the same time.
To toggle through selections use the “+” or “-” button.
To select, press the power button.
To return to the home screen, press and hold the “+” and “-”.
For a full description on the VPO™ firmware please visit quietkat.com/vpo.
USING THE LIGHTS AND HORN
To turn on the running lights (front and rear) push and hold the “+” button on the control pad.
Press the horn icon on the auxiliary control pad to sound the horn.

Toggle the light switch on the auxiliary control pad to adjust the high and low beams.
The rear light gets brighter when either brake is pulled.
25 LYNX ASSEMBLY & QUICK START GUIDE 24 LYNX ASSEMBLY & QUICK START GUIDE
RIDING THE BIKE
The Lynx utilizes a twist throttle which allows variable power output based on how far you’ve twisted the throttle.
The Lynx is also equipped with an automatic 2 speed hub. The hub shifts gear based on your speed! The gear change occurs around 15mph.
Note: since the hub is direct drive, you will only feel the gear change when using pedal assist, not throttle only.

INSTALLING AND SETTING UP THE BIKE WITHIN THE QUIETKAT APP


Head to the google play or app store. Download the app.
The app will walk you through a tutorial.
The barcode you will need to scan is located between the rear tire and the seat tube.

SCAN BARCODE HERE

27 LYNX ASSEMBLY & QUICK START GUIDE 26 LYNX ASSEMBLY & QUICK START GUIDE


970.328.2399 | P.O. Box 5830, Eagle, Colorado 81631
