Penske Driver™ App: Hours of Service User Manual (English)
Hours of Service User Manual
Before You Begin
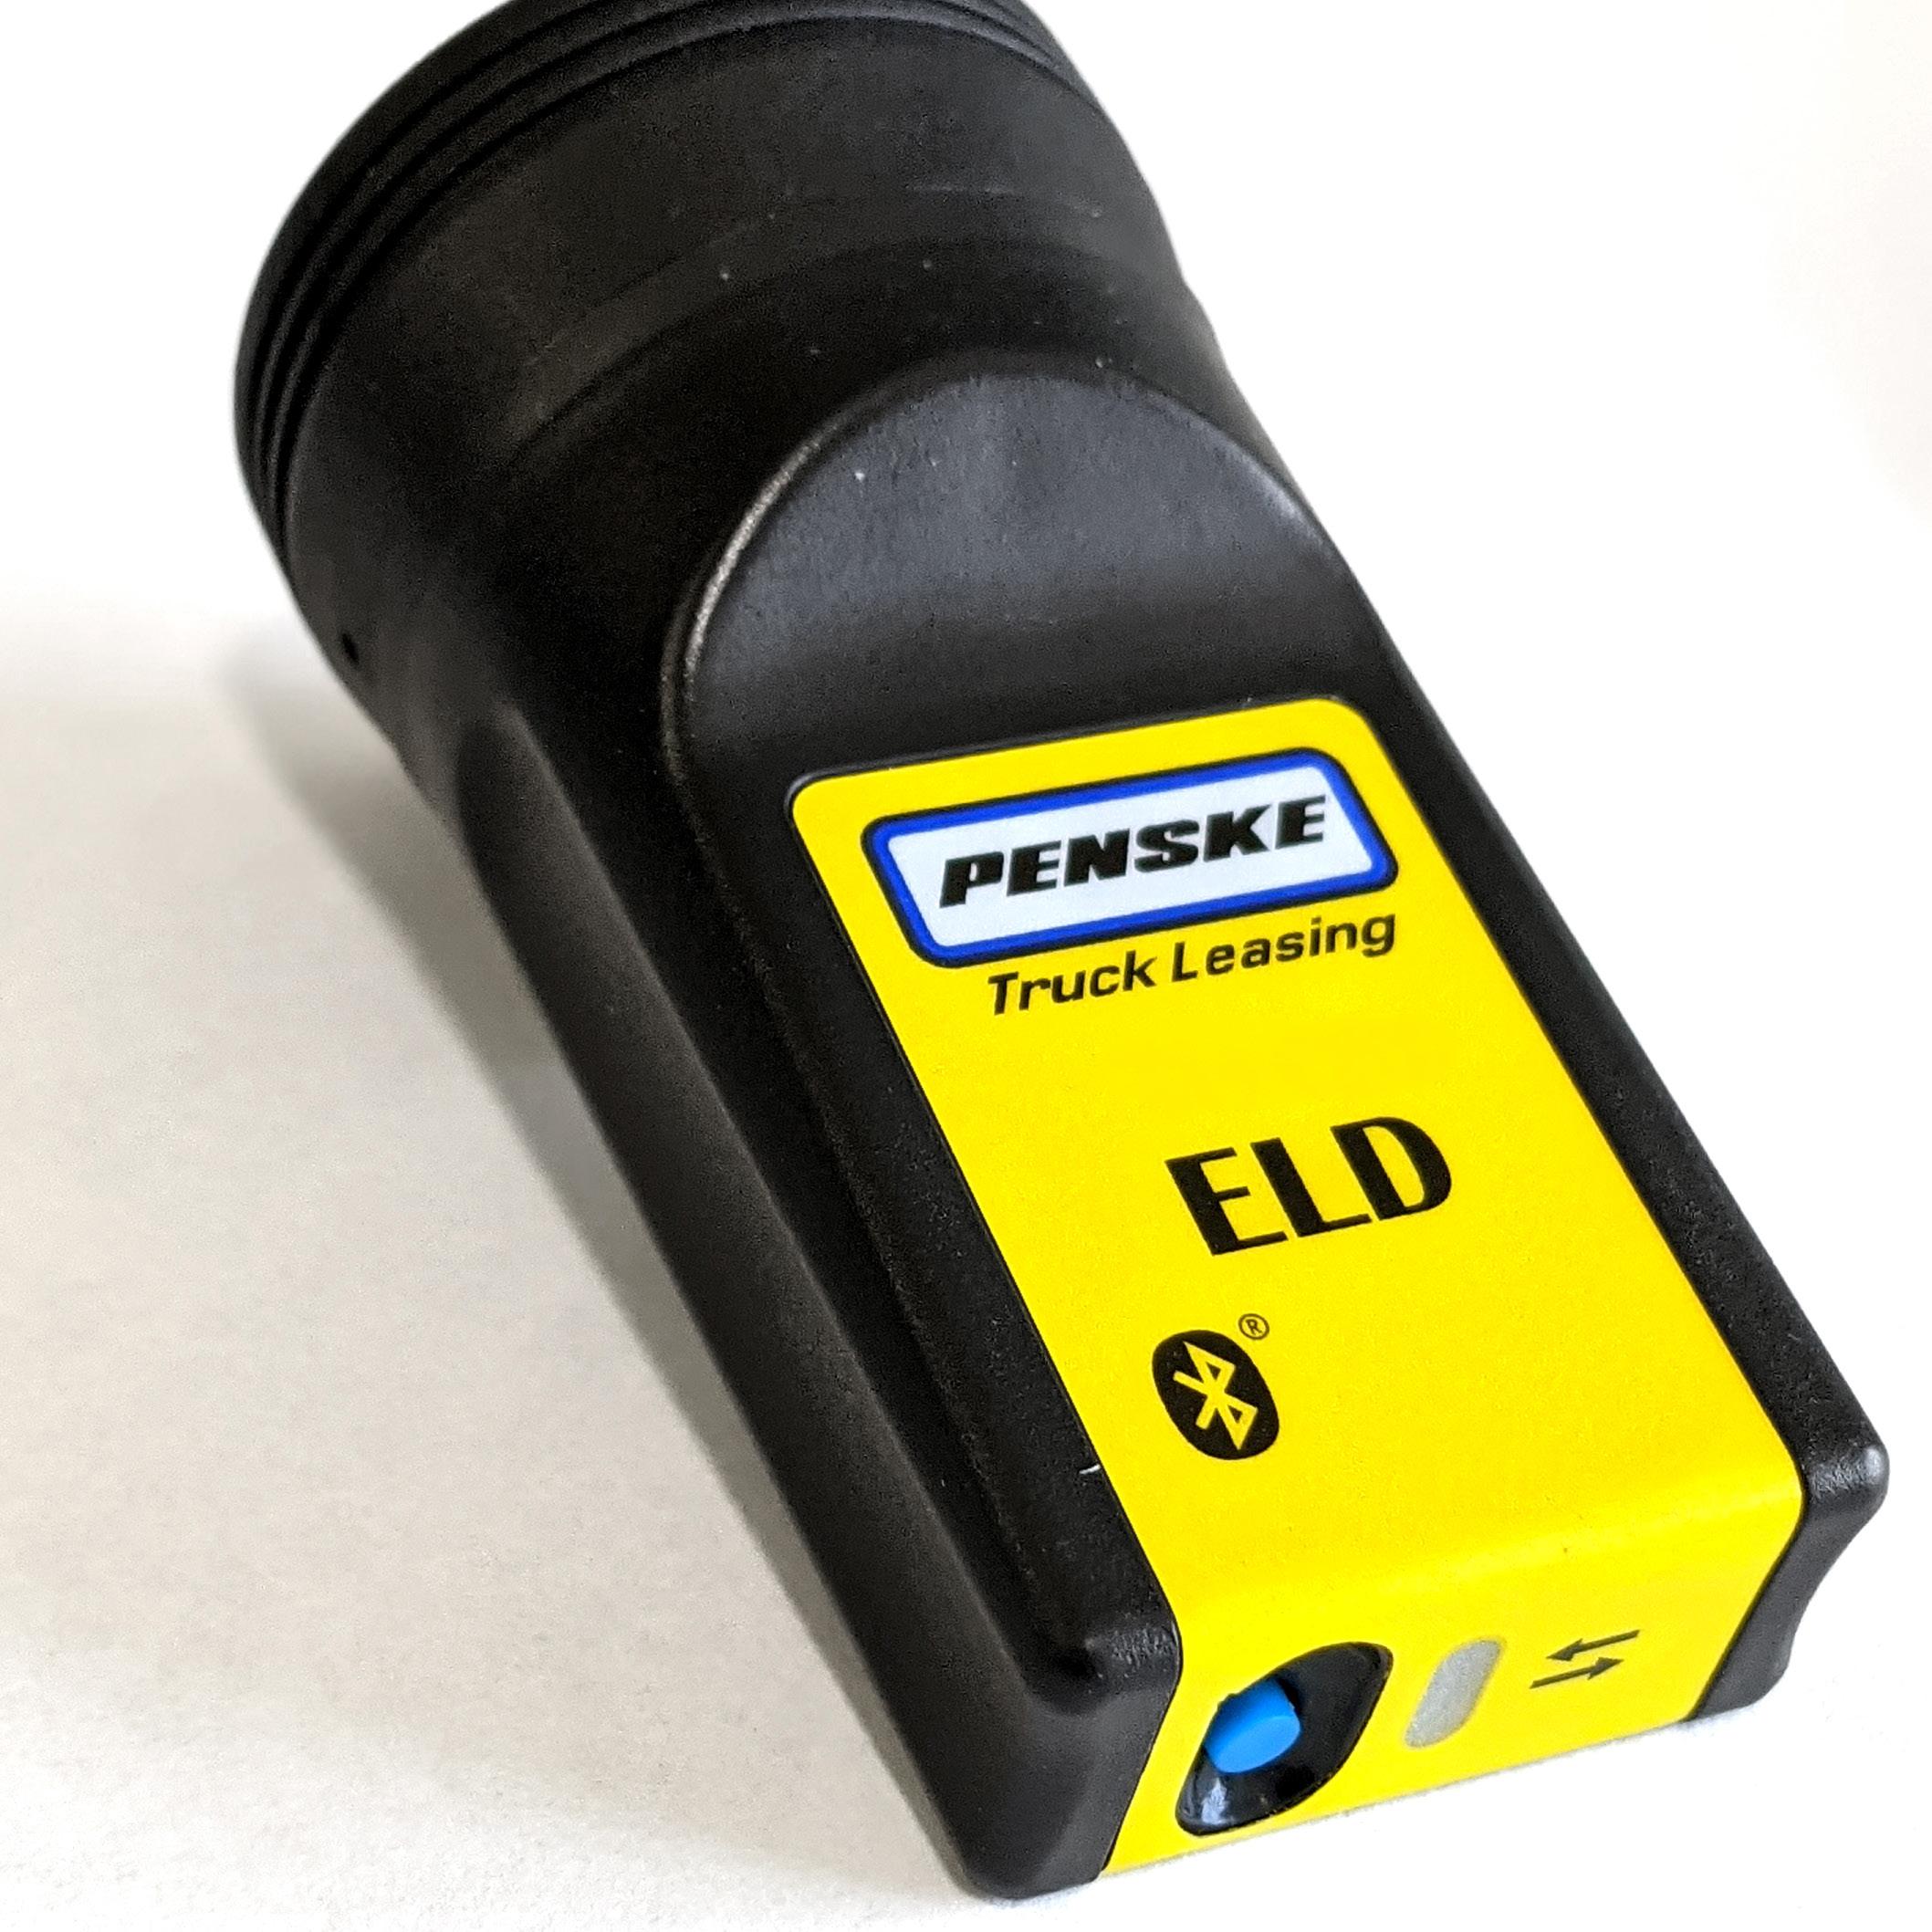
The electronic logging device (“ELD”) as referred to in this manual is the Penske Driver™ application (“Penske Driver™ app”) and the adapter installed on the Penske vehicle.
Follow the directions listed below to get started. For up-to-date information and instructions, visit gopenske.com/hos
1. Make sure that your device is plugged into a power source.
2. Verify that the volume is loud enough to hear audible alerts.
3. Make sure that you have the Penske Driver app installed for your device.
4. In order to use Hours of Service within the Penske Driver app, you must have a registered account and your company must have Hours of Service enabled. To register your company, please contact your local Rental Representative or Penske Customer Success.
5. If you are using an Android device, the first time you use the app, you may see some additional prompts requesting access to features on the device such as, but not limited to, location and notifications. When encountering these prompts, please tap Allow in order for the application to run properly.
6. Open and sign in to the app before powering on your vehicle to ensure ELD is functional.
Rulesets and Exemptions
Supported Hours of Service Rulesets
USA Property
• 60 Hour/7 Day
• 70 Hour/8 Day
USA California Property
• 80 Hour/8 Day (Intrastate)
USA Florida Property
• 70 Hour/7 Day (Intrastate)
• 80 Hour/8 Day (Intrastate)
USA Texas Property
• 70 hour/7 Day (Intrastate)
• Excludes Oilfield Operations
• Excludes Texas Sleeper Berth Provision
Canada South of Latitude 60° N Cycle 1
• 70 Hour/7 Day
Canada North of Latitude 60° N Cycle 1
North of Latitude 60° N — drivers operating north of latitude 60° N often travel longer stretches between destinations and in extreme weather conditions at times. These drivers use a modified set of rules that include increased on-duty, shift and drive time. Their offduty time can also be decreased by two hours.
• 80 Hour/7 Day
Canada South of Latitude 60° N Cycle 2
• 120 Hour/14 Day
Canada North of Latitude 60° N Cycle 2
• 120 Hour/14 Day
Exemptions
Supported — If you meet one or more exemption(s) below, your administrator must mark your account as “exempt” and detail what exemption you are operating under in your account within the Driver Management website. Your exemption status will display on the PDF view of your log within the app. It’s also available in CSV format of your log should you be required to report it to a DOT official.
1. 150 Air-Mile Short-Haul Exemption (CDL) (Must be configured by Admin)
2. 150 Air-Mile Radius Exemption (Non-CDL) (Must be configured by Admin)
3. Less than Eight-Day RODS Exemption (Must be configured by Admin).
Not Supported at this time — Timers on the Duty Status Screen will not calculate the exemptions highlighted below. These will be supported in future versions of the app.
1. 16-Hour Short-Haul Exemption
2. Adverse Driving Conditions Exemption
Accessing Hours of Service
In order to access Hours of Service within the Penske Driver app, your company and user account must be setup to do so.
REMINDER: Open and sign into the app before powering on your vehicle to ensure the ELD is functional, prior to logging HOS.
Be sure to sign into the Penske Driver app before powering on your vehicle. Failing to do so may result in a Power Data Diagnostic Event.
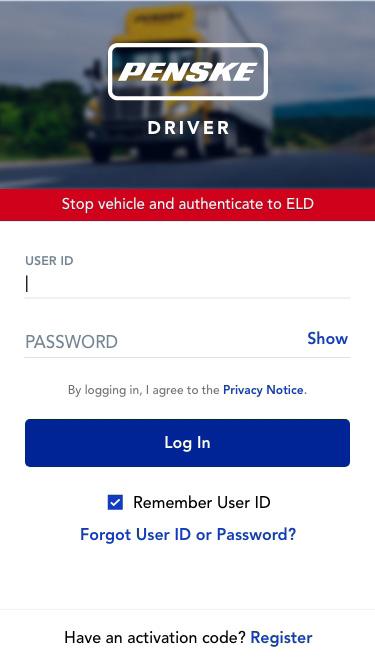
Signing In
1. Locate and tap on the Penske Driver app on your smartphone.
2. Once opened, tap on the Sign In button at the bottom of the page.
3. Enter your User ID and Password.
4. Tap the Log In button.
Launching Hours of Service
1. Once logged in, tap the Hours of Service button. It may take a few seconds for Hours of Service to load.
2. If you have any uncertified logs from previous days, you will be prompted to take action at this time.
Country Icon Key
This user manual gives instruction for both USA and Canadian rulesets. It also shows functionality for drivers who travel between the USA and Canada. The following icons are used to display these options:
In USA — Drivers who are driving in the USA and using USA rulesets.
In Canada — Drivers who are driving in Canada and using Canadian rulesets.
Operating in Both USA and Canada — Drivers who are driving between both countries and using multiple rulesets.
Hours of Service Setup
In USA In Canada
In USA
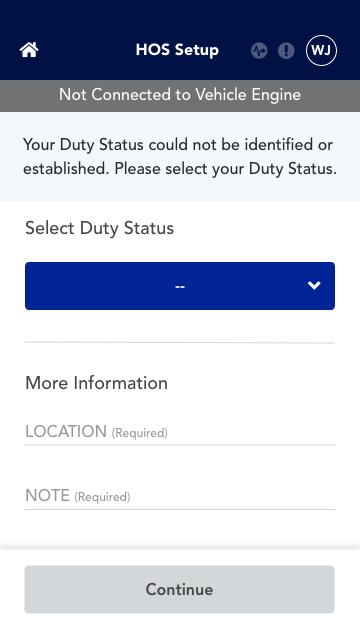
HOS Setup must be completed to begin using the Hours of Service feature. Setting up your HOS will establish and identify your Duty Status.
1. After tapping the Hours of Service button, you will begin the HOS setup.
Operating in Both USA and Canada
2. If prompted, select a Duty Status by tapping on the drop down button Select the appropriate status from the list. Options include: Off Duty, Sleeper Berth and On Duty Not Driving
3. Enter location and note
4. Tap Continue and the setup is complete
Editing Rules and Conditions
• HOS Setup must be completed to use the Hours of Service feature.
• Settings can be changed after submission.
Operating in Both USA and Canada / In Canada
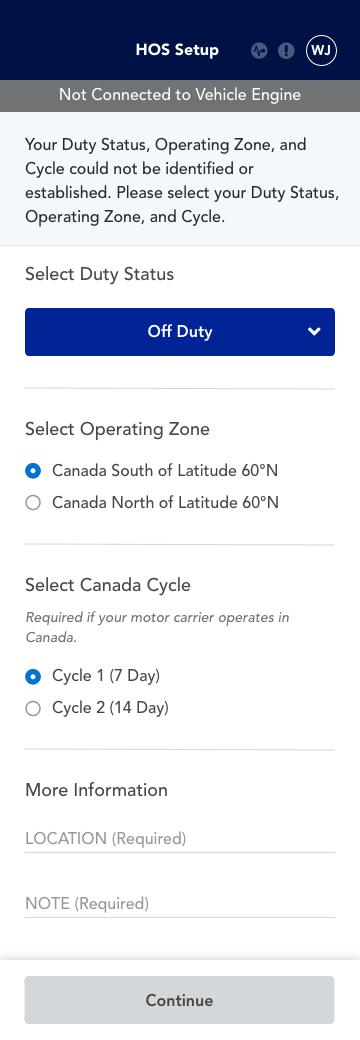
HOS Setup must be completed to start using the Hours of Service feature. Setting up your HOS will establish and identify your Duty Status, Operating Zone, and/or Canada Cycle.
1. After tapping the Hours of Service button, you will begin the HOS setup, where you will be expected to take action on up to three of the following prompts.
2. If prompted, select a Duty Status by tapping on the drop down button Select the appropriate status from the list. Options include: Off Duty, Sleeper Berth and On Duty Not Driving
3. If prompted, select an Operating Zone
4. If prompted, select a Canada Cycle
5. Enter location and note
6. Tap Continue and the setup is complete
Editing Rules and Conditions
• HOS Setup must be completed to start using the Hours of Service feature.
• Settings can be later changed after submission.
• Not all three prompts will be needed based on previous information gathered or by administrative restrictions.
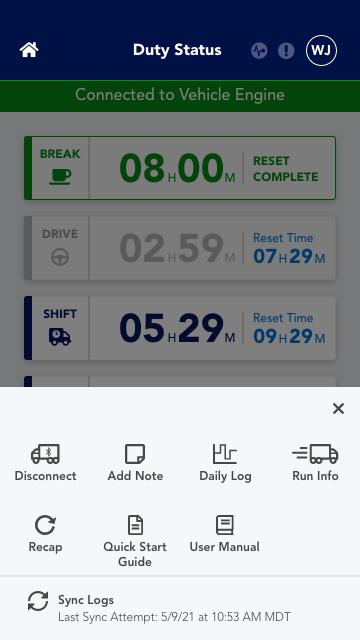
Duty Status
Connection Bar
Displays the current state of your connection to the vehicle.
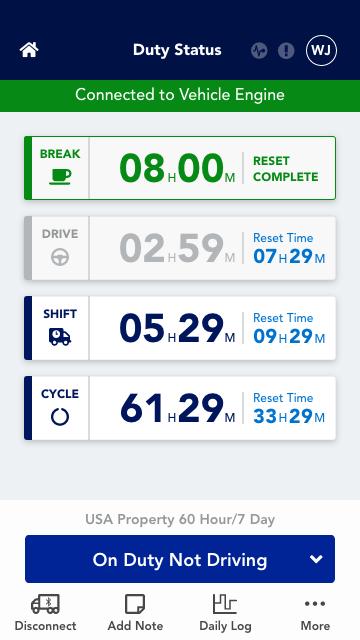
Current Status
Displays your current status. Options include: Off Duty, Sleeper Berth, Driving and On Duty Not Driving.
USA Duty Status
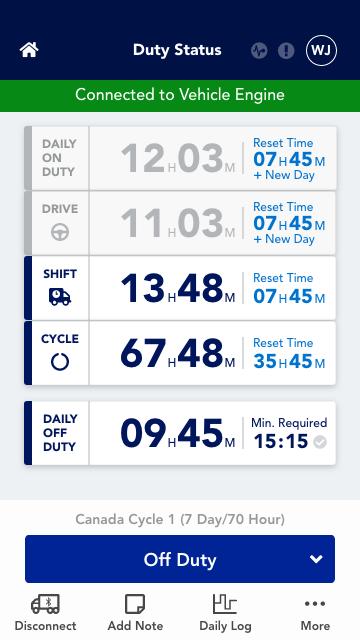
Canada Duty Status
Timers
On-duty Timers
• Break
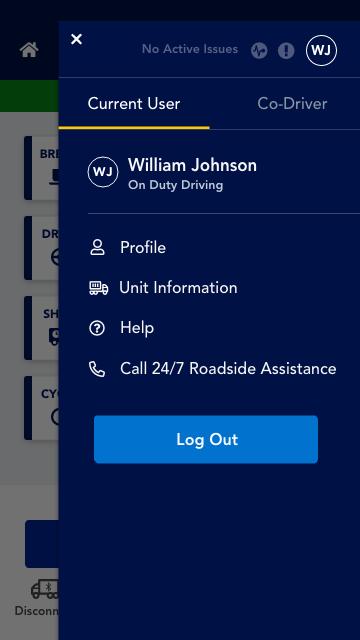
Profile Icon
Tap to open the side menu to access your profile information along with links to other app related items.
Timers
On-duty timers (break, drive, shift and cycle) and off-duty timers (break reset, day reset and cycle reset) all start counting down based on your activity.
Diagnostic Event/ Malfunction Indicators
Indicators activate when there are any data diagnostic events or malfunctions occurring within the app.
Timers
On-duty timers (daily on duty, drive, shift and cycle) and off-duty timers (10-hour daily off duty with 30-minute incremental break timer, work shift reset and cycle reset).
In USA — This is the amount of time remaining before you should take a 30-minute break.
• Daily On Duty
In Canada — This is the amount of on-duty time you have remaining.
• Drive
In USA / In Canada — This is the amount of remaining drive time you have.
• Shift
In USA / In Canada — This is the amount of on-duty time you have remaining in your shift.
• Cycle
In USA / In Canada — This is the amount of on-duty time remaining within your seven or eight-day rolling work week (USA) or seven or fourteenday rolling work week (Canada).
Off-duty Timers
• Break Reset
In USA — The amount of time you must not be driving to reset your onduty break timer.
• Day Reset
In USA — The amount of consecutive off-duty time needed to reset your on-duty drive and shift timers.
• Cycle Reset
In USA / In Canada (Both South and North of Latitude 60° N) — The amount of consecutive off-duty time needed to reset your on-duty cycle timer.
• 10-Hour Daily Off Duty
In Canada (South of Latitude 60° N only) — This timer keeps track of the required 10 hours of daily off-duty time a driver must take. 10 hours (in increments of at least 30 minutes) of any of the off-duty statuses (Off Duty, Sleeper Berth and Personal Conveyance) to complete this timer for the day.
• 30-Minute Timer
In Canada (South of Latitude 60° N only) — Represents the minimum amount of time that counts toward the required 10-hour daily break.
• Work Shift Reset
In Canada (Both South and North of Latitude 60° N) — The number of hours you must remain in any of the off-duty statuses (Off Duty, Sleeper Berth and Personal Conveyance) before drive and shift time are restored.
Switching Your Status
1. Tap on Status button.
2. Select the appropriate status from the list.
Options include: Off Duty, Sleeper Berth, Driving and On Duty Not Driving
Note: Additional options such as Personal Conveyance and Yard Moves can be added by your administrator.
Connecting to a Truck
Immediately after starting the connection process, you will be prompted to enter your run information. Run information for previously recorded Duty Status Events is not editable. If information entered is incorrect, a note can be added to applicable events indicating the error.
If using an Android device and this is your first time connecting to this vehicle, after step 4, you will need to tap Connect after selecting your adapter. You must connect to a truck within 60 seconds of powering on the vehicle.
NOTE: We recommend that you power all Bluetooth devices off (other than the device with the Penske Driver app installed) when making the initial connection to the vehicle engine. This includes, but is not limited to, Bluetooth headsets, speakers, tablets or other phones.
(All Bluetooth devices can be turned back on after connection has been established.)
1. Log into Penske Driver app
2. Tap on Hours of Service
3. Change to appropriate status
4. Tap on Connect to Truck
5. Turn on the truck (engine running)
6. Type in Run Information then select Save/Continue
7. Once you tap on Save/Continue, scan for the device name This process may take several seconds to complete.
8. On the Choose Adapter pop-up, tap on the adapter for your vehicle to connect. If the adapter is not listed, tap on the Rescan button to try again. The name of the adapter for your vehicle will be on a sticker within the cab.
9. If prompted, enter the VIN and tap Continue. This will occur only if there is a problem with the VIN being reported by the adapter that is connected to the vehicle.
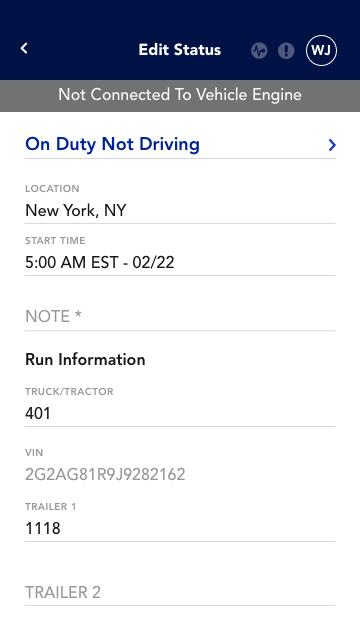
Adding a Note to Your Current Status
Notes added to your status will appear within that event on your daily log and on the sharable PDF from the application.
1. Tap on the Add Note icon.
2. Enter your note accordingly.
3. Tap Save
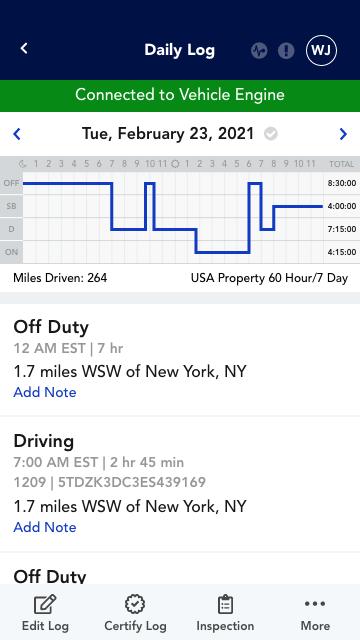
Viewing Your Daily Log
1. Tap on the Daily Log icon.
Viewing Your Run Information
1. Tap on the Run Info icon to view details about your truck, trailer, manifest/commodity and more.
Change Operating Zone — Operating in Both USA and Canada / In Canada
When driving to a different operating jurisdiction, it is important to change your Operating Zone accordingly. Based on your location, rules and regulations will change and must be reflected when capturing your data for hours of service.
1. Tap on the Change Zone icon
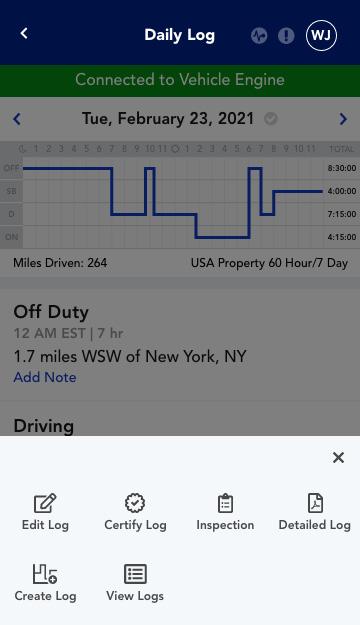
More Options
Menu shows additional options when the “More“ icon is selected.
2. Select the new Operating Zone Options may include: USA, Canada South of Latitude 60°N or Canada North of Latitude 60°N based on your Motor Carrier’s Country of Operation
3. Enter location and note
4. Tap Confirm Co-Driver
• If there is a co-driver logged in, you will be prompted with an alert to hand the device over to them to update their Operating Zone.
Deferring Off Duty Time — In Canada
1. Tap on the Defer Off Duty icon.
2. When the defer option is selected, the user will input the amount of time they wish to defer to the next day on the Defer Off-Duty screen.
3. This change will reduce the 2-hour Off Duty Timer for your current day’s Off Duty requirement and add the deferred time to your required 8 consecutive hours of off duty time for the following day.
Note: This change applies to Canada operations only and cannot be edited once applied.
Change Canada Cycle — In Canada
Drivers that operate in Canada can drive in Cycle 1 or Cycle 2. This selection can be updated based on the permissions set by your Admin. Based on your cycle, rules and regulations will change and must be reflected in capturing your data for hours of service.
1. Tap on the Change Cycle icon
2. Changing the Cycle will default to the new one.
3. Enter location and note
4. Tap Confirm
Editing Rules and Conditions
• Admins can restrict your ability to change your cycle
• If you are in a Cycle 2 and want to change to change to Cycle 1, you must complete 72 consecutive hours of off duty time before changing
• If you are in a Cycle 1 and want to change to change to Cycle 2, you must complete 36 consecutive hours of off duty time before changing
• If your admin updates your cycle permissions, you need to take either 36 or 72 consecutive hours of off-duty time before the cycle can be updated.
Viewing Your Cycle Recap
1. Tap on the Recap icon to see overview of past seven, eight or fourteen days logs based on your current cycle/ruleset.
Viewing Any Unassigned Driving Time
1. Tap on the Unassigned icon to manually review any unassigned driving time as described in the Unassigned Driving Time flow on page 30.
Viewing Quick Start Guide
Tap on the Quick Start Guide icon to go to the Quick Start Guide page under the Help section of the Driver app.
Viewing the User Manual
Tap on the User Manual icon to view a PDF version of this manual.
Sync Your Logs
Tap on the Sync Logs icon to manually synchronize your data. See page 26 — Synchronizing Your Data — for more detailed explanations and instructions.
Daily Log Screen
Log Date Toggle
Toggle between logs using left and right arrows.
Events
Each event is composed of a status, start time, duration, location and a note. The duration is calculated based on the start time of the event and the start time of the following event.
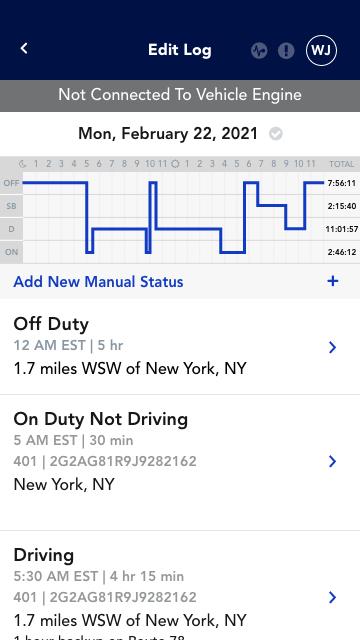
Edit Your Log
1. Tap on the Edit Log icon.
2. Tap into the field that you wish to edit.
3. Make your changes accordingly. Please note, some fields are required
Event Graph
The graph will display your 24-hour period and will update automatically based upon your logged events.
Options Menu
Options for editing, certifying, creating and viewing logs as well as tools for roadside inspection.
More Options
Menu shows additional options when the “More“ icon is selected.
4. When you are finished editing, tap on the Continue button. You will return to the Edit Log screen
5. To save your edits, tap on the Save button.
Editing Rules and Conditions
• Automatically created driving events; only notes can be edited
• Manually created driving events; only location and notes can be edited
• Events following driving events; start time cannot be edited
• Once a status is changed to Driving, that status is no longer editable
• Any recorded event, the status cannot be changed to Off Duty - Personal Conveyance or On Duty Not Driving - Yard Moves
Add a manual status.
Tap into the field that you wish to edit.
• Any automatically created events without a valid location; location can be edited
• Editing Run Information for a previous recorded Duty Status Event is not permitted
• If this information has been entered incorrectly, please annotate the effected Events with the correct information
Manually Add Events to Your Log
You may manually add as many events as necessary. Pay close attention to your start times as gaps and overlaps are not permitted. Keep in mind that you cannot manually add events with a status of Off-Duty - Personal Conveyance or On-Duty Not Driving − Yard Moves.
1. Tap on the Edit Log icon.
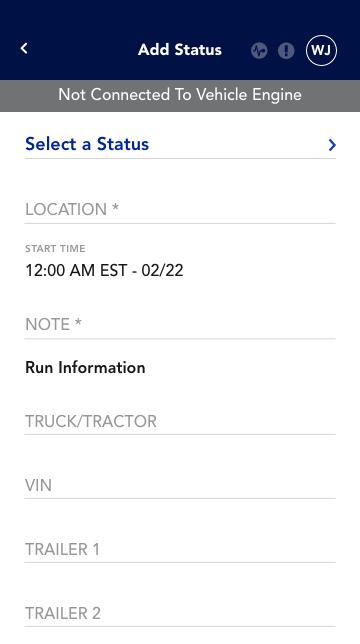
2. Tap on Add New Manual Status +.
3. Tap on Select a Status and select the appropriate status.
4. Enter a location, start time and note. The start time will default to the start of your 24-hour period
Certify Your Log
Daily logs for previous days and current day can be certified. Please note: if you certify the current day before the 24 hour period has lapsed and you go On Duty again, you will need to recertify the current day log. Certification requires an active internet connection.
1. Tap on the Certify Log icon.
2. Enter in any missing information if required.
3. On the Certification screen, read the certify log statement and tap the Agree button.
The Not Ready option will cancel the certification process.
Start a Roadside Inspection
When starting a roadside inspection, you will be able to choose between displaying your daily log on screen, sending to eRODS (USA) or emailing your log (Canada). Please choose the appropriate option per the request of the roadside inspector.
Show On Screen
When starting a roadside inspection, you will be able to choose between displaying your daily logon screen or sending to eRODS. Please choose the appropriate option per the request of the roadside inspector.
1. Tap on the Inspection icon.
2. Tap the Show On Screen button.
3. Operating in both USA and Canada — If you are logging hours in both the USA and Canada, select the PDF format — either USA format or Canada format.
Send to eRODS — In USA
This option will generate and send all required daily log information to eRODS for the roadside inspector to retrieve and view on their device.
1. Tap on the Inspection icon.
2. Tap on the Send to eRODS button.
3. Enter an optional output file comment if required by the roadside inspector.
4. Tap on the Continue button.
5. Upon successful submission, tap on the Continue button. In case of failure, you will be presented with an option to retry.
Export to Email — In Canada
1. Tap on the Inspection icon.
2. Enter an email address where the log should be sent. Note: This should be the email address of an authorized roadside official only. Files sent to unauthorized email addresses will be encrypted and unreadable.
3. Tap on the Export to Email button.
View a Detailed Version of Your Log
The detailed view of your daily log will create a PDF file, including the graph of your activity and all recorded events (status changes, malfunctions, etc.) for the day being viewed. You have the option to share this PDF.
1. Tap on the Detailed Log icon. It may take a few seconds to generate the detailed view of your daily log, please be patient.
2. To share your log, tap on the Share Log button.
3. Review your log information and tap on Share Log to proceed.
4. Select a share option to send a PDF version of your log. The available share options are based on the device that you are using and any available applications that are installed.
Create a New Log
In order to manually create a new log, you must have an active internet connection.
1. Tap on the Create Log icon.
2. Use the date picker to select a previous date and tap OK.
3. On the Select Date screen, tap Continue You may select a different date by tapping on Create New Log Date
4. Tap the displayed Status to change the default Off Duty status if needed.
Options include: Off Duty, Sleeper Berth, Driving and On Duty Not Driving.
Note: Off Duty – Personal Conveyance and On Duty Not Driving - Yard Moves are not available when manually creating a log.
5. Tap into the Location field and enter a location.
6. Tap into the Start Time field to edit or enter the start time of the event.
7. Tap into the Note field and enter a note.
8. Tap on Add New Manual Status in order to add additional events. After tapping on Select a Status, repeat steps 5 through 8 to continue building your day.
9. Tap on the Save button.
Note: Penske Driver will not automatically create logs for days you are not logged in to the app. You need to manually create logs for those days.
Managing ‘On Duty’ Logs When Not Logged into the Penske Driver App
Purpose
This section outlines carrier responsibilities when the Penske Driver App has not recorded the ‘On Duty’ status of the driver because he/she has not logged in during the required time frame of current 24-hour period and the previous 7 consecutive days (USA) and 14 consecutive days (Canada). It is essential to ensure compliance with Hours of Service (HOS) regulations by manually recording any necessary logs.
Scenario
In instances where the driver has not logged into the Penske Driver App, the system may fail to generate and transfer the required output file containing the driving logs for the current 24-hour period and the previous 7 consecutive days (USA) and 14 consecutive days (Canada). To maintain compliance regulations within the United States, it is important to manually enter ‘On Duty’ logs for any days affected by this issue.
Carrier/Driver Responsibilities
1. Manual Entry of ‘On Duty’ Logs:
If the driver’s daily log is missing or is incomplete because they did not log into the Penske Driver App, they must manually enter the ‘On Duty’ status for any affected days.
Make sure to accurately input the date(s) and the time range(s) during which the driver was on duty.
2. Steps to Manually Enter ‘On Duty’ Logs:
Refer to ‘Create a New Log’ section (page 19)
By adhering to these responsibilities and procedures, you can help ensure compliance with regulations within the United States and maintain accurate records of your driving hours, even when you have not logged into the Penske Driver App.
1. Tap on the View Logs icon.
Carrier Change Password
Change Country Change Distance Units
2. Select the date for which you wish to view logged events.
Filter/Sort Logs
1. Tap on the View Logs icon.
2. Filter the list by tapping All.
3. Select a filter(s) and tap on the Apply button.
Options include: All, Certified Records, Uncertified Records and Requested Edits.
4. You may also sort the list by tapping on the Blue Arrows to reverse the order.
Add Notes to Events for the Current Day
1. Select the Add Note link in the event.
2. On the Add Note to Status window, tap into the Note field and add your note.
3. Tap the Save button.
Add Notes to Events for Previous Day
1. Follow the Edit Log flow on page 16.
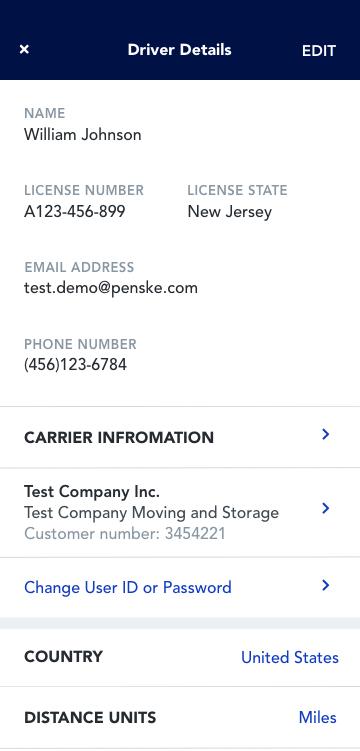
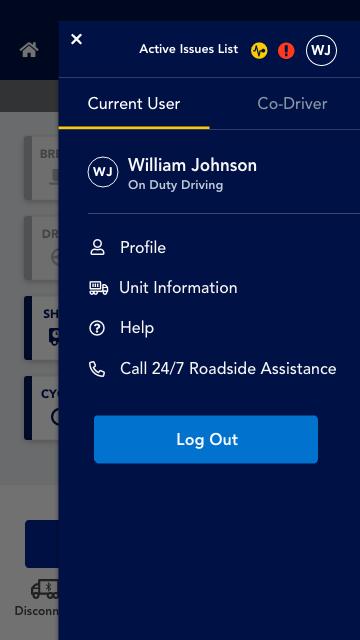
Your Profile
View Your Profile
1. Tap on the Profile icon indicated by your initials in the upper right-hand corner.
2. Tap on View Driver Information.
Edit Your Profile
You can only edit your email address and phone number from within the application.
1. Tap on the Profile icon.
2. Tap on View Driver Information.
3. Tap on the Pencil icon (Android) or Edit (iOS).
4. You may edit your email address or phone number.
5. To save your changes, tap on the Checkmark icon (Android) or Done link (iOS).
6. To exit without saving your changes, tap on the X icon.
Change Your Password
Changing your password from within Hours of Service will change your password for the Penske Driver app.
1. Tap on the Profile icon.
2. Tap on View Driver Information
3. Tap on Change Password.
4. Enter your current password.
5. Enter your new password.
6. Tap Confirm Password and re-enter your new password from step 5.
7. Tap the Continue button.
Change Your Country
1. Tap on the Profile icon.
2. Tap on View Driver Information
3. Tap on Country.
4. Select either United States or Canada.
Note: Changing the location settings under your profile are for the Location finder feature within the Penske Driver app and do not control any settings within Hours of Service.
Change Your Distance Units
1. Tap on the Profile icon.
2. Tap on View Driver Information
3. Tap on Distance Units.
4. Select either Miles or Kilometers.
Note: Changing the distance unit settings under your profile are for the Location finder feature within the Penske Driver app and do not control any settings within Hours of Service.
View Your Carrier Information
1. Tap on the Profile icon.
2. Tap on View Driver Information.
3. Tap on Carrier Information
4. Tap on the back chevron (<) to return to the Driver Details page.
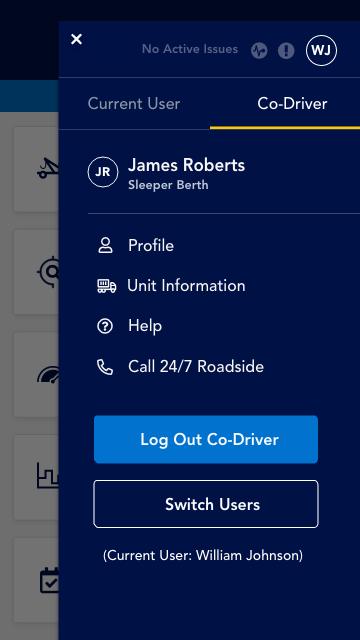
Logging Out
1. Tap on the Profile icon.
2. Tap on Log Out button under your name.
3. On the Attention notice, tap on the Continue Log Out button. You may see additional alerts if you have uncertified logs or if a co-driver is logged in.
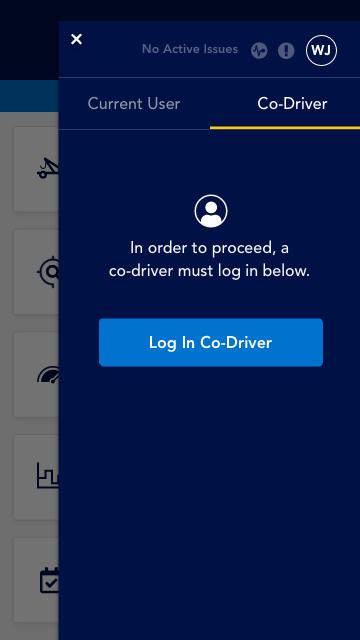
Co-Driver
Co-Driver Log In
Using Hours of Service with a Co-Driver
Co-Driver Log Out
Switching Users
Co-drivers must log in to the application prior to the vehicle being in motion. Co-driver log in is not allowed when the active driver is in any of the following statuses: Driving, Off Duty – Personal Conveyance or On Duty Not Driving – Yard Moves.
Important: Only one driver can be in one of the following statuses at a time:
• Driving
• Off Duty – Personal Conveyance
• On Duty Not Driving – Yard Moves
Important: When driving with a co-driver, only one mobile device should be used. Both drivers will log into the same mobile device to record logs.
Co-Driver Login
1. Tap on the Profile icon to open the side menu.
2. Select Co-Driver tab.
3. Enter your User ID and Password.
4. Tap on the Log In button.
5. If the co-driver has any uncertified logs, you will be prompted to take action at this time.
Co-Driver Logout
1. Tap on the Profile icon to open the side menu.
2. Tap on Log Out button under your name.
3. On the Alert notice, tap on the Continue to Logout button.
4. On the Attention screen, tap the Continue button.
Switching Co-Driver and Driver
Please note, after switching, if there is no activity from the co-driver for one minute or an alert is triggered requiring driver interaction, the application will revert back to the primary driver and any unsaved information will be lost.
1. Tap on the Profile icon to open the side menu.
2. Tap on Switch Users
Synchronizing Your Data
Last Sync Date and Time
The Penske Driver app version 4.0 or higher, syncs your profile and log data across all your devices. When logging into Hours of Service on a different phone or after a clean install, your information will automatically download and be available for your viewing. Having a dedicated device is advised when using the Penske Driver app HOS feature.
Automatic Sync
Your data is automatically synced with the Penske cloud under the following situations:
• Certifying logs
• Logging out
• Once per hour
• Processing suggested edits
• Saving edits to your logs
• Signing in
View When Last Sync Occurred
1. Tap on the More icon on the Duty Status screen.
2. View Sync Logs at the bottom of the opened menu.
3. The last sync is displayed.
Manual Sync
You can manually force your device to sync with the Penske cloud by performing the following steps:
1. Tap on the More icon on the Duty Status screen.
2. View Sync Logs at the bottom of the opened menu.
3. The last sync is displayed. Tap on the Sync Logs icon to manually synchronize your data.
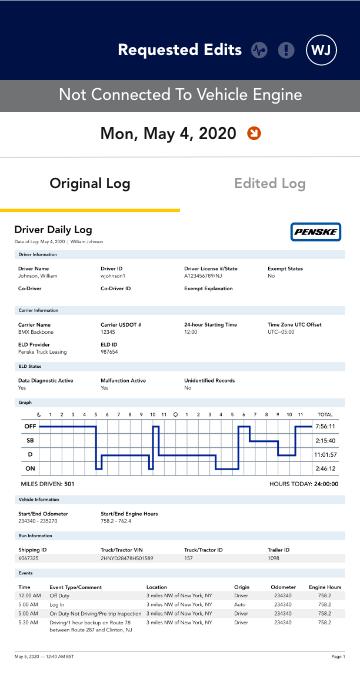
Requested Edits
Requested Edits Icon
What Are Requested Edits?
Toggle Log View
Toggle between the original log and the requested edits.
Using the Driver Management Portal, your admin has the ability to request edits to your daily log files for you to accept or reject. You will be alerted of any requested edits after launching Hours of Service, when logging out and when editing a day with pending edits.
Reviewing Requested Edits at Login and Logout
1. On the Requested Edits prompt, tap on the View Records button. You may tap on Not Ready to skip the review for a later time.
2. Tap on the Requested Edits date. Dates with requested edits are marked with a red icon containing a downward facing white arrow.
3. Toggle between the Original Log and the Edited Log by tapping on the tabs at the top of the screen to review the edits.
4. Tap on the Reject Edits or Accept Edits button accordingly.
5. If edits are accepted, you will be prompted to recertify.
6. Repeat the process as necessary until all requested edits are resolved.
Reviewing Requested Edits When Editing a Day
1. On the Requested Edits prompt, tap on the Continue button.
2. Toggle between the Original Log and the Edited Log by tapping on the tabs at the top of the screen to review the edits.
3. Tap on the Reject Edits or Accept Edits button accordingly.
4. If edits are accepted you will be prompted to recertify.
Unassigned Driving Time
Date Selector
If the Review unassigned logs option is selected, a date selector screen is displayed.
Events Selector
After selecting driving dates, specific, unassigned events for that date are displayed.
Logs Assigned to Your Name
After confirming, all selected events will be assigned to you. Any unselected events will be assigned to the unidentified driver profile associated with your company.
What is Unassigned Driving Time?
Unassigned driving records are records that are recorded by the adapter on a vehicle, but not associated with a particular driver. These records are created and stored on the adapter when the vehicle is driven without an active connection to a mobile device. Once a logged in driver connects to that adapter, any unassigned driving records will be transferred to that device to be managed. If found, you must take action immediately and will not be able to use the application until resolved.
You will be notified about any unassigned driving time after connecting to a vehicle and entering your run information. If the process is interrupted, you will be prompted to take action the next time you sign in to the application.
Manage Unassigned Driving Time
All unassigned drive time must be accounted for by either taking ownership of the logs or declining the logs, which assigns them to the unidentified driver profile associated with your motor carrier.
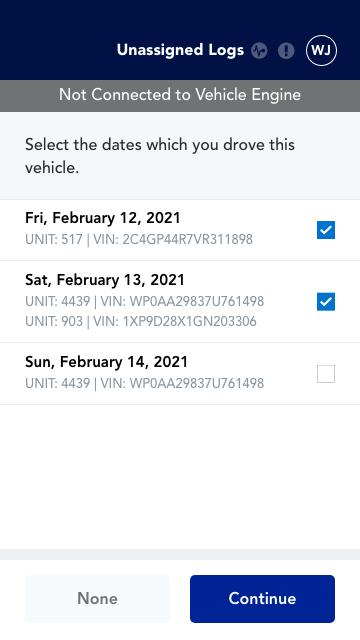
1. When prompted, tap on either the Review or Reject All buttons. All rejected logs will be immediately assigned to the unidentified driver profile associated with your company.
2. When Review is selected, a list of dates showing unassigned logs will appear. Unit numbers and VINs will also be displayed for further identification. Use the checkboxes to select the dates that may belong to you. You may exit the screen by selecting None. All unchecked dates or logs will be declined and assigned to the unassigned driver profile for the company.
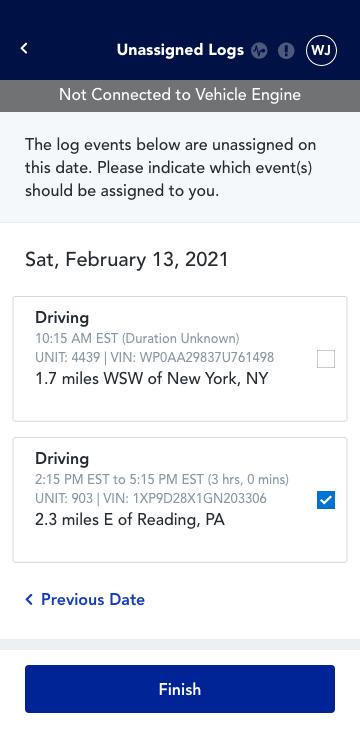
3. To review specific events for selected dates, tap Continue.
4. Beginning with the first date selected, review and select any events that should be assigned to you. Advance to any following dates you may have selected by tapping on the Next Date link.
5. After reviewing your changes by selecting the Next Date or Previous Date links, tap on the Finish button.
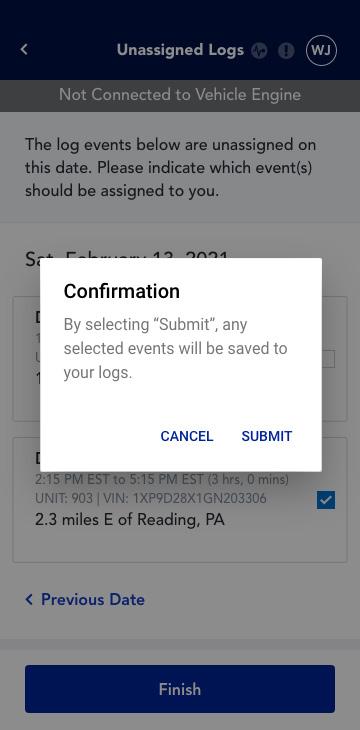
6. A confirmation modal will appear. Tap on the Submit link to assign selected events to your logs.
Data Diagnostic Events and Malfunctions at a Glance
Malfunction Indicator
When a malfunction occurs,the Malfunction Indicator will light up red.
Data Diagnostic Event Indicator
When a data diagnostic event occurs,the Data Diagnostic Event Indicator will light up yellow.
Active Issue List
When there are active data diagnostic events or malfunctions, tapping on this will load a list view of all active items. The list will be sorted chronologically with the most recent items at the top.
Details
This view shows you more information about the item at hand. You can see what it is, when it happened and suggested troubleshooting steps.
What to Do When a Data Diagnostic Event or Malfunction Occurs
1. Tap on the Profile icon to open the side menu.
2. Tap on View Active Issues to view all active issues.
3. Tap on an item to view details of the issue along with any suggested troubleshooting steps.
Data Diagnostic Event Details
Below is a list of all data diagnostic events along with what causes them and suggested troubleshooting steps.
Data Transfer Data Diagnostic Event
A Data Transfer data diagnostic event occurs when the operation of the data transfer mechanism(s) is not confirmed.
This may lead to a Data Transfer Compliance malfunction.
To resolve this issue, confirm internet access is available and restart the device if necessary.
Engine Synchronization Data Diagnostic Event
Engine Synchronization data diagnostic events occur when an ELD loses ECM connectivity to any of the required data sources (engine power status, vehicle motion status, miles driven, and engine hours) and can no longer acquire updated values for the required ELD parameters within five seconds of the need.
This may lead to an Engine Synchronization Compliance malfunction.
To resolve this, power off the vehicle, restart the device and have the application ready to connect. Power on the vehicle and connect the device.
Missing Required Data Elements Data Diagnostic Event
A Missing Required Data Elements data diagnostic event occurs when any required data field is missing at the time of its recording.
To fix this, try powering off the vehicle, restarting the device and having the application ready to connect. Power on the vehicle and connect the device.
Power Data Diagnostic Event
Power data diagnostic events occur when an ELD is not powered and fully functional within one minute of the vehicle’s engine receiving power and does not remain powered for as long as the vehicle’s engine stays powered.
This may lead to a Power Compliance malfunction.
To resolve this, try powering off the vehicle, restarting the device and having the application ready to connect. Power on the vehicle and connect the device.
Malfunction Details
Below is a list of all malfunctions along with what causes them and suggested troubleshooting steps.
Important: if you are unable to resolve any malfunction, you must switch to paper logs.
Data Recording Compliance Malfunction
A Data Recording Compliance malfunction occurs when an ELD can no longer record or retain required events or retrieve recorded logs that are not kept remotely by the motor carrier.
This may be caused by low storage. Try removing data on the device to free up storage and relaunch the application.
If the malfunction persists, switch to paper logs.
Data Transfer Compliance Malfunction
A Data Transfer Compliance malfunction occurs when the ELD stays in the unconfirmed data transfer mode following the next three consecutive monitoring checks.
To fix this, confirm internet access is available and restart the device if necessary.
If the malfunction persists, switch to paper logs.
Engine Synchronization Compliance Malfunction
Engine Synchronization Compliance malfunctions occur when ECM connectivity to any of the required data sources (engine power status, vehicle motion status, miles driven, and engine hours) is lost for more than 30 minutes during a 24-hour period aggregated across all driver profiles.
Power off the vehicle, restart the device and have the application ready to connect. Power on the vehicle and connect the device.
If the issue persists, contact Penske Service and switch to paper logs.
Position Compliance Malfunction
When an ELD fails to acquire a valid position measurement within five miles of the commercial motor vehicle moving and 60 minutes has passed, a Position Compliance malfunction will be recorded in the data diagnostic. Ensure that location services are enabled on your device and restart the application.
If the malfunction persists, switch to paper logs.
Power Compliance Malfunction
Power Compliance malfunctions occur when an ELD is not powered for an aggregated in-motion driving time of 30 minutes or more over a 24-hour period across all driver profiles.
To resolve this, power off the vehicle, restart the device and have the application ready to connect. Power on the vehicle and try to connect.
If the malfunction persists, switch to paper logs.
Timing Compliance Malfunction
A Timing Compliance malfunction occurs when the ELD can no longer meet the underlying compliance requirement to record Universal Time Coordinated (UTC), where ELD time must be synchronized with UTC, not to exceed an absolute deviation of 10 minutes at any time.
Close the application, verify and correct the time on the device and relaunch the application.
If the malfunction persists, switch to paper logs
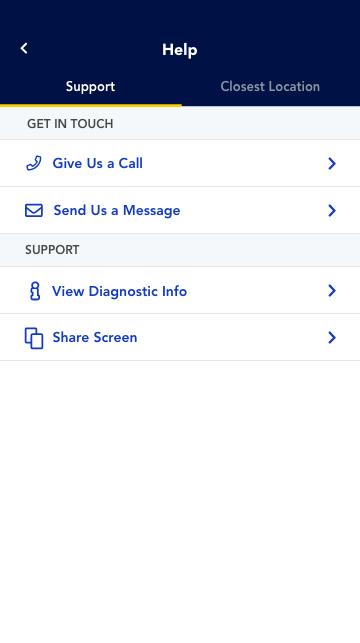
Help and Support
Contact Options
Tap on either of these options for support.
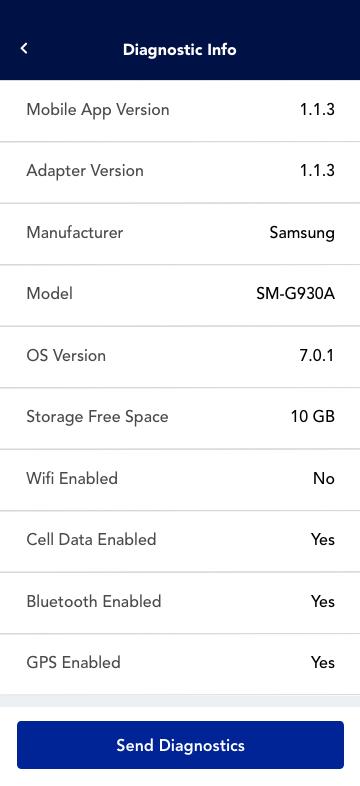
Device Specific Info
These data points are not available on Apple iOS devices.
Force Closing the Driver App
If you force close the app or it closes unexpectedly, you will remain on your most recent ELD Duty Status. Please verify your correct duty status and disconnect from the vehicle before closing or logging out of the app.
• If you are unable to edit/correct your latest Duty Status, the next time you re-enter the Hours of Service section of the app, please explain your log events accordingly, or call the Penske Customer Success team for assistance.
Restart Your Device
Restarting your device is an easy way to solve many issues. Due to the variety of devices out there, the process for restarting will vary. Please consult the documentation from your manufacturer for the proper steps to follow.
Before you restart:
• Save any edits that you may be working on.
• If you are connected to a vehicle, make sure to disconnect.
• Log out of the application.
Reinstall the Driver App
Uninstalling and reinstalling the Penske Driver app can cause data loss. Please consult with the Penske Customer Success team at 844-426-4555 before performing this action.
Motion Detected Without Being Authenticated to the ELD
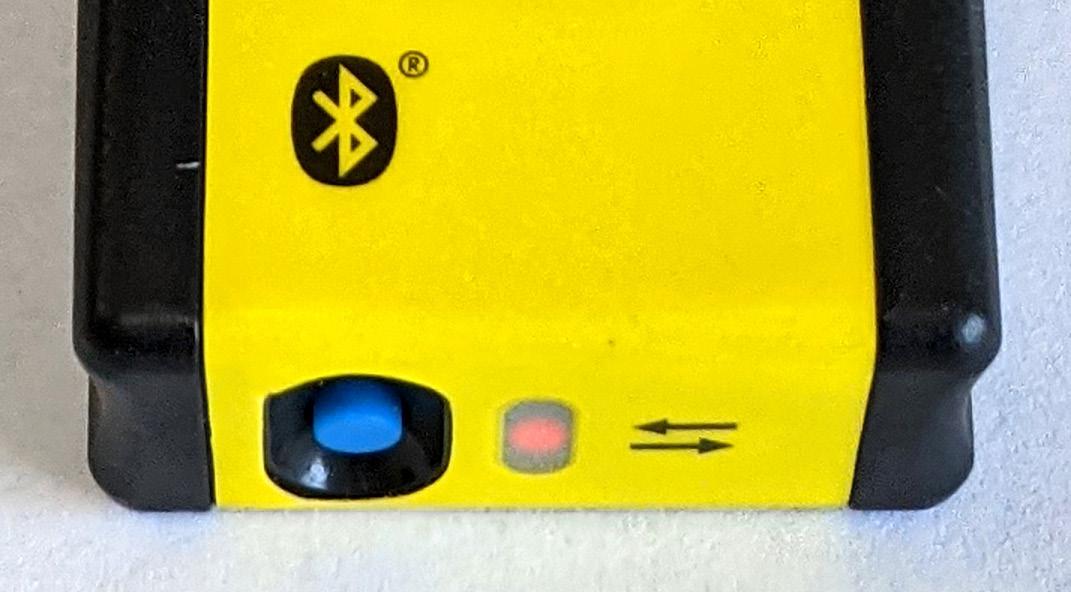
If vehicle motion is detected, and there is no bluetooth connectivity between the mobile device and the engine component, the LED light on the engine component will blink red three times and remain solid read, indicating that the driver needs to stop the vehicle and connect to the ELD.
Once a driver is authenticated and has connectivity between the mobile device and engine component, the LED light on the engine component will display solid green to indicate a successful connection.
If the engine component is not visible upon installation, the driver interface on the mobile device will alert the driver if motion is detected, advising to authenticate to the ELD. This indicator will be present on the Driver app login screen and Driver app home screen.
Engine Component
Connects engine data and mobile device via Bluetooth
Red LED Light
Indicates that there is no connection (will blink three times and then remain solid red)
Green LED Light
Indicates a successful connection
Motion Alert
Alert will advise stopping the vehicle and authenticating to the ELD
Contact Support
You can reach the Penske Customer Success team 24 hours a day, seven days a week directly from the Penske Driver app.
Email | hello@penskecustomersuccess.com
1. Tap on the Profile icon.
2. Tap on the Help link.
3. Tap on Send Us a Message.
4. Type in the details of the issue that you are facing.