Opening Account REQUI REMENTS
FEDERAL REQUIREMENTS
CUSTOMER ONBOARDING is the process of verifying a person’s identity by gathering necessary information using both documentary and non-documentary means. The onboarding process uses the bank’s Customer Information Program, or CIP, to determine the type of activity a customer is likely to conduct with the bank as well as assess the customer’s risk level. This is crucial to protect the Bank from money laundering and terrorist financing.
CUSTOMER INFORMATION PROGRAM
Federal Law requires certain information be obtained before opening an account. To meet Federal requirement, we must obtain:
• Legal Name
• Address (physical residence)
• Date of Birth
• Social Security Number (SSN) or Individual Taxpayer Identification Number (ITIN)
IRS TAX IDENTIFICATION NUMBER REQUIREMENTS
The IRS uses two types of Tax Identification Numbers (TIN) for individuals:
• SSN: 123-45-6789
• ITIN: 987-65-4321
A Social Security Number is assigned to U.S. citizens, permanent residents, and temporary residents under the Social Security Act. Social Security Numbers never change; these remain the same during a person’s lifetime. An Individual Taxpayer Identification Number, however, must be renewed every three years.
OFFICE OF FOREIGN ASSESTS CONTROL LIST
Non-documentary measures are taken to determine if the customer appears on a list of known or suspected terrorists or terrorist organizations issued by any federal government agency. The bank uses the Office of Foreign Assets Control, or OFAC, List; the OFAC is a financial intelligence and enforcement agency of the U.S. Treasury Department.
*
3 / CONSUMER CHECKING ACCOUNTS GUIDE
ID THEFT PREVENTION (RED FLAG)
In an effort to protect both the bank and valued customers, certain Identity Theft Prevention measures are taken to ensure the true identity of the individual opening the account. In accordance with The Fair and Accurate Credit Transactions (FACT) Act, Paducah Bank completes a Red Flag Checklist for each customer on each account opened. Any suspicious activity should be reported to the bank’s BSA officer before proceeding. The BSA officer will decide whether the account should be opened and if a Suspicious Activity Report, or SAR, will be filed.
CUSTOMER DUE DILIGENCE (RISK)
Customer Due Diligence, or CDD, is the process of assessing risk level by gathering customer data and transaction information at account opening. Paducah Bank determines risk level using the appropriate risk analysis form for each customer. The BSA Officer uses this form in conjunction with all other information gathered to examine and monitor for potential illegal activity. Paducah Bank is obsessed with building relationships. This is our frontline defense against money laundering and identity theft!
BANK REQUIREMENTS
BOARD APPROVED FORMS OF ID
Paducah Bank has a Board-approved list of acceptable forms of identification that meet Federal CIP requirements:
PRIMARY ID
• State Issued Driver’s License/Permit
• State Commercial or Motorcycle License
• KY State ID Card
• IL State ID Card
• IL State ID Card
• Military ID (do not copy)*
• Passport
• US Alien Registration Card
• Matricula Consular
• Global Entry Card
SECONDARY ID
• Firearm License
• Insurance Card
• Social Security Card
• Utility Bill/Property Tax Bill
• Credit Card
• Voter Registration
• Work or Student Visa
• Student ID Card
• Work Badge
• Birth Certificate
• Organization Membership Card
*Per Title 18, US Code Part I, Chapter 33, Section 701, we cannot make a photocopy of a military ID Card. Document ID information for CIP purposes without making a copy.
*
4 / CONSUMER CHECKING ACCOUNTS GUIDE
One Primary and one Secondary form of ID is required at account opening. The exceptions to this rule are for minors, disabled, and elderly; in these cases, we can accept two forms of secondary ID; if an exception is made, obtain copies of both secondary forms. Existing customers whose identities are known and their relationships with the Bank established prior to October 1, 2003, are exempt from CIP requirements, assuming the customer’s name, physical address, date of birth, and TIN are known to the Bank.
Legal names must match on both forms of ID. We must enter the full legal name, as it is on the ID presented.
The address on the ID must also match the current address given by the customer. If the address on ID is not the current physical residence, we must obtain proof of current address for Federal CIP compliance.
A Parent or guardian must be on an account with minors under 18 years of age.
NON-RESIDENT ALIEN/NO SSN
A Non-Resident Alien is not required to have a U.S. TIN. In this case, the customer must certify foreign status by signing an IRS Form W-8 BEN, found in New Account Console. This ensures we meet both Federal and Bank CIP Requirements. Primary and Secondary ID is still required to verify customer’s identity.
In New Account Console, we will use 999-99-9998 as the TIN when building the customer’s CIF. It is important to note that all identification and customer documents will be indexed at the account level for easy access.
5 / CONSUMER CHECKING ACCOUNTS GUIDE
OPENING A SINGLE OWNER ACCOUNT

PART 1: BUILDING THE CIF
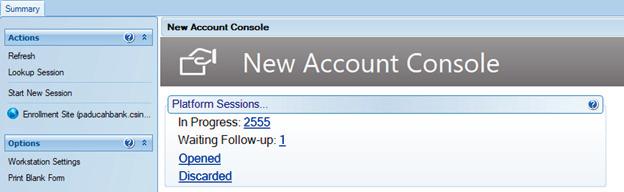
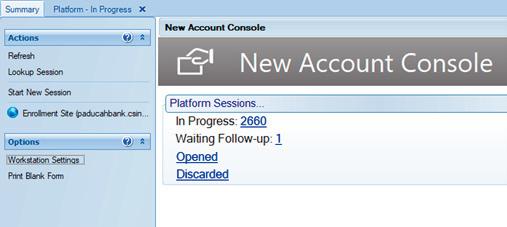
After accessing Start New Session, the program will navigate to a blank session where users, products, and all necessary information will be entered. We start by building a customer’s information file (CIF) using our customer onboarding knowledge and tools.
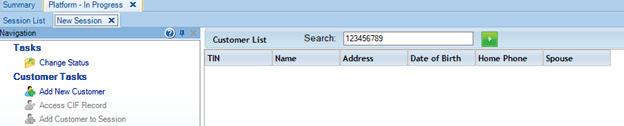
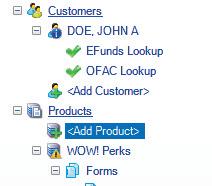
Because all customers have a unique Social Security Number, we use that number to search. This will tell us if the customer either currently has active accounts or has had them in the past; if no name populates under the search bar, click Add New Customer to build a new file. Because the same program is used for business accounts, some fields may not pertain to an individual and should be left blank. All fields with (*) are required. Some fields are not required but are helpful to us. For example, if we know a customer is married, listing “Marital Status” and “Spouse” may be helpful.
* 7 / CONSUMER CHECKING ACCOUNTS GUIDE
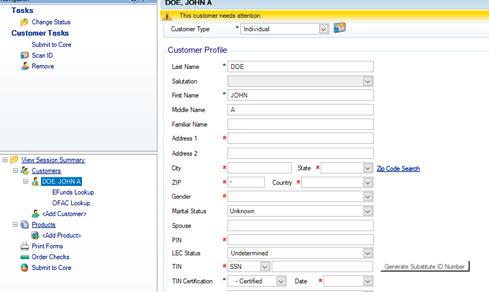
It is important to note that a CIF must be recorded using the full legal name on the individual’s ID.

The PIN field will be the last four digits of the SSN. If the customer has a Social Security Number, the TIN Certification will be “1-Certified” with the current date. This is our way of verifying the TIN is correct. If the customer does not have a Social Security Number, the certification will be “8-Customer has signed a W-8 form.”
Enter all Primary ID information into the ID fields. Do not include any dashes or other symbols into the ID Number. This field should include only letters and numbers.
Moving down the page, BSA Risk Code for individuals is typically set to “LOW” to start. This code is determined by the Risk Analysis form; all Non-Resident Aliens are considered moderate risk. Use the findings from the Risk Analysis form to determine the risk level. Contact the BSA Officer with any questions during account opening. The BSA Officer can change risk level at any time after the customer has established account habits.
*
8 / CONSUMER CHECKING ACCOUNTS GUIDE
Similar to the TIN Certification is CIP Status. This field refers to the customer’s true identity, rather than their SSN. Assuming the customer’s true identity has been verified using our onboarding tools, the CIP Status will be set to “Certified Level 1” with the current date. This certification is good for 5 years.


Notice the Email Address is not marked with an asterisk; this is because not everyone will have an email. If the customer does have an email, include it here. We must obtain occupation and employer information as well.
Navigate to the EFunds Lookup by pressing Next at the bottom of the session screen.
*
9 / CONSUMER CHECKING ACCOUNTS GUIDE
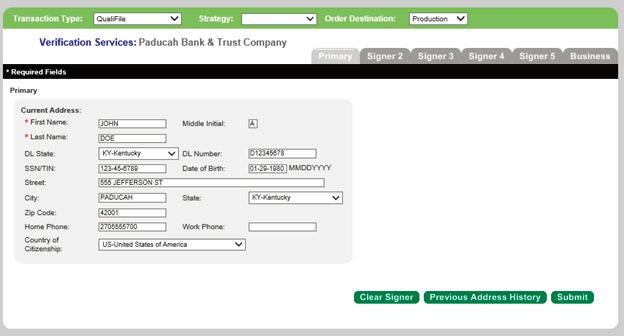
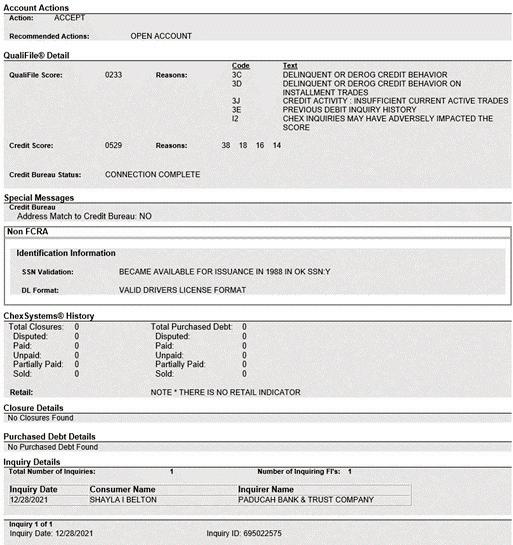
In a separate window, Harland Clarke’s Verification Services will populate the customer’s information based on what was inputted into the CIF. Verify this is correct, and press Submit. This will generate a ChexSystems report, which will give any charge off information, estimated credit score, and recent bank inquiries. Each of these are important to the next steps:

*
10 / CONSUMER CHECKING ACCOUNTS GUIDE
• Charge off information will determine if we can open a normal checking account, stop the process and provide an adverse action notice, or open a Renew Account.
• Estimated Credit Score will determine if an instant issue debit card can be printed or if the debit card must be mailed. If the credit score is below 470, the debit card cannot be issued same day in the branch. This number will be referenced on the account later on in the session.
• If there are multiple inquiries made to other banks within a small time frame, this may be cause for concern involving illegal activity. This is a part of Customer Due Diligence. Some reasons this may not be a cause for concern are: the customer has a charge off and is trying to open an account elsewhere or customer has moved frequently/recently.
Once EFunds has been run, click next at the bottom of the session to Navigate to the OFAC Lookup.


Preview all information for accuracy and click the green arrow to search. This will generate a list of any possible matches. If there is a match, contact the BSA officer for further guidance.
Click Next at the bottom of the session and navigate to the Products section to choose products.
* 11 / CONSUMER CHECKING ACCOUNTS GUIDE
Zero Charged Off Accounts-Open Regular Checking Product 1-2 Charged off Accounts left unpaid totaling less than $1,000 total-Renew Checking 3 or more Charged off Accounts or 1-2 Charged off Accounts totaling more than $1,000-Provide Adverse Action
PART 1: INDEXING THE ID
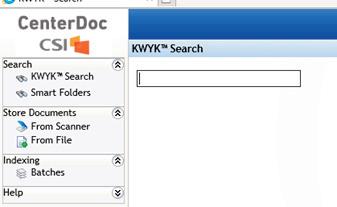

After entering the CIP information, navigate to Centerdoc within NuPoint. Click on From Scanner and then set the Scan Plan to Identification: Non-Passport. Click Add at the top. Batch Title will be set as the Social Security Number.
Scan the ID through the ID scanner. Then go back to Centerdoc and click Batches on the lefthand side. There may be multiple documents available. Find the ID and click Index. Retype the SSN and batch. This uploads the ID so it can be viewed in the future.
* 12 / CONSUMER CHECKING ACCOUNTS GUIDE
PART 2: BUILDING THE ACCOUNT
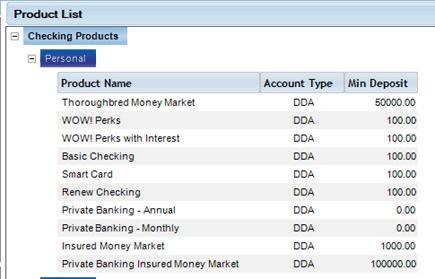
After adding the customer to the session, it’s time to add the appropriate accounts. On the left-hand side, navigate to Products and click <Add Product> to see a list of all current Paducah Bank account types. Multiple accounts can be built within one session; click on as many as needed
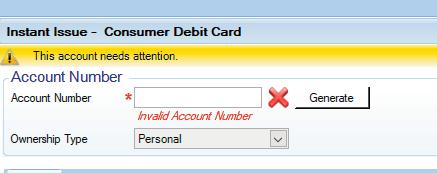
If a debit card is desired, it will be added here as well. If the card is being printed same-day within the branch, use the Instant Issue Consumer Debit Card option. Navigate Next to start building the new account.
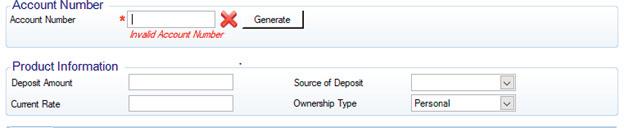
Click “Generate” to create a new account number. Put the initial deposit amount in, and add the source of deposit. If the account is an interest-bearing account, such as a CD, NuPoint will populate our current interest rate. Do not add a rate amount if one is not prefilled. Many of our interest-bearing accounts offer tiered interest based on account balance, and the system will generate that automatically when the account is submitted.


* 13 / CONSUMER CHECKING ACCOUNTS GUIDE
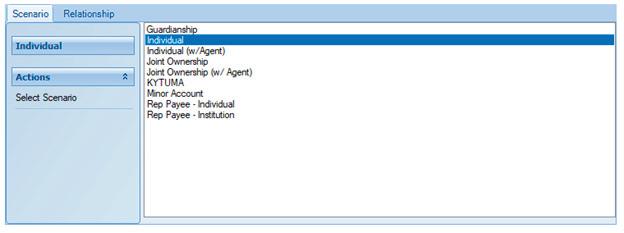
The scenario section will determine the customer’s ownership. For an account with only one person, click “Individual” and add his/her name from the dropdown. This fills the customer’s information below in “Customer Data” section.
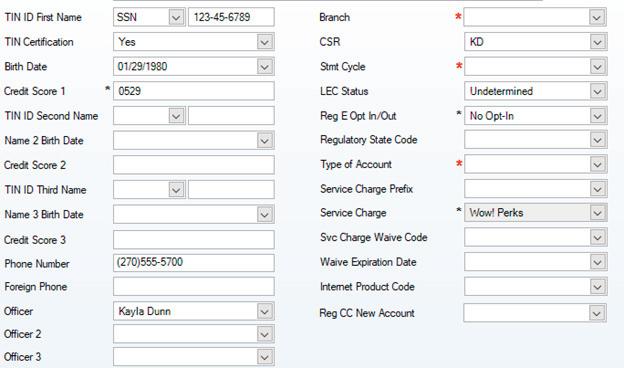
Credit Score 1 is the credit score found on Harland Clarke’s EFunds page. This field does, however, require 4 digits for back office reporting purposes; this is remedied using a 0 in front of the score. For example, if the credit score is 529, input 0529 into the score field.


* 14 / CONSUMER CHECKING ACCOUNTS GUIDE
Input the branch in which the account is being opened. Type of Account for consumers will always be Personal.
One important field to note is the Stmt or Statement Cycle. The statement date and monthly cycle is determined by the last digit of the account number. In this case the account number ends in 1 so the statements cut on the 4th of the month.
1 or 2 4th of month
3 or 4 6th of month
5 or 6 11th of month
7 or 8 18th of month
9 or 0 20th of month
Reg E Opt In/Out refers to overdraft protection on the customer’s debit card. This can be selected here or after the account has been opened.


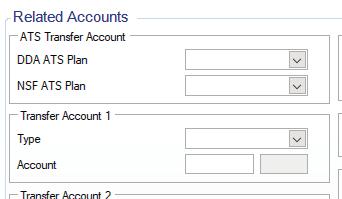
If a customer requests an ATS transfer between accounts, that can be selected on this screen as well.
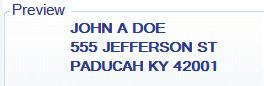
Navigate to the next screen for a preview of mailing address label. This is the preview of how all mailings will be addressed regarding the account. Navigate to the next screen to add appropriate forms.generate that automatically when the account is submitted.
* 15 / CONSUMER CHECKING ACCOUNTS GUIDE
PART 3: ACCOUNT DOCUMENTS
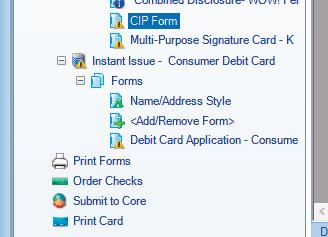
Navigating to the “Add/Remove Form” section will list required forms on the left, such as the required disclosures and the signature card. The list of available forms can be added into the session. Double click on the documents to add or click on the document and use the “<” button to add it to the session.
REQUIRED FORMS:
• Combined Disclosure
• Consumer Account Fees
• Signature Card
• Risk Analysis
• Red Flag
• CIP for new Customer or if CIP is older than 5 years
Add any extra forms pertaining to account into the session (Debit Card forms can be added to the Debit Card Product later in the session).
ADDITIONAL FORMS EXAMPLES:
• Internet Banking Form
• ATS Setup Form
• Oops Protection Opt Out Form
Navigate forward to begin completing each form.
* 16 / CONSUMER CHECKING ACCOUNTS GUIDE
Personal Account Ownership will be individual if there is only one person on the account
Personal Account Designation allows for Payable-on-Death beneficiaries to be added. If the account holder wishes to add POD beneficiaries, obtain as much information as possible. Name, DOB, and SSN are preferred as DOB and SSN do not change. Name and Address alone are subject to change over a person’s lifetime.
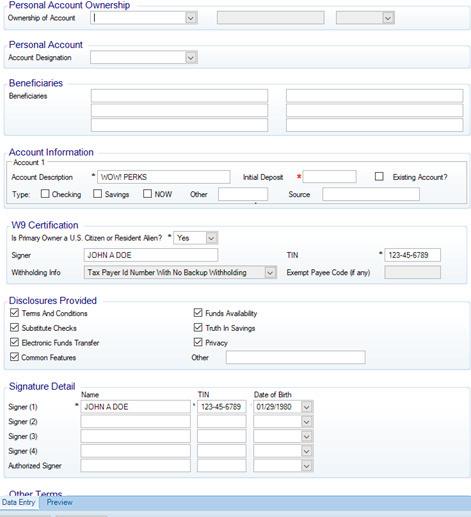

Account Information will prefill the account level. Input the Initial Deposit amount, and mark the account type, whether checking or savings. Source is where the funds come from and reflects on the signature card (ex. Cash, CFSB, Regions, etc.).
Our W-9 Certification prefills as well as Disclosures Provided. Do not make changes to these fields. The very bottom prefills your desired signers. You can toggle between Date Entry and Preview to view the document as needed. Inspect the document for errors before proceeding.
* 17 / CONSUMER CHECKING ACCOUNTS GUIDE SIGNATURE CARD
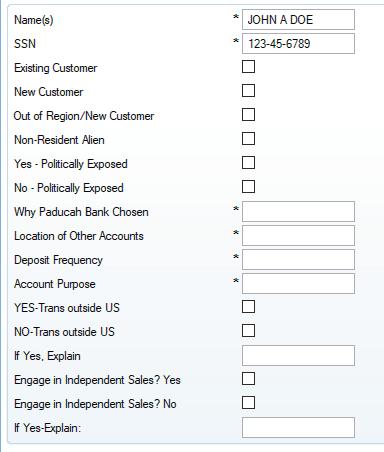
Our BSA Officer relies on this form to establish normal activity on the account and detect potential illegal activity. This form is crucial to Customer Due Diligence. Fill out this form with as much information as possible. Toggle the Data Entry and Preview Screens as needed to make sure the form is filled out correctly.

* 18 / CONSUMER CHECKING ACCOUNTS GUIDE RISK ANALYSIS
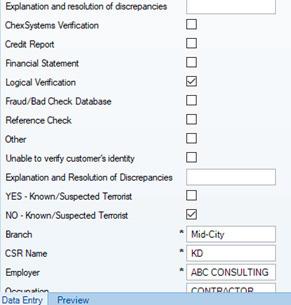
The Red Flag Checklist is a document intended to detect, prevent, and mitigate Identity Theft on the front line at account opening. This document appears to be filled in with the answer “no” defaulted after each question. Be sure to read through each question carefully.
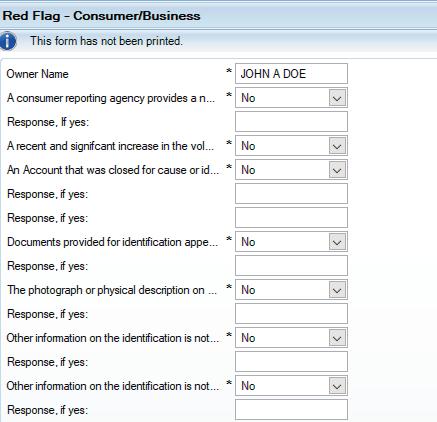
The questions are categorized into three sections:
• Alerts, Notifications, or Warnings on Credit Report
• Documents
• Identifying Information
Each section asks a series of questions to ensure the Bank has examined identifying documents carefully and verified the true identity of the client requesting a new account.
Contact your Supervisor or the BSA Officer with any questions.
* 19 / CONSUMER CHECKING ACCOUNTS GUIDE
RED FLAG CHECKLIST
CIP FORM


The CIP form is a record of the customer’s information, including the identifying documents used at account opening, the branch and Personal Experience Banker that opened the account, OFAC results, and other non-documentation means of identification.

Information from the primary form of ID that was entered into New Account Console at the beginning of the session will populate automatically. Type in the secondary form of ID information. Product information will populate from the session.
This form is good for 5 years.
* 20 / CONSUMER CHECKING ACCOUNTS GUIDE
PART 4: BUILDING THE DEBIT CARD
If the credit score obtained from Efunds is 470 or higher, the card can be printed within the branch. For this, select Instant Issue Consumer Debit Card. Click Next to navigate to the card information.

Click generate to create a new card number.


Click Individual and link the customer to the card. This will populate the customer’s information at the bottom.

* 21 / CONSUMER CHECKING ACCOUNTS GUIDE
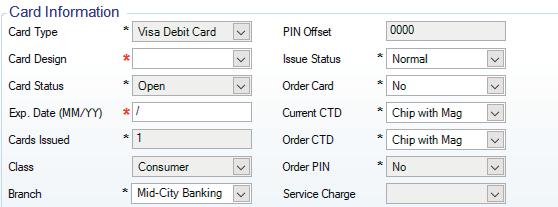
Card Design for a consumer debit card is always EMV WOW Card.
Enter the expiration date as three years out from the current month and year. For example, if it is issued in January of 2022, the expiration will be 01/25. This card will expire at the end of January 2025. A new card is automatically mailed to the customer at the beginning of that month to make sure there is no lapse in card access.
Issue Status will be set to normal.
The Current CTD and Order CTD currently prefill to Chip with Mag, but both fields need to be set to Dual EMV with Mag to incorporate the Contactless or Tap to Pay feature.
Under Related Accounts, set the Type to DDA, add the account number to link to the debit card, and set the status to Primary Account (Dep, W/D, Transfers).

Standard consumer debit card limits are automatically set in place:
• $1,500 Point-of-Sale/Purchases per day
• $500 ATM per day

* 22 / CONSUMER CHECKING ACCOUNTS GUIDE
PART 5: DEBIT CARD DOCUMENTS DEBIT CARD APPLICATION
Each debit card requires a debit card application.


On the application, indicate whether the card is printed in branch via instant issue or if it was ordered and mailed to the client. Each debit card application form populates the account number incorrectly. Simply remove the entire account number and type it in again to remove the extra numbers and spaces.

The A-9 is where clients choose to accept or decline overdraft protection on the debit card. A single election is made for all debit cards linked to the account. Fill out the form entirely. If the client does not have an email address, make note of no email address in the email section.

* 23 / CONSUMER CHECKING ACCOUNTS GUIDE
A-9 FORM
PART 6: SUBMITTING THE ACCOUNT: E-SIGN AND WET SIGNATURES
E-SIGN

To avoid delays caused by filing paper documents, Electronic Signature or e-Sign is used as much as possible for new account documents. These electronic documents can be saved for later signing if necessary and accessed at all Paducah Bank locations.
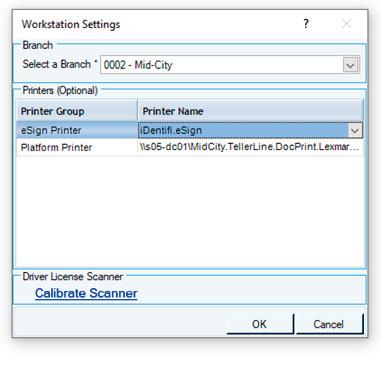
To use this form of signing, the printer must be set to the identify.eSign. On the New Account Console’s main screen, click Workstation Settings, located under Options of the left-hand side. Platform Printer is set to the printer in which all disclosures will be printed.
* 24 / CONSUMER CHECKING ACCOUNTS GUIDE
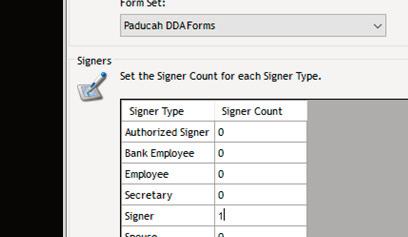
A separate Login will pop up; this is your Centerdoc credential. Next, select the form set. This is where the program populates the correct signature spaces for each signer. Each account owner should be counted as a “signer” and not an “authorized signer” for appropriate population. The authorized signer is specifically for agents and not account owners.


* 25 / CONSUMER CHECKING ACCOUNTS GUIDE
In the account session, click Print Forms on the left hand side.
Navigate each form by using the arrows at the top of the screen. For a client signature, click on each red box and then accept each signature. After all documents have been signed, click Complete at the top.
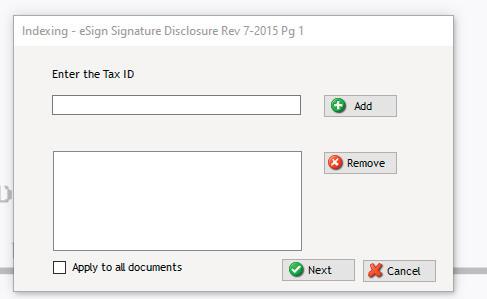
Enter the Social Security Number for each signer on the document. Notice each document name is listed at the top of the box. Enter as many SSN’s as needed on each document. Click next to index all signed pages.
Go back to the Account Session and click “Submit to Core” to upload the account. The account is now active.

* 26 / CONSUMER CHECKING ACCOUNTS GUIDE
WET SIGNATURES OR PAPER DOCUMENTS*
To print paper documents, go to the Workstation Settings and set both printers to the printer in which all documents will be printed. Make sure all appropriate documents are signed.
Scan each document to your email and send to the Client Services Manager for indexing.
*Only use paper documents when electronic options are not available.
In the Account Session and click “Submit to Core” to upload the account. The account is now active.
PART 6: PRINTING THE DEBIT CARD
If the card is being printed via instant issue, click Print Card within the session. Set the PIN. If the card is being ordered, no further action is needed.
PART 6: ACCOUNT MAINTENANCE
Once the account is active, go to the account and set the Allowed Overdraft and RegE/A-9 options. Use the internet banking admin to set up the internet banking log in. For Wow!Perks accountholders, set up the Total Identity Monitoring. Order any requested checks through Harland Clarke.
27 / CONSUMER CHECKING ACCOUNTS GUIDE

paducahbank.com MEMBER FDIC