Interpreting and using statistics in psychological research andrew (drew) n christopher - Download t
Interpreting and Using Statistics in Psychological Research Andrew (Drew) N
Christopher
Visit to download the full and correct content document: https://textbookfull.com/product/interpreting-and-using-statistics-in-psychological-rese arch-andrew-drew-n-christopher/
More products digital (pdf, epub, mobi) instant download maybe you interests ...
A Handbook of Visual Methods in Psychology 2nd ed Using and Interpreting Images in Qualitative Research 2nd Edition Paula Reavey
Another random document with no related content on Scribd:
mortise-and-tenon, and tongue-and-groove joints are employed. These joints must be well made, however, so that perfect unions will result, for every piece of furniture will rack in time if not properly braced. For this reason only the plain joints are advocated for the young workman; and nothing has been said about the dowel, key, and other joints that are frequently employed by cabinet-makers in the general construction of furniture. These latter require much more care and accurate fitting, and for the open and exposed joint the simple forms are far better.
A Plain Chair
Of all the pieces of furniture in the house, chairs are the ones most used, and, as they are subjected to hard usage, they should be well constructed and the joints carefully made.
In the plain chair shown in Fig. 1 the front legs are sixteen inches high, the back supports are thirty-four inches high, and all of them are one and three-quarter inches square. All the side-rails and the four that support the seat are two inches wide and three-quarters of an inch in thickness, so that the laps cut in the corner-posts (Fig. 2, A and B) will correspond in width and depth. The cross-cuts are made with a fine saw, and the wood removed with a broad firmerchisel, taking care, however, not to cut deeper than three-quarters of an inch when removing the wood. Use a mallet to help the chisel, but do not seek to take out too much at one time; better try three or four times, and take a moderate bite each time, than run the risk of having a large chunk come out and bring with it some of the wood that should be left for the rail-end to lap against.
The rail at the front is eight inches above the floor, and those at the sides are four inches. At the back the distance is ten inches from the floor to the under side of the cross-rail. Take care to make the saw-cuts inside the two-inch mark, so that the rails will fit snugly into the corner-posts without any play. There is nothing so annoying in a chair as to have it loose-jointed and rickety.
A wooden seat sixteen inches square, with the rear corners cut out to fit around the back posts, is nailed or screwed fast to the top edges of the upper rails all around; and for the back a twelve-bysixteen-inch piece is cut and screwed fast in the laps cut at the upper ends of the back posts, as shown in Fig. 2 B.
To make a comfortable back and seat, cover the wood with curled hair from an old mattress, or some cotton and dried moss; then tack unbleached muslin over it to hold it in place. For the final covering use burlap, denim, cretonne, or other stout fabric, that can be had at a dry-goods store for fifteen or twenty-five cents a yard. Draw it down and turn it under all around the edges of the back and seat, fastening with small tacks driven at regular distances apart.
Large, oval-headed upholsterers’ tacks painted black will appear to good advantage if driven about two inches apart along the edge of the goods. If they cannot be had, or are too expensive, a very good substitute may be made from sheet-lead or an old piece of lead pipe split open and beaten out flat.
From the sheet of lead cut disks three-quarters of an inch round with a cold-chisel, on the upturned face of an old flat-iron. With a small hammer beat the edges to resemble a hand-wrought nailhead, similar to those you may have seen in an old hand-bellows in a blacksmith-shop. These are to be painted black, and applied to the wood with slim, steel-wire nails, the heads of which will be invisible if they are driven well into the lead. The heads of the screws that fasten the lap-joints can be hidden with these mock nail-heads, as shown in the drawing.
A good black paint for the metal parts of furniture is made by adding dry lamp-black to some brass lacquer or shellac, so it will have the consistency of cream. It is then applied with a soft-hair brush to the surface of the metal, on which it will dry quickly. It often requires two or three days for oil paint to dry on metals, and it lasts no longer than the lacquer or shellac coating. Several small nails driven around the edge of the mock nail-heads will hold them in place, and to all appearances they will look like the large-headed, wrought bellows-nails.
An Odd Chair
For studying or reading, the chair shown in Fig. 3 will be found a useful piece of furniture.
The wood is three-quarters or seven-eighths of an inch in thickness, planed on both sides, and may be finally stained and varnished or painted. The front posts are fourteen inches high and four inches wide, while the back ones are thirty-four inches high,
three inches wide at the top, and eight inches wide at the bottom. The side-rails are twenty-eight inches long, three inches wide at the front, and six inches across the widest place near the rear. The siderails are fastened outside the rear uprights and inside the front posts, as shown at Fig. 3. At the back, near the foot, the chair is held together with a plate of wood six inches wide and eighteen inches long, screwed fast to the lower edge of the high posts, as shown in Fig. 4.
The top of the rear uprights are bound together with a piece of two-inch curtain-pole, with a saw-cut in the end to the shoulder, as shown in Fig. 5. After it is in place, glue-covered wedges are driven into the saw-cuts to make a key, and so hold the joint securely. Between the front ends of the side-rails a similar piece is placed; or a two-inch square piece of wood, with the front top edge rounded off, may be substituted.
The seat and back is composed of one piece of leather, fabric, or even carpet, caught to the front and top cross-pieces, and adjusted so as to form a comfortable support to the body.
This chair can be made with a shifting back by rounding off the lower ends of the back uprights and attaching them to the side-rails with bolts and washers, one bolt to a side. With two or three corresponding holes in the side-rail and upright, pegs can be fitted into them, or a rod passed through from side to side of the chair, in fashion similar to the well-known Morris chair. The pegs must be stout, or the rod substantially heavy, since the leverage is great and would snap off light pegs or bend a thin rod.
A Morris Chair
One of the most comfortable pieces of furniture in a boy’s room is a Morris chair, and if properly constructed it should last almost for a lifetime.
Fig. 6 gives a good idea for a solid affair that can be made twenty inches wide and twenty inches deep from outside to outside of corner-posts. The posts are two inches square and twenty-three
inches high, and in the front and back ones laps are cut to receive three-inch rails, with the upper edges sixteen inches above the floor. At the lower part of the sides, five inches above the floor, two-inch rails are let into the posts. From these side-rails to the under side of the arms four flat balustrades are mounted and held in position to the lower rails with screws and glue. At the upper end they are mortised into the under side of the arms for half an inch. Two more rails are let into the posts at the inside and on a line with the rails, at front and back, that support the seat and to which the leather is to be attached.
A frame twenty-two inches high is made for the back and covered with leather stretched tight and nailed all around the edges with large, oval-headed upholsterers’ tacks. The back is hinged to the rear rail of the chair, and held in position with a cross-rod, which in turn is supported by wooden pins driven into the end of the arms, as shown in the illustration. The arms are wedge-shaped, five inches broad at the front and two inches at the rear, where the ends are rounded. They are held to the tops of the corner-posts with long, slim screws, the heads of which are covered with the imitation nail-heads described in the making of the plain chair (Fig. 1).
A Settle
For the side of a room, where there is space to accommodate it, a settle is a comfortable piece of furniture, and Fig. 7 gives some good lines that can easily be followed.
The back of this settle is forty-two inches long and thirty-two inches high. The seat is sixteen inches above the floor and eighteen inches deep. The front plates are each six inches wide, twenty-five inches high, and seven-eighths of an inch thick. They are attached to the front and side rails of the settle with stout screws and glue, and a line of screws is driven through the front plate and into the edge of the one it laps against, as shown at Fig. 8, which is one end of the settle frame.
The leather forming the seat is drawn over the front and back rails (which are each six inches wide), and is nailed to the wood, as
shown in the illustration. The leather is applied to the back in the same manner, and, to hold the edges down, glue may be used.
A chair may be constructed in similar fashion with the same height and depth dimensions, but twenty-four inches wide over all, the sideplates under the arms being four inches wide.
A Box-desk
In the illustration of a box-desk (Fig. 9) an idea is shown that the young craftsman can easily work out.
Obtain a box twenty-four inches long, eighteen inches wide, and twelve inches deep. It should be made of planed boards. At the joints drive in a few screws to make them more secure. Cut two pieces of wood thirty-six inches long, four inches wide, and seven-eighths of an inch thick, and attach them to the rear edges of the box when it is stood on end, allowing the lower ends to extend down four inches below the bottom of the box. These will form the back feet. For the front ones, cut two pieces of wood fourteen inches long and six inches wide, rounding off one end, and cutting the bottom out three inches, thus allowing the remaining wood to be three inches wide, as shown at Fig. 10. These are fastened to the lower edges of the box at the sides with screws and glue.
F��. 9. F��. 10. F��. 11. F��. 12.
Two shelves, ten inches wide, and as long as the inside width of the box, are to be cut and fastened six inches apart, leaving a ten or twelve inch space at the bottom for high books, or a place to put the feet when sitting at the desk. A top twenty-two inches wide and eighteen inches deep is made fast to the top of the box, and if a slant is desired the back of the top board may be propped up for an inch or two with a strip of wood. On the ends of the side-rails that project above the desk-top a ledge six inches wide may be made fast for ink-bottles, pencils, and other accessories. Attached to the upper edges of the box brackets of wood may be arranged to support the projecting edge of the desk-top.
Stain and varnish, or paint, will add the finishing touch to this boxdesk.
A Writing-table
Two boxes, a drawer, and a broad top can be easily transformed into the writing-table shown in Fig. 11. If well put together and decorated with artistic hinge-straps and escutcheons, the boxes are entirely hidden from sight.
Two boxes, each twenty-two inches long, fifteen inches deep, and ten inches wide (outside measure), are placed on end and made fast under a broad top forty-five inches long and eighteen inches wide. Three inches of the top will project beyond the boxes at the ends and front. This will leave a space nineteen inches wide between the boxes. At the bottom a ledge eight or ten inches wide must be made fast to the bottom of the boxes, on which to rest the feet when writing at the table. This ledge will also serve as a brace, and help to hold together the bottoms of the boxes.
Legs six inches high are cut from wood seven-eighths of an inch thick, and fastened under the four corners at the front of the boxes. At the back, the foot-piece is a board ten inches wide, screwed fast to the lower rear ends of the boxes, so that six inches of it will project down to the floor to correspond with the legs in height. A shallow drawer is made to fit between the boxes, and a slide on runners is attached with screws near the top.
Doors ten inches wide and twenty-two inches high are hinged to the outer sides of the boxes, and from sheet-lead the hinge-plates or straps and the escutcheons are cut with a light cold-chisel and mallet, as shown at Fig. 12, A and B. (For other designs, see Chapter VII., on Decorative Hardware.) The front hinge-plates are eight inches long and four inches wide across the scrolls, and the shorter ends are four inches in length. The flat edges that butt against the hinges must be made to correspond with the hinges in width, but they are no part of the hinges proper, being purely for effect. This hardware is coated with the black metal finish. It is then fixed in place with large-headed nails or with steel-wire nails.
A top board, with half-circular supports, can be made and attached to the rear of the desk-top if thought desirable.
A Whatnot
For trinkets, books, and the general assortment of odds and ends that a boy is sure to possess, the whatnot shown in Fig. 13 will be found useful.
It is fifty-four inches high, twenty wide, and twelve inches deep. The cap projects two inches beyond the sides and front. The sideboards are cut up at the bottom, the angle of the coves being ten inches above the floor. Near the top a corresponding effect is obtained by cutting out pieces of wood in the form of shields. The side-ledges are thirty-six inches above the floor, twelve inches long, and seven wide. They are supported by two brackets at each side, five inches wide at the top and six inches deep, cut as shown in the illustration, and made fast with glue and screws.
F��. 13. F��. 14. F��. 15.
The ledge over the drawers is forty inches above the floor, and each drawer is five inches deep. The lower ledge or shelf is twelve inches above the floor, and the front edge is cut in with a compasssaw.
All the wood-work is of stock seven-eighths of an inch thick, and the edges of the shelves are butted against the side-boards, through which screws are passed, the real heads being afterwards covered with the mock nail-heads. The usual stain and varnish will treat the wood nicely and lend a good finish to this useful bit of furniture.
A Treasure-chest
For stamps, coins, minerals, and other valuable possessions, the treasure-chest shown in Fig. 14 is just the thing.
To give the chest an appearance of strength and security, the doors should be made of wood one and a quarter inches thick, while the legs and feet should be of one-and-a-half inch stock. The box is thirty inches long, eighteen inches high, and twelve inches deep (inside measure), and the top projects an inch and a half over the ends and front when the doors are closed. The legs are twenty-eight inches high and twelve inches wide. At the lower ends feet are cut from wood the same thickness as the legs, and made fast to them with screws. A cross-rail six inches wide and cut in at the under edge is mortised and tenoned into the legs twelve inches above the floor; while across the top of the legs a board twelve inches wide is securely fastened, and braced at the back with a four-inch rail, to prevent this base from racking with the weight of the chest.
Shelves and divisions are arranged, according to requirement, within the chest. To close it, two doors are swung on stout hinges, against which lead hasps are mounted to lend an appearance of strength. These are cut from stout sheet-lead, and applied with large-headed upholsterers’ nails painted black. The front hasp-ends should be ten inches long and the return ends five inches in length. Over the key-hole a long hasp may be placed, with a corresponding one on the other door to complete the decorative effect.
Studying-table and Stool
For service and comfort when studying or writing, two useful pieces of furniture are shown in Fig. 15.
The top of the table is twenty-four inches wide and forty-two inches long. It can be made from three or four boards of pine or white-wood glued together at the edges and battened at the under side. The front legs should be twenty-seven inches high and two and a half inches square. The rear legs are thirty-nine inches high, and where the table-top joins them laps are cut out on two sides for a depth of one inch, and a corresponding notch is cut from the corner of the ledge so as to fit into the lap. The lower rail at the back is six inches wide, and the lower side-rails are four inches wide. The shelf attached to the top of the rear posts is seven inches wide and fortytwo inches long. It need not be more than seven-eighths of an inch in thickness, and the front ends of it may be supported with short bracket sticks which rest on the table-top close to the rear posts.
At both the front and back brace-strips are let into the legs and the edge of the table, as shown in Fig. 15; these pieces are eighteen inches long and bevelled at both ends.
To accurately cut the laps in the legs and table-top, lay a strip across in the proper place, and mark the lines with a pencil; then with a saw cut slowly and accurately on this line to the proper depth. With a chisel cut the wood away and let in the brace-strips, when they can be securely fastened with glue and screws. At both ends shelves may be attached to the posts and the braces, as shown in the illustration. These will make good book-ledges or convenient places for pencil and pen boxes, extra pads, and school trappings. Books may rest on the table under the top shelf. To prevent their falling off at the back, a rail two inches wide is attached to the rear posts and supported at the middle by a short upright block which also acts, as a brace to the middle of the top shelf.
The stool is eighteen inches high, sixteen inches long, and fourteen inches wide. The corner-posts are two inches square, and the rails are two inches wide and three-quarters of an inch thick. At
the sides the top-rails support the seat, which is a piece of cowhide attached with nails and glue, over which imitation nail-heads are made fast. The lower rails, at front and back, are three inches above the floor, and the lower side-rails are eight inches above the floor. Stain and thin shellac will finish this wood-work nicely.
Chapter XIX
PAINTING, DECORATING, AND STENCILLING
There are very few crafts that a boy takes hold of with so much confidence as painting. In the average boy’s mind it merely means getting a pot full of paint, a brush, and daubing it on. This is painting in one sense of the word, but not painting as a real craftsman should do it.
Good painting is a skilled trade, just as are horseshoeing, plumbing, or bricklaying. But this manual is not intended to be an artisan’s guide; all that can be done is to lay down certain principles, and to give the practical hints that may make a boy’s efforts in this line worth while.
It is not necessary that a boy should know how to make paints; that is a branch of manufacture that requires years of experience, improved machinery, and chemical and mineral formulæ. A boy should know, however, what paints are made of, how prepared, and how they are mixed, so that he will be able to work with intelligence and success.
The basis of all good paint suitable for wood-work is lead or zinc. Some painters prefer all lead for outside work, while others take twothirds of lead and one-third of zinc, and then add the coloring dust or ground colors to get the required shade. Both white-lead and zinc are ground in linseed-oil, and can be purchased in cans, or kegs, ranging in weight from one-pound tins to five-hundred-pound kegs. Zinc is sold in the same kind of packages, and the cost in small quantities is about ten cents a pound. Inside shades of any color are generally made of two-thirds zinc and one-third white-lead; then the dust or ground colors are added to tone down the white to any desired shade. Pure boiled linseed-oil and good turpentine should be used to thin paints. Benzine, naphtha, kerosene, or other oils should never be used in the preparation or thinning of paints unless for special purposes.
To make the best paint for outside use, take two pounds of whitelead and one pound of white-zinc, and mix them thoroughly, adding whatever oil is necessary to render the mixture about the consistency of rich cream. If coloring matter is to be added, it is best to use the ground colors rather than the dry dusts, because the colors ground in oil are much finer, and will mix better with paint than the dusts. Colors ground in oil may be purchased at a paint store for ten or fifteen cents a pound. A portion of the color should be thinned first with turpentine, and then added to the pot of mixed white, stirring the mixture while the coloring is added.
If the paint should not be thin enough to lay on the wood, you may add small portions of turpentine until it is the right consistency. A little experience is the best teacher in this matter, and to make sure, it is well to ask a painter. Painters, and all masters of arts and crafts nowadays, are much more easily approached than they were a few years ago, and a boy who really wants to know, and who goes about it in the right way, can generally get the knowledge or advice he is seeking. When making paint for inside use, take the proportion of two parts of zinc to one part of lead, then mix and thin with oil to the consistency of rich milk or thin cream.
Before new wood-work is painted, all knots or sappy places should be given a coat or two of shellac to “set” the sap. The priming, or first coat, should be composed of equal parts of boiled linseed-oil and white-lead for outside, or zinc with some turpentine for inside work. When this is dry one or two coats are to be laid on, taking care to apply the paint evenly and to work it into all cracks, crevices, and corners. The secret of good work is not in daubing a whole lot of paint on the surface to be covered, but in laying it on evenly and in a thin coating, so that it will neither gum nor run. Two or three thin coats are always better than one thick one, and the extra time spent in putting the thin coats on, and in going over the work several times, will be amply repaid, because the work will last. The thick coat will dry unevenly, and in time will chip, crack, and peel off.
When painting over old wood-work, it is always best to scrape or remove as much of the old paint as possible. Then sand—paper everything smooth, and wash all surfaces of painted wood-work with
a sponge and sapolio, or other good scouring soap. If there should be any glossy surfaces to the wood-work it is best to give them a washing with a very strong solution of washing soda. A saturated solution of the soda is best. This is made by adding washing soda to water (about a pound to two quarts), and mixing or stirring it until the water has taken up all the soda it will hold. After the soda-water has been applied to the wood-work, be careful to wash it all off with clear water, changing the bucket of water frequently, so that no traces of soda will be left on the wood-work. Follow these directions explicitly, and do not try your own way nor trust to luck to have the new job look well and last. There is an old saying that “A little putty and paint hide a multitude of sin,” but get rid of as much of the “sin” as you can before the new coat is put on. The soda bath is particularly necessary on old furniture that has been varnished several times. Paint will not hold on varnished surfaces unless the varnish is first cut with soda-water or some of the prepared paint and varnish removers.
It is always best to mix your own paints rather than to purchase “ready-mixed” paints or “prepared paints” at a store. There are, of course, a great many reputable makers of mixed paints, and you may use their preparations if you so desire. But my advice to the young craftsman is to purchase the raw materials of a good dealer and learn how to mix his own paints.
When you have finished using your brushes they should be washed out—first with turpentine, then rubbed out in kerosene oil and laid away for future use. If they are to be used again within a few days, it will not be necessary to wash them out, and they may be allowed to stand in water Bore a hole through the handle, and slip through a stout wire so that the ends of it will rest on the top edge of a can. The brush should then be placed in the can so that it will hang on the wire but not touch the bottom, as shown in Fig. 1. Then water is put in until it just covers the bristles, as shown at A. Never drop a brush into a pail or can of water for even so short a time as overnight. The brush sags and causes the bristles to curve, as shown at B, and it is then a hard matter to get them straight again. The several kinds of brushes that a boy will need for his work are
shown in Fig. 2. A is a regular wire-bound bristle brush which can be had at a paint or hardware store in several sizes; B is known as a “sash tool”; C is a flat floor or varnish brush; D is a sizing, kalsomine, or whitewash brush; and at E a round-liner or stipple brush and a flat tool are shown. For light work the tin-ferruled, cedar-handle flat bristle brush can be had in sizes ranging from one to six inches in width.
F��. 1. F��. 2.
There is nothing that freshens up a room so much as repainted wood-work, newly papered or tinted walls, and kalsomined ceilings; and while it may not be possible for a boy to become an expert paper-hanger, it is quite within his ability to tint walls and ceilings, paint wood-work, and varnish the floors. If he has any artistic faculty whatever he can do a great deal of effective decorating, and this is a subject that we will now discuss at greater length.
Decorating
There is no secret in the art of decorating. Good judgment, good craftsmanship, and common-sense, coupled with the use of the best materials, will always bring about good results.
The schemes that are shown in the illustrations on the following pages are those that any boy can carry out; and with a fair knowledge of carpentry, painting, and other crafts he will find it an
enjoyable task to change his room into one containing characteristic features of his own invention or creation.
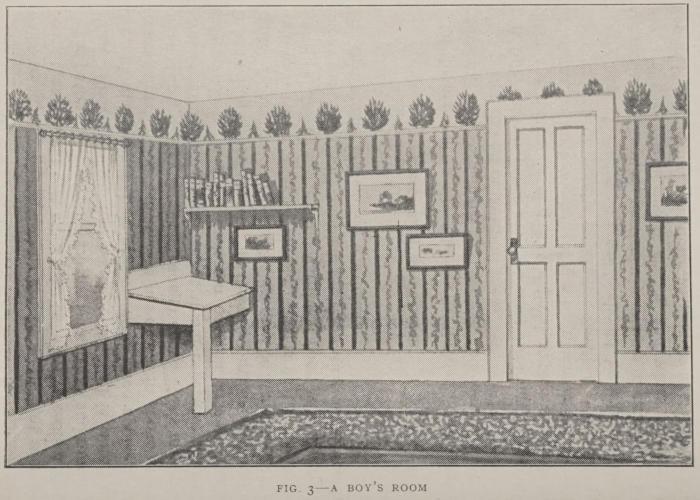
A very simple effect is shown in Fig. 3, and for this room it will not be necessary to remodel or change any of the wood-work. After removing all old paper from the walls with hot water and a sponge (and cleaning off the ceiling also), the walls and ceiling should be given a coat of size. This is made by dissolving a handful of good ground or flake glue in a pailful of water, and then painting it on the wall with a wide brush. Do not slop the size over the floor, nor have your brush too wet with the glue-water when you are using it. Try to work it in well rather than attempt to lay it on thick. When it is dry you can kalsomine, paper, or tint over the walls, and the size will help to hold the covering material in place. The wood-work in this room is painted white or a light shade of any color that is easily washed and kept clean. If paper is to be used on the side walls, some very good patterns can be selected at a stock house that will not cost more than twenty-five cents a roll.
The pattern shown in this scheme is in stripes and running vines. Above the picture-moulding the wall is tinted or papered with a lightbuff paper. With some apple-green fresco-paint the laurel-bush tops are drawn in above every other stripe, if they are wide enough apart. This makes a good finish to broad stripes that would otherwise stop at the moulding. A small desk can be built in one corner. It has a hinged top, and within it writing-materials may be kept. Above the desk a book-ledge may be attached to the wall with two brackets. Simple curtains at the windows and a painted or stained and varnished floor, with a carpet rug at the centre, will complete the decorating of this room. The cost should not exceed ten dollars.
Decorating a Bedroom
Of the many attractive schemes for the decoration of the bedroom, there are none so pleasing and lasting as the plain paper and an ornamental frieze.
A full-pattern paper soon becomes tiresome, and while there are thousands of pretty figured papers adapted to bedrooms, at least one-half of the bedrooms in our homes are overdone or poorly papered. Small figures and as nearly neutral shades as possible should be used, as they are restful to the eyes, particularly in time of sickness. In Fig. 4 a pleasing scheme is shown, and while its beauty lies in its simplicity, it is quite as inexpensive as it is attractive.
���. 4 � �������
Pink is the general tone, and the wood-work is painted cream color or light ivory Four feet and six inches above the floor a rail is run around the room, and between it and the surbase vertical strips are made fast to divide the wainscot into panels.
Plain cartridge or ingrain paper is hung on the wall above the surbase, and between the rail and picture-moulding a lighter-pink paper is applied. This may be a finely figured paper, or a narrow, satin-striped paper that can be had at twenty-five to fifty cents a roll. A border paper with garlands and ribbons, to match the shade of the others, may be had by the yard or roll in several widths. Light shades of soft green or robin’s-egg blue, with white wood-work, always make an effective and cheerful combination.
An artistic effect for the door may be secured by making thin panels for the upper and lower sections, and covering them with a fabric or burlap as near the shade of the paper as it can be matched.