
Kimberley Hybrid Flooring Installation Guide
Preparation
All installation of Hybrid I4F Click floors should be in accordance with AS1884-2012.
Hybrid I4F Click floors must be installed using a floating floor system and should not be adhered, nailed or pinned in any way to the subfloor or structure.
Floating floor installation systems should not be used if loads are likely to exceed 200kg/object area or if the load is greater than 30kg/cm2 - in this case, we recommend only direct stick products should be considered.
Pre-installation Checks
It is the installer’s responsibility to verify that the product and accessories supplied are the correct product, colour, pattern and quantity. Prior to installation, each plank should be carefully checked in good natural light for any obvious visual defects. Never install defective product. If the product is incorrect or has any visual defects or damage, contact your nearest National Tiles store. National Tiles will not be responsible for any visible defects after the flooring has been cut and/or installed.
Site Testing and Conditioning
Concrete subfloors must be tested in accordance with AS1884-2012 for moisture using the relative humidity in-situ probe test. RH levels can be up to 95%.
Generally Hybrid I4F Click floors do not need to be acclimatised. However, if boxes are exposed to extreme temperature within the 12 hours prior to installation, please refer to the Extreme Temperature below.
Extreme Temperature Prior to Installation
Should your Hybrid I4F Click floor be exposed within the 12 hours prior to installation for over 2 hours to extreme temperatures (under 5ºC or over 50ºC) (which may be due to storage in vehicles or transport to site), acclimatisation is required at a room temperature between 18ºC to 28ºC for minimum of 12 hours, in unopened packages prior to installation. Ensure individual stacks are no more than 3 packs high and they are spaced at least 200mm apart to allow airflow between stacks. The temperature must remain between 18ºC to 28ºC for the entire installation period and a minimum of 48 hours after installation completion. The ambient relative humidity in the installation area should be maintained at 30%-60% to prevent condensation forming under the laid flooring.
These instructions are intended to assist in achieving an optimum installation. Any variation to these instructions by installers may affect the warranty. www.nationaltiles.com.au
Subfloor Testing and Preparation
Subfloor must be clean, dry, flat & structurally sound.
Concrete floors should be checked with a straight edge 2m long. When the straight edge is placed at rest on the subfloor no part of the surface shall be more than 3mm below the length of the straight edge.
Depressions and cracks must be filled using a suitable approved levelling compound in accordance with the manufacturer’s instructions. All irregularities must be levelled.
Timber, plywood and particleboard subfloors, must be checked for any loose boards/panels or excessive deflection or movement. If loose boards are found or movement is excessive, the subfloor should be repaired and damaged boards replaced, then if required, sanded to a level smooth and dust free surface.
Subfloor must be flat, dry and in the case of tiling over ceramics in a residential installation, grout line tolerances are no more than 3mm wide and 3mm deep. Otherwise, grout joints should be filled to the level of the tiles with a suitable leveller. Carpet, carpet underlay and/or existing floating floors are NOT a suitable subfloor.
Underfloor Heating
Hybrid I4F Click floor is suitable for installation with Underfloor Heating (UFH) provided the heating system selected is a Hydronic In-slab system and is installed and operated as per the heating system manufacturer’s installation and operating recommendations. See further pre-laying instructions below.
Hydronic Radiant Underfloor Heating System
Before installing your Hybrid I4F Click floor with Underfloor Radiant Heat Systems, operate the system at maximum capacity for a minimum of 7 days to force any residual moisture from the cementitious topping of the radiant heat system. The moisture content of the screed prior to installation must be less than 1.5% (CM method). Shut down the floor heating at least 48 hours prior to installation. Make sure that the temperature in the room is at least 15ºC during installation. It is recommended that the radiant heat be applied in a gradual manner (no more than 2ºC per day) after installing the Hybrid I4F Click floor. After installatin, ensure the surface temperature of the subfloor never exceeds 27ºC.
Underlay
Your I4F Click floor has its own pre-adhered acoustically rated (BCA compliant) 1mm IXPE underlay so there is no need for additional underlay.
www.nationaltiles.com.au
Wet Areas
Hybrid flooring is NOT SUITABLE for installation in wet areas. Wet area means an area within the building supplied with water from a water supply system, which includes bathrooms, showers, laundries and sanitary compartments and excludes kitchens, bar areas, kitchenettes or domestic food and beverage preparation areas.
Perimeter / Expansion Gaps
A perimeter expansion gap of no less than 8mm to 10mm must be maintained against all fixed vertical surfaces (e.g. walls, cabinets, sliding doors, island benches, plumbing fixtures etc.). For installation over large areas or in between multiple rooms that exceeds a total of 15m in length and 10m in width, a 10mm expansion gap is required within the floor or between rooms. A trim or skirting/scotia can be used to cover this gap, ensuring the floor is not pinned to the substrate or vertical surfaces. Silicone or caulking compound is not recommended.
Note: For installations that include the floor passing through possible pinch-points, for example doorways and transitional areas from smaller passageways to larger rooms, consideration should be given to additional expansion allowance at these points.
Tools Required
• 8mm to 10mm spacers
• jig saw
• utility knife
• straight edge
• t-square
• pull bar
Installation
• pencil
• tape measure
• safety glasses
• tapping block
• soft rubber mallet
Plan the direction of the area to be installed to maximise the visual appearance once installed. The direction of the plank grain should be confirmed and the installation should be balanced from the centre of the area to minimise waste.
Measure
the room and estimate
the number of rows
required.
If the last row is not at least 50mm wide, the first row should be cut so that the first and last rows are similar in width.
To minimise shade variation, mix and install product from several different packs alternatively. After laying a small quantity of product, view from a distance that allows you to clearly see the overall effect. If there is any doubt cease installation immediately and contact your National Tiles store.
I4F Click System Installation Video
From the left corner of the room, put the first plank in place using spacer blocks against the walls to maintain the appropriate expansion gap so both the end and side seam grooves are facing outwards. Planks are to be installed from left to right. To assist in laying the first row straight, the use of masking tape across each short end locking system is recommended. Continue this for the first two rows and remove after completion of installation. (fig 1-2)
Use the off cut from the last board in the first row (min length 150mm) or cut a plank that is at least 150mm shorter than the first plank to start the second row. Install the first plank in the second row by inserting the long side tongue into the groove of the plank in the first row at a low angle to the installed plank. Then firmly lower the plank while maintaining a slight pressure toward the installed plank. The planks should fit snugly together and lay flat maintaining the appropriate expansion gap along the perimeter of the room or fixed vertical surfaces (fig. 6)
Install the second plank in the first row by laying the short-end tongue onto the previously installed plank for short-end groove. Lock the planks together by pressing down over the join, or lightly tap using a soft, white No. 2 rubber mallet to vertically engage the lock. You will feel the planks lock together as the end join engages. Care must be taken to properly line up the end join and NEVER force the join while out of the alignment, otherwise this could result in permanent damage to the end groove. (fig. 2-3)
To install the remaining planks in the second row, first align the long edge tongue into the groove of the previous row at an angle. Slide the plank to the left until it meets the previously installed plank. Firmly lower the plank while maintaining a slight pressure towards the installed piece. The planks should fit snugly together and lay flat. Engage the short edge join as in the above. (fig. 7-8).
Continue in this manner for the rest of the first row. The last plank in the row should be cut to length while maintaining the appropriate expansion gap along the perimeter of the room or fixed vertical surfaces. (fig. 4-5)


Check to be certain all planks are fully engaged; if slight gapping is noticed or the planks will not lay flat, simply disengage the long side join and then carefully slide the short/end join apart. Do not pull up on this join as it will damage the locking mechanism! Reinstall the plank. (fig 9-11)


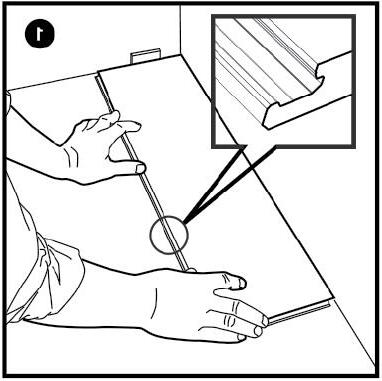
Note: If necessary, to disassemble your Hybrid I4F Click foor, separate the whole row by lifting it up carefully at an angle. To separate the planks, leave them flat on the ground and slide them apart. If planks do not separate easy, you can slightly lift up the planks (5º) when sliding them apart. (fig 9-11)
Important:
As floating floor, the floor should not be adhered, nailed or pinned in any way to the subfloor or structure.
Post installation; if construction work is still underway, the surface of the flooring must be protected to prevent any undue surface damage and/or scratching
For Care and Maintenance of your Hybrid I4F Click floor please refer to the National Tiles Maintenance guide.
Further information in respect to the scope and limitations of these warranties can be found on the National Tiles website (nationaltiles.com.au).
In respect to transactions with consumers (as set out in S3 of the Australian Consumer Law): These warranties are provided by National Tiles and are in addition to other rights and remedies of the consumer under law in relation to the goods. These goods also come with warranties that cannot be excluded under Australian Consumer Law.