ASSEMBLY INSTRUCTIONS
ASSEMBLY INSTRUCTIONS (CONT.) StartLite® Racing Hose and AQP® Racing Hose (with Lightweight Crimp Fittings) ProCrimp® 1380 Crimp Machine
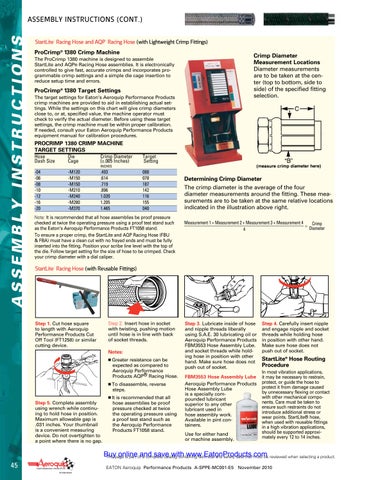
Crimp Diameter Measurement Locations Diameter measurements are to be taken at the center (top to bottom, side to side) of the specified fitting selection.
The ProCrimp 1380 machine is designed to assemble StartLite and AQP® Racing Hose assemblies. It is electronically controlled to give fast, accurate crimps and incorporates programmable crimp settings and a simple die cage insertion to reduce setup time and errors.
ProCrimp® 1380 Target Settings The target settings for Eaton’s Aeroquip Performance Products crimp machines are provided to aid in establishing actual settings. While the settings on this chart will give crimp diameters close to, or at, specified value, the machine operator must check to verify the actual diameter. Before using these target settings, the crimp machine must be within proper calibration. If needed, consult your Eaton Aeroquip Performance Products equipment manual for calibration procedures.
ProCrimp 1380 Crimp Machine Target Settings Hose Dash Size
Die Cage
-04 -M120 -06 -M150 -08 -M150 -10 -M210 -12 -M240 -16 -M280 -20 -M370
Crimp Diameter Target (±.005 Inches) Setting INCHES
.493 .614 .719 .896 1.020 1.205 1.465
088 078 187 142 116 155 040
Note: It is recommended that all hose assemblies be proof pressure checked at twice the operating pressure using a proof test stand such as the Eaton’s Aeroquip Performance Products FT1058 stand. To ensure a proper crimp, the StartLite and AQP Racing Hose (FBU & FBA) must have a clean cut with no frayed ends and must be fully inserted into the fitting. Position your scribe line level with the top of the die. Follow target setting for the size of hose to be crimped. Check your crimp diameter with a dial caliper.
Determining Crimp Diameter The crimp diameter is the average of the four diameter measurements around the fitting. These measurements are to be taken at the same relative locations indicated in the illustration above right. Measurement 1 + Measurement 2 + Measurement 3 + Measurement 4 = Crimp 4 Diameter
StartLite® Racing Hose (with Reusable Fittings)
Step 1. Cut hose square to length with Aeroquip Performance Products Cut Off Tool (FT1258) or similar cutting device.
Step 2. Insert hose in socket with twisting, pushing motion until hose is in line with back of socket threads. Notes: � Greater resistance can be expected as compared to Aeroquip Performance Products AQP® Racing Hose. � To disassemble, reverse steps.
Step 5. Complete assembly using wrench while continuing to hold hose in position. Maximum allowable gap is .031 inches. Your thumbnail is a convenient measuring device. Do not overtighten to a point where there is no gap.
� It is recommended that all hose assemblies be proof pressure checked at twice the operating pressure using a proof test stand such as the Aeroquip Performance Products FT1058 stand.
Step 3. Lubricate inside of hose and nipple threads liberally using S.A.E. 30 lubricating oil or Aeroquip Performance Products FBM3553 Hose Assembly Lube. and socket threads while holding hose in position with other hand. Make sure hose does not push out of socket. FBM3553 Hose Assembly Lube Aeroquip Performance Products Hose Assembly Lube is a specially compounded lubricant superior to any other lubricant used in hose assembly work. Available in pint containers. Use for either hand or machine assembly.
Step 4. Carefully insert nipple and engage nipple and socket threads while holding hose in position with other hand. Make sure hose does not push out of socket.
StartLite® Hose Routing Procedure In most vibration applications, it may be necessary to restrain, protect, or guide the hose to protect it from damage caused by unnecessary flexing or contact with other mechanical components. Care must be taken to ensure such restraints do not introduce additional stress or wear points. StartLite® hose, when used with reusable fittings in a high vibration applications, should be supported approximately every 12 to 14 inches.
Buy online save with www.EatonProducts.com This page is part ofand a complete catalog containing technical and safety data that must be reviewed when selecting a product. 45
eaton Aeroquip Performance Products A-SPPE-MC001-E5 November 2010