No part of this publication may be reproduced, stored in a retrieval system, or transmitted in any form or by any means, electronic, mechanical, photocopying, recording, or otherwise, without the prior written permission of the publisher.
Permissions may be sought directly from Elsevier’s Science & Technology Rights Department in Oxford, UK: phone: ( 44) 1865 843830, fax: ( 44) 1865 853333, E-mail: permissions@elsevier.com. You may also complete your request online via the Elsevier homepage (http://elsevier.com), by selecting “Support & Contact” then “Copyright and Permission” and then “Obtaining Permissions.”
Recognizing the importance of preserving what has been written, Elsevier prints its books on acid-free paper whenever possible.
Library of Congress Cataloging-in-Publication Data
Application submitted
British Library Cataloguing-in-Publication Data
A catalogue record for this book is available from the British Library.
ISBN: 978-0-7506-8709-6
For information on all Newnes publications visit our Web site at www.books.elsevier.com
08 09 10 11 12 10 9 8 7 6 5 4 3 2 1
Typeset by Charon Tec Ltd (A Macmillan Company), Chennai, India www.charontec.com
Finally, since the publication of my previous book on Programming 16-bit microcontrollers in C, I have received so much feedback and so many readers have written to me to congratulate but also to point out errors and issues. This has been a very humbling but also rewarding experience and I want to thank you all. I tried to incorporate as many of your suggestions as possible in this new work but I am still looking for your continued support and advice.
This page intentionally left blank
This page intentionally left blank
Introduction
The first step in almost every rehabilitation program is A- Acknowledge . . . your limitations. So this is how I need to start this book, I will admit it: I am an 8-bitter!
I have been programming 8-bit microcontrollers since I was in high school and for most of my professional career. And there is worse, while I am relatively fluent in several high level programming languages, I truly love assembly programming!
There, I said it! I love that kick that I get when I know I used every single machine cycle in every microsecond my embedded applications run. I am also obsessed with control: I like to know of every configuration bit in every peripheral I use. As a consequence, in general, I don’t trust compilers or other people’s libraries unless I really cannot live without them or I have them completely disassembled.
So why would I write a book about 32-bit programming in C?
In fact I started what I should call my “rehabilitation program” a couple of years ago by approaching the programming of 16-bit microcontrollers first. The introduction of the PIC24 family of microcontrollers gave me the motivation to try and migrate to C programming with a new and exciting architecture. As a result of my experience, I wrote the first book: “Programming 16-bit microcontrollers in C. Learning to fly the PIC24”. But by the time the book was published, rumors circulated in Microchip that a new 32-bit chip had just come out of the “ovens” and I had to have one!
I’ll spare you the details of how I got my hands around one of the very first test chips, but what you need to know is that in a matter of days I had most of the code, originally developed for the PIC24 book, ported and running on the PIC32 plugged in my old Explorer16 board.
Microchip marketing folks will tell you that the PIC32 architecture was specifically designed so to make the “migration” from 8-bit and 16-bit PIC architectures smooth and seamless, but I had to see it with my eyes to believe it.
So who better than an assembly-loving, control-obsessed, 8-bitter can tell you about the exploration of the PIC32?
Who Should Read this Book?
The PIC32 turns out to be a remarkably easy to use device, but nonetheless, it is a truly powerful machine based on a well established 32-bit core (MIPS) and supported by a large number of tools, libraries and documentation. This book can only offer you a small glimpse into such a vast world and in fact I call it a first “exploration”. It is my strong belief that learning should be fun, and I hope you will have a good time with some of the “playful” exercises and projects I present throughout each chapter in the book. However you will need quite some preparation and hard work in order to be able to digest the material I am presenting at a pace that will accelerate rapidly through the first few chapters.
This book is meant for programmers of a basic to intermediate level of experience, but not for “absolute” beginners; so don’t expect me to start with the basics of the binary numbers, the hexadecimal notation or the fundamentals of programming. Although, we will briefly review the basics of C programming as it relates to the applications for the latest generation of general-purpose 32-bit microcontrollers, before moving on to more challenging projects. My assumption is that you, the reader, belong to one of the following four categories:
● Embedded Control programmer: experienced in assembly-language microcontrollers programming, but with only a basic understanding of the C language.
● PIC® microcontroller expert: with a basic understanding of the C language.
● Student or professional: with some knowledge of C (or C ) programming for PCs.
● Other SLF (superior life forms): I know programmers don’t like to be classified that easily so I created this special category just for you!
Depending on your level and type of experience, you should be able to find something of interest in every chapter. I worked hard to make sure that every one of them contained
both C programming techniques and new hardware peripherals details. Should you already be familiar with both, feel free to skip to the experts section at the end of the chapter, or consider the additional exercises, book references and links for further research/reading.
A special note is reserved for those of you who have already read my previous book on programming 16-bit microcontrollers in C. First of all let me thank you, then let me explain why you will get a certain sensation of deja vu. No, I did not try to cheat my way through the old 16-bit material to produce a new book, but I have re-produced most of the projects to demonstrate practically the main claims of the PIC32 architecture and toolset: its seamless migration from 8 and 16-bit PIC applications, the vastly increased performance and nonetheless the great ease of use. For you, at the end of every chapter, I have included a special section where I detail the differences encountered, the enhancements and other information that will help you port your applications faster and with greater confidence.
These are some of the things you will learn:
● The structure of an embedded-control C program: loops, loops and more loops
● Basic timing and I/O operations
● Basic embedded control multitasking in C, using the PIC32 interrupts
● New PIC32 peripherals, in no specific order:
1. Input Capture
2. Output Compare
3. Change Notification
4. Parallel Master Port
5. Asynchronous Serial Communication
6. Synchronous Serial Communication
7. Analog-to-Digital conversion
● How to control LCD displays
● How to generate video signals
● How to generate audio signals
● How to access mass-storage media
● How to share files on a mass-storage device with a PC
Structure of the Book
Each chapter of the book is offered as a day of exploration in the 32-bit embedded programming world. There are three parts. The first part contains six small chapters of increasing levels of complexity. In each chapter, we will review one basic hardware peripheral of the PIC32MX family of microcontrollers and one aspect of the C language, using the MPLAB C32 compiler (Student Version included in the CD-ROM). In each chapter, we will develop at least one demonstration project. Initially, such projects will require exclusive use of the MPLAB SIM software simulator (a part of the MPLAB toolsuite included in the CD-ROM), and no actual hardware will be necessary; although, an Explorer 16 demonstration board or a PIC32 Starter kit might be used.
In the second part of the book, titled “Experimenting” and containing five more chapters, an Explorer 16 demonstration board (or third-party equivalent) will become more critical, as some of the peripherals used will require real hardware to be properly tested.
In the third part of the book, titled “Expansion”, there are five larger chapters. Each one of them builds on the lessons learned in multiple previous chapters while adding new peripherals to develop projects of greater complexity. The projects in the third part of the book require the use of the Explorer 16 demonstration board and basic prototyping skills too (yes, you might need to use a soldering iron). If you don’t want to or you don’t have access to basic PCB prototyping tools, an ad hoc expansion board (AV32) containing all the circuitry and components necessary to complete all the demonstration projects will be made available on the companion web site: http://www.exploringpic32.com
All the source code developed in each chapter is also available for immediate use on the companion CD-ROM.
What this Book is Not
This book is not a replacement for the PIC32 datasheet, reference manual and programmer’s manual published by Microchip Technology. It is also not a replacement for the MPLAB C32 compiler user’s guide, and all the libraries and related software tools offered by Microchip. Copies are available on the companion CD-ROM, but I expect you to download the most recent versions of all those documents and tools from Microchip’s Web site (http://www.microchip.com). Familiarize yourself with them and keep them handy. I will often refer to them throughout the book, and I might present small block diagrams and other excerpts here and there as necessary. But, my narration cannot replace
the information presented in the official manuals. Should you notice a conflict between my narration and the official documentation, ALWAYS refer to the latter. However please send me an email if a conflict arises, I will appreciate your help and I will publish any correction and useful hint I will receive on the companion web site: http://www. exploringpic32.com
This book is also not a primer on the C language. Although a review of the language is performed throughout the first few chapters, the reader will find in the references several suggestions on more complete introductory courses and books on the subject.
Checklists
Although this book is not directly making references to aviation and flight training as my previous book was, I decided to maintain some important elements introduced there.
The use of checklists to perform every single procedure before and during each project is one of them. Pilots don’t use checklists because the procedures are too long to be memorized or because they suffer from short memory problems. They use checklists because it is proven that the human memory can fail, and tends to do so more often when stress is involved. Pilots can perhaps afford less mistakes than other categories, and they value safety above their pride. There is nothing really dangerous that you, as a programmer can do or forget to do, while developing code for the PIC32. Nonetheless, I have prepared a number of simple checklists to help you perform the most common programming and debugging tasks. Hopefully, they will help you in the early stages, when learning to use the new PIC32 toolset or later if you are, like most of us, alternating between several projects and development environments from different vendors.
New Project Setup
Project Project Wizard Start
The Pilot Checklist – MPLAB® IDE Quick Start Guide
Step 1: Device PIC32MX360F512L
Step 2: ToolSuite MPLAB C32 C Compiler
Step 3: NewProject dialog box Select BROWSE
Folder Select or create new
Project name Type new name here
Step 4: Copy files Only if necessary
Step 5: Complete wizard Click on Finish
Manual Device Configuration (if not using pragmas)
Configure Configuration Bits Open window
Configuration bits set in ocde Unchecked
ICE/ICD Comm channel select ICE EMUC2/EMUD2 share with PGCD2
Boot Flash Write Protect Boot Flash is writable
Code Protect Protection Disabled
Oscillator Selection bits Primary OSC with PLL (XT, HS, EC)
Secondary Oscillator Enable Enabled
Internal External Switchover Disabled
Primary Oscillator Configuration XT osc mode
CLKO output signal active on OSCO Disabled
Peripheral Clock Divisor PB clock is Sys clock/2
Clock Switching and Monitor Disabled and clock monitor disabled
Watchdog Timer Postscaler Any
Watchdog Timer Enable Disabled
PLL Input Divider 2 Divider
PLL Multiplier 18 Multiplier
System PLL output clock divider PLL Divide by 1
Create New File and Add to Project
Project AddNewProjectFile Assign name (.c or .h)
File Open Select “\c32\include\Template.c” if main source file & using pragmas Select “\c32\include\Template wPragmas.c”
Header/comments Copy
Add code As needed
File Save Select
Project SaveProject Select
MPLAB SIM Debugger Setup
Debugger Select Tool Select MPLAB SIM
Debugger Settings Select
1. Osc/Trace Tab Select
1.1 Processor Frequency 72 MHz
1.2 Trace Options Trace All
2. Animation/Real Time Updates Select Tab
2.1 Animate Step Slow 500 ms/Fast 10 ms
3. Apply/OK Select
PIC32MX Family Characteristics
Vdd range 2.0 V to 3.6 V
Digital input pins 5 V tolerant
Analog input pins 0 V to 3.6 V max
MPLAB ICD2 In Circuit Debugger Setup
Target Board Power Up
ICD2 to Target Connect
ICD2 to PC Connect (wait for triple ding-dong)
Debugger SelectTool Select MPLAB ICD2
Debugger Settings Select
1. Status Tab Select
1.1 Automatically Connect Verify NOT Checked
2. Power Tab Select
2.1 Power target from ICD2 Verify NOT Checked
3. Program Tab Select
3.1 Allow ICD2 to select ranges Verify Checked
3.2 Program after successful build Select if desired (not recommended)
3.3 Run after successful program Select if desired (not recommended)
OK button Click
Debugger Connect Select
Emergency: USB Drivers Re-start (Debugger fails to connect)
Debugger SelecTool Select None
Project Close Save Project and close
File Exit Terminate MPLAB
USB cable Disconnect
Target Cycle Power
MPLAB Launch
USB cable Connect (wait for enumeration)
Debugger SelecTool Select Debugger model
Debugger Connect Select (not required for REAL ICE)
Emergency: Breakpoint Cannot Be Set (debugging)
1. Verify the C source code line is not commented
2. Verify you have not used more than six breakpoints (see breakpoints list F2)
3. Verify the C source line does not contain only a variable declaration
4. Verify the C source file is part of the Project Files list
5. Verify the project has been Built before placing a breakpoint
Explorer16 Demonstration Board
Power Supply
Main oscillator
Secondary oscillator
9 V to 15 V (reversed polarity protected)
8 MHz crystal (use 4 PLL to obtain 32MHz )
32,768 Hz (connected to TMR1 oscillator)
The Pilot Checklists – MPLAB® IDE Quick Start Guide (Debugginh and Emergencies)
Project Build
1.Project Build Configuration Select “Debug”
2. Project BuildOptions P roject Open Dialog box
2.1 Directories Tab Select
2.2 Show Directories for: Select “Include Search path”
2.3 “New” Button Press
2.4 “. . .” Button Press and select “\C32\include” directory
3. MPLAB PIC32 C Compiler Tab Select
3.1 Categories Select “General”
3.2 Generate debugging information Checked
3.3 Categories Select Optimization
3.4 Optimization Level Select 0 during debugging
3.5 All other optimization options Unchecked during debugging
4. MPLAB PIC32 Linker Tab Select
4.1 Categories Select “General”
4.2 Heap Size Assign generously if malloc() used
5.OK button Click
Add all (.c) (.h) and (.o) required Use “Add Files to a Project” checklists (A, B or C)
Project BuildAll or Project Make Select (CTRL F10) Select (F10) if only a few modules modified
Adding Files to a Project Method A
View Project Checked
Project AddFilesToProject Select
1. Select directory If required
2. Select files of type (.c), (.h) or (.o)
3. Select File name
Project SaveProject Select
Adding Files to a Project Method B (text files only)
File Open Open existing file
With cursor inside Editor Right Click
Editor pop up menu Select AddToProject
Project SaveProject Select
Adding Files to a Project Method C (from Project window)
View Project Checked
With cursor on File folder Right Click
Project pop up menu Select Add Files. . .
Project SaveProject Select
Simulator Logic Analyzer Setup
View SimulatorLogicAnalyzer Select
Debugger Settings Osc/Trace Select
TraceOptions TraceAll Verify Checked
Channels button Click
Available Signals Select all required
Signals Order Move Up/Down
OK button Click
PIC32MX360F512L Characteristics
Maximum operating speed 72 MHz
General Purpose RAM available 32,768 bytes
FLASH Program memory 512k bytes
MPLAB REAL ICE In Circuit Debugger Setup
Target Board Power Up
ICD2 to Target Connect
ICD2 to PC Connect (wait for enumeration)
Debugger SelectTool Select MPLAB REAL ICE
PIC32 Starter Kit In Circuit Debugger Setup
PIC32 Starter Kit to Target Connect
Target Board Power Up
PIC32 Starter Kit to PC Connect (Wait for enumeration)
Debugger SelectTool Select PIC32MX Starter Kit
Emergency: Lost Cursor while Single Stepping/Animate
Program Counter value
Check in MPLAB status bar (bottom)
1. Place cursor on first line of main() Execute Run To Cursor
2. Continue single stepping until the cursor reappears in the main program
3. Search for the PC in the Memory Window
Else
Most likely you Stepped IN a library function
1. Place the cursor on the next Cstatement execute Run To Cursor
2. If you have one or more breakpoints already set, execute Run
IF all else seems to fail
Send RESET command and start again
Emergency: After Pressing Halt, MPLAB Freeze (ICD2 debugging)
Wait!
1. MPLAB could be uploading the content of a large variable/array in the Watch window
2. MPLAB could be refreshing the Special Function Registers window (if open)
3. MPLAB could be updating the Disassembly window (if open)
4. MPLAB could be updating the Local Variables window (if open and contains a large object)
After regaining control, close any data window or remove any large object before continuing
This page intentionally left blank
Exploring
This page intentionally left blank
The Adventure Begins
The Plan
This will be our first experience with the PIC32 32-bit microcontroller and, for some of you, the first project with the MPLAB® IDE Integrated Development Environment and the MPLAB C32 language suite. Even if you have never heard of the C language, you might have heard of the famous “Hello World!” programming example. If not, let me tell you about it.
Since the very first book on the C language, written by Kernighan and Ritchie several decades ago, every decent C language book has featured an example program containing a single statement to display the words “Hello World” on the computer screen. Hundreds, if not thousands, of books have respected this tradition, and I don’t want my books to be the exception. However, our example will be just a little different. Let’s be realistic—we are talking about programming microcontrollers because we want to design embeddedcontrol applications. Though the availability of a monitor screen is a perfectly safe assumption for any personal computer or workstation, this is definitely not the case in the embedded-control world. For our first embedded application we’d better stick to a more basic type of output: a digital I/O pin. In a later and more advanced chapter, we will be able to interface to an LCD display and/or a terminal connected to a serial port. But by then we will have better things to do than writing “Hello World!”
Preparation
Whether you are planning a small outdoor trip or a major expedition to the Arctic, you’d better make sure you have the right equipment with you. Our exploration of the PIC32 architecture is definitely not going to be a matter of life or death, but you will appreciate
the convenience of following the few simple steps outlined here before getting your foot out the door . . . ahem, I mean before starting to type the first few lines of code.
So, let’s start by verifying that we have all the necessary pieces of equipment ready and installed (from the attached CD-ROM and/or the latest version available for download from Microchip’s PIC32 Web site at www.microchip.com/PIC32). You will need the following:
● MPLAB IDE, free Integrated Development Environment (v8.xx or later)
● MPLAB SIM, free software simulator (included in MPLAB)
● MPLAB C32, C compiler (free Student Edition)
Now let’s use the New Project Setup checklist to create a new project with the MPLAB IDE. From the Project menu, select the Project Wizard. This will bring up a short but useful sequence of little dialog boxes that will guide us through the few steps required to create a new project in an orderly and clean way:
1. The first dialog box will ask you to choose a specific device model. Select the PIC32MX360F512L device and click Next. Although we will use only the simulator, and for the purpose of this project we could use pretty much any PIC32 model, we will stick to this particular part number throughout our exploration.
3. In the third dialog box, you are asked to assign a name to the new project file. Instead click the Browse button and create a new folder. Name the new folder Hello, and inside it create the project file Hello World, then click Next.
4. In the fourth dialog box, simply click Next to proceed to the following dialog box since there is no need to copy any source files from any previous projects or directories.
5. Click Finish to complete the project setup. Since this is our first time, let’s continue with the following additional steps:
6. Open a new editor window by selecting File | New, typing the Ctrl N keyboard shortcut or by clicking the corresponding (New File) button in the MPLAB standard toolbar.
7. Type the following three comment lines:
** Hello Embedded World!
8. Select File | Save As to save the file as Hello.c.
9. Now right-click with your mouse on the editor window to bring up the editor’s context menu and select the Add To Project item. This will tell MPLAB that the newly created file is an integral part of the project.
10. Select Project | Save Project to save the project.
Note
You will notice that, after saving the file, the color of the three lines of text in the editor window changes to green. This is because the MPLAB Editor has been able to recognize your file as a C language source file (the .c extension tipped it off) and is now applying the default contextsensitive color rules. According to theses rules, green is the color assigned to comments, blue is the color assigned to language keywords, and black is used for all the remaining code.
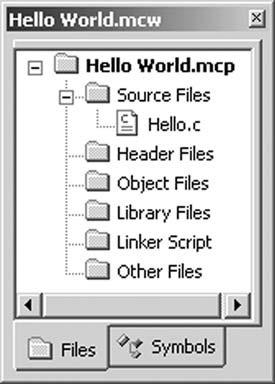
Once you are finished, your project window should look like the one in Figure 1.1. If you cannot see the project window, select View | Project. A small check mark should appear next to the item in the View menu. Also make sure that the Files tab is selected. We will review the use of the other tab (Symbols) in a later chapter.
Figure 1.1: The “Hello World” Project window.
Depending on your personal preferences, you might now want to “dock” this window to assign it a specific place on your workspace rather than keeping it floating. You can do so by right-clicking with your mouse on the title bar of the small window to access the context menu and selecting the Dockable option. You can then drag it to the desired edge of the screen, where it will stick and split the available space with the editor.
The Adventure Begins
It is time to start writing some code. I can sense your trepidation, especially if you have never written any C code for an embedded-control application before. Our first line of code is:
#include <p32xxxx.h>
This is not yet a proper C statement but an instruction for the preprocessor (which feeds the compiler) with the request to include the content of a device-specific file before proceeding any further. The pic32xxxx.h file, in its turn, contains more #include instructions designed so that the file relative to the device currently selected in the project is included. That file in our case is p32mx360f512 l.h. We could have used its name directly, but we chose not to in order to make the code more independent and hopefully easier to port, in the future, to new projects using different models.
If you decide to further inspect the contents of the p32mx360f512 l.h file (it is a simple text file that you can open with the MPLAB editor), you will see that it contains an incredibly long list of definitions for all the names of the internal special-function registers (often referred to in the documentation as the SFRs) of the chosen PIC32 model. If the include file is accurate, those names reflect exactly those being used in the device datasheet and the PIC32 reference manual.
Here is a segment of the p32mx360f512 l.h file in which the special-function register that controls the watchdog module (WDTCON) and each of its individual bits are assigned their conventional names: ... extern volatile unsigned int WDTCON__attribute__ ((section("sfrs"))); typedef union { struct { unsigned WDTCLR:1;
Back to our Hello.c source file; let’s add a couple more lines that will introduce you to the main() function: main()
What we have now is already a complete, although still empty and pretty useless, C language program. In between those two curly brackets is where we will soon put the first few instructions of our embedded-control application.
Independently of this function position in the file, whether in the first lines on top or the last few lines in a million-lines file, the main() function is the place where the microcontroller will go first at power-up or after each subsequent reset. This is actually an oversimplification. After a reset or at power-up, but before entering the main() function, the microcontroller will execute a short initialization code segment automatically inserted by the MPLAB C32 linker. This is known as the Startup code or crt0 code (or simply c0 in the traditional C language literature). The Startup code will perform basic housekeeping chores, including the all important initialization of the stack, among many other things.
Our mission is to activate for the first time one or more of the output pins of the PIC32. For historical reasons, and to maintain the greatest compatibility possible with the many previous generations of PIC microcontrollers, the input/output (I/O) pins of the PIC32 are grouped in modules or ports, each comprising up to 16 pins, named in alphabetical order from A to H. We will start logically from the first group known as PortA. Each port has
several special-function registers assigned to control its operations; the main one, and the easiest to use, carries traditionally the same name as the module (PORTA).
Notice how, to distinguish the control register name from the module name in the following, we will use a different notation for the two: PORTA (all uppercase) will be used to indicate one of the control registers; PortA will refer to the entire peripheral module.
According to the PIC32 datasheet, assigning a value of 1 to a bit in the PORTA register turns the corresponding output pin to a logic high level (3.3 V). Vice versa, assigning a value of 0 to the same bit will produce a logic level low on the output pin (0 V).
Assignments are easy in C language—we can insert a first assignment statement in our project as in the following example:
#include <p32xxxx.h>
main() { PORTA = 0xff; }
First, notice how statements in C must be terminated with a semicolon. Then notice how they resemble mathematical equations—they are not!
An assignment statement has a right side, which is computed first. A resulting value is obtained (in this case it was simply a constant expressed in hexadecimal notation) and it is then transferred to the left side, which acts as a receiving container. In this case it was the special-function PORTA register of the microcontroller.
Note
In C language, by prefixing the literal value with 0x (zero x), we indicate the use of the hexadecimal radix. For historical reasons a single 0 (zero) prefix is used for the octal notation (does anybody use octal anymore?). Otherwise the compiler assumes the default decimal radix.
Compiling and Linking
Now that we have completed the main() and only function of our first C program, how do we transform the source into a binary executable?
Using the MPLAB Integrated Development Environment (IDE), it’s very easy! It’s a matter of a single click of your mouse in an operation called a Project Build. The sequence of events is actually pretty long and complex, but it is mainly composed of two steps:
1. Compiling. The MPLAB C32 compiler is invoked and an object code file (.o) is generated. This file is not yet a complete executable. Though most of the code generation is complete, all the addresses of functions and variables are still undefined. In fact this is also called a relocatable code object. If there are multiple source files, this step is repeated for each one of them.
2. Linking. The linker is invoked and a proper position in the memory space is found for each function and each variable. Also, any number of precompiler object code files and standard library functions may be added at this time, as required. Among the several output files produced by the linker is the actual binary executable file (.hex).
All this is performed in a very rapid sequence as soon as you ask MPLAB to build your project. Each group of files, as presented in the project window (refer back to Figure 1.1), will be used during the project build to assist in the compiling or linking phase:
● Every source code (.c) file in the Source Files list will be compiled to produce relocatable object files.
● Each additional object file in the Object Files list will then be linked together with the previous object files.
● The Library Files list will also be used during the linking process to search for and extract library modules that contain functions, if any have been used in the project.
● Finally, the Linker Script section might contain an additional file that can be used to provide additional instructions to the linker to change the order and priority of each data and code section as they are assembled in the final binary executable file. The MPLAB C32 tool suite offers a default linker script mechanism that is sufficient for most general applications and certainly for all the applications we will review in this book. As a consequence, for the rest of this book we will safely leave this section of the project window empty, accepting the default setting provided.
The last two sections of the project window are treated differently:
● The Header Files section is designed to contain the names of the include files (.h) used. However, they don’t get processed directly by the compiler. They are listed here only to document the project dependencies and for your convenience; if you double-click them they will open immediately in the editor window.
● The Other Files section is designed to contain the names of any additional file, not included in any of the previous categories but used in the project. Once more this section serves a documentation purpose more than anything else.
The Linker Script
Just like the p32xxxx.h include file tells the compiler about the names (and sizes) of device-specific SFRs, the (default) linker script informs the linker about the SFRs’ predefined position in memory (according to the selected device datasheet). It also provides other essential services such as:
● Listing the total amount of FLASH memory available
● Listing the total amount of RAM memory available
● Listing their respective address ranges
● Listing the position of critical entry points such as the reset and exception vectors
● Listing the position of the interrupt vectors and the vectors table
● Listing the position of the device configuration words
● Including additional processor-specific object files
● Determining the position and size of the software stack and the heap (via parameters passed from MPLAB project files, as we will see in the next chapters)
Now, if you are curious like me, you might want to take a look inside. The linker script file, it turns out, is a simple text file, although with the .ld extension. It can be opened and inspected using the MPLAB editor. Assuming you accepted the default values when you installed MPLAB on your hard drive, you will find the default linker script for the PIC32MX360F512L microcontroller by opening the procdefs.ld file found in the following directory:
Wow, I know, my head is spinning, too! It took me half an hour to find my way through the labyrinth of subdirectories created during the MPLAB installation. But the reality is that the linker will find it and use it automatically, and you will hardly ever have to see or worry about it again. Here is a segment of the script where the address of the reset vector, the general exception vector, and a few other critical entry points are defined:
Don’t try to open the procdefs.ld from Windows Explorer or using the default Windows Notepad application; it won’t look pretty. This file was generated in a Unix environment and does not contain the standard end-of-line sequence used by Windows programs. Instead use the MPLAB Editor as I suggested.
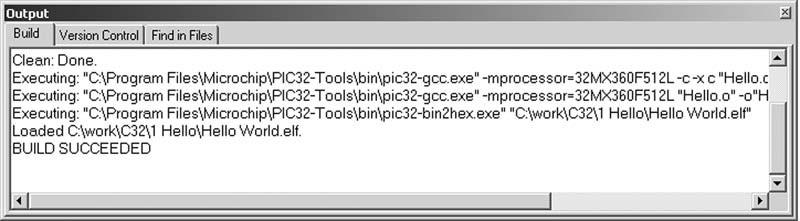
Building the First Project
Select the option Build All from the Project menu or click the corresponding (Build All) button in the project toolbar. MPLAB will open a new window; the content of yours should be very similar to what I obtained, shown in Figure 1.2.
Figure 1.2: The content of the Output Window Build tab after a successful build.
Should you prefer a command-line interface, you will be pleased to learn that there are alternative methods to invoke the compiler and the linker and achieve the same results without using the MPAB IDE, although you will have to refer to the MPLAB C32 compiler user guide for instructions. In this book, we will stick with the MPLAB IDE interface and will use the appropriate checklists to make it even easier.
Using the Simulator
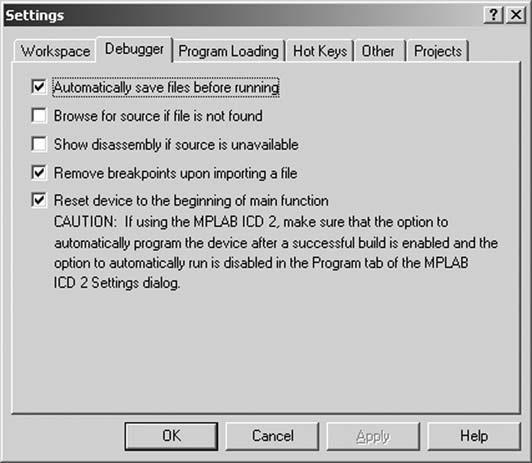
Select Debugger | Select Tool | MPLAB SIM to choose and activate the software simulator as the main debugging tool for this project. I recommend that you get in the habit of using the MPLAB SIM debugger setup checklist to configure a number of parameters that will improve your simulation experiences, although we won’t need it during this first simulation. Let’s perform instead another and all-important general configuration step of MPLAB itself. Select the Configure | Settings item from the MPLAB menu and, inside the large and complex dialog box that will pop up, select the Debugger tab.
As illustrated in Figure 1.3, I recommend that you check three of the options available to instruct MPLAB to automatically perform a few useful tasks:
● Save all the files you changed in the Editor window before running the code.
● Remove existing breakpoints before importing a new executable.
● After any device reset, position the debugger cursor at the beginning of the main function.
The last task, in particular, might seem redundant, but it is not. If you remember, as was briefly mentioned at the beginning of this chapter, there is a small segment of code (crt0 or Startup code) that the linker places automatically for us between the actual reset vector and our code. If we do not instruct MPLAB otherwise, the simulator will attempt to step through it, and since there is no C source code to show for it, it would have to happen in the disassembly window. Not that there would be anything wrong with that; actually, I invite you to try that sometime to inspect this mysterious (but so useful) segment of code. The fact is that we are just not ready for it yet and, after all, our focus in this exploration is 100 percent on the C language programming of the PIC32 rather than the underlying MIPS assembly.
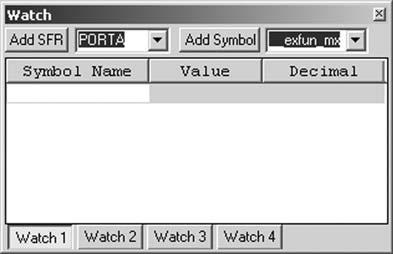
If all is well, before trying to execute the code let’s also open a Watch window and add the PORTA special-function register to it:
1. Select View | Watch from the main menu to access the Watch window (see Figure 1.4).
2. Type or select PORTA in the SFR selection list (top left).
3. Click the Add SFR button.
4. Press the simulator reset button (Reset) in the Debug toolbar or select Debugger | Reset.
Figure 1.4: MPLAB IDE Watch window.
5. Observe the contents of the PORTA register; it should be cleared (all zeroes) at reset.
6. Also notice that a large green arrow has appeared right next to the first opening curly bracket of the main function. It points at the part of our code that is going to be executed next.
7. Now, since we need to learn to walk before we “run,” let’s use the (Step Over) or the (Step In) buttons in the Debugger toolbox, or the Debugger | Step In and Debugger | Step Over commands from the main menu, to execute the one and only statement in our first program.
8. Observe how the content of PORTA changes in the watch window. Or, I should say, notice how nothing happens. Surprise!
Finding a Direction
It is time to hit the books, specifically the PIC32MX datasheet (Chapter 13 focuses on the I/O ports detail). PortA is a pretty complex, 12-pin-wide port. Each one of the pins is controlled by a small block of logic, represented inFigure 1.5.
Dedicated port module
RD ODCFG
DATA Bus
PBclock
WR ODCFG
RD TRIS WR TRIS
WR LAT
WR PORT
RD LAT
RD PORT Sleep
PBclock
Synchronization
Figure 1.5: Block diagram of a typical PIC32 I/O port structure.
Although completely understanding the diagram in Figure 1.5 is beyond the scope of our explorations today, we can start by making a few simple observations. There are only three signals that eventually reach the I/O cell. They are the data output, the data input, and the tristate control signals. The latter is essential to decide whether the pin is to be used as an input or an output, which is often referred to as the direction of the pin.
From the datasheet, again, we can determine the default direction for each pin—that is, in fact, configured as an input after each reset or power up event. This is a safety feature and a standard for all PIC microcontrollers. The PIC32 makes no exception.
The TRISA special-function register allows us to change the direction of each individual pin on PortA. The rule is simple to remember:
● Clear a bit to 0 for an Output pin.
● Set a bit to 1 for an Input pin.
So, we need to add at least one more assignment to our program if we want to change the direction of all the pins of PortA to output and see their status change. Here is how our simple project looks after the addition:
#include <p32xxxx.h>
main()
{ // configure all PORTA pins as output
TRISA = 0; PORTA = 0xff; }
We can now retest the code by repeating the following few steps:
1. Rebuild the project (select Project | Build All, use Ctrl F10, or click the Build All button in the project toolbox).
2. Execute a couple of single-steps and . . . you have it (see Figure 1.6)!
If all went well, you should see the content of PORTA change to 0xFF, highlighted in the Watch window in red. Hello Embedded World!