13 minute read
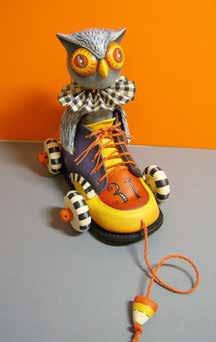
OWL PULL TOY


NIGHT OWL Pull Toy
By Linda Hollander

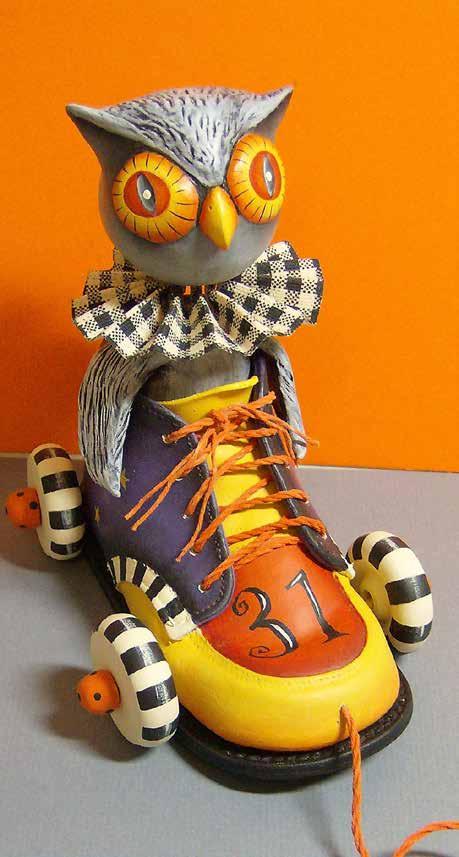
Combining clay and paint is one of my favorite things to do! Painting on vintage items has always been my passion so turning an old Buster Brown baby shoe into a pull toy was totally in my wheelhouse!
SUPPLIES
SURFACE:
• Vintage high-top leather baby shoe • Sculpey ® Polyform Model Air (air dry modeling clay) • Sculpey® Polyform 11 pc. Essential Tool Kit or substitutions for clay roller, needle tool, rubber tip shaper, and super slicer blade • Craft foam shapes: ball 2”; cone approximately 3” tall • String or cord (natural color or off white) • 1 1/2” wide wired ribbon or fabric (collar) • Wood dowels (4) 1/8” x 4” or wooden BBQ skewers • Wooden wheels (4) 1 ½”
PAINTS: DecoArt® Americana®
• Bleached Sand DA257 • Golden StrawDA168 • Grape Juice236 • Grey SkyDA111 • Lamp Black067 • Persimmon DA293 • Slate GreyDA068 • Zinc DA304
Mediums:
• DecoArt® Multi-Purpose Sealer DS17 • DecoArt® Chalky Gesso CG01 DecoArt® Americana® DuraClear Soft Touch Varnish DS123
BRUSHES: Royal Aqualon
• Round Series 2250 #2, 10/0 • Shader Series R2150 #4, 8, 12 • Angular Series R2160 3/8”, ½” • Glaze/Wash Series R2700 ¾”
Royal Mop
• Series 4999 #4
MISCELLANEOUS SUPPLIES:
• Graphite paper • Stylus • Sanding sponges fine and medium grit • Paint cubby • Flat smooth work surface such as a craft mat or smooth ceramic tile • Craft knife • Serrated kitchen knife • Toothpick • White glue • E6000® or similar strong glue • Ruler • Drill • Fabric stiffener or starch • Needle and thread color, coordinated with your collar material • Cellophane tape

I have been painting, drawing, and crafting since a child but my art supplies had been collecting some dust while I was busy raising my 3 active boys. It was not until 1999 that I discovered the world of decorative painting while flipping through some magazines on the newsstand. Back then. We had so many publications to choose from. I bought them all and poured over them daily with renewed excitement! I used the instructions to teach myself most of the techniques until I could get to seminars and conventions. I chose vintage furniture as my substrate...go big or go home is my mantra! Collecting vintage pieces, such as silver-plated tea sets and wooden bowls, is half the fun of painting. Garage sales and flea markets are hard to pass, as my 3 boys will attest to. I heard many groans from the back seat as I pulled over to take a quick look at another sale. I am not above picking up curbside treasures on trash day. The things people throw away simply amazes me! Painters are fortunate to have all the wonderful new mediums and paint formulas that we have today. There is virtually nothing that cannot be painted...as long as it doesn’t move too fast!
CLAY NOTES:
Cover unused clay tightly with plastic wrap. It is a good idea to keep a wet, shop towel handy to keep hands, tools, and work surfaces clean as you work. The clay will begin to dry out if you overwork it or expose it to air for too long. If that happens, knead a few drops of water into it. Use water on fingers or a paint brush to smooth clay as needed. If too much water is used, the clay will become mushy and stick to your hands and tools. Set it aside for a few minutes or knead it until it comes back to a good working consistency. Wet clay parts will adhere well to one another. If the clay has begun to set up, add water to both parts and apply light pressure before attaching them. Additional layers of clay can be added to dried clay. Dried clay can be sanded lightly to smooth and trimmed with a craft knife as needed. You may need to adjust the size of the clay shapes in the directions if your shoe is smaller or larger than the shoe used here. Considerable drying time is needed to complete this project. In cold or damp climates, drying time may take longer than usual. If the clay is cold to the touch, it is not completely dry. You can speed drying time by using a hair dryer or placing next to a he t vent or near a warm oven.
PREPARATION:
Remove shoelace. Drill holes in the shoe to accommodate the pull cord and axles. Choose a drill bit slightly bigger than the width of your axles. The axle holes need to be slightly higher than the inner sole of the shoe so the axle rests on the sole or just slightly above it. Check the axles for fit. They should fit snugly in the holes. Place wheels onto axles for fit. Adjust the wheels so they are straight. The axles need to extend 1/4” beyond the wheel to accommodate the hub caps. There should be a little “wiggle room” as well so the wheels can turn freely once the toy is assembled. A small hacksaw or utility knife can be used to cut the axles down if needed. Use gesso to prime the shoe.
CLAY PARTS: Body:
Check the foam cone for fit by inserting into the shoe. Keep in mind that the body should fit snugly once covered with clay. It should also extend above the top of the shoe by approximately ½” once covered with clay. Use the serrated knife to trim the shape if needed for a good fit. Cut a 1” slab of clay then roll out into a sheet of clay approximately 1/8” thick. Use Super Slicer to lift clay sheet. Cover the sides and top of the foam cone. Let dry. Sand as needed.

Head:
Roll a sheet of clay to cover the foam ball. Systematically press clay and cover the entire ball pushing out air pockets as you work. Pleat and remove excess clay with craft knife. Smooth clay by gently rolling in palms or on your work surface. Use the needle tool to pierce any air pockets that may have formed. Apply white glue to one end of a toothpick and insert it 1/3 into the ball. Let dry. Sand to smooth as needed. Forehead and ears: Roll a 1” ball of clay into a 2” log. Place the log on top of the head (opposite toothpick). Use finger pressure to adhere the log and form the ears at either end of the log. Press some of the clay from the center of the log downward to form the forehead (triangular area above the beak). Flatten the top center area between the ears. Press some of the wet clay over
the back of the head as well. Use the rubber tool to indent the inside of the ears and to define the edges of the forehead. Use the side of the needle tool to create feathery texture. Let dry, then sand as needed.
Beak:
Roll a 1/4” ball of clay, then form a football shape. Press onto face between eyes. Use the rubber tool to smooth edges. Use the needle tool to indent nostrils. Let dry.
Eyes:
Roll a ½” ball of clay, then cut in half. Press onto the face, then bevel the edges with the rubber tool. Smooth with a wet shader. Let dry. Sand as needed.
Wings:
Place body inside shoe. Tighten the shoelace and tie in a bow to secure the body in place. Roll a 1 ½” ball into a 5” log then flatten into a 1” wide sheet. Cut out the wing pattern (or use as a guide) to cut the wing section. Center the wing over the top of the body then use finger pressure to taper edges over the cone. Pinch the ends of the wings and curve them forward slightly. The wings should not press against the sides of the shoe. Leave a small gap between the shoe and wings. The top of the wings will touch the top edge of the shoe. Use the needle tool to carefully texture the wings and to make a hole in the center of the

top to accommodate the head. When dry, loosen the lace and gently pull the body out of the shoe. The clay will give just a little, but too much torque will cause the wings to crack. Small cracks can be mended with a little white glue and pressure. Sand, as needed, to smooth top area of body. Use the needle tool to make a hole in the top of the body to accommodate the toothpick in the owls’
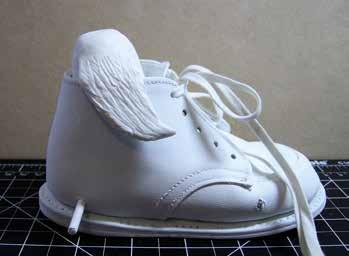
head. Remove any clay residue from the shoe.
Hub caps:
Roll two ½” balls of clay. Use the slicer to cut them in half. Press onto the end of an axle, then carefully remove, and set aside to dry.
Candy corn bead:
Roll a ½” ball of clay into a cone shape. Flatten the cone slightly. Use the needle tool to ream a hole directly down the center of the bead. Repeat with a toothpick to enlarge the hole. Let dry.

PAINTING NOTES:
Use appropriately sized brushes unless otherwise noted. Use the mop brush to soften floats as needed. Use water to thin paint as needed for line work and sheer floats. Seal dried clay with Multi-Purpose Sealer.
PAINTING INSTRUCTIONS:
Note: Use a thin coat of Multi-Purpose Sealer to protect painted areas as you work. Mistakes are easily removed with a damp brush.
OWL:
Use Golden Straw plus touch of Bleached Sand to base the eyes and beak. Don’t stress over getting paint on the adjacent areas as you will be covering any stray paint with the next step. Use Persimmon to float shading on the outer edges. Transfer eye detail or use pattern as a guide. Base the Iris with Persimmon. Use Lamp Black to base pupil and add line work. Use Bleached Sand to float a highlight on the left side of the pupil and to add a dot of reflected light in the center. Base the head and body with Slate Grey. Use Lamp Black to float shading inside the ears. Antiquing the feathers: Thin Lamp Black slightly with water and apply over wing texture. Be sure to work the paint into the nooks and crannies. Use a damp shop towel to remove paint from the high areas while the paint is still wet. Repeat with the textured areas on the head. When dry, dry brush Grey Sky to highlight the raised areas. Use the shaders and Lamp Black to dry brush the body and the smooth areas of the head. Use a light touch and a slip slap or cross hatching motion. Repeat with Grey Sky to highlight over top.
SHOE:
Note: All shoes are not constructed the same as the one used here. You may have to improvise to get the designs to work for your project. Don’t forget to seal painted areas to protect them!
Sky:
Mix Grape Juice + touch of Slate Grey and store in a paint cubby. Use this mix to base coat the largest section of the shoe. Use Lamp Black to float shading around all edges of the sky. Transfer the moon pattern on each side of the shoe, taking care not to place them under the wing areas. Use Golden Straw plus a touch of Bleached Sand to base the moons. Use Persimmon to float shading and Bleached Sand to float highlights. Use the stylus and Golden Straw, dip dot the stars, one at a time. Use the liner to pull 5 arms out from the center of the dip dot.
Toe box:
Use Golden Straw plus a touch of Bleached Sand to basecoat the upper half of the tongue and the toe box. Use Persimmon to float shading along the bottom of the toe box. Use Persimmon plus a touch of Golden Straw to base the vamp. Use Heritage Brick to float shading. Transfer the number pattern or use a guide to freehand them. Use Lamp Black to basecoat. Let dry, then add highlights with Bleached Sand.
Graphic areas:
Use Bleached Sand to basecoat. Use the #4 shader and Lamp Black to paint stripes.
Sole:
Use Lamp Black to base the sole (bottom of shoe and edges).
Misc. parts:
Use Golden Straw to base the front axle and the purple mix to base the rear axle. Use Bleached Sand to base the wheels. Use the #4 shader and Lamp Black to paint stripes. Use the round brush and Bleached Sand to dry brush the center of the stripes. Use Persimmon plus a touch of Golden Straw to base the hub caps. Use the stylus and Lamp Back to add dip dots. Use Bleached Sand to base the candy corn bead. Use Golden Straw to base the center section and Persimmon to base the bottom third. Use the liner and thinned Lamp Black to paint a fine broken line to define the sections.
Shoelace and pull string: cut two lengths of cord to desired lengths, plus a few additional inches for good measure. Use water to thin a large puddle of Persimmon. Drag the cord through the paint puddle. Use a brush to help cover well. Set aside to dry.
Collar:
Cut a 14” length of ribbon or cut a strip of fabric 1” x 14” long. Apply fabric stiffener or starch according to the manufacturer’s instructions. This allows you to get sharp pleats and prevents the material from fraying. Let dry. If using wired ribbon, trim one edge off the entire length which will become the top of the collar. Make accordion folds along the ribbon or fabric strip. Open the collar and form a circle of your desired size. Trim off excess but leave two flaps at either end so you can connect them. Hand sew a basting stitch along the top edge of the collar. Be sure to run the needle through each” peak” of the accordion pleats. Pull the thread taut and tie off to secure. Run a bead of white glue on the end tabs and secure with a small binder clip or paper clip. Let dry, then remove the clip.
FINISHING:
Apply Soft Touch Varnish to all painted areas to seal wood parts and clay figure.
CORDS:
Wrap a small piece of cellophane tape tightly around the ends of the cords. Cut the tip off, at an angle, to make threading the cord through the holes easier.
PULL CORD:
Push the pull cord through the hole in the toe box, then grab it from inside the shoe and pull out several inches. Form a large knot to keep the cord secure in the shoe. Thread the other end through the large end of the candy corn bead and make a knot. Trim off excess. Loosely lace the shoe with the other cord.


OWL ASSEMBLY:
Carefully insert owl body in shoe. Pull the shoestrings taut and check for fit. If the body wobbles you can glue it in place or stuff packing peanuts or cotton in the cavity to make it more secure. Tie off shoelace and fray the end of the cord. Trim as desired. Center the collar over top of body. Apply white glue to the exposed end of the toothpick and insert into hole. Let dry. Insert axles into shoe. Slide wheels onto axles. Apply a small amount of strong glue to the ends of the axles, one at a time. Press hubcaps onto axles. Let dry.

Enlarge or reduce the size to the surface of your choice.
Note to reproduction companies/stores: The bearer of the original color magazine has full rights to have this drawing reproduced and enlarged one time for personal use. This notice has been printed in red ink for verification of authenticity.


