
15 minute read
TIME TO HIBERNATE

By Cindy Makowski Cindy discovered painting in the late 90’s and continues to learn every day. She was finally able to take early retirement in 2017 to commit her full time to painting and teaching. Since then with the help of her husband of 40+ years, her mom Eleanor, and her side kick Diane she has traveled to multiple art conventions, workshops, and seminars around the states. In 2019 she was able to travel to Australia and New Zealand to teach at workshops there and looks forward to returning. Cindy lives in Florida with her husband and dog Chico and now has her mom living with her full time. www.Cindysbrushstrokes.com
SUPPLIES:
SURFACE:
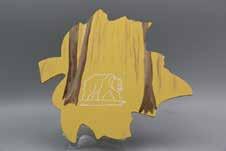
• Wood Leaf, source Viking Woodcrafts - about 9 inches - 20-11578
OTHER SUPPLIES:
• White transfer paper • Large headed stylus
BRUSHES:
• Scharff 1/4” Angle brush • Small round detail #1 • Script Liner • 3/4 or 1” Flat
PAINTS:
• Golden Straw DA168 • Burnt Umber DA223 • Toffee DA059 • Burnt Sienna DA063 • Evergreen DA082 • White DAW01 • Sunny Day DA325 • Black DAW67 • Georgia Clay DA017 • Spiced Pumpkin DA310 • Tuscan Red DA265 • Heritage Brick DA219 • Marigold DA194 • Prussian Blue DA138 (Feel free to substitute any fall colors of choice)
SPECIALTY PRODUCTS:
• DecoArt® Acrylic Spray • Cindy’s Bear Stamp • Ink pad (optional)
PREPARATION:
WOOD LEAF PREPARATION:
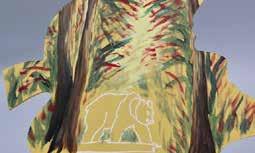
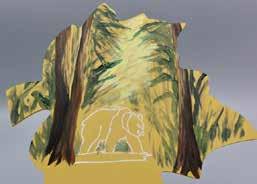
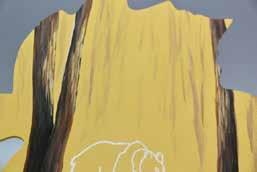
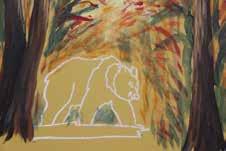
Base coat the leaf 2 good coats of Golden Straw using your 3/4’ or 1” flat, don’t forget to do the edges. Allow to dry then stamp or trace the bear pattern about 2 inches up from the bottom. (Image 1).
PAINTING INSTRUCTIONS:
BASE IN TREES:
Use your 1/4” Angle brush to base in where you want to place your trees. I recommend 3 trees. Depending on where you place your bear, you can have one in back, two in front or vice versa. Three in front, NOT three in back though, that would look awkward. Be sure they are different sizes and end them at the bottom at different depths. Colors can be any of your brown mix as this is just a base coat. I used Burnt Umber and a touch of Toffee. Clean your brush right on your leaf, by scrubbing in with a dry brush fashion the far away trees. (Pick up a little more color well worked into the brush if you need more). These do not even need to have complete trunks so don’t worry if they are skipping in spots. Refer to image 2. After you finish cleaning your brush, your tree base coat should be dry so go ahead and add the second layer of definition. (Image 2)

SECOND LAYER ON TREES:
Brush mix and vary what you pick up, Burnt Umber, Burnt Sienna, a touch of Toffee. (Add Black for a darker brown) With the flat of the brush held flat against the wood (not on the chisel) slide and lift, slide and lift to put in the bark. (Image 3) Pick up a touch of black, work it into the bristles just a bit. Then, add for a shadow, especially at the base of the tree in front of the bear. Refer to photo 6. Notice how it looks like there are many roots starting to come out of the bottom of the tree. Bring the darkness up slightly into the bark. Where there are two trees on the left, be sure to use some Burnt Umber and black right along the edge. Where the two trees overlap as a shadow, push one tree behind the other. Use more Toffee and Sienna on the light side of the tree, this will round your tree and begin the highlight. Do not add anything more to the scuffed in shadowy trees in the background. Give this a moment to dry then make a dirty yellow mix with Sunny
Day and Burnt Sienna. (Image 4) Add this as a highlight on the light side of each tree. Keep in mind the sun is in the middle and shining out. So left trees highlight right side and right tree highlight the left side. Gradually add layers, going with brighter yellow and a touch of white. Each layer of brighter highlight will get smaller and smaller in size.
BACKGROUND:
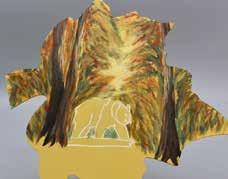
With a touch of Sunny Day added to the White on the 1/4” angle, lightly scrub in what will be the sunshine through the trees. I place this randomly in front of the bear and between the two sets of trees. An irregular shaped scrub. (Image 5) With the 1/4” angle brush, begin adding in your fall leaf colors. There is no specific pattern or shape. Alternate your colors and shades and fill in the area for a dense woodsy look. (Refer to images 6 -9.) I started with my brighter and deeper colors, such as the Tuscan Red and Spiced Pumpkin. You do not have to add one color all at one time but alternate for a more layered look. While it looks like tree shapes, all I did was lay the brush to the side and rub in paint in the general direction that branches would be growing. Remember to add some greens, and green blues, as not all trees would change color at the same time. I also added Burnt Sienna to some of the colors to tone them down a bit and add variations to the colors for that automatic shading look. Do not forget, (like I do), to do the two little triangles of forest that shows under his belly between his legs. Before adding the highlights, reinforce the sunshine with additional Sunny Day and White with a whiter spot towards any opening you have.
BACKGROUND DEFINITION:
Repeat the process for the background this time use a few lighter colors on the “tips” of branches where the sunlight would be lighting them up. If you need to add more darkness, or to fill in gaps, especially along the tree trunks, add a wash of blue/green. Do not attempt to really define bushes in the background, keep it a jumble with nothing specific. Only keep in mind, the direction you scrub your brush, in the general direction you would expect to find a branch growing. Closer to the front, you can add more definition near the trees. See the difference between image 9 and the finished picture where I added the wash.
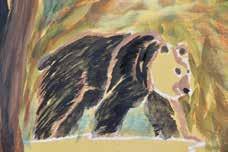
BEAR:
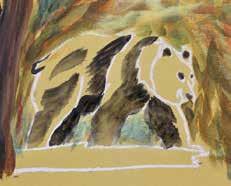
Working with a basically dark animal, I do two things. I make sure I know where my darkest areas are, such as the belly, and the “away” legs, and the backside of the “forward” legs that are not having the sun hit them. I also make sure I know where my highlights are for shape. I base these in with a dark or light version of my final color just so I do not lose them. (Images 10 and 11) Let’s start. Caution! Make sure you see his tiny nub of a tail and don’t lose it. Use strokes that would generally go in the direction of the fur, but with the width of the brush, not attempting individual hair strokes. Use a dark brown mix of Burnt Umber and Black to base in the left rear leg (the away leg) and the belly area near the rear legs. With this same mix, base in the backside of the front left leg and the entire front right leg. The same mix indicates the inside of both ears, the eyes and the nose. ( Image 12) Rinse your brush and mix a lighter shade of Burnt Umber, Burnt Sienna, and Toffee. Then, lightly indicate where the highlight will be along the top of both ears, the hunch of the back, and right shoulder coming down the front of the left front leg. I have a pattern line for the front of the right rear leg, curve of the hip which is also highlighted. You can use this same mix if you want to put in the nose, muzzle, and smile so as not to lose it. Again, color is not specific as it will get covered over, this is just for placement. Refer to image 12. Rinse your brush and now we will build our bear! There is no right or wrong mix as long as you are dark, and you can see shade variation. Some bears are browner, some more black, and some more red. For the mid tone, mix a browner version of the Burnt Umber and Black. Fill in any area not covered with the highlights and dark shadow. Pick up the same combination and add Burnt Sienna. Now, on the chisel edge stroke in the fur. I will sometimes do a daisy type stroke, and others, I will pull short long strokes along the flat of the chisel. Vary your strokes and they can
overlap, just do not have x’s for fur! For variation in the dark areas, add some Prussian Blue to the Black, and Burnt Umber and stroke in. Again, in the direction of the fur. Hint: Along the outside edges of the legs, leave it jagged, do not make it smooth let it be fuzzy like fur would be. (Image 13) For the ears, use a small round detail brush. Add a second layer of Black and Burnt Umber. And even straight black in spots, stroke this in with short choppy strokes, do not make it smooth. Rinse or wipe your brush and add Burnt Sienna and Oyster Beige and short strokes again, not a smooth line. Add in the highlights on both ears and on top of the head. For some reason I always leave the face and neck for last. So, let’s finish the body. Highlight the top of the back, on down to the top of his nubby little tail. Be sure the bottom of the tail is darker and juts out from that hind leg just a tiny bit. If you need to reshape, bring your color of the forest in to reshape that area. Drop down under the tail and highlight going down the back of the right rear leg. Reinforce the highlight on the front of the right rear leg, just ever so slightly, it is not standout bright, just enough for definition. Reinforce the highlight, from hump of the shoulder top on down to the halfway point on the rear of the front right leg. If your bear body is looking flat and not furry, darken the highlight color, but keep it lighter than the bear and add additional fur indications in the body area. (image14)
FACE AND NECK:
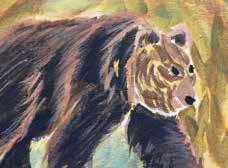
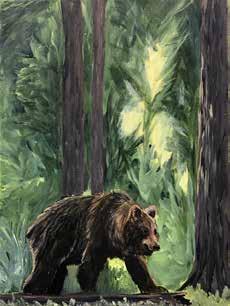
For best reference use the photo for your guide. Use your detail round brush and darken the eyes and the nose with black. Add Burnt Umber using a backwards comma stroke, bring in the dark fur along the front side of his face and under his mouth (the chin). Come out slightly from his right eye and darken in front of and above. As you need to, pick up paint, add Burnt Sienna to the mix and no black. Add very short streaks along the side of his face and just a few fading away along the chin. Wipe your brush, do not clean it. Pick up more Burnt Sienna, and a touch of the Burnt Umber, add to the top of his head closest to you and bring this down between the eyes towards the snout. You may need to add a little Burnt Umber and smoothly stroke this towards the center of the forehead. Add a touch of Toffee, and White to the mix. Careful, this is strong, and fill in the snout. (Image 15) Basically, work these colors back and forth so you have the look of texture, shades, and highlights. Refer to the photo. You don’t have to match exactly just the same general appearance. With the lighter color, lay in the reverse smile of the upper lip, and lighten ever so slightly to catch the very edge of the lip. Do not add any more paint to your brush, flatten the round brush out and gently touch around the outside of the bear’s right eye. A little on the top, and a little on the bottom, touching in the back but open in the front. Just enough to stand out. With your detail liner, underline the upper lip with a black or dark brown/black mix to put in the “smile”. You can also touch just a tiny amount twice at the bottom of the nose for nostrils. If the neck needs more highlights, use mostly Burnt Sienna, a touch of Burnt Umber and a touch of Toffee. Lightly in the reverse comma direction add highlights in a dry brush pattern. (Image 16) Check your bear. Does the fur look blended and the colors flow from one shade to the next? If so, you are good. If it looks blocky, you may need to add more of your base color or shadow colors to break up the blocks of colors. It is ok to putts with the fur, add a stroke here or there just to break it up or make it stand out more. (Image 17)
OLD DEAD LOG:
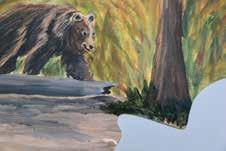
Use any mix of dirty colors for your old dead log. Keep it similar to your trees or slightly greyer. Brush the color on using left to right strokes with the 1/4” angle. The very end or ends of the log should be mostly black as they are in dark shadow. With a lighter version of your tree, run a broken edge along the front side making it jagged. Blend the color back into the trunk. Notice when I did the bear pattern, only his left front foot is stepping up onto the log. All other feet are hidden. (Image 18) When the log is dry, add some sunlight highlights with Sunny Day, with a touch of Burnt Sienna. With your detail
round, dap in irregular shapes that will look like fallen leaves. Use any of the colors from the background. Refer to image 21.

PATH:
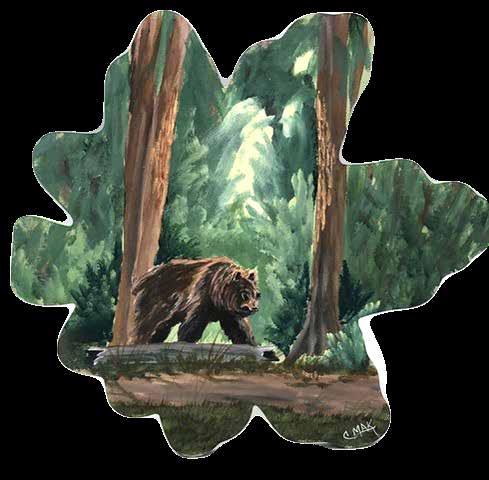
With your 1/4” angle brush, make a marbled brush mix of a light dirty brown color using Burnt Sienna, Burnt Umber, and Oyster Beige. Streak it left to right using the flat of your brush and just let the color come off as it will. Add shadow indications by adding a little blue to the mix. Scrub in a greyer look to the path that would be the shadow of the bear. (Image 19) Use a mix of dried grass colors, add clumps of grasses in front of the tree, against the log, and on the front side of the path. Use your darker mixes first, and then tap over with lighter yellow brown mix for highlights. I just brush mix the colors as I go so that the colors constantly vary. I used Burnt Sienna, Burnt Umber, Marigold, White, Green, and Blue. Even a touch of Black now and then. All on a dirty brush, I just kept mixing. (Image 20) If you start getting too grey, go ahead and rinse your brush and start again. Your goal is dead dried grass like you see in the fall. Use a variety of motions to do this. Tap some in with the chisel of your brush. Lay the brush sideways and tap in short grass. Use the script liner with inky thin paint to pull up long tendrils of weeds with the same colors. (Image 21) Have fun with the grounds. Another option is to use the splatter effect with a toothbrush or a fan brush, using your various shades of browns and black and add pebbles to the path. Create your own. (Finished image 22) When your piece is dry, spray 2-3 light coats of Acrylic Spray to seal and bring out the extra luster. I like to use Gloss, but the choice is yours. Hint: When dry, flip your leaf over and paint the other side using “Hal’s Bear” spring color pattern or create your own winter scene. Be adventurous. (Image 23) I hope you enjoyed Time to Hibernate. Do not forget to sign your piece and show your family and friends!


Enlarge or reduce the size to the surface of your choice.
LINE DRAWING HERE
Note to reproduction companies/stores: The bearer of the original color magazine has full rights to have this drawing reproduced and enlarged one time for personal use. This notice has been printed in red ink for verification of authenticity.
