12 minute read
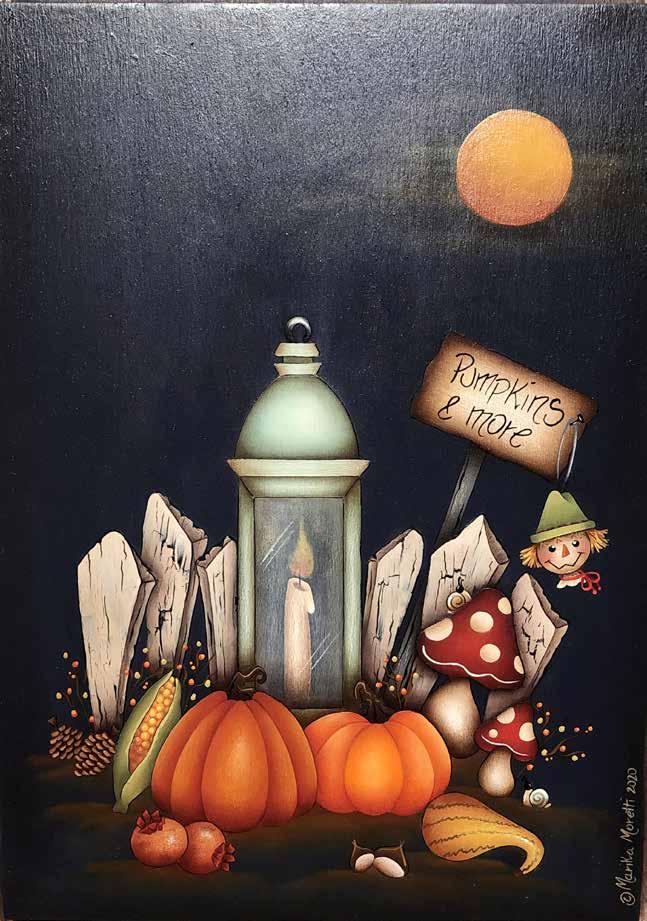
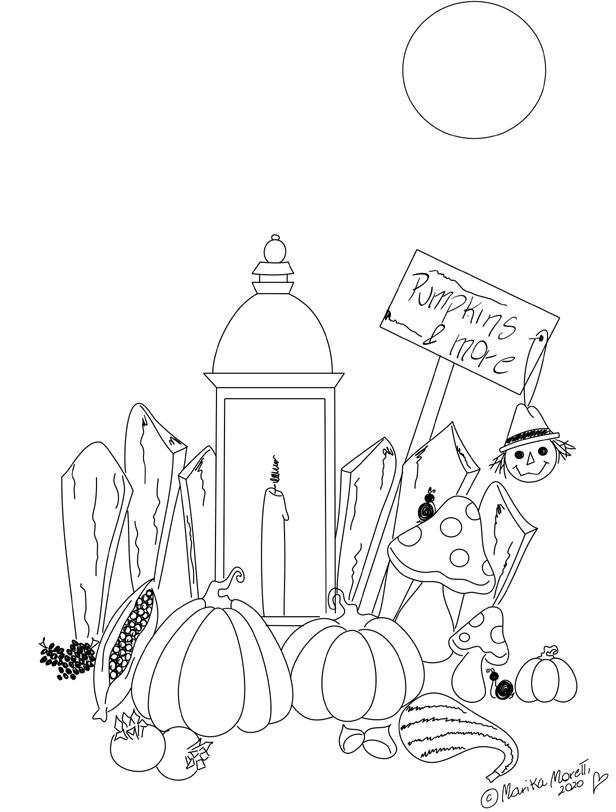
PUMPKINS AND MORE


By Marika Moretti My name is Marika, I am 36 years old and I live in Bologna, Italy. My adventure with painting began more than 10 years ago… I had never taken a brush in my hands at that time, but when I started, it was love at first sight and I never stopped since then! During the years, I also had the chance to take many classes with American artists, amazing and talented teachers who helped me improving my painting skills and developing my own style and, in the end… becoming myself a designer! I started creating my own designs about three years ago and I really love it! I also have been teaching during the years, even if I continue to consider myself as a student, because you never stop learning, from others, but especially from yourself, from your mistakes… or better from your creative attempts!
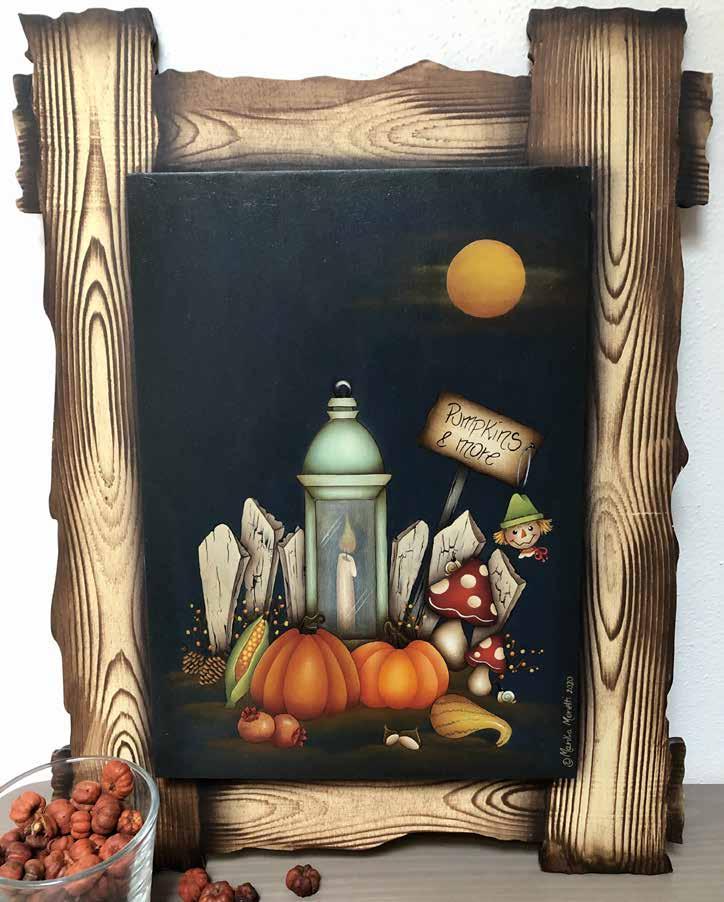
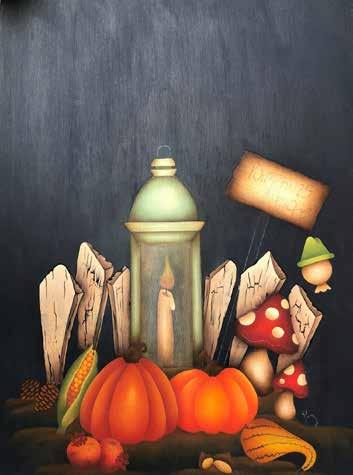
Dear Painting World Magazine’s readers, thank you for painting this design with me! This is a Fall design with warm and vibrant colors. There are floats for shading and highlighting and also some dry brush. You will need to use the crackle medium and there is also a nice and quick decoration for the frame of the design to create the wooden effect. Have fun! • Deep Midnight Blue DA166
SUPPLIES
SURFACE:
• This is a surface that I personally designed. It is made of 2 different boards: one is a larger board that has the shape of a frame and the other is just a regular rectangular surface. This design can be easily adapted to many surfaces because it is basically made of a main panel (approx. 12.5”x9”) and a frame that can match the dimension.
PAINTS: DecoArt® Americana® paints
• Antique White DA058 • Asphaltum DA180 • Avocado DA052 • Avocado Dip DA254 (or Olive Green DA56) • Black Plum DA172 • Burlap DA319 • Burnt Orange DA016 • Burnt Sienna DA063

• Country Red DA018 • Burnt Umber DA064
• Hauser Light Green DA 131 • Heritage Brick DA219 • Honey Brown DA 163 • Lamp Black DA067 • Light Buttermilk DA 164 • Marigold DAI 94 • Mississippi Mud DA094
Neons:
• Fiery Red DHS4 • Primary Yellow DA201 • Sea Glass DA297 • Spiced Pumpkin DA310 • Soft Black DA155 • Thicket DA357 • True Ochre DA143 • Zinc DA304
MEDIUMS/OTHER PRODUCTS:
• DecoArt® Americana® Weathered Wood
Crackle DAS8 • DecoArt® Americana® Multi-Purpose Sealer
DS17 • Windsor & Newton® Oil paint - Burnt Umber • Linseed oil
BRUSHES BY COMPANY NAME:
• Dynasty® - Black Gold 206 FW Shader: 3/4”, 1/2”, 1/4” • Dynasty® - Black Gold Round 206L: #1, #2 • Dynasty® - Black< Gold Filbert 206FIL (for base coating): #4, #6, #8 • Dynasty® - Black< Gold Liner 10/0 and Mini
Liner 20/0 • Dynasty® - Mezzaluna: Extra Large, Large,
Medium • Loew Cornell™ - Maxine Mop: 3/4” 1/2” 1/4” • Flat 1” (any brand) • An old flat brush (for crackle)
MISCELLANEOUS SUPPLIES:
• Paper towels • Paper palette • Transfer paper • Graphite paper (black and white) • Brush cleaning basin • Stylus • Sanding pad (medium and fine) • Super film • Wood grainer • Hot glue gun • A couple of old fabric pieces (I cut an old t-shirt and it works great!)

HELPFUL TIP OR HINT:
This design might seem difficult to do, but it is actually not. Maybe it will not be super quick to paint because we have many elements, but there are many of the basic techniques of Decorative Painting. So, do not stress too much and just enjoy the journey!
USE OF THE WEATHERED WOOD CRACKLE:
When applying the crackle, use an old flat brush that needs to be moist (not wet!), so dry it out quite well on the paper towel. Remember that the crackle application needs to be quick, you don’t have to think about it too much, just apply it with short and quick strokes. You don’t have to work it out too much or over stroke it, otherwise you won’t get any crackle. You can let it dry naturally or if you are impatient (like me), you can also use a blow drier, just be careful not to dry it too much... it must be sticky, then you can apply the second color, always with quick strokes.
PREPARATION:
Sand the entire surface and clean with a tack cloth. Seal the surface with DecoArt Multi Purpose Sealer (optional) and let dry. Sand again and wipe away any remaining dust. After base coating, I suggest you lightly sand the surface with Super film or an extremely fine sanding pad before shading/highlighting.
PAINTING INSTRUCTIONS:
BACKGROUND:
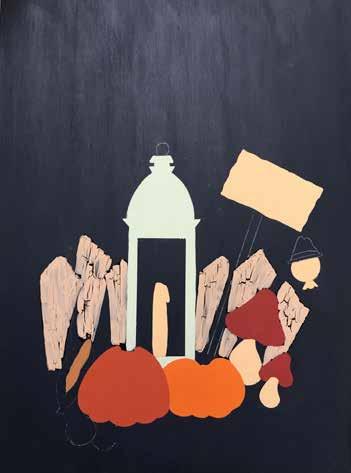
Basecoat with Midnight Blue Transfer the main line drawings.
FENCE:
Undercoat first with Lamp Black. When dry, lay down the crackle medium. Let dry (not completely... it must be sticky) and lay down one coat of Burlap and let dry again. If it didn’t crack, please... no panic... no stress!!! You can always line the cracks with your liner brush and Lamp Black. Let dry completely before floating colors (crackle takes a little more time). Shade with Mississippi Mud, then deepen with Soft Black: behind corn, pumpkins, lantern, and mushrooms. Shade also between fence boards and on each board to create thickness. Highlight the top a little with Burlap and Light Buttermilk. If necessary, line some cracks with Lamp Black using the liner brush.
CANDLE:
Basecoat with Antique White. Dry brush the center with Light Buttermilk. Shade with Burnt Umber, then Soft
Black:
Lightly on the sides and to separate the wax drop (only Burnt Umber here), on indent and at the bottom. Add wick with Lamp Black. Dry brush some Marigold to create the halo, then use the same color to make the flame. Shade the flame at the bottom with Burnt Sienna and highlight the top with Primary Yellow.
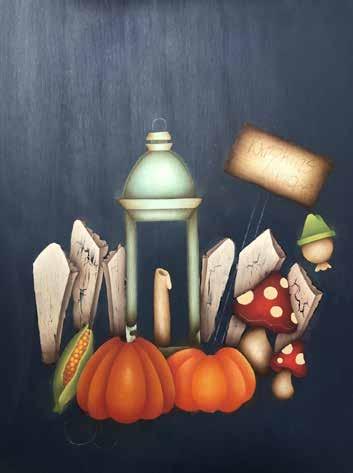
LANTERN:
Basecoat the lantern with Sea Glass. Dry brush, with Light Buttermilk, the center of each section: horizontal, vertical and more or less at 2 o’ clock on the “roof” (sorry... not sure if it’s the right word). Shade with Thicket: to separate sections, on sides of “roof”, at the bottom and behind pumpkins (wider here). Thicket is a cold color and I wanted to have a vintage look, so I decided to warm up
all previous floats with Asphaltum (just once is enough). Deepen with Soft Black: bottom of lantern, behind pumpkins and bottom of “roof”.
GLASS (MAKE SURE YOU HAVE COMPLETED THE CANDLE):
Add a wash with Light Buttermilk on the entire glass area, making sure not to go on the lantern sides. Repeat if necessary. Shade all sides with Asphaltum to add an extra vintage 1001<. Add some highlight dashes with Light Buttermilk (top left and bottom right). Paint the handle with Zinc, shade bottom with Soft Black and highlight top with Light Buttermilk.
POLE AND “PUMPKINS & MORE” SIGN
Basecoat the pole with Zinc. Shade with Soft Black under sign, at the bottom and behind fence. Lightly highlight the center with Light Buttermilk. Add wood grains with Lamp Black, using your liner brush. Basecoat the sign with Antique White. Dry brush
the center with Light Buttermilk. Shade all around with Burnt Umber. Add lettering and nail with Lamp Black (highlight dash on nail with Light Buttermilk).
SCARECROW:
Basecoat face and collar with Antique White. Dry brush center of face and tip of collar with Light Buttermilk. Shade with Burnt Umber, then Soft Black: under hat and to separate face and collar.
Hat:
Basecoat with Hauser Light Green. Highlight on top of hat and center of brim with Avocado Dip. Shade with Avocado: sides of brim, between hat and brim and between the two tips on the top.
Straw hair:
Add hairs with thin lines of Burnt Sienna, then Marigold and then Primary Yellow. Lightly shade on hair (under hat) with Burnt Sienna.
Details:

Eyes - Lamp Black (highlight dot Light Buttermilk), stitches on hat - Country Red, dry brush cheeks with Country Red plus Light Buttermilk, nose - Burnt Orange with highlight line Spiced Pumpkin, mouth line - Soft Black, bow - Country Red with Neons Fiery Red highlight. Add string with Zinc. Shade bottom with Soft Black and highlight with Light Buttermilk.
CORN
Add corn dots first, with Honey Brown. Highlight some of them, especially in the center and on the tip, by adding other smaller dots with Marigold. When dry, shade on the inner corner with Burnt Sienna. Basecoat the leaves with Hauser Light Green. Shade the leaves at the bottom and to separate them with Avocado. Highlight with lines of Avocado Dip.
PINECONES
The pinecones are done with small dashes of color, one next to the other. Use a small brush
to do them (a #1 round or the tip of a liner works fine). The color doesn’t have to be completely dry before you add the next one. Follow this order: Burnt Umber, Burnt Umber plus Honey Brown and then only Honey Brown. Add the tip with Burnt Umber and highlight it with a line of Honey Brown.
PUMPKINS Left pumpkin:
Basecoat with Burnt Orange. Shade with Heritage Brick: at the bottom, to separate sections and on top of each section. Dry brush with Spiced Pumpkin, then with Marigold: the center of the middle section and on sides of the external ones.
Right pumpkin:
Undercoat first with Antique White, then basecoat with Spiced Pumpkin (undercoating with Antique White makes it just easier, because Spiced Pumpkin is a transparent color and it doesn’t cover that much when you use it for base coating). Shade with Burnt Orange: at the bottom, to separate sections and on top of each section. Dry
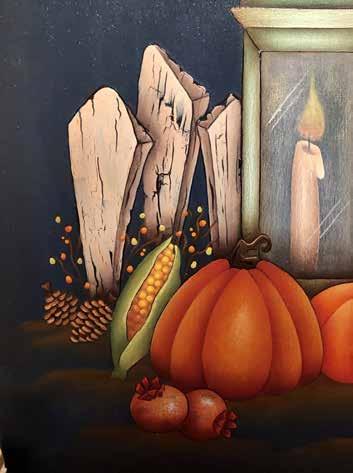
brush with Marigold, then with Primary Yellow: the center of the middle section and on sides of the external ones. Shade on small pumpkin to better separate it from the big one with Heritage Brick.
Stem (both pumpkins):
Basecoat with Burnt Umber. Shade the bottom with Soft Black. Highlight line with Honey Brown.
MUSHROOMS
Red sections: basecoat with a mix of Heritage Brick plus Country Red. Dry brush the center with Neons Fiery Red. Lightly shade on the sides with Black Plum.
Stalk and dots:
Basecoat with Antique White. Dry brush center of stalk and top of dots with Light Buttermilk. Shade all around stalk and bottom of dots with Burnt Umber. Deepen the shading (under red part and at the bottom of stalk) with Soft Black. Add wavy line with Light Buttermilk.
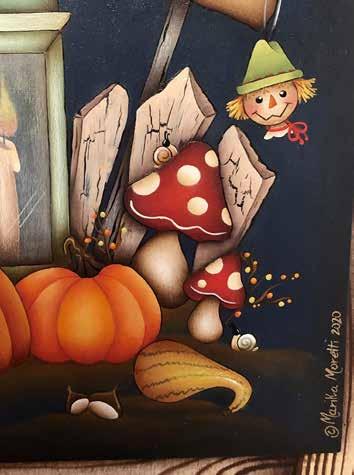
LITTLE SNAILS Body:
Antique White; head and antennae: Lamp Black with Light Buttermilk highlight dot
Shell:
True Ochre with Honey Brown curvy line (snail on mushroom) and Sea Glass with Thicket line (snail on the ground). Shade both at the bottom with Asphaltum or Burnt Umber, it doesn’t matter.
POMEGRANATES
Basecoat with True Ochre. When dry, add some dark touches by dry brushing with Burnt Umber. Add a wash of the entire area with Country Red. When dry, shade with Country Red, then deepen with Black Plum: pomegranate on the left - circular float (from 5 o’ clock to 10 o’ clock); pomegranate on the right - on left side and bottom. Dry brush on top right of each fruit with Marigold, then add highlight with Light Buttermilk. Transfer the “tips” with Country Red. Shade them with Black Plum and highlight with Neons Fiery Red lines.
YELLOW SQUASH
Basecoat with Marigold. When dry, add zig zag lines with Avocado. Shade all around and wider on left side with Burnt Sienna; dry brush in the center with Marigold. Add highlight line with Light Buttermilk. Stem is Burnt Umber, highlight line with Honey Brown.
CHESTNUTS Dark area:
Basecoat with Burnt Umber. Shade the bottom with Soft Black; highlight the top with Honey Brown.
White area:
Basecoat with Antique White. Shade the bottom with Burnt Umber; highlight the top with Light Buttermilk.
BERRIES AND BRANCHES:
Add thin branches with Burnt Umber using the liner brush. Highlight them with a thin line of Honey Brown. Add the berries with the colors you have your palette. You can also change them and make your own color combination! Otherwise, if you want them to look like mine, you need to use Avocado Dip and Primary Yellow (for the green ones); Burnt Orange and Spiced Pumpkin (for the orange ones).
MOON AND GROUND
Basecoat the moon first with Antique White, then with Marigold. Shade bottom (from 5 0’clock to 10 0’clock) with Burnt Sienna. Dry brush, then float highlights on the opposite side with Primary Yellow. Dry brush the foggy area with Burnt Sienna and Marigold. Dry brush, or float on the ground area, to make the main design set on the ground with Burnt Sienna or Honey Brown (either would work).
FRAME
Basecoat the frame with a mix of Antique White and Light Buttermilk. When it’s all dry, use the woodgrain to create the wood effect. You can actually use the colors that you want, I decided to use Burnt Umber because I wanted to keep a natural effect. Shade between the boards with Asphaltum. Glue the painted surface on the frame and shade around the painted surface with Traditional Burnt Umber + Soft Black, then only Soft Black.
FINISHING
I love antiquing my pieces!!! You don’t have to if you don’t like it, but I think antiquing gives a warmer touch to the whole project and makes it more uniform. I take a piece of old fabric (a piece of an old T-Shirt is perfect), take some linseed oil and touch it in some Burnt Umber oil paint. Then I start rubbing on the surface until I get the effect that I like. I hope you enjoyed painting this design with me! Have a wonderful Fall! Marika
Enlarge to fit the surface you choose.
Note to reproduction companies/stores: The bearer of the original color magazine has full rights to have this drawing reproduced and enlarged one time for personal use. This notice has been printed in red ink for verification of authenticity.
Your ad could be here!
Ads start at only $159.00 and reach about 3,000 print subscribers & thousands more on social media! Contact us at info@paintingworldmag.com to get started today!