
HYPERFIRE™ [ USER’S MANUAL Original User Manual Rev 101 6/23
CONTAINS FCC/IC ID: TV7LR2 THIS DEVICE COMPLIES WITH PART 15 OF THE FCC RULES.
Operation is subject to the following two conditions:
1. This device may not cause harmful interference, and,
2. This device must accept any interference received, including interference that may cause undesired operation.
To obtain EU Declaration of Conformity please contact infoEMEA@lionprotects.com
NOTE
Read and follow all instructions within the user manuals of any other optional equipment or accessories used in conjunction with the HYPERFIRE™
WARNING
There are no user serviceable parts inside the HYPERFIRE. Attempting to open the unit will void the warranty.
WARNING
Improper installation, adjustment, alteration, service or maintenance can cause injury or property damage.
Read the setup, operation and maintenance instructions thoroughly before installing or servicing this equipment. Failure to follow these instructions could result in property damage, personal injury, or death.
WWW.LIONPROTECTS.COM 1. HOW THE HYPERFIRE™ WORKS ........................................................................................ 2 2. FOR YOUR SAFETY............................................................................................................ 3 3. HYPERFIRE PARTS AND ACCESSORIES ............................................................................ 4 4. HYPERFIRE SPECIFICATIONS ........................................................................................... 5 5. PRODUCT INFORMATION .................................................................................................. 6 6. OPTIONAL ACCESSORIES ................................................................................................. 7 7. LION SERVICE ................................................................................................................... 8 8. OPERATING INSTRUCTIONS .............................................................................................. 8 8.1 INITIAL UNBOXING ......................................................................................................... 8 8.2 TRAINING LOCATION SELECTION 8 8.3 CONNECTING POWER TO THE HYPERFIRE ...................................................................... 8 8.4 ATTACK™ PANEL MOUNTING 8 8.5 CONNECTING POWER TO THE ATTACK PANELS .............................................................. 8 8.6 CONNECTING ATTACK POWER CABLES TO HYPERFIRE ................................................... 9 8.7 CONNECTING SG4000 SMOKE GENERATOR TO POWER 9 8.8 POWER ON HYPERFIRE AND SG4000 ............................................................................. 9 8.9 CONNECTING TO HYPERFIRE NETWORK 9 8.10 OPEN HYPERFIRE CONTROLLER IN WEB BROWSER ...................................................... 10 8.11 UPDATES .................................................................................................................... 10 8.12 CONFIGURE HYPERFIRE SCENARIO 11 8.13 GRID CONFIGURATION 11 8.14 ATTACK STATUS LED.................................................................................................... 15 9. CONTROLLING HYPERFIRE SIMULATION 16 9.1 TABLET CONTROL ....................................................................................................... 16 9.2 WI-FI INDUSTRIAL REMOTE ......................................................................................... 17 10. TRAINING WITH THE HYPERFIRE..................................................................................... 18 10.1 TRAINING EVOLUTION PREPARATION 18 10.2 CONDUCTING THE TRAINING EVOLUTION 18 11. TABLET CHARGING ......................................................................................................... 18 12. USING AN ATTACK IN STANDALONE MODE ..................................................................... 18 13. SHUT DOWN OPERATION ................................................................................................ 19 14. TRANSPORTATION INSTRUCTIONS ................................................................................. 19 15. WARRANTY INFORMATION ............................................................................................. 19 16. CONTACT INFORMATION................................................................................................. 21 SAVE THESE INSTRUCTIONS FOR FUTURE REFERENCE TABLE OF CONTENTS
1. HOW THE HYPERFIRE™ WORKS
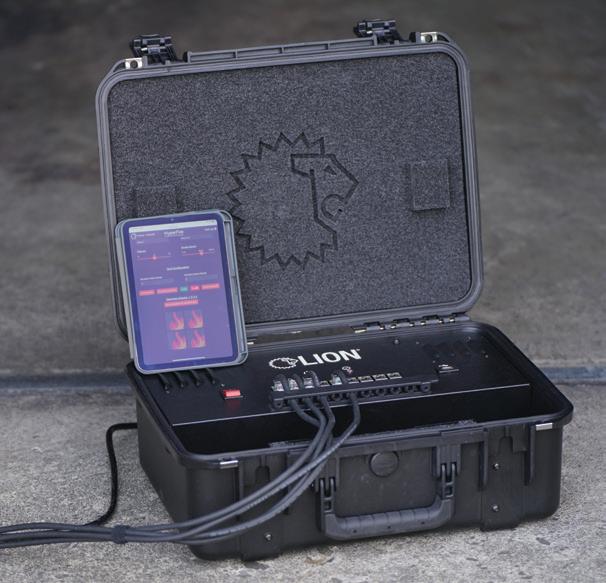
Congratulations on the purchase of your new HyperFire. This accessory for the ATTACK™ Digital Fire Training System enables users to connect up to nine (9) digital fire panels together to create a larger fire.
The plug-and-play design makes setup a breeze. Simply mount your ATTACK panels, plug the power cables into the HyperFire and move on to scenario configuration.
With an easy-to-use tablet-controlled interface, the trainer can create a custom scenario deciding how large the fire will be, the class of fire and difficulty level.
Once you start, the simulation fire will grow from the bottom panels and extend to the upper panels if not quickly addressed.
We hope the HyperFire helps you expand your Fire Training Program and ensure your trainees are always Ready For Action.
HYPERFIRE™ 2 WWW.LIONPROTECTS.COM
2. FOR YOUR SAFETY
1. The HyperFire™ is designed for firefighter training. Operators, trainees and observers involved in training or within proximity of training must wear proper PPE (personal protective equipment) in accordance with National Fire Protection Association (NFPA) and local fire training standards for live fire training.
2. Ensure the HyperFire is setup in a dry location and will not get wet during training.
3. The HyperFire power supply must be connected to a Ground Fault Circuit Interrupter (GFCI) outlet. Ensure that the power supply outlet and all other electrical equipment, including the Smoke Generator, air compressor, laser extinguishers and tablet controller do NOT come in contact with water or water mist spray.
4. Do NOT use this appliance within the vicinity of any other electrical devices or electrical outlets.
5. Do NOT connect a computer or other devices to the Ethernet ports on the HyperFire, they are powered and may damage your device.
6. Always use in accordance with all applicable local, state, and national codes.
7. Do not use this appliance without reading the entire User’s Manual and the user manual of any optional equipment.
8. Do NOT alter or modify this appliance in any manner.
9. Do NOT use in an explosive atmosphere. Keep the areas surrounding the appliance free and clear from combustible materials, gasoline and other flammable liquids.
10. Always use this appliance on a hard, level surface such as concrete or asphalt.
11. Do NOT use in inclement weather such as rain, hail, sleet, or snow. Keep sprinklers and other water sources away from the unit.
12. Do NOT attempt to disassemble, inspect, or adjust any hardware inside the unit; doing so will void your warranty, may damage your product, and could put you at risk of injury.
13. This appliance should be thoroughly inspected on a regular basis by trained personnel.
14. Do NOT use the HyperFire when the temperature is below 32°F (0°Celsius).
15. This product should not be used with any power source other than what has been provided. Use of other power sources is dangerous and will void the warranty.
16. When using, exercise the same precautions you would with any electrical device.
17. Death, serious injury, or damage to property may occur if the above is not followed exactly.
DISCLAIMER
Purchaser assumes all risk in the assembly and operation of this unit. Failure to follow this manual’s WARNINGS and instructions can result in severe personal injury, death, or property damage. LION is not responsible for any damage, death, or injury that may arise or result from misuse or improper use.
3 WWW.LIONPROTECTS.COM
WARNING
3. HYPERFIRE™ PARTS AND ACCESSORIES
NUMBER PART DESCRIPTION
1. HyperFire
2. HyperFire ATTACK™ Power Cables
3a. Tablet Controller for HyperFire (Optional)
3b. Handheld Wi-Fi Industrial Remote (Optional)
5. ATTACK Digital Fire Training System
6a. ATTACK Wall Mounts
6b. ATTACK Weighted Base with Refillable Water Tank
7. Smoke Generator 4000™ (Optional)
8. Waterproof Case − Smoke Generator, Wi-Fi enabled (Optional)
9. Digital Nozzle (Optional)
PARTS LIST
To order replacement parts, contact your distributor or LION.
HYPERFIRE™ 4 WWW.LIONPROTECTS.COM
4. HYPERFIRE™ SPECIFICATIONS
PHYSICAL SPECIFICATIONS
CONTROLLERS
Tablet Controller (Required) Can be purchased through LION or Customer Supplied
Handheld Wi-Fi Industrial Remote (Optional)
5 WWW.LIONPROTECTS.COM
HyperFire Dimensions 20"L x 15.75"W x 8"H (50.8 x 40 x 20.3 cm) HyperFire Weight 19.5 lbs. (8.85 kg) HyperFire ATTACK™ Power Cable Length 50 ft. each (15.24 m) HyperFire ATTACK Power Cable Weight 2 lbs. each (.91 kg)
Input 12A/115VAC Version 6A/230VAC Version
ELECTRICAL
5. PRODUCT INFORMATION
A HYPERFIRE™
The HyperFire is an accessory for the ATTACK™ Digital Fire Training System to enable users to connect up to 9 Digital Fire Panels together to create a larger fire. It is built into a rugged transport case for protection and easy maneuverability.
B HYPERFIRE ATTACK POWER CABLES
To connect your ATTACK Panels to the HyperFire there are specially designed power cables. You will not need to use your standard ATTACK Power cables that came with your panel. The HyperFire powers the panels through Power Over Ethernet (POE) so an Ethernet Connector is used in place of the factory power supply.
C USER MANUAL
D LIMITED ONE-YEAR WARRANTY
• See Section 15 for more details on the HyperFire warranty.
HYPERFIRE™ 6 WWW.LIONPROTECTS.COM
TABLET CONTROLLER SOLD SEPARATELY
6. OPTIONAL ACCESSORIES
A ATTACK™ TRANSPORT CASE
This black, industrial-grade high-impact plastic case can be used to conveniently transport the ATTACK panel. Locking latches provide safe and secure storage of the ATTACK when not in use.
B ATTACK WALL-MOUNTING BRACKET
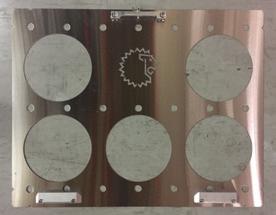
The mounting bracket allows you to mount your ATTACK on a floor, wall, or ceiling. The ATTACK quickly attaches and detaches from the mounting so the ATTACK can easily be moved from one location to another or so large arrays of panels can be set up quickly.
C WATERTIGHT SMOKE GENERATOR CASE WITH SMOKE GENERATOR 4000™
This rugged case acts as a watertight housing for the Smoke Generator 4000 and control electronics. The case has enough room to store the accompanying 50 ft. (15 m) power cord with GFCI protector along with the 50 ft. (15 m) Ethernet cord going to the panel. The on-board control electronics allow the ATTACK to automatically control the Smoke Generator during a simulation. The Smoke Generator can be stored and transported in the case.
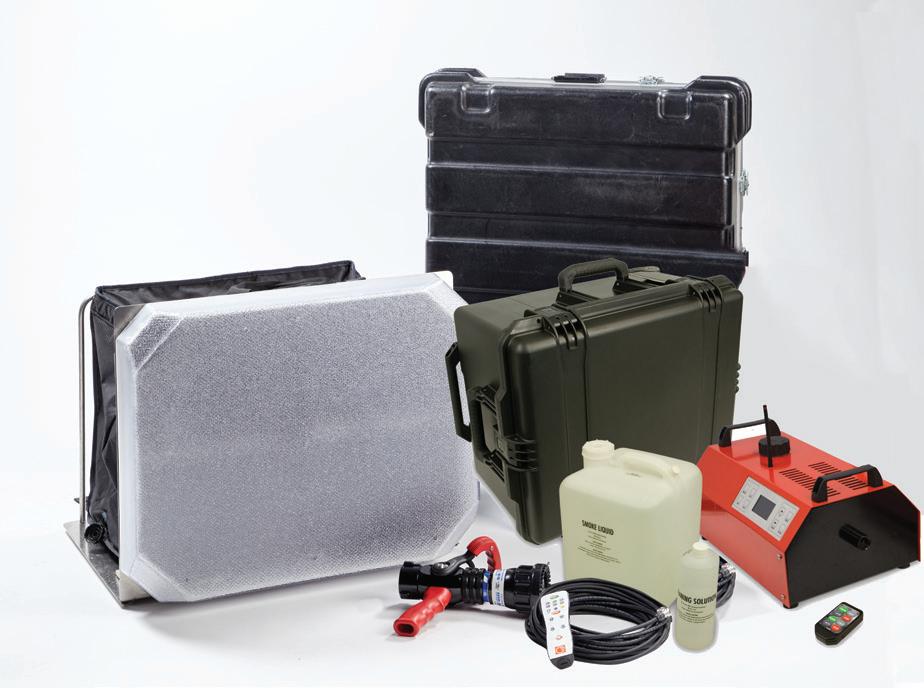
D HANDHELD WATERPROOF WI-FI INDUSTRIAL REMOTE
This rugged waterproof handheld remote allows the trainer to have full control over the ATTACK evolution. The remote uses Wi-Fi to communicate with the ATTACK so the simulation can be started without line of sight to the panel. The remote can be clipped to turnout gear or clothing for easy access and convenience.
7 WWW.LIONPROTECTS.COM
A B C D
7. LION SERVICE
The training product service team is comprised of four distinct groups that collaborate to provide technical support, repair services, and delivery training to our customers. Whether you need help by phone, factory service, onsite service, or delivery training, LION has you covered.
Please see page 21 for contact details.
8. OPERATING INSTRUCTIONS
8.1 INITIAL UNBOXING
Unpack all parts, removing any packaging materials. Inspect the product and accessories. Contact LION or an authorized dealer immediately to report any concerns.
8.2 TRAINING LOCATION SELECTION
Setup HyperFire™ in a location where it will not get wet. Position within 50 feet (15.2 m) of your ATTACK™ panels.
8.3 CONNECTING POWER TO THE HYPERFIRE
Locate HyperFire power cable and attach it to the back of the unit. There is a small cover over the inlet that needs to be lifted to gain access. Plug the other end of the power cable into the wall outlet.
8.4 ATTACK PANEL MOUNTING
Once you have determined the size and shape of your array, secure ATTACK wall mounts to the wall (or) setup Weighted Base and fill with water.
8.5 CONNECTING POWER TO THE ATTACK PANELS
Connect the power cable to the back of the ATTACK. Align the triangle features on the connector and the plug. The power cord will always run towards the bottom of the panel when connected. Push the connector into the plug. There is no need to twist the collar on the plug. You will hear a click when the connector latches onto the plug correctly.
HYPERFIRE™ 8 WWW.LIONPROTECTS.COM
8.6 CONNECTING ATTACK POWER CABLES TO HYPERFIRE™
The ATTACK(s) can be connected to any of the 9 ports on the HyperFire; they will be arranged into position with the configuration software. The strain relief bar mounted near the ports can be used for cable management and to reduce the risk of accidentally pulling out a cable during use. Lift bar from right, insert power cables and close.
8.7 CONNECTING SG4000 SMOKE GENERATOR TO POWER
If you will be training with smoke, connect the SG4000 in Wi-Fi Transport case connect it to a power source.
8.8 POWER ON HYPERFIRE AND SG4000
Turn on the HyperFire and SG4000. Each product has a red toggle switch for power.
8.9 CONNECTING TO HYPERFIRE NETWORK
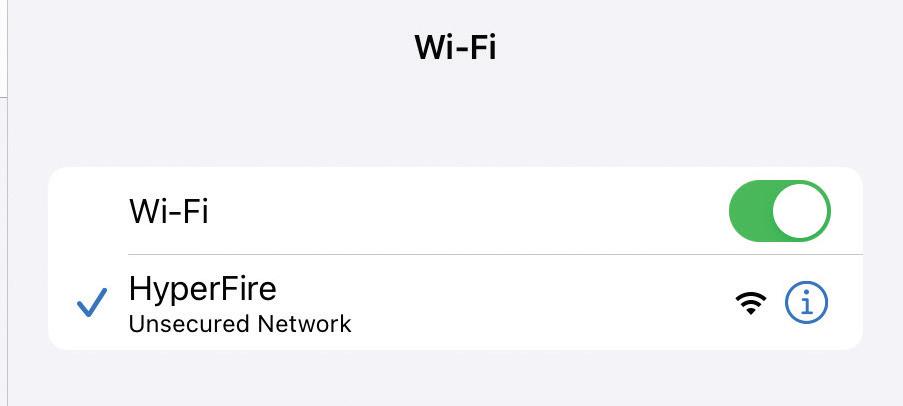
Using the provided tablet or any compatible device, connect to the HyperFire Wi-Fi network.
9 WWW.LIONPROTECTS.COM
HYPERFIRE WI-FI NETWORK
8.10 OPEN HYPERFIRE™ CONTROLLER IN WEB BROWSER
If you purchase the tablet through LION, a shortcut link will be on your home screen. If you are using your own device, open a web browser and type HyperFire.local into the address bar.
8.11 UPDATES
If prompted with available updates for ATTACKS or SG4000, check all boxes and press yes.
Existing ATTACK™ 2.0 panels will need to be updated to work with your new HyperFire system. The HyperFire can update your Attacks automatically; just connect your ATTACK 2.0 panel to the HyperFire and connect your wireless device to the HyperFire network as described above.
Once connected and all props have booted, load the configuration interface and any panels in need of an update will be shown. Follow the on-screen instructions to complete the update, and your Attacks and accessories are ready to use with the HyperFire.

HYPERFIRE™ 10 WWW.LIONPROTECTS.COM
8.12 CONFIGURE HYPERFIRE™ SCENARIO
1. Fire class for scenario
• When adjusting the setting, an indicator bar will appear on the screen. The indicator bar will fill as the level is increased. The options are Class A, B, C.
2. Extinguishing Mode
• This is the water extinguishing mode that will be used to extinguish the fire. The options are Water Can and Hose Line.
3. Difficulty
• The difficulty can be set using the slider on a scale of zero to ten. Five is the default difficulty.
4. Smoke Density
• The Smoke level can be adjusted from 0% to 100%. This setting is only visible when there is a smoke generator present.
11 WWW.LIONPROTECTS.COM
1 3 2 4
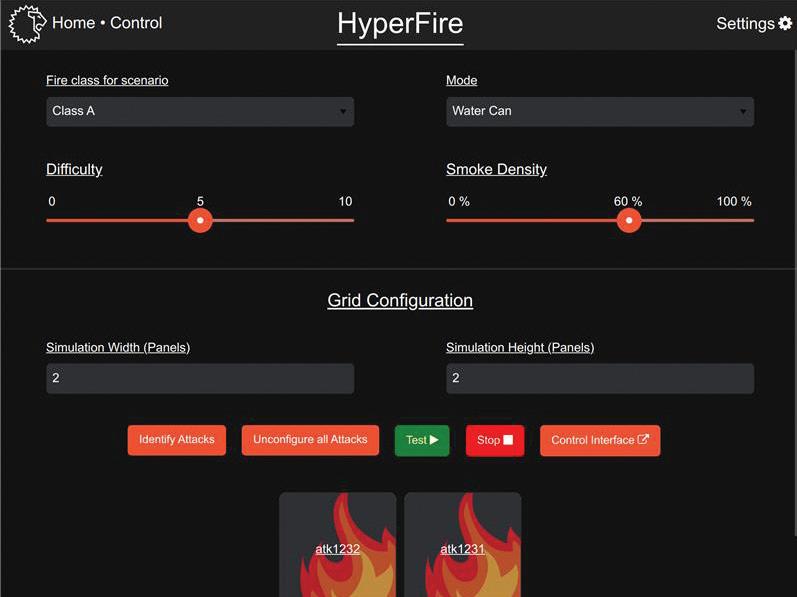
8.13 GRID CONFIGURATION
1. Simulation Width (Panels)
• This field is where you enter the width of the grid in number of panels.
2. Simulation Height (Panels)
• This field is where you enter the height of the grid in number of panels.
3. Identify Attacks
• This button will display the IDs on the Attacks.
4. Unconfigure all Attacks
• This button will unconfigure the grid and leave the grid in an unconfigured state. It is not necessary to unconfigure the grid before starting the configuration, as the new one will be saved over the existing configuration upon saving.
5. Test
• This button will start the simulation so that it can be confirmed the configuration is correct.
6. Stop
• This button will stop the simulation.
7. Control Interface
• This button will bring the user to the primary control interface page.
HYPERFIRE™ 12 WWW.LIONPROTECTS.COM
2 1 5 4 3 7 6
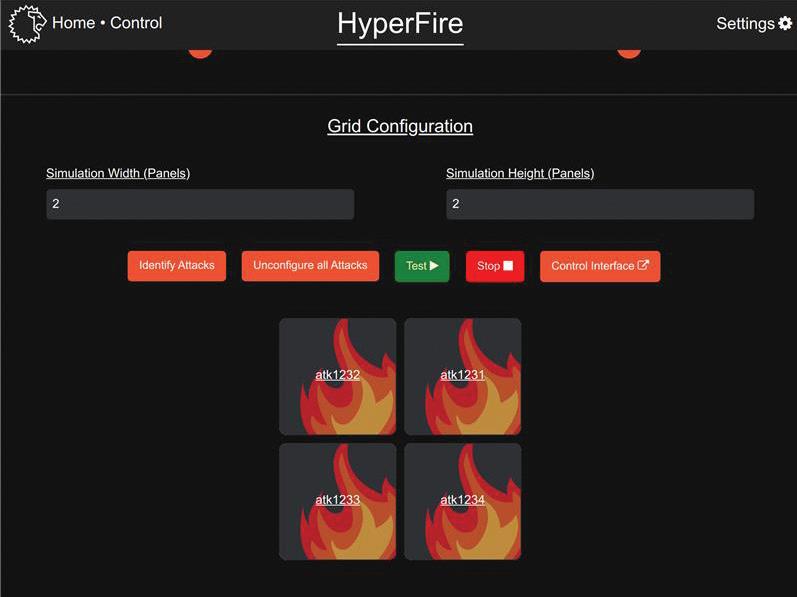
To arrange the HyperFire™ grid, push Identify Attacks button, each Attack is assigned an identification number (ID) that shows on the physical ATTACK™ panel. This ID can then be used on the user interface to arrange the grid. When Attacks are detected, the user interface will display the IDs of those Attacks in a section with the text “Detected Attacks.”
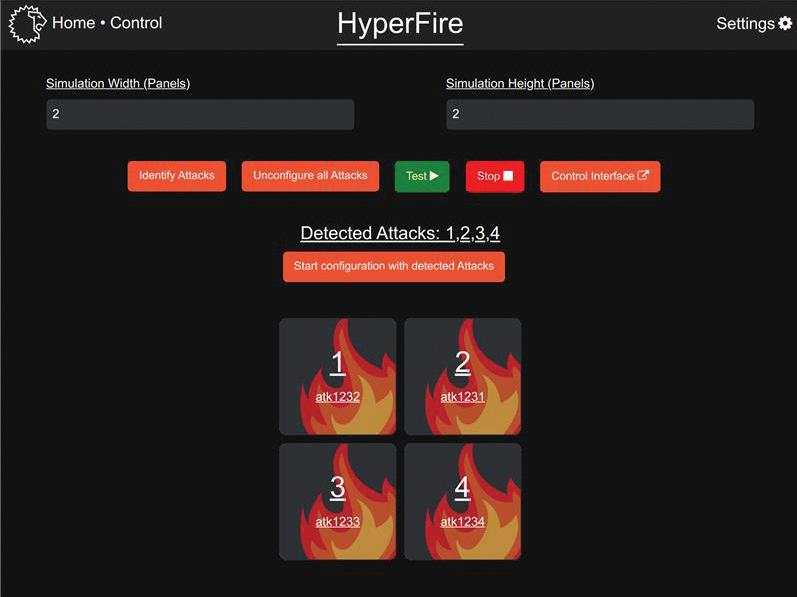
When this is present, there will also be a button labeled “Start configuration with detected Attacks.”
This button will bring up a short explanation with the following text “To configure the HyperFire, select the position in the grid for the currently displayed Attack. You may also skip the Attack if you don’t wish to include it.”
13 WWW.LIONPROTECTS.COM
Upon starting the configuration process, a section will appear with the following components:
1. Select Location for N (where N is the ID of the first Attack)
• This is the Attack for which the user is currently selecting a position.
2. Save Configuration
• Save the configuration and complete the process. This button is only available when all spots of the grid have been populated.
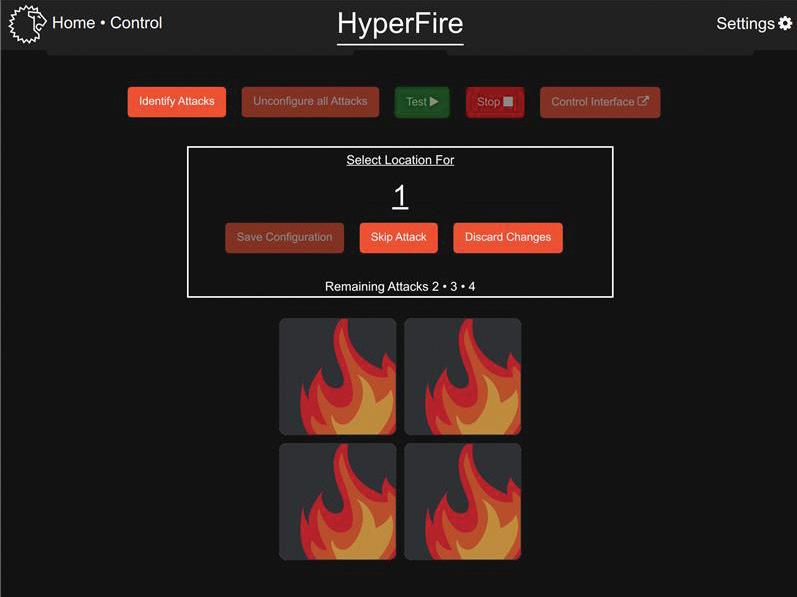
3. Skip Attack
• Skip the current Attack and move on to the next one. The skipped Attack will still be available to select a position for and will be put to the end of the list.
4. Discard Changes
• This aborts the configuration of the grid and returns the configuration to the state it was in before the process was started.
5. Remaining Attacks
• These are the IDs for the Attacks that remain to be configured.
HYPERFIRE™ 14 WWW.LIONPROTECTS.COM
1 2 5 4 3
Once the configuration process is begun, tap on the grid location where the current Attack’s ID is on the physical grid. For example, when the user interface is displaying “Select location for 1,” reference the physical grid to see where the 1 is, and then tap the corresponding location on the user interface.
If a mistake is made selecting a location, subsequent Attacks can be placed upon a location where there already exists an ID. This will overwrite the existing ID and return it to the remaining Attacks section to be placed.
When there are no remaining Attacks to be configured, select the Save Configuration button. Prior to doing so you will also have the option to Discard Changes.
8.14 ATTACK™ 2.0 STATUS LED
Once your scenario is configured and saved, any Attack(s) that are active for the given scenario will display a Green LED on the panel. Below is a chart which shows other colors you may encounter and what they indicate.
LED COLOR DESCRIPTION
Off ATTACK powered off Red ATTACK powered on, not ready to use Yellow ATTACK powered on and connected to HyperFire™, but not configured in simulation
Green ATTACK powered on and ready to use Blue ATTACK powered on and updating
15 WWW.LIONPROTECTS.COM
9. CONTROLLING HYPERFIRE™ SIMULATION
9.1 TABLET CONTROL
The HyperFire Control interface allows you to easily control the evolution of a simulation from your tablet or compatible device.
The Control Page has the following components:
1. Return to Configuration Page
• This returns the user to the configuration page for the HyperFire.
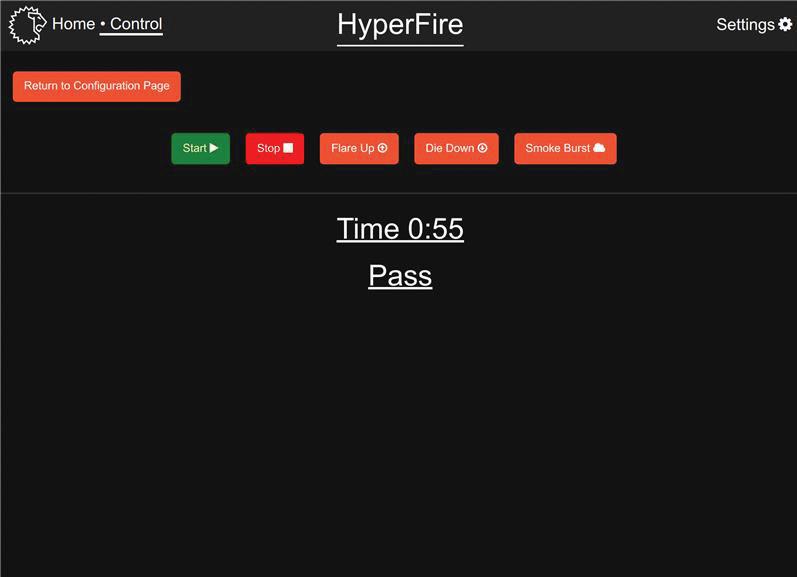
2. Start
• Starts the HyperFire simulation.
3. Stop
• Stops the simulation.
4. Flare Up
• Causes the simulation to grow to its maximum size.
5. Die Down
• Causes the simulation to gradually die down.
6. Smoke Burst
• This button displays when there is a connected smoke generator and will cause that smoke generator to create a burst of smoke.
7. Time
• Displays the amount of time the simulation has been running for.
8. Pass/Fail
• Displays whether the user has extinguished the fire (pass) or if the simulation was stopped (fail).
HYPERFIRE™ 16 WWW.LIONPROTECTS.COM
1 2 6 5 4 3 8 7
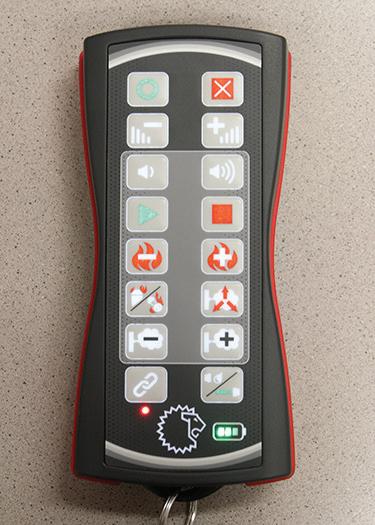
9.2 WI-FI INDUSTRIAL REMOTE
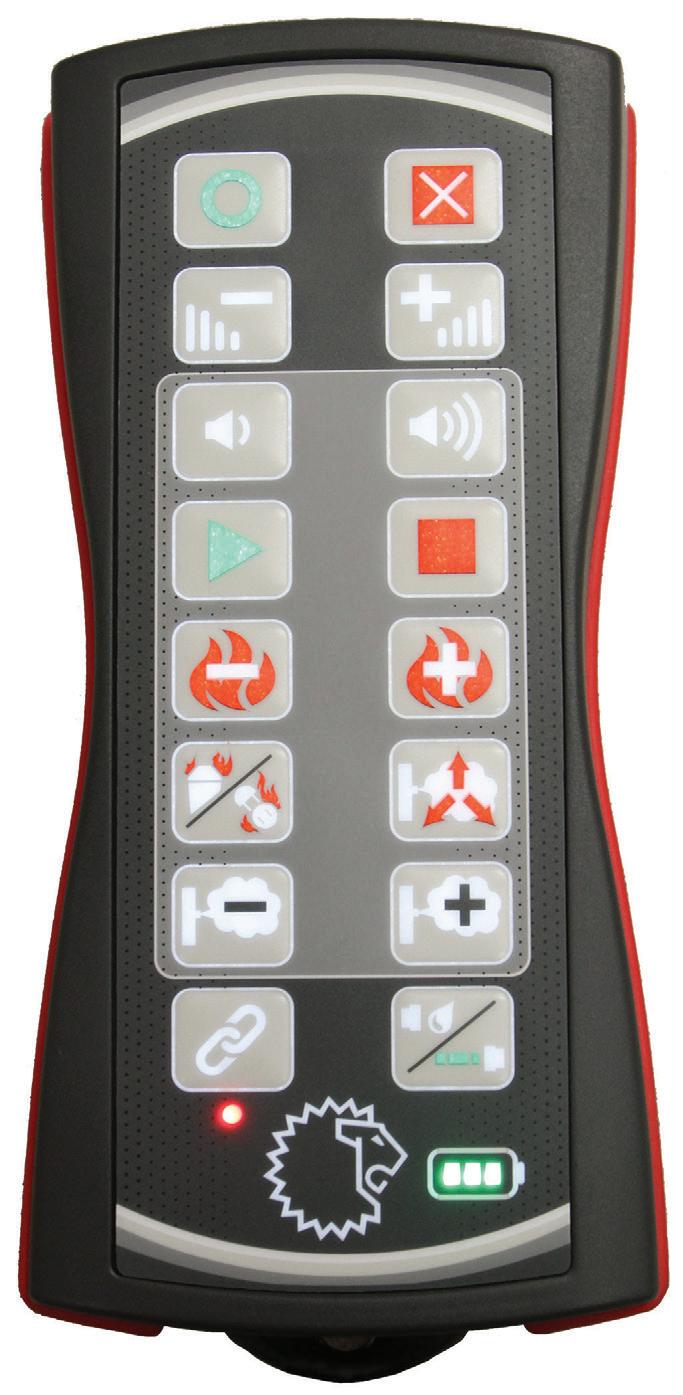
ON: press for half second
Decrease difficulty
Decrease volume
Start evolution
Diminish fire
Change fire class
Decrease smoke
Link: press and hold until vibrator and backlight pulse
Link indicator:
Red = no link to panel Green = linked to panel
OFF: press and hold until the Industrial Remote vibrates
Increase
difficulty
Increase volume
Stop evolution
Flare up fire
Smoke Burst
Increase smoke
Change panel mode (e.g. hand line, watercan)
Batter y level indicator
17 WWW.LIONPROTECTS.COM
10. TRAINING WITH HYPERFIRE™
10.1 TRAINING EVOLUTION PREPARATION
1. Ensure that the HyperFire is set up per previous instructions.
2. Select your Fire Class, Mode, Difficulty, and Smoke Density (if applicable).
3. Begin Grid Configuration as outlined previous sections.
4. Once you are satisfied, Save Configuration.
5. Test can be used to ensure you are satisfied with configuration.
6. If you will be using the tablet controller, navigate to Control Interface.
7. Do a final check of your training environment.
8. Ensure that the trainees are prepared to begin.
10.2 CONDUCTING THE TRAINING EVOLUTION
1. Press START on your selected controller.
2. Allow the fire to develop.
3. As the fire develops it will spread to configured panels.
4. If the proper technique is used to suppress the fire it will go out.
5. The instructor can also manually stop the fire by pushing STOP on the controller.
11. TABLET CHARGING
Keep your tablet charged and ready for your next training by utilizing the built-in USB port on the HyperFire.
12. USING AN ATTACK™ IN STANDALONE MODE
In order to use an ATTACK panel in standalone mode, simply disconnect the primary panel from the HyperFire™ and power it with a standalone power supply. When an ATTACK is disconnected from the HyperFire, it behaves like a standard factory panel.
HYPERFIRE™ 18 WWW.LIONPROTECTS.COM
13. SHUT DOWN OPERATION
1. To shut down the HyperFire™ when running, press the STOP button on the tablet controller or wireless remote.
2. Toggle the red power button on the HyperFire to the off position.
3. Unplug the power supply from the wall.
4. Unplug any ATTACK Power cords from the unit.
14. TRANSPORATION INSTRUCTIONS
The HyperFire is ready for transport after the steps of the “Shut Down Operation” have been performed.
When transporting the HyperFire, the following procedures should be followed:
1. HyperFire lid should be closed and latched.
2. Additional accessories should be gathered and secured.
3. The HyperFire and all accessories should be packed into a cardboard box to ensure adequate cusion to prevent damage.
15. WARRANTY INFORMATION
All parts such as stainless steel sheet-metal components and controls are covered, and LION will provide replacement parts free of charge during the warranty period. Labor related to warranty repair is covered free of charge during the warranty period. Repair work, however, requires the prior approval of an authorized company official. Labor costs to the account of LION are based on a predetermined rate schedule and any repair work must be done through an authorized LION dealer. This warranty covers labor and parts related defects. This warranty does not cover neglect, accidents, misuse, or negligence on the operator’s part.
19 WWW.LIONPROTECTS.COM
CONDITIONS AND LIMITATIONS
LION warranties its products against manufacturing defects to the original purchaser only − i.e., the individual or legal entity (registered customer) whose name appears on invoice for the HyperFire™, provided that the purchase was made through LION or an authorized LION dealer and is subject to the following conditions and limitations:
This factory warranty is nontransferable and may not be extended whatsoever by any of our representatives.
Assembly and use must be done in accordance with the instructions included with the product and all local and national fire codes.
This Limited Warranty does not cover any damage caused by misuse, lack of maintenance, hostile environments, accident, alterations, abuse, or neglect. Parts installed by other manufacturers will void the warranty.
This Limited Warranty does not cover scratches, dents, damage to the panel, cracked or broken screens, or corrosion. Abrasive and chemical cleaners will also damage the appliance. In the first year, this warranty extends to the repair or replacement of warranted parts which are defective in material or workmanship provided that the product has been operated in accordance with the operation instructions and under normal conditions.
After the first year, LION will not be responsible for replacement part expense, installation, labor or any other costs or expenses related to the reinstallation of a replacement part, and such expenses are not covered by this warranty.
Notwithstanding any provisions contained in this Limited Warranty, LION’s responsibility under this warranty is defined as above and it shall not in any event extend to any incidental, consequential or indirect damages.
This warranty defines the obligations and liability of LION with respect to the LION electronic appliance and any other warranties expressed or implied with respect to this product.
This limited warranty does not cover damages resulting from the use of components not supplied with the appliance.
Any damages to appliance due to weather, long periods of exposure to dampness, condensation, damaging chemicals or cleaners will not be the responsibility of LION.
The original bill of sale or copy will be required together with a serial number and a model number when making any warranty claims from LION or authorized dealer.
LION reserves the right to have its representative inspect any product or part thereof prior to honoring any warranty claim.
LION or its representatives shall not be liable for ANY transportation charges, labor charges or duties.
HYPERFIRE™ 20 WWW.LIONPROTECTS.COM
16. CONTACT INFORMATION
LION
North America | South America
7200 Poe Avenue, Suite 400
Dayton, OH 45414, U.S.A.
info@lionprotects.com
800-421-2926 (PPE)
888-428-5539 (Training)
Europe | Middle East | Asia
Rheastraat 14
5047 TL Tilburg, The Netherlands
infoEMEA@lionprotects.com
0031-13-507-6800
21 WWW.LIONPROTECTS.COM
WWW.LIONPROTECTS.COM [ Manufactured in the USA © LION Group, Inc. All rights reserved.
