Set Up Ad Builder

Page 1


Set Up Ad Builder

Overview

Follow these steps to enable families and businesses the to create an ad for the Yearbook. This is a wonderful way to celebrate a child's achievements, share a special message, or promote a business while supporting the school.

Set Up an Ad Option

The adviser can set up all the details (price, templates and ad type) for an ad within Sales Tracker.

Set Up Pricing

1. From the Menu, hover over Sales Tracker and select Set Up Pricing.

2. Scroll down to the Set Up Ads section and click on Edit Ads

3. The Edit Ads page opens. Here you will have multiple options to complete.

a. Select the Purchase by Date-you can type in or click on the calendar to select the specific date ads need to be purchased by.

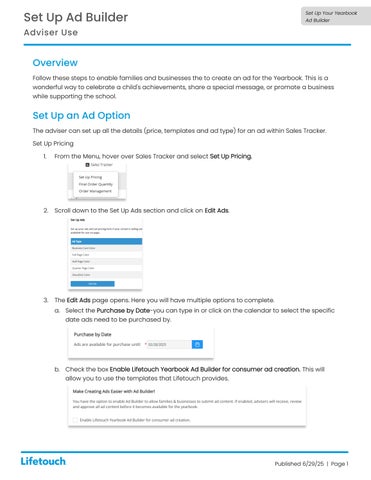
b. Check the box Enable Lifetouch Yearbook Ad Builder for consumer ad creation. This will allow you to use the templates that Lifetouch provides.

The Submission Date field does not display until the Enable Ad Builder checkbox is checked.

c. Select the Submission Date-you can type in or click on the calendar to select the specific date ad needs to be submitted by.

Have this date before your Yearbook due date. This will allow time for you (adviser) to review and approve the ads.

d. Under the Select Ads check the box (s) on the type of ad that will be offered in the Yearbook to purchase.

e. There are 5 type of ads that can be offered.

1. Business Card Color

2. Full Page Color

3. Half Page Color

4. Quarter Page Color

5. Shoutout Color

Each ad option activates so you can enter in each ad’s details and select the appropriate templates.

4. Enter the price in the Consumer Price field. This amount is determined by the school and what is charged to families and business.

5. Enter the number of ads that are going to be available to purchase in Ads available for purchase.

The Ads purchased will be show how many ads have been bought by families/businesses. .

6. Check or uncheck the template to include and make available for use. By default, all templates are checked/unchecked.

a. Repeat steps 4-6 for each additional ad type you want to offer.

When a family or business purchases an ad from YBPay (and Ad Builder is enabled), they will automatically receive an email inviting them to create the ad within Ad Builder. For more information and the steps on setting up YBPay, see the Set Up Pricing Section of the Sales Tracker Help Topic.

If you (the adviser) enter a cash/check order in Sales Tracker, be sure to include a family or

business email address in the Consumer Email field to trigger the Ad Builder email. For more information and the steps on entering a check or cash order, see the Order Management section of the Sales Tracker Help Topic.

View an Ad

1. On the Yearbook dashboard page, go to Manage Assets

2. Click on Manage Ads. This will bring you to the main page for ads.

3. Under the Review Ads section you (adviser) will be able to see who has submitted an ad, create an ad, resend link or view the ad.

a. You can click on the options under actions or the blue button Review in Ad Builder to review the information entered for the ad.

4. Click View under the actions section to open the ad.

a. Ad will open and no action can be done

Edit an Ad

1. On the Yearbook dashboard page, go to Manage Assets.

2. Click on Manage Ads section.

3. Click on the specific ad that you want to open by selecting an option under the Review Ads section.

4. If the ad has not been approved, you will be able to click the Edit function on the ad.

5. Make any necessary changes.

6. Click Save

a. If ad is ready to be approved, click on the green button Approve.

7. No further action is needed. Ad is ready to be placed in Yearbook.

Approving an Ad(s)

1. On the Yearbook dashboard page, go to Manage Assets.

2. Click on Manage Ads section.

3. Review the Status section for InProgress and Submitted.

a. For Inprogress click on the Edit option under Actions to determine what necessary changes need to be made.

b. For Submitted click on the Review option under Actions to determine what necessary changes to be made.

i. If changes need to be made,

4. Under Actions click on the appropriate action based on the status.

5. Review ad to determine if any changes needed to be made.

a. If changes need to be made, click on the pencil icon to make text edits.

b. Missing a picture click the + sign to upload a picture.

c. Click Unsubmit to make the ad editable. This will allow you to make any necessary changes prior to approving the ad.

i. The family or business will receive an email with your feedback.

Apply an Ad to a Yearbook Page

1. On the Yearbook Dashboard page, hover over Book Builder and select Ladder Diagram

a. The Ladder Diagram screen displays all pages of the yearbook based on your contract and the background border based on theme you select. By default, the Ladder Diagram mode displays.

2. Click on the page where you would like the ad to appear.

3. Page Builder opens with the page that was selected.

4. Click My Images on the left-hand side

5. Click to expand the My Ads – [Ad size] category.

a. The category type is expanded and all approved ads display.

Any ad that has a green check is already placed on a yearbook page.

6. Drag and drop the desired ad over to the canvas.

a. The ad appears in the size as it was purchased.

b. You can make size adjustments as necessary to fit to the specific area that you would like the ad to be on.

i. When modifying the size slightly you can use the image handles to make the necessary adjustment.

7. Click Save. This change will save your work completed on the specific page.

a. The ad image is now checked to show that the ad has been placed on a page.

Turn static files into dynamic content formats.

Create a flipbook
Issuu converts static files into: digital portfolios, online yearbooks, online catalogs, digital photo albums and more. Sign up and create your flipbook.