

Welcome to ProgrammingHomeworkHelp.com! In this Assignment Sample, we will walk you through a sample programming assignment for university students, demonstrating how our services can assist you in excelling in your coursework.
Inventing The Wheel
•Graphics Setup
•Basic Graphics Application
•Animating the Wheel
Graphics Setup
Step-by-Step Instructions
Download graphics.py from the course materials. Run the module to ensure proper setup. Access documentation for further reference.
1.Graphics setup
• Download the graphics.py file from the Materials section of the course webpage. Make sure to save it in the directory you’ll be doing your work in.
• Run the module as if it were a Python program (open it in IDLE and run it). If everything was done correctly you will get a demo window with a triangle and some text. GET AN LA’S HELP if this doesn’t work right on your machine!
• Documentation on the graphics module is on the handout given in class, and also on the Materials section of the course webpage.
2.Basic Graphics Application
Here is a skeleton of a new graphics program: from graphics import * #add any functions or classes you might define here # create a window with width = 700 and height = 500 new_win = GraphWin(’Program Name’, 700, 500)
Download the file wheel.py from the Materials section of the course webpage (it is exactly the same as what you saw in class today). Run it and make sure that a wheel appears in a pop-up window.
Now let’s try to add an animate method that would move the wheel across the screen. We will make use of the move method in the wheel class that moves the object dx units in the x direction and dy units in the y direction. Here is what the animate method will look like: from graphics import *
class Wheel: def animate(self, win, dx, dy, n): if n > 0: self.move(dx, win.after(100,dy)self.animate, win, dx, dy, n-1)
The animate method has 4 parameters - a GraphWin object win, the units by which to move the object in the x and y directions, dx and dy, and the number of times to call the animate method, n. The animation will stop when n = 0. The interesting part here is the after method of the GraphWin object. The first parameter is the time in milliseconds after which the GraphWin object will call the animate method again.
The second parameter is the function object the GraphWin object needs to call; in our case it is the animate method of the Wheel object. As we mentioned in class, in Python everything is an object - even functions/methods and they can be passed as parameters to other functions/methods. The rest of the parameters are the new parameters to the animate method. Note that we decrement n by 1 every time we setup a new call to animate.
Now, write a program that uses the updated Wheel class and create a Wheel object (you can pick the colors1 of the tire and wheel to be anything you want) and make it move the wheel across the screen by 1 unit in the x direction 100 times. Remember you first need to draw the wheel before you can move it.
1. Drawing Rectangles
To display a rectangle, you need to specify two points: the upper left corner and the bottom right corner. Remember our y-axis is flipped.
Make a file car.py and try the code below:
from graphics import *
new_win = GraphWin("A Car", 300, 300)
rect = Rectangle( Point( 10,10), Point(200, 100 ) ) rect.setFill( "blue" ) rect.draw( new_win ) new_win.mainloop()
Run your program and make sure that the rectangle appears on the screen.
Try changing the color and width of the outline of the rectange. Look at the setOutline and setWidth methods.
2. Drawing the car
In this exercise, we will create a class for a car that will use the Wheel class from exercise 1. To do that, include the line from wheel import * directly underneath the line from graphics import *. Be sure that wheel.py and car.py are saved in the same directory; this will enable you to use your definition of Wheel from 4.1 instead of redefining it. Ask an LA if you’re confused about this.
The car will contain 3 attributes: two Wheel objects and one Rectangle object (the body of the car) that is horizontal and whose bottom corners correspond to the centers of the wheels. Below is an example on how to use the Car object. Try to figure out how the class Car should be defined based on the way it is used. new_win = GraphWin(’A Car’, 700,
300) # create a car object
# 1st wheel centered at 50,50 with radius 15 # 2nd wheel centered at 100,50 with radius 15 # rectangle with a height of 40
car1 = Car(Point(50, 50), 15, Point(100,50), 15, 40) car1.draw( new_win )
# color the wheels grey with black tires, and the body pink car1.set_color(’black’, ’grey’, ’pink’ )
# make the car move on the screen car1.animate(new_win, 1, 0, 400) new_win.mainloop()
The size of the wheel is given only by the radius of the tire circle. You can compute the radius of the wheel circle as a percentage of the radius of the tire circle, e.g. 60%.
This exercise should be done after you’ve completed the written exercises. You may want to wait until after Thursday’s lecture to start.
Tetris is deemed by some to be the most popular video game of all time. It is a puzzle game developed by Alexey Pajitnov in 1984 while he was working at the Academy of Science of the former USSR in Moscow. There have been hundreds of variants of the game developed since.
We are going to create our own version of the basic Tetris game for the final project. The goal of this exercise is to get familiar with the game and to create the shapes (also called tetrominoes) used in the game. Just remember you need to stop playing at some point :
Each of the tetrominoes has 4 blocks; a block is a rectangle (more specifically, a square). Notice some relationships here - ’Has’ signifies containment, or an attribute, while ’is’ signifies inheritance. Here is an example of the basic tetrominoes:

The tetris board is typically 10x20 squares, where a square has a width of 30 pixels. Each block occupies a single square at a time. For this problem, we’ll think of the board not in terms of pixels but in terms of squares - so we’ll pass in Points in terms of square position, and your methods should convert these into pixels for display purposes.
Create a new Block class that inherits from the Rectangle class and save it in a file called tetrominoes.py. It should have x and y attributes that correspond to the position of the block on the tetris board, in terms of squares, not pixels. The position (0,0) is the top left corner of the board, and (9, 19) is the bottom right corner.
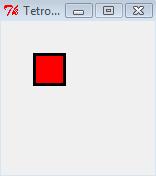
Here is how you can use the block: win = GraphWin("Tetrominoes", 150, 150)
# the block is drawn at position (1, 1) on the board block = Block(Point(1, 1), ’red’) # the init method for your block should deal with converting # the Point into pixels block.draw(win) win.mainloop() and what it will look like on a 5x5 board:
Create a Shape class that has a list of blocks as an attribute, and a draw method.
Once you have your Shape class made, add in this code for the I shape class, a subclass of the Shape class.
class I_shape(Shape):
def init (self, center): coords = [Point(center.x - 2, center.y),
Point(center.x - 1, center.y),
Point(center.x , center.y),
Point(center.x + 1, center.y)] Shape. init (self, coords, "blue")
The parameter center is a Point that holds the position of the central block in the shape. Verify that your code displays the I shape correctly. Here is an example test:
win = GraphWin("Tetrominoes", 200, 150) shape = I_shape(Point(3, 1)) shape.draw(win)
win.mainloop()
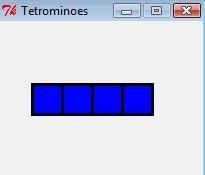
In the code above, the third block of the I shape is drawn at position (3, 1).
Now create subclasses for each of the other 6 shapes. One thing you need to know is, for each shape, which block is the center block. Here are all the shapes with their center block marked in black.

Here is example code for displaying all the shapes above (of course, all your blocks should be the same color- the black blocks are only to represent the ‘center’ block for each shape):
win = GraphWin("Tetrominoes", 900, 150) # a list of shape classes tetrominoes = [I_shape, J_shape, L_shape, O_shape, S_shape, T_shape, Z_shape] x = 3 for tetromino in tetrominoes: shape = tetromino(Point(x, 1)) shape.draw(win) x += 4
win.mainloop()
Ensure you have graphics.py in your working directory and run it to check if it displays the demo window correctly.
Create a basic graphics application with a window of width 700 and height 500: from graphics import *
# Create a window with width = 700 and height = 500 new_win = GraphWin('Program Name', 700, 500)
# Add your code below this point new_win.mainloop() from graphics import *
# Create a window with width = 700 and height = 500 new_win = GraphWin('Program Name', 700, 500)
# Add your code below this point new_win.mainloop()
Download wheel.py and ensure it displays a wheel. Now, we will add an animate method to move the wheel.
First, here’s the Wheel class with the animate method: from graphics import *
class Wheel:
def __init__(self, center, tire_radius, wheel_radius):
self.center = center
self.tire_radius = tire_radius
self.wheel_radius = wheel_radius
self.tire_circle = Circle(center, tire_radius)
self.wheel_circle = Circle(center, wheel_radius)
def draw(self, win):
self.tire_circle.draw(win)
self.wheel_circle.draw(win)
def move(self, dx, dy):
self.tire_circle.move(dx, dy)
self.wheel_circle.move(dx, dy)
def animate(self, win, dx, dy, n): if n > 0: self.move(dx, dy) win.after(100, self.animate, win, dx, dy, n-1)
To animate the wheel across the screen:
# Create a window new_win = GraphWin('Animate Wheel', 700, 500)
# Create and draw the wheel wheel = Wheel(Point(50, 250), 20, 12) wheel.draw(new_win)
# Animate the wheel wheel.animate(new_win, 1, 0, 100) new_win.mainloop()
# Create a window
new_win = GraphWin('Animate Wheel', 700, 500)
# Create and draw the wheel wheel = Wheel(Point(50, 250), 20, 12) wheel.draw(new_win)
# Animate the wheel wheel.animate(new_win, 1, 0, 100)
new_win.mainloop()
1. Drawing Rectangles
Draw a rectangle and modify its appearance: from graphics import *
new_win = GraphWin("A Car", 300, 300)
rect = Rectangle(Point(10, 10), Point(200, 100)) rect.setFill("blue")
rect.setOutline("black")
rect.setWidth(3)
rect.draw(new_win)
new_win.mainloop()
Create a Car class using the Wheel class: from graphics import * from wheel import * class Car:
def __init__(self, wheel1_center, wheel1_radius, wheel2_center, wheel2_radius, body_height):
self.wheel1 = Wheel(wheel1_center, wheel1_radius * 1.6, wheel1_radius)
self.wheel2 = Wheel(wheel2_center, wheel2_radius * 1.6, wheel2_radius)
self.body = Rectangle(
Point(wheel1_center.x - wheel1_radius, wheel1_center.y - body_height),
Point(wheel2_center.x + wheel2_radius, wheel2_center.y) )
def draw(self, win):
self.wheel1.draw(win)
self.wheel2.draw(win)
self.body.draw(win)
def set_color(self, tire_color, wheel_color, body_color):
self.wheel1.tire_circle.setFill(tire_color)
self.wheel1.wheel_circle.setFill(wheel_color)
self.wheel2.tire_circle.setFill(tire_color)
self.wheel2.wheel_circle.setFill(wheel_color)
self.body.setFill(body_color)
def move(self, dx, dy):
self.wheel1.move(dx, dy)
self.wheel2.move(dx, dy)
self.body.move(dx, dy)
def animate(self, win, dx, dy, n): if n > 0:
self.move(dx, dy)
win.after(100, self.animate, win, dx, dy, n-1)
# Create a window
new_win = GraphWin('A Car', 700, 300)
# Create and draw the car car1 = Car(Point(50, 50), 15, Point(100, 50), 15, 40) car1.draw(new_win)
# Set colors car1.set_color('black', 'grey', 'pink')
# Animate the car car1.animate(new_win, 1, 0, 400) new_win.mainloop()
4.3.1 – Blocks
Create the Block class: from graphics import *
class Block(Rectangle):
def __init__(self, position, color):
p1 = Point(position.x * 30, position.y * 30)
p2 = Point(p1.x + 30, p1.y + 30)
super().__init__(p1, p2)
self.setFill(color)
# Test the Block class
win = GraphWin("Tetrominoes", 150, 150)
block = Block(Point(1, 1), 'red')
block.draw(win)
win.mainloop()
4.3.2 – Tetromino
Create the Shape class and the I_shape subclass:
class Shape:
def __init__(self, blocks, color): self.blocks = [Block(b, color) for b in blocks]
def draw(self, win): for block in self.blocks: block.draw(win) class I_shape(Shape): def __init__(self, center): coords = [Point(center.x - 2, center.y), Point(center.x - 1, center.y), Point(center.x, center.y), Point(center.x + 1, center.y)] super().__init__(coords, "blue")
# Test the I_shape class win = GraphWin("Tetrominoes", 200, 150) shape = I_shape(Point(3, 1)) shape.draw(win) win.mainloop()
4.3.3
Create subclasses for all Tetromino shapes and display them:
class J_shape(Shape):
def __init__(self, center):
coords = [Point(center.x - 1, center.y), Point(center.x, center.y), Point(center.x + 1, center.y), Point(center.x + 1, center.y + 1)]
super().__init__(coords, "orange")
class L_shape(Shape):
def __init__(self, center):
coords = [Point(center.x - 1, center.y), Point(center.x, center.y), Point(center.x + 1, center.y), Point(center.x - 1, center.y + 1)]
super().__init__(coords, "cyan")
class O_shape(Shape):
def __init__(self, center):
coords = [Point(center.x, center.y), Point(center.x + 1, center.y), Point(center.x, center.y + 1), Point(center.x + 1, center.y + 1)]
super().__init__(coords, "yellow")
class S_shape(Shape):
def __init__(self, center):
coords = [Point(center.x - 1, center.y + 1), Point(center.x, center.y + 1),
Point(center.x, center.y), Point(center.x + 1, center.y)]
super().__init__(coords, "green")
class T_shape(Shape):
def __init__(self, center):
coords = [Point(center.x - 1, center.y), Point(center.x, center.y), Point(center.x + 1, center.y), Point(center.x, center.y + 1)]
super().__init__(coords, "purple")
class Z_shape(Shape):
def __init__(self, center):
coords = [Point(center.x - 1, center.y), Point(center.x, center.y), Point(center.x, center.y + 1), Point(center.x + 1, center.y + 1)]
super().__init__(coords, "red")
# Display all tetromino shapes win = GraphWin("Tetrominoes", 900, 150)
tetrominoes = [I_shape, J_shape, L_shape, O_shape, S_shape, T_shape, Z_shape] x = 3 for tetromino in tetrominoes:
shape = tetromino(Point(x, 1))
shape.draw(win)
x += 4
win.mainloop()