COMMAND


Revised January 2024
QUICK START GUIDE
What is Command? Getting Started in Command Command Integrations
Complete Your Marketing Profile
Customize Your Command Homepage
Table of Contents
Use Map to Find Referral Partners Send a Referral Referral Get Started with Contacts What is a Complete Contact? Add an Activity or Interaction to Lead/Contact Contacts What is Campaigns? Get Started with Paid Ads Connect Your Facebook Account for Paid Ads Campaigns Create Tasks View and Manage Tasks Tasks Set or Edit Your Goals Reports
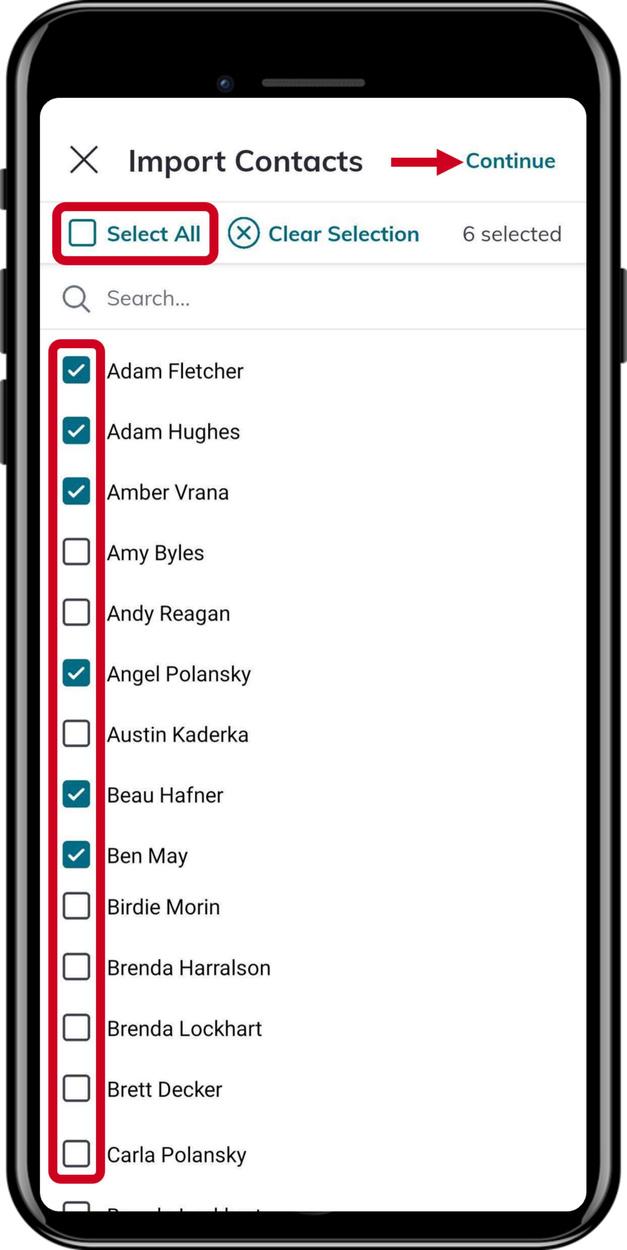
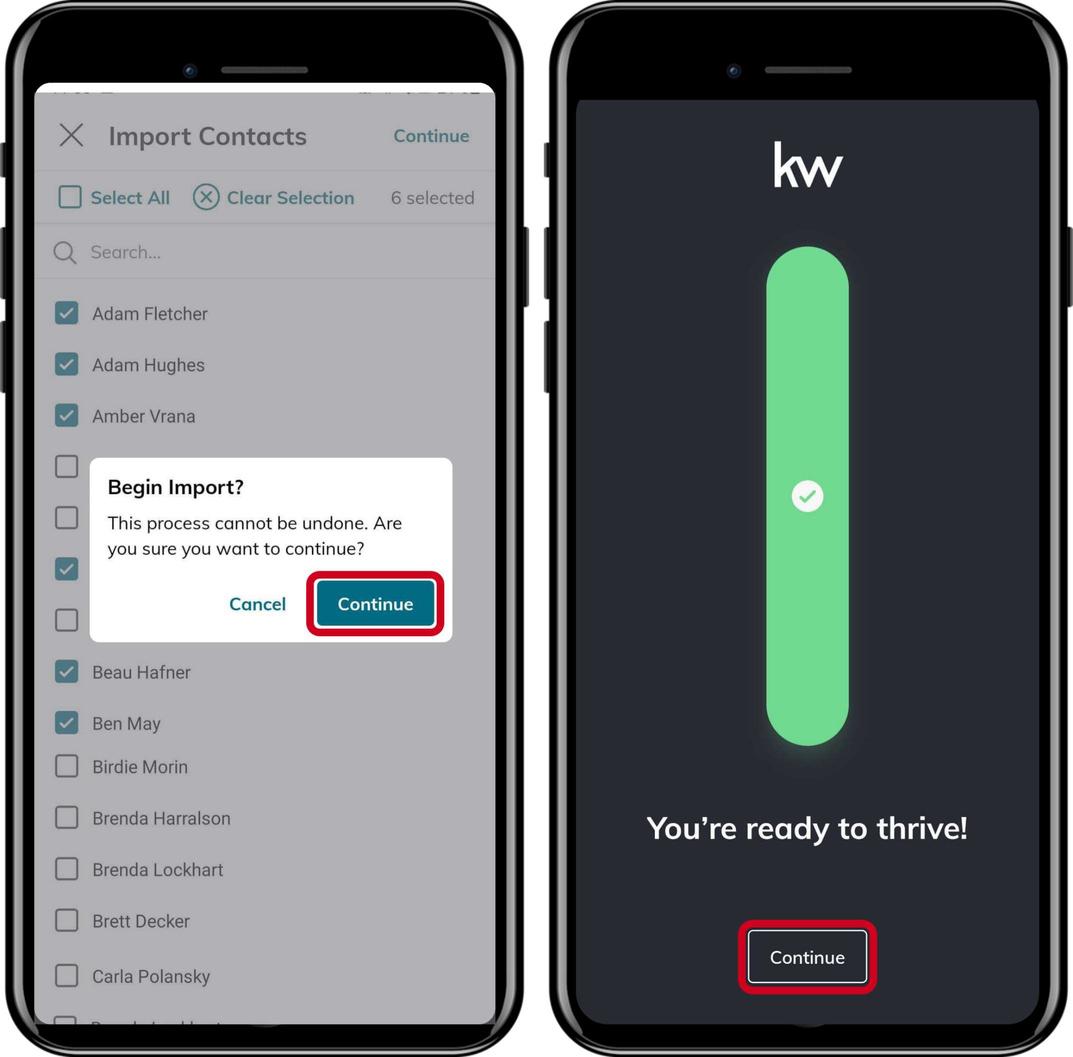
Import Phone Contacts into Command Introduction Best Practices for SmartPlans
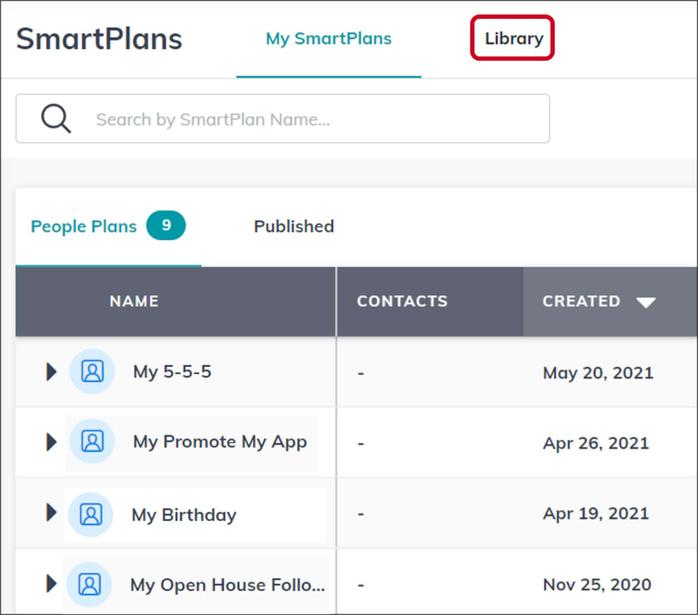
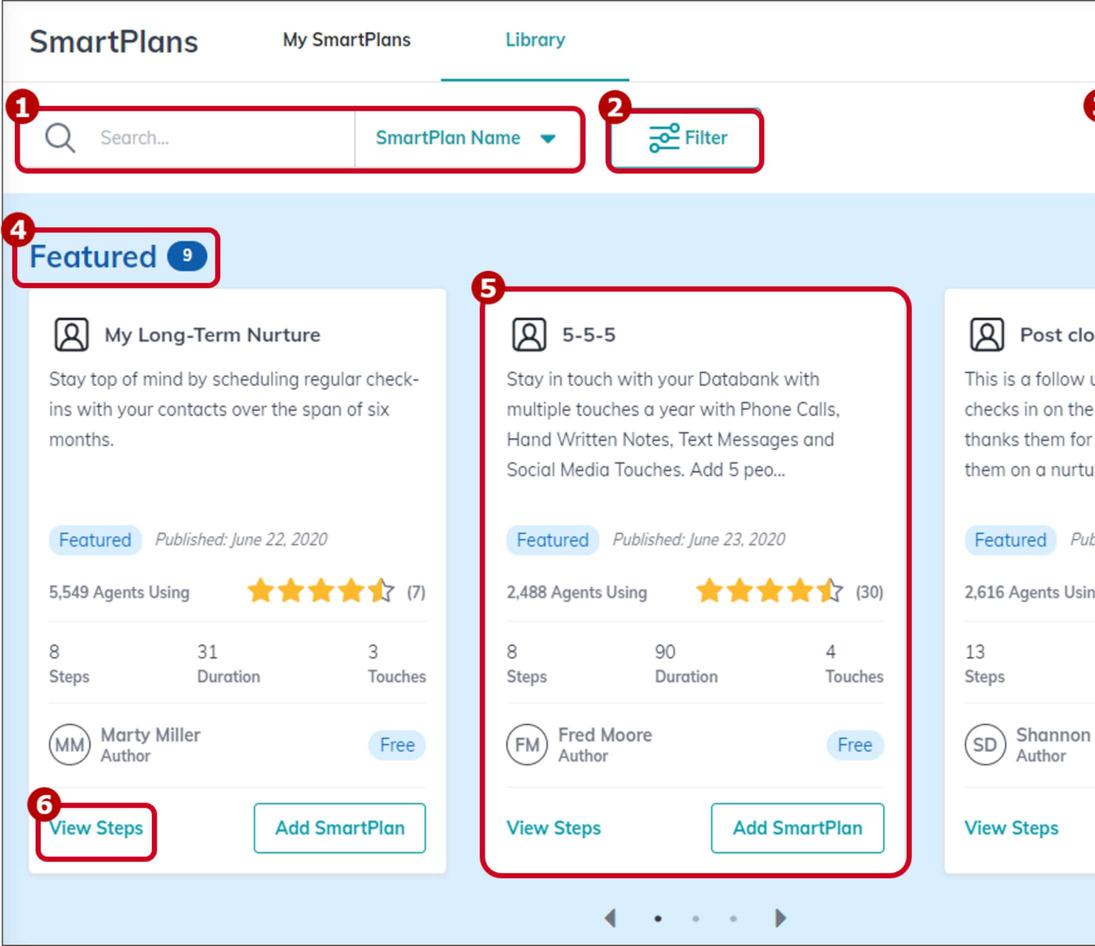
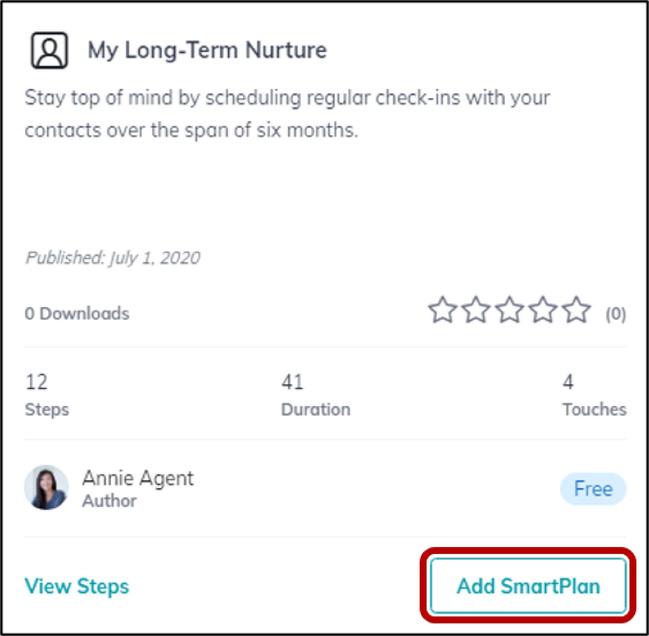
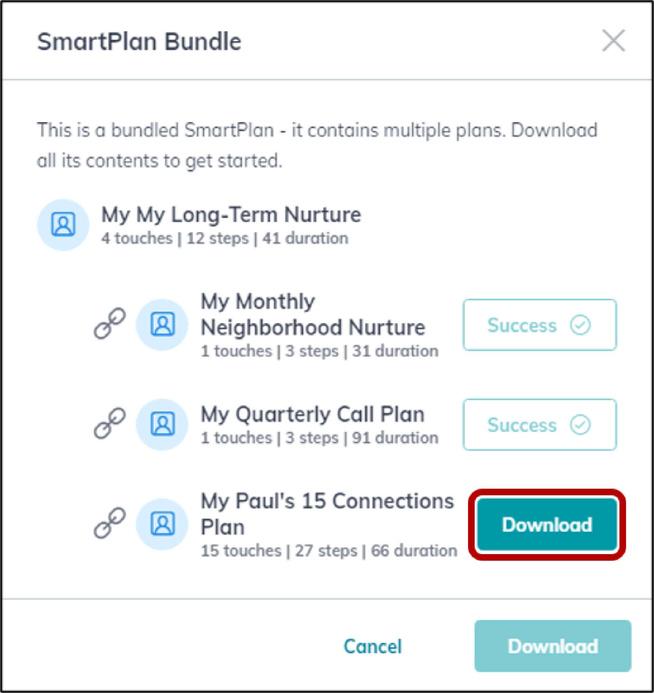
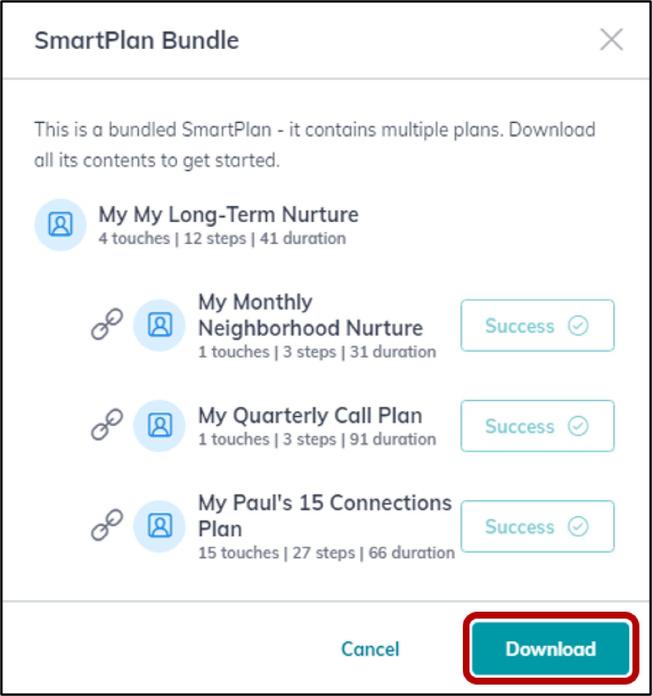
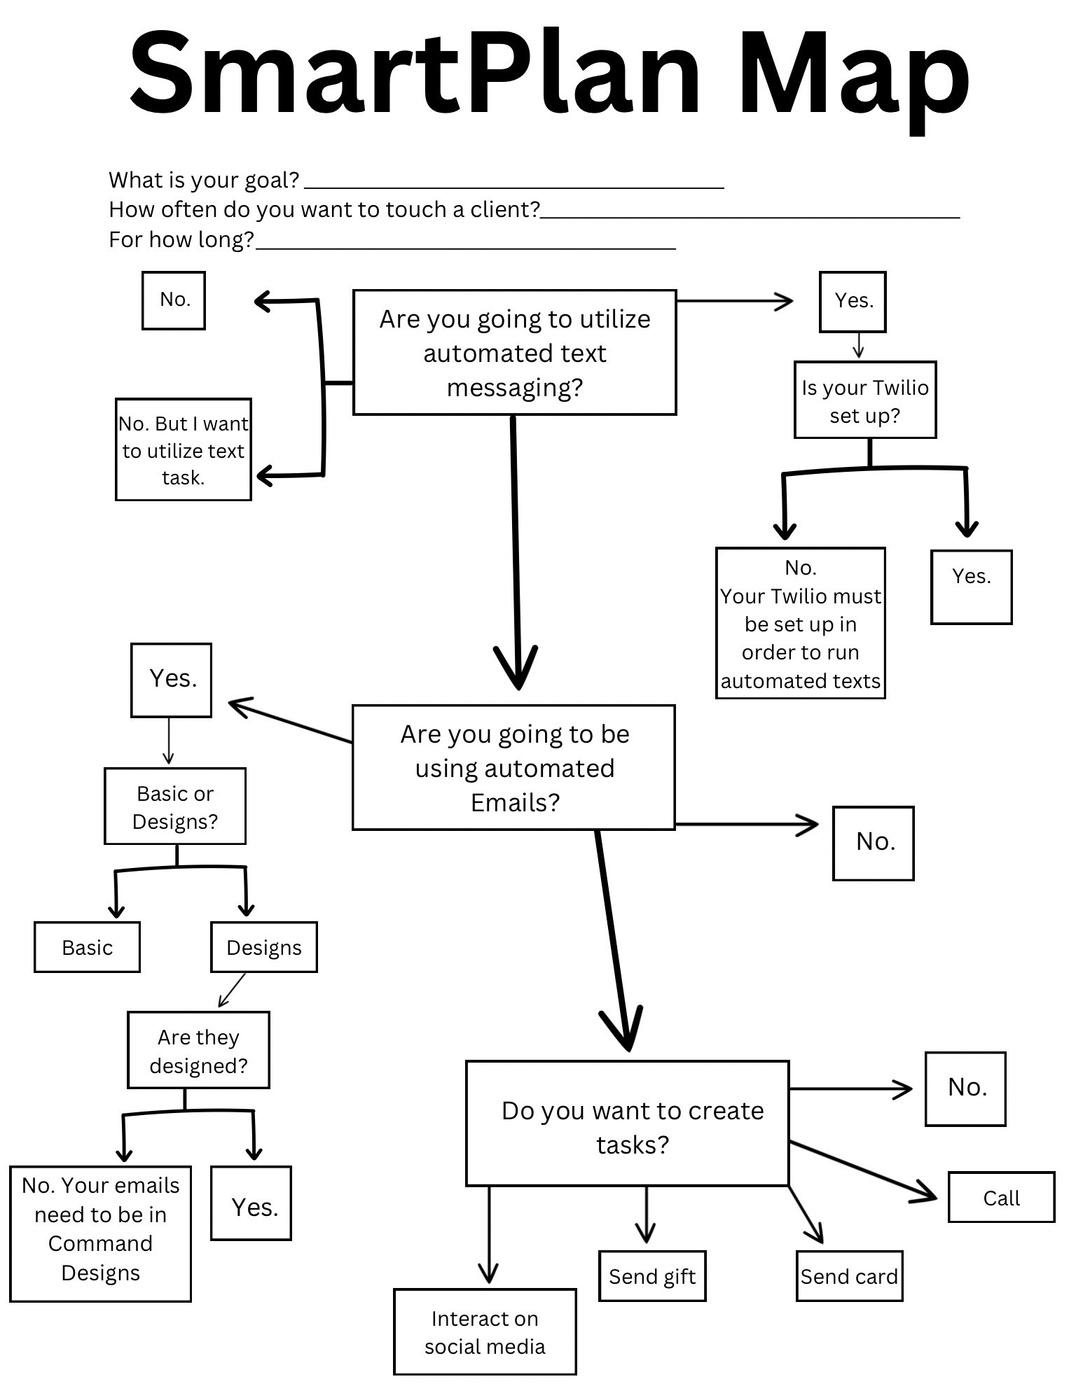
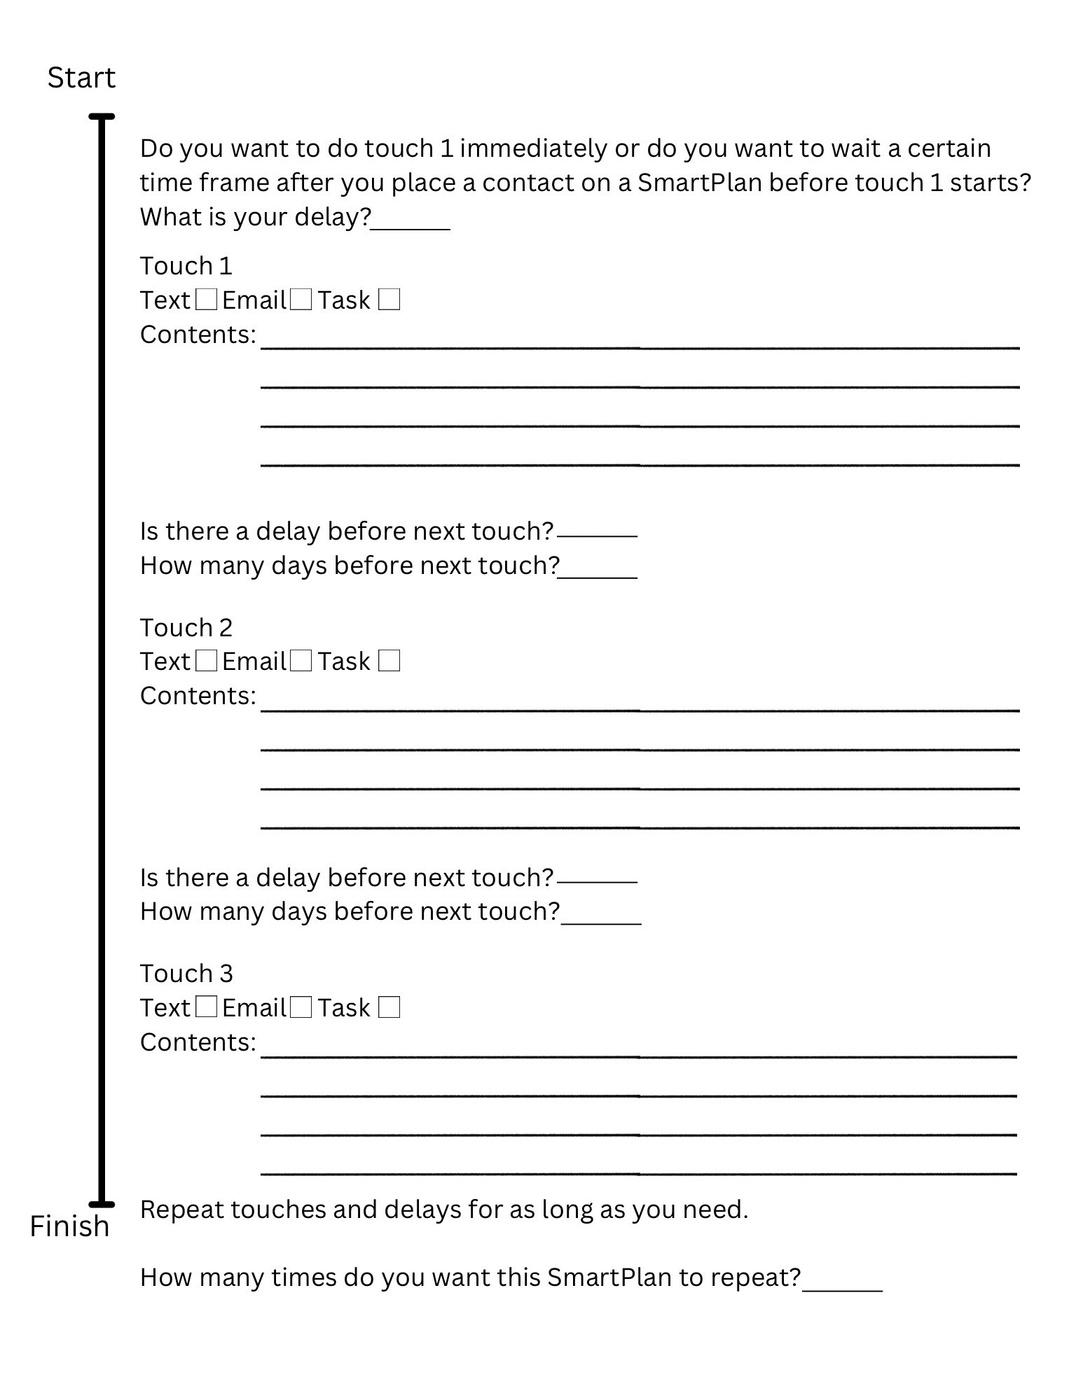
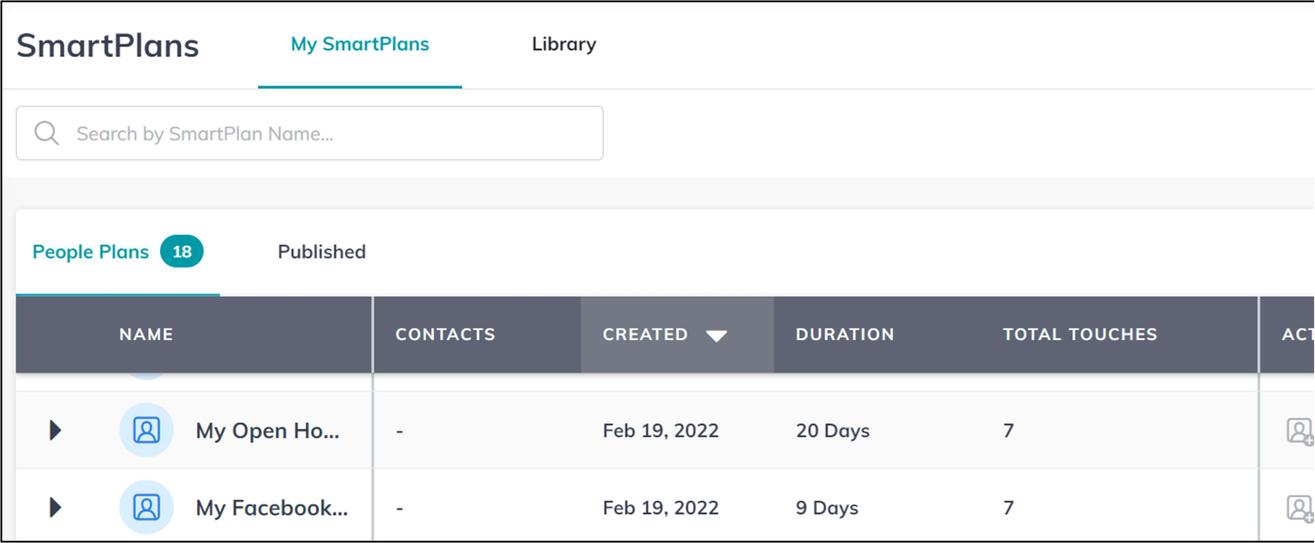
Add a SmartPlan from the Library SmartPlan Map: Plan Your SmartPlan Create a Custom SmartPlan Set Time Zone in Command Add Contact to SmartPlan from within Contact Add Contacts to a SmartPlan SmartPlans Create Opportunity and Loop How to Submit Offers and Commissions Required Documents Opportunities
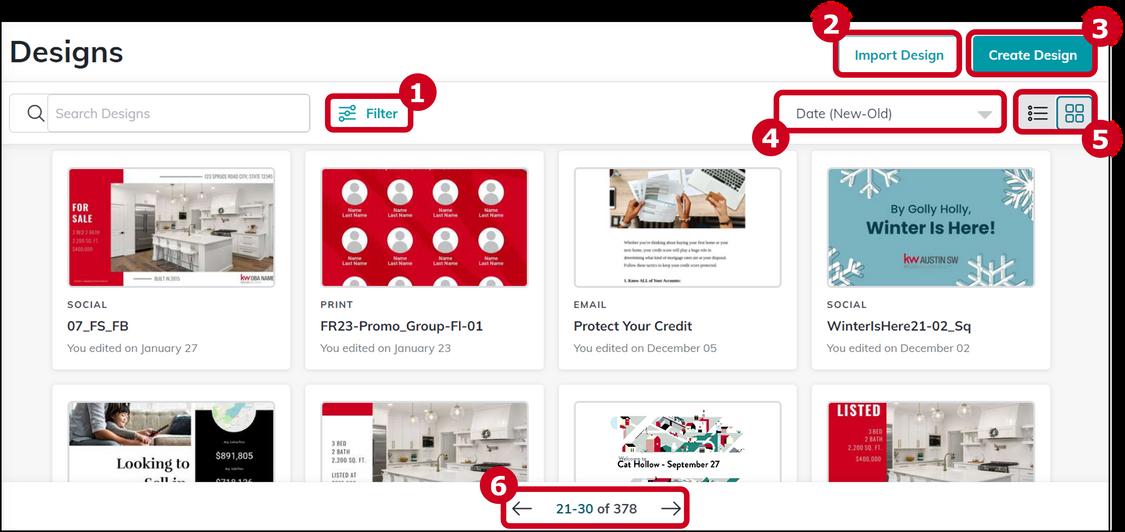
Get Started in Designs
MLS
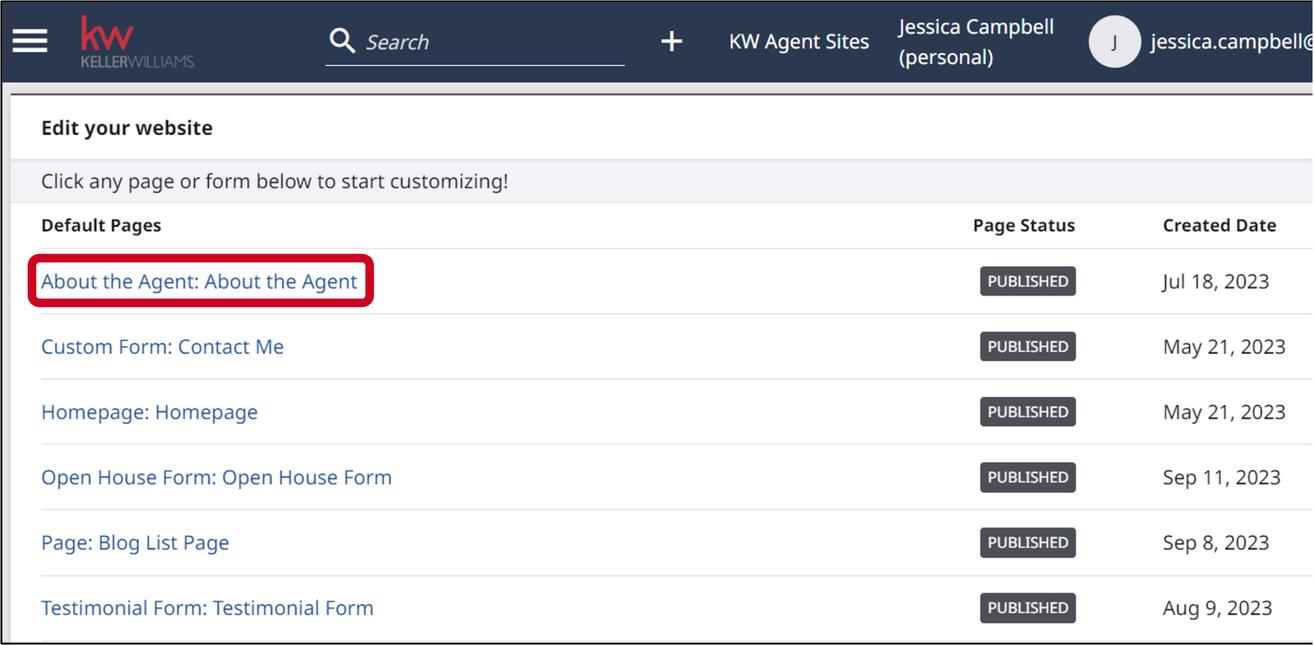
Default Pages
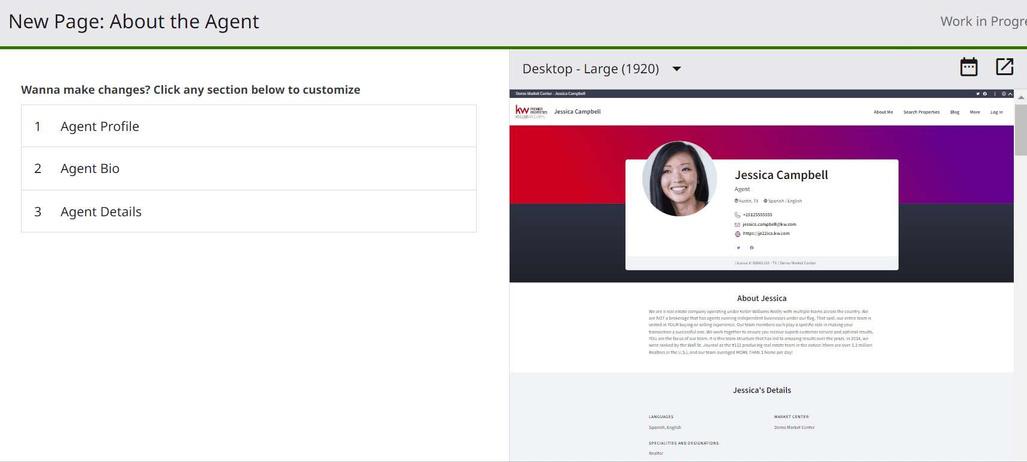
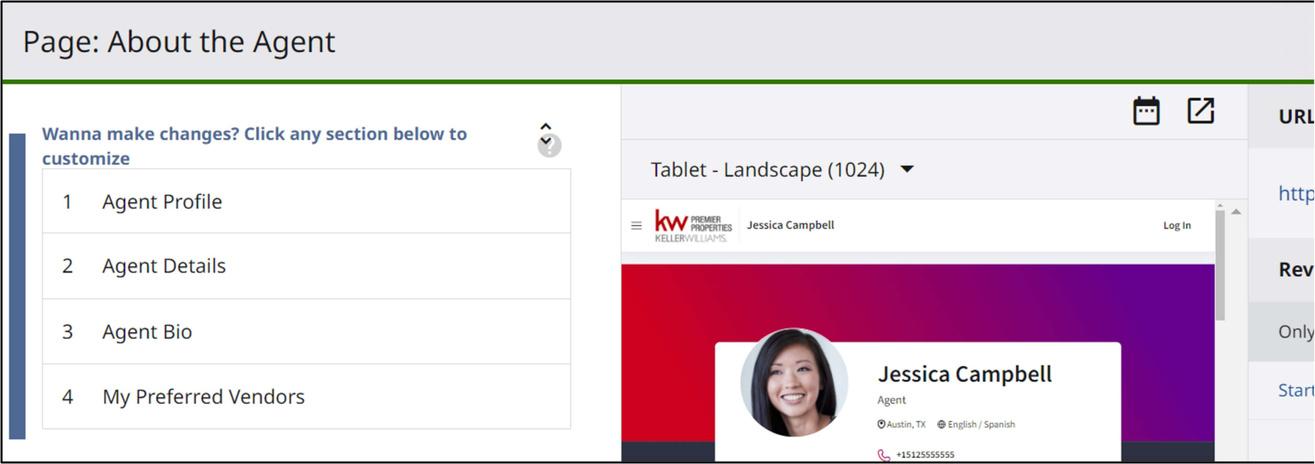
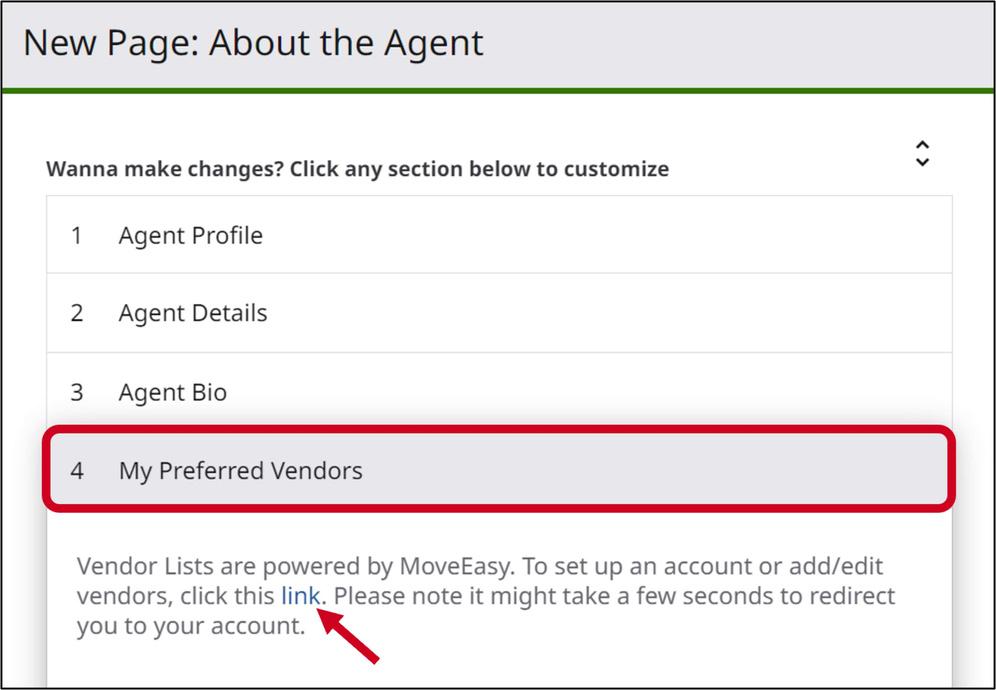
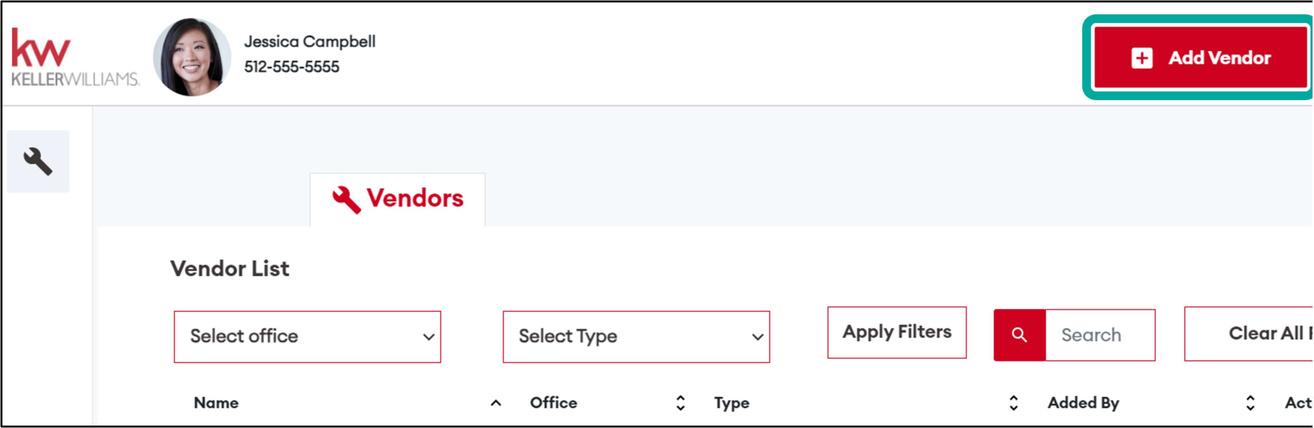
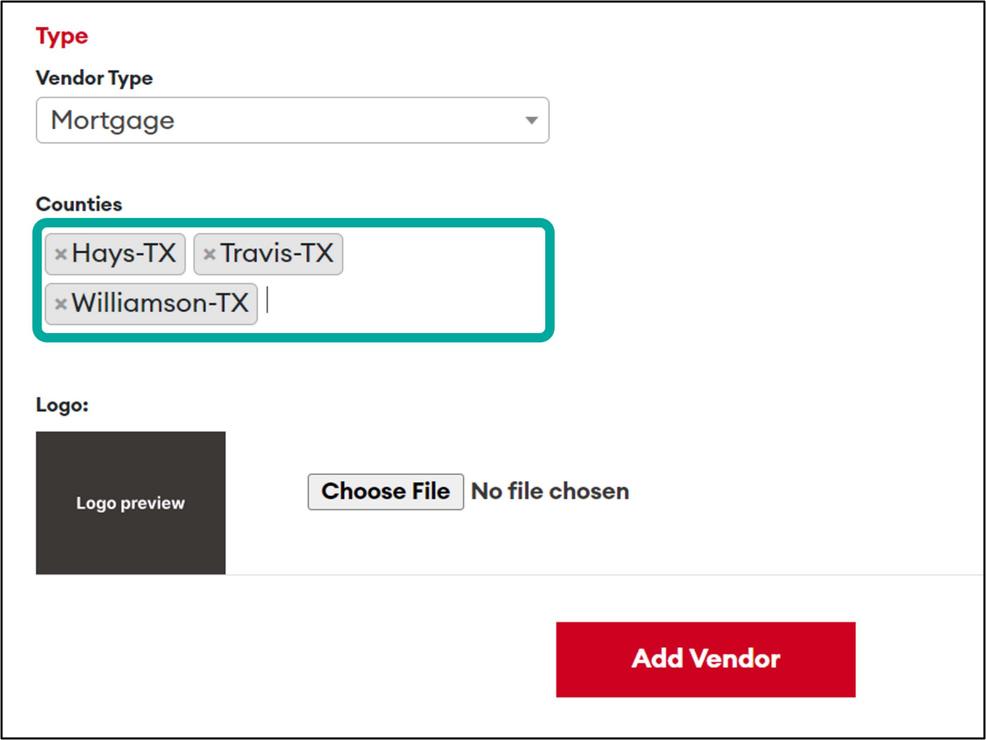
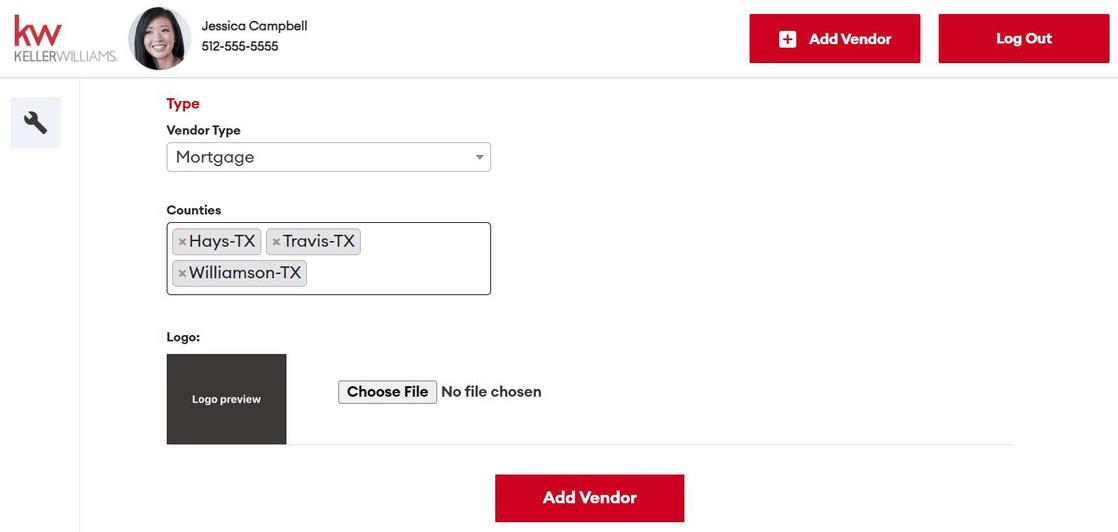
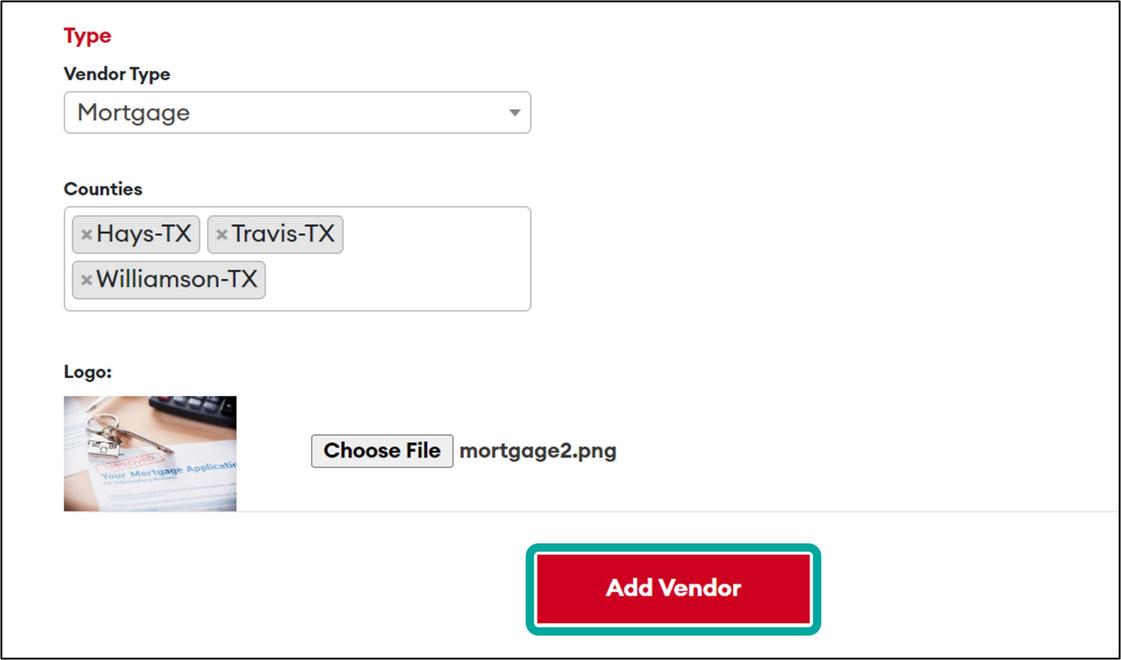
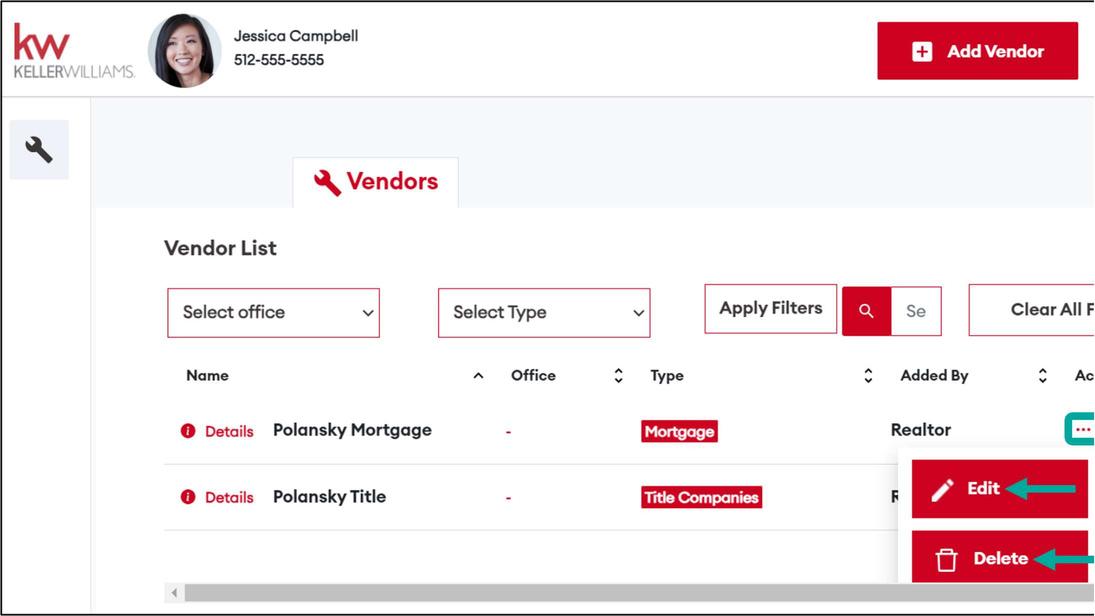
Vendor on Agent Site
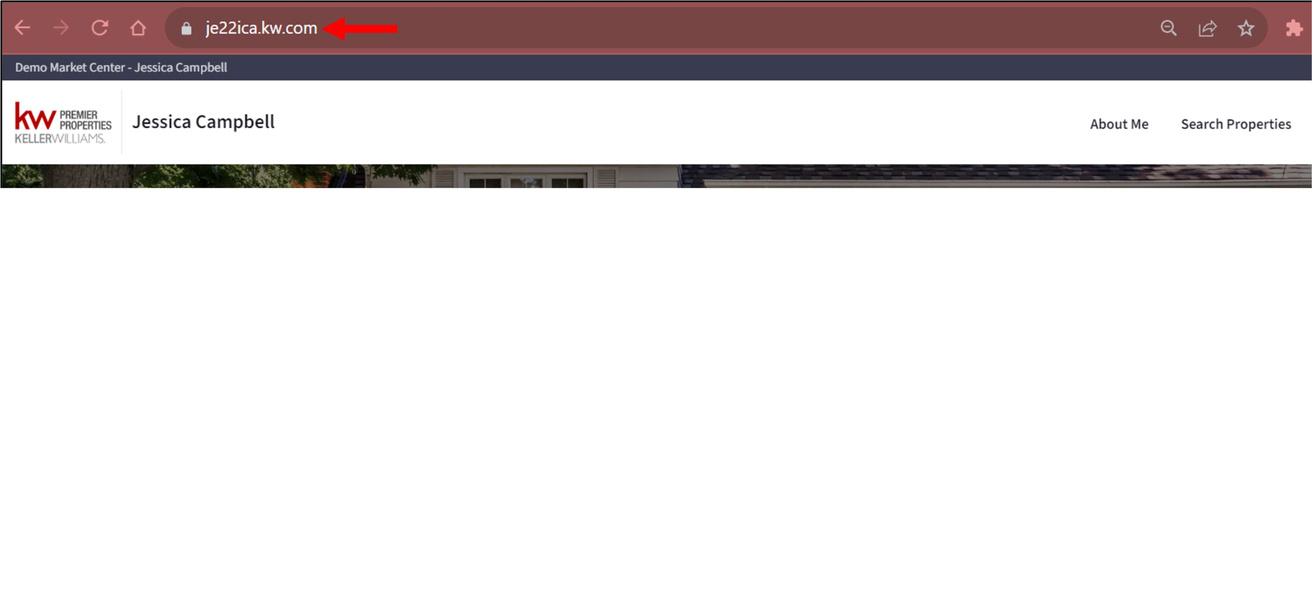
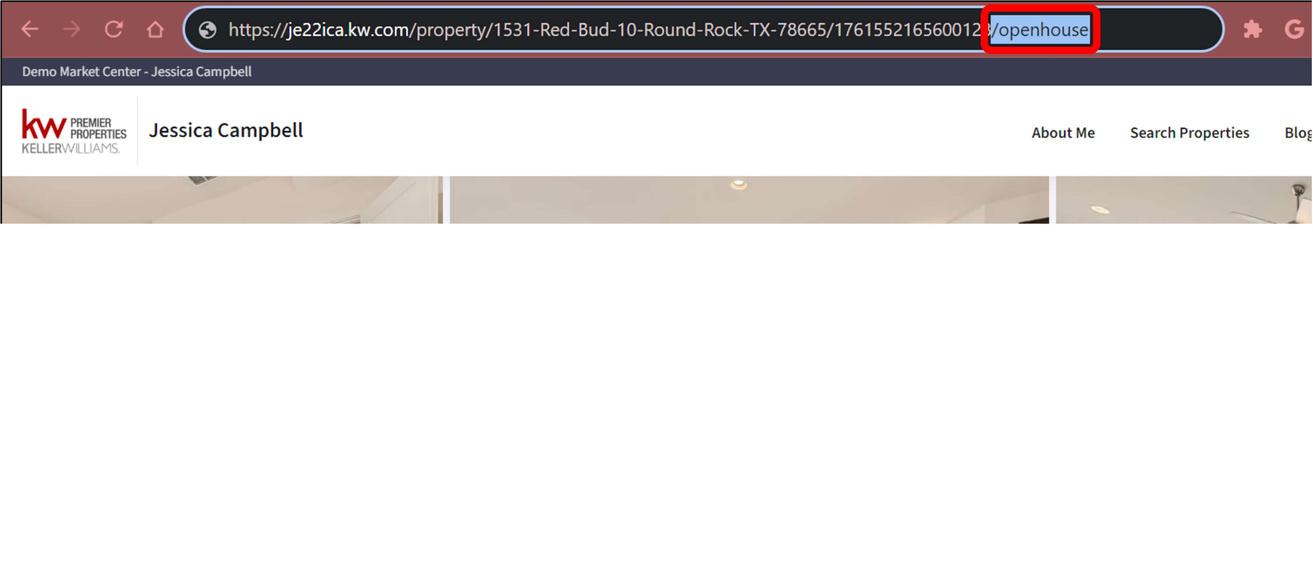
an Open House Sign-in Sheet
Started with KW App Consumer
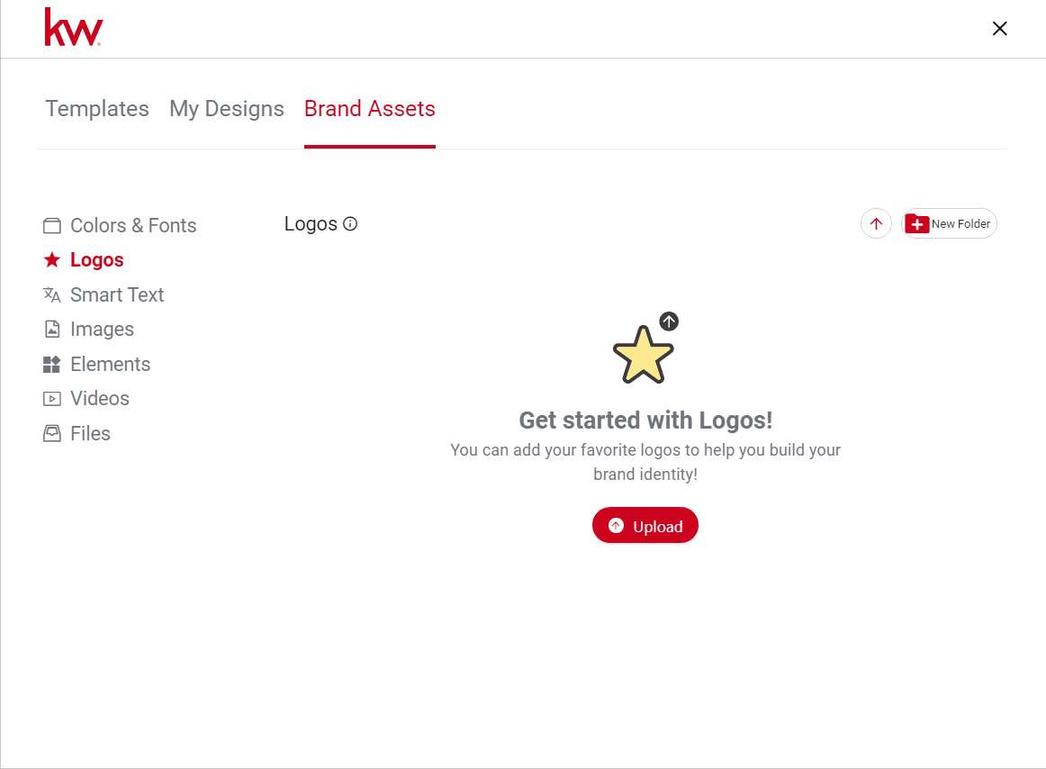
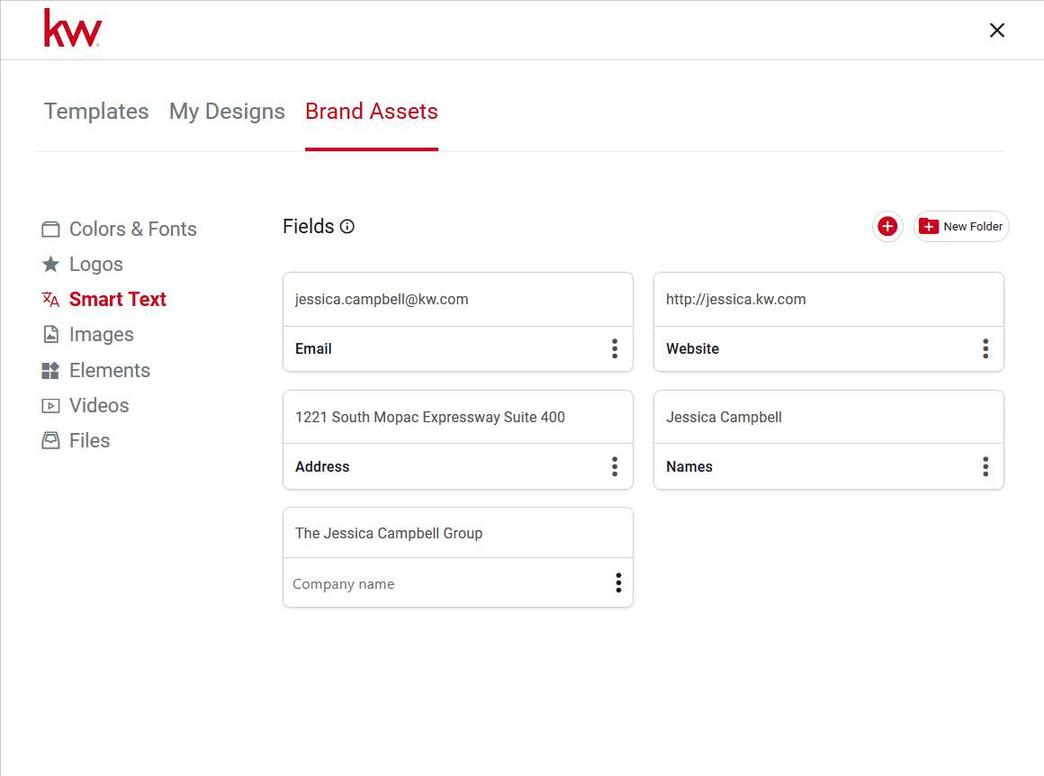
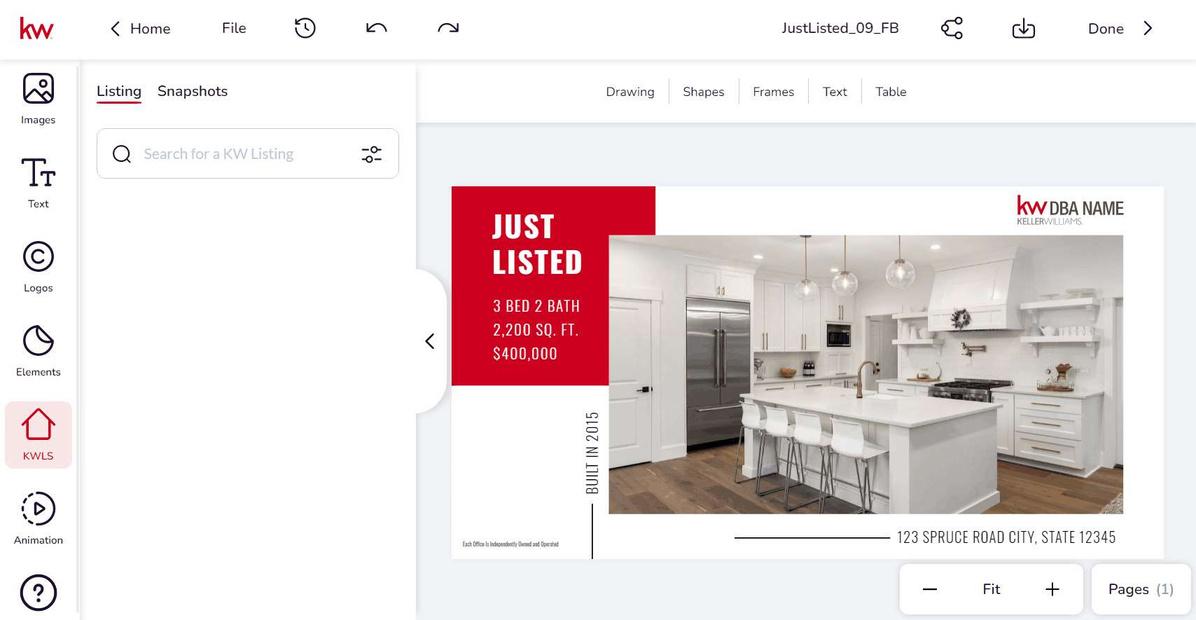
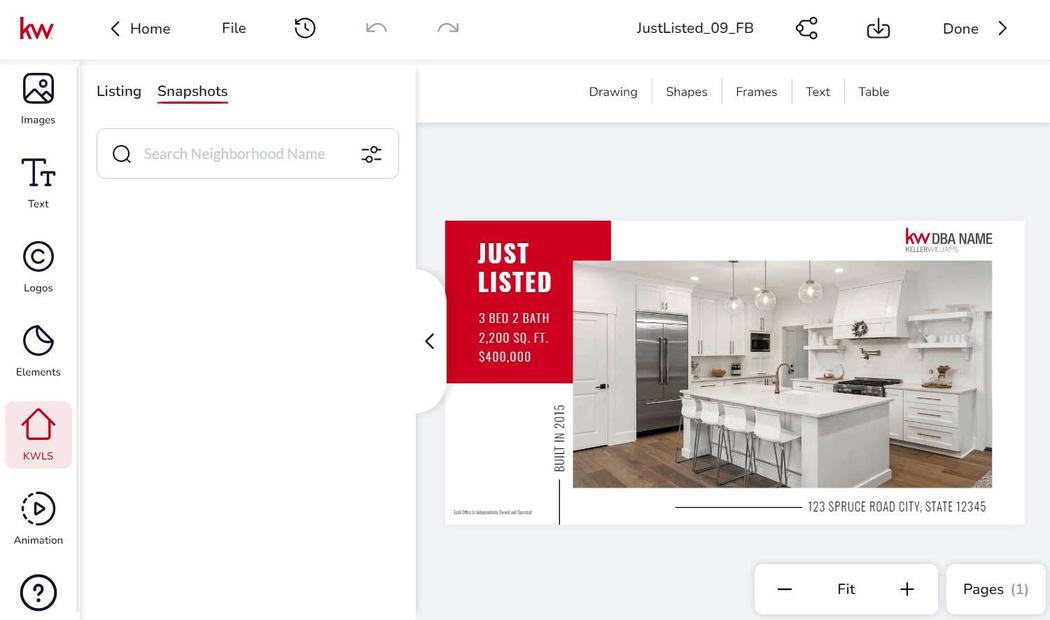
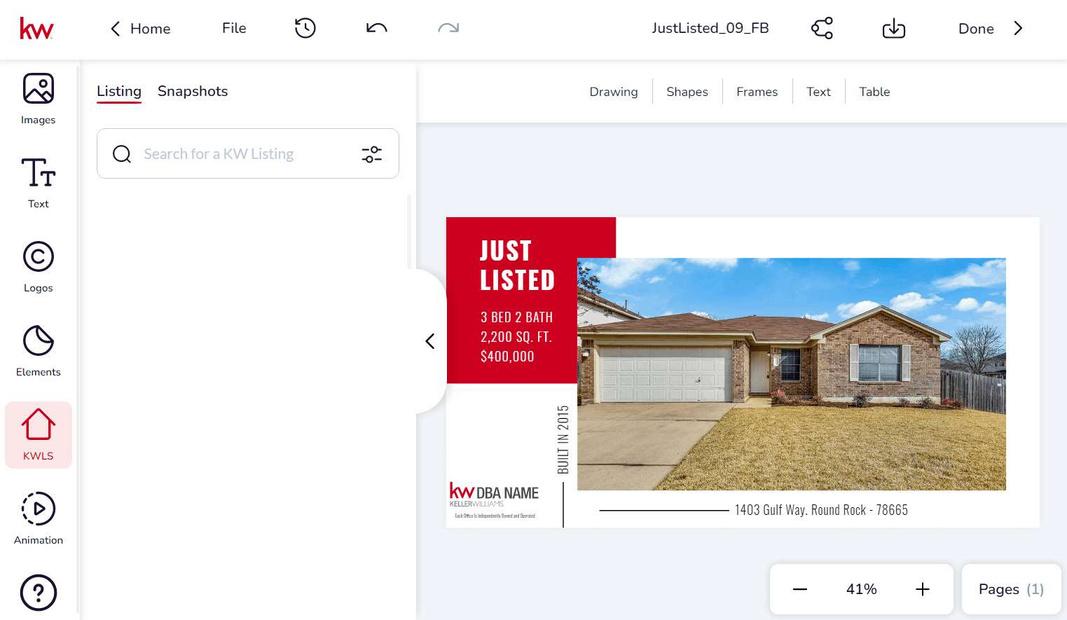
Add your Brand Assets to Your Library Use KWLS Panel in Design Editor Designs Create an Internal Listing Sync
Listings Get Started with Consumer Applet Edit
Add
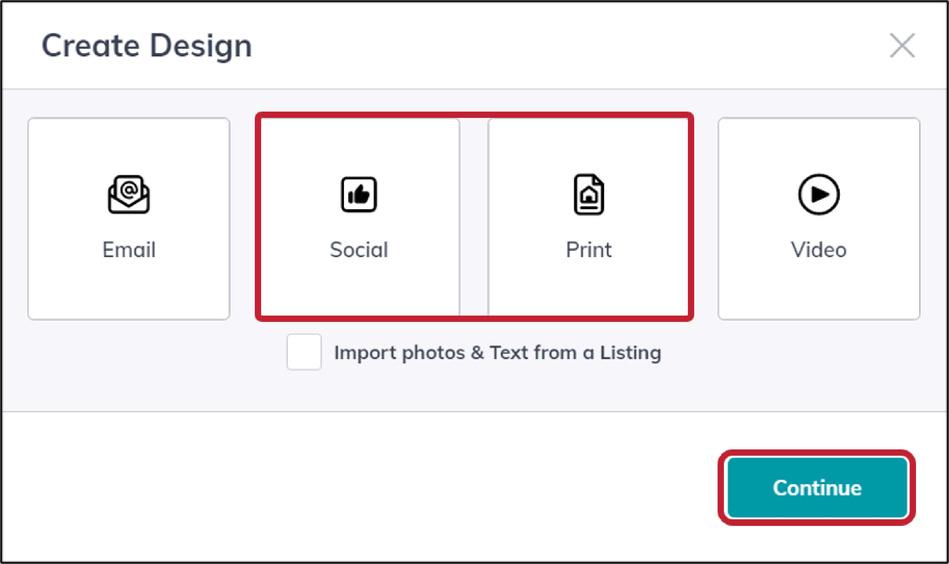
Create
Get

Introduction
What is Command?
KW Command is a real estate website and marketing platform designed exclusively for Keller Williams’ real estate agents. The KW Command proprietary, feature-rich software, which was released in 2019, helps real estate agents, Realtors®, and brokers manage leads, nurture them, and ultimately lead them to conversion.
Whether you’re looking to create a drip campaign to keep in touch with clients, customizing your website, or completing an opportunity to get paid, Command is the solution for you.
Command includes options for every agent, team, or group to utilize their database to the fullest potential to gain new leads and recurring referral business.
Getting Started in Command
Once you have been onboarded into your MC, you will receive an email from Scott Le Roy Marketing subject line- “Keller Cloud Set up Complete”. There you will find your KW Systems username and password to log on to Command.
Please note that your Command username is not your email address.
You will go to agent.kw.com to log in to Command. If you have forgotten your username or password, please let a member of Leadership know and they can help you retrieve it. Username Password

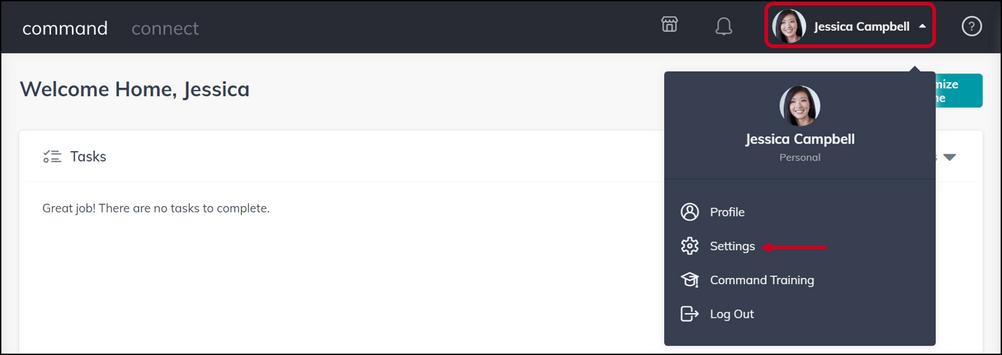
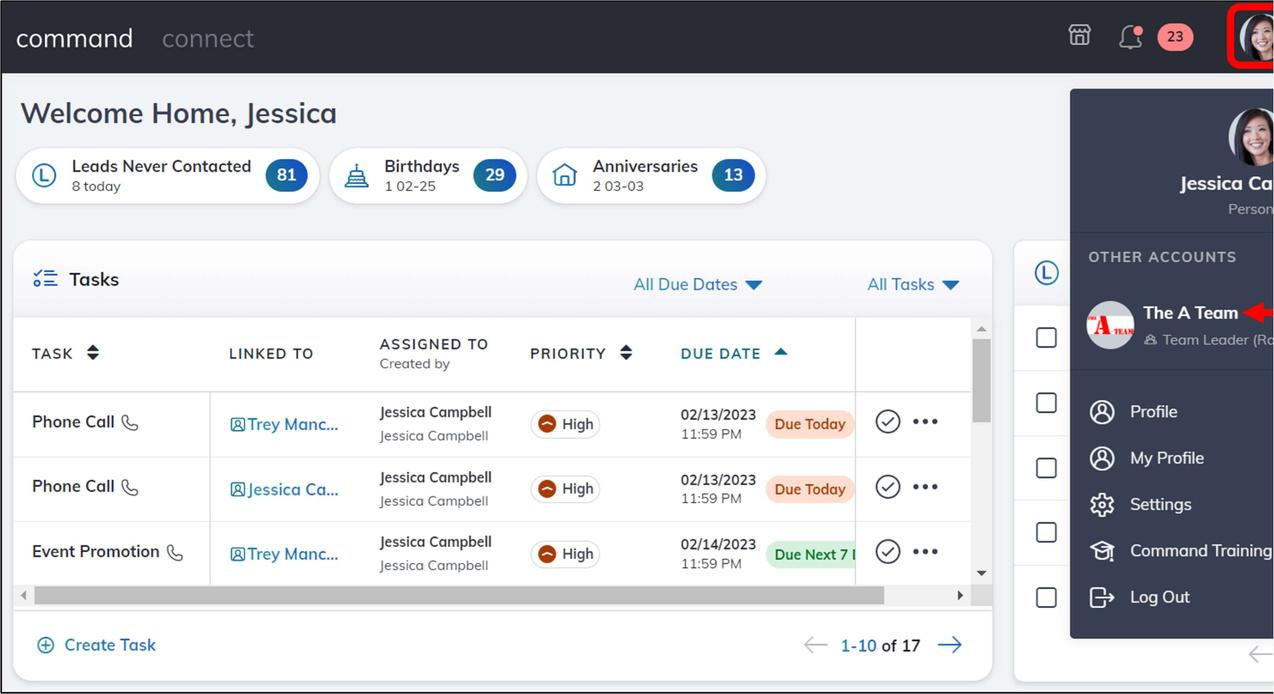
Once you log into Command your will see the following screen. Yours may not look identical to mine. This home screen can be customized to that you see what’s most important. We will customize this later on. For now, you’ll click on your name in the top right and select “My Profile”.
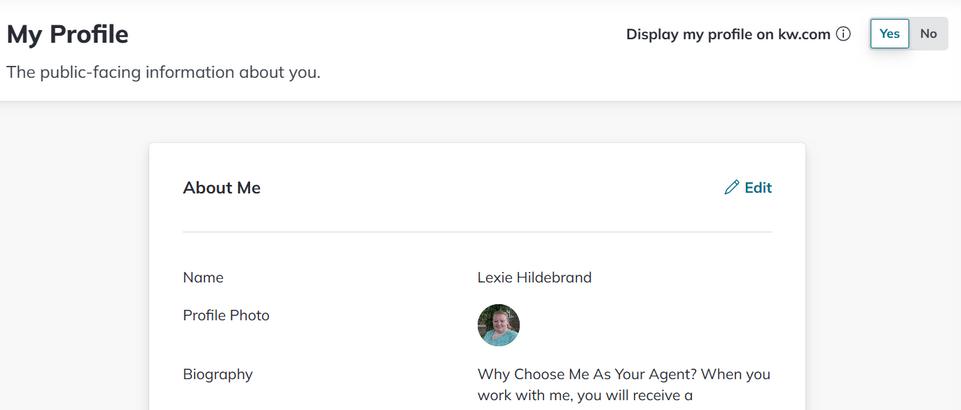
At the top of the screen, make sure that “Yes” is highlighted in blue, if not toggle it to “Yes”. Next, you’ll select the “Edit” and update all pieces of information. This information will pull to your website so ensure it’s complete and accurate. Then click “Settings Home”.
Integrations
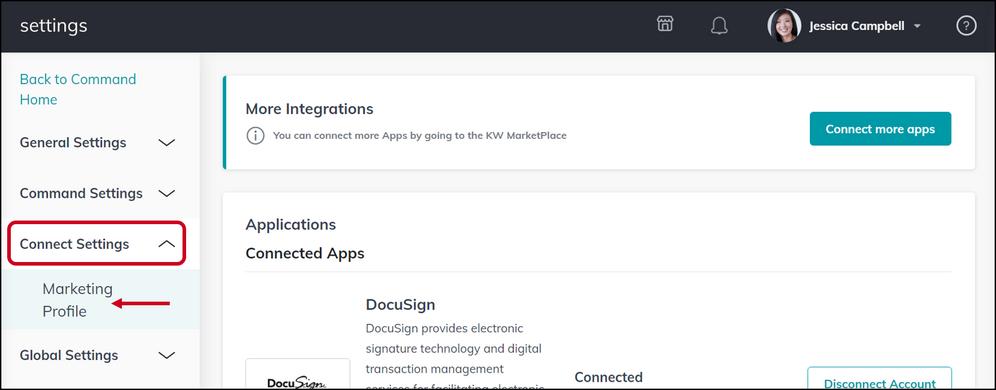
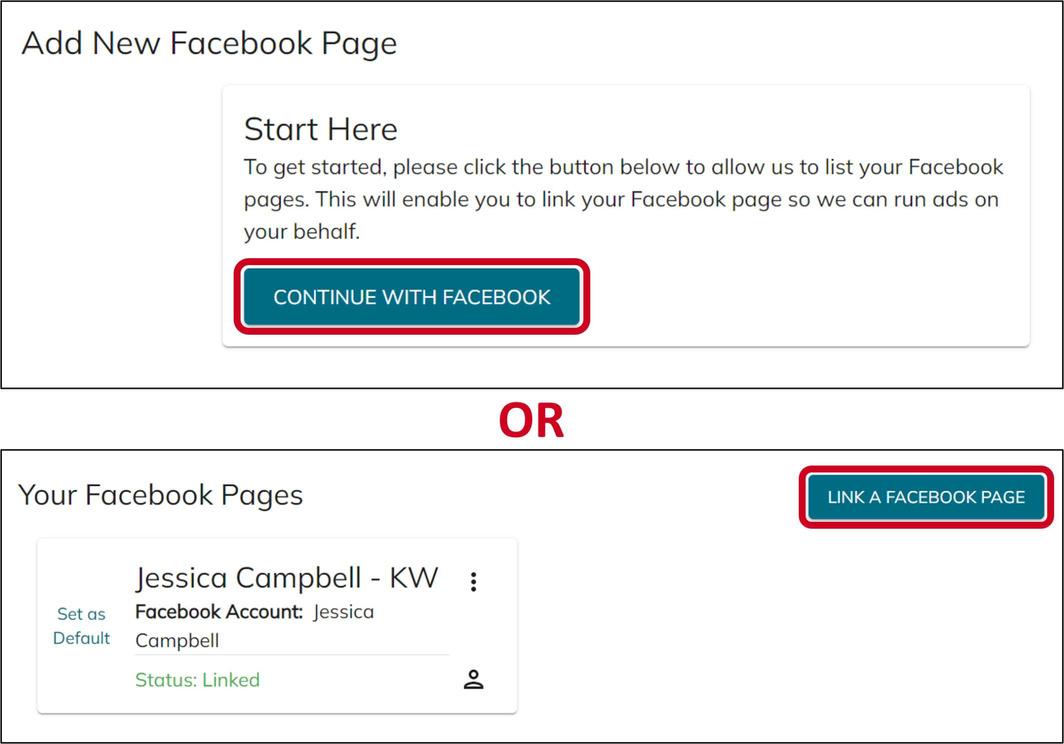
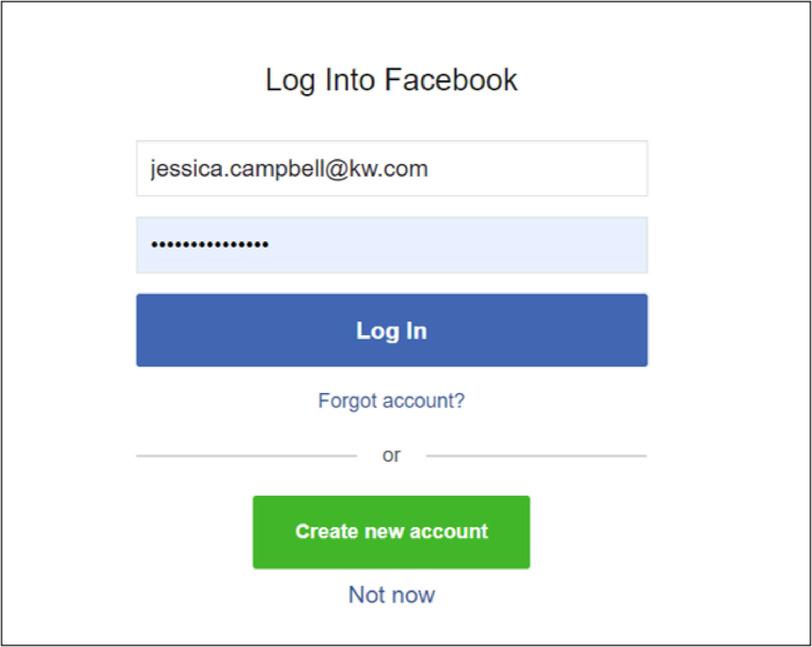
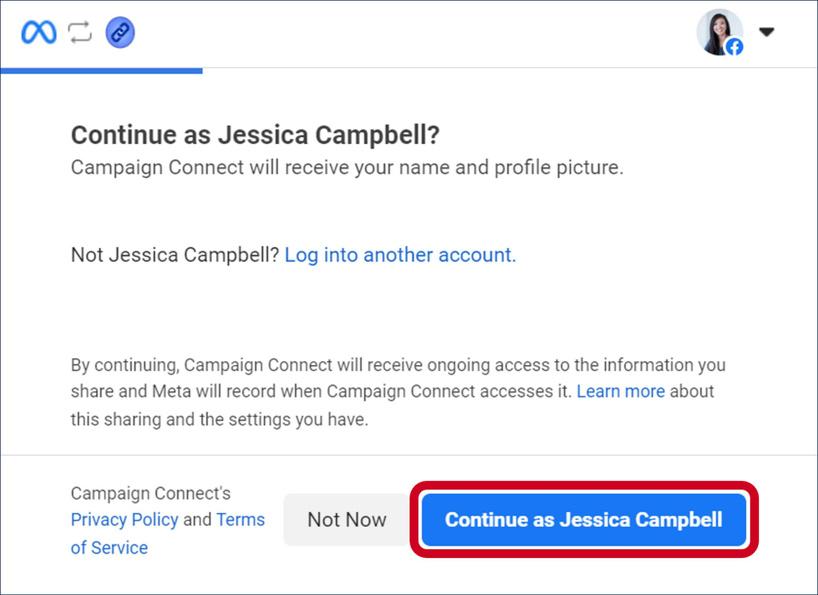
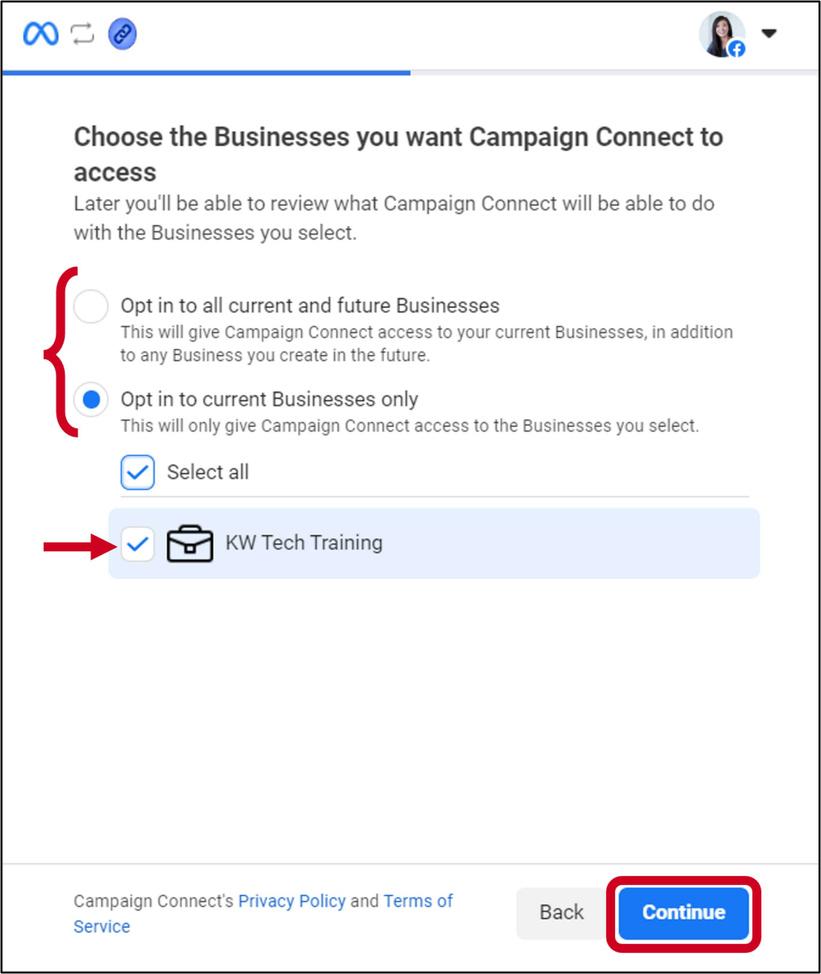
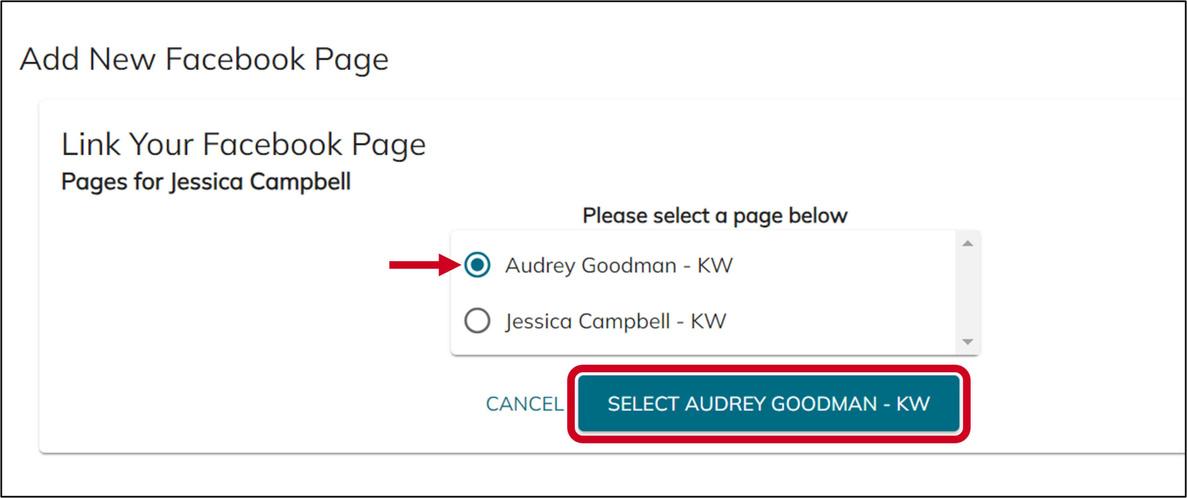
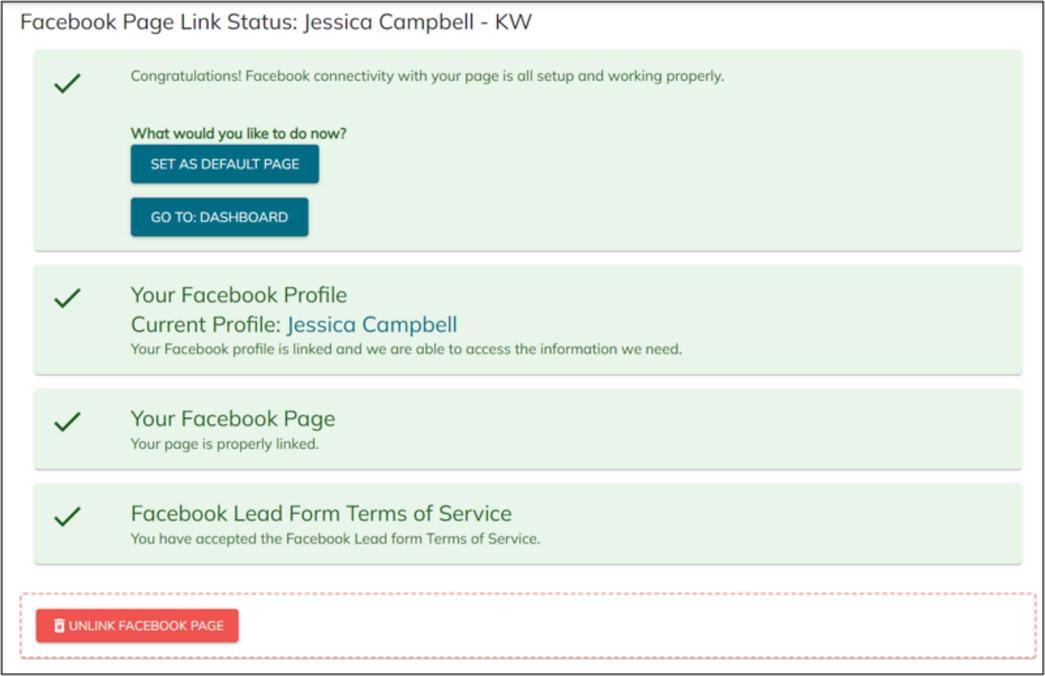
From your main page, you’ll select your name in top right and select “Settings” if you were just in your Profile, the “Settings Home” will take you to your Settings page. On this page we are going to connect your different account. To ensure a smoother process please log into your Facebook account in another tab. If you do not have a Facebook Business page, please do so and come back.
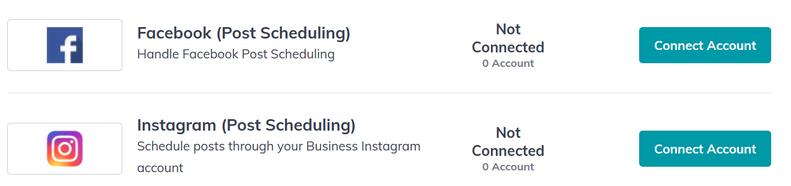
Some accounts were already set up by Scott LeRoy. You will need to connect your Facebook (business account only), Instagram (business account only), and Twilio.
Connecting Facebook and Instagram allows you to utilize post scheduling and other settings. We will connect your Facebook account to your Ads Manager later.
Twilio will allow you to send automated test messages through your SmartPlans, as well as messages directly through Command. We suggest that you start with the lowest package until you know how many texts you are going to use in a month. Whatever you don’t use will rollover and if you need more, you can always come back and increase your credit package. The number for Twilio will NOT be the same as your phone number. We highly suggest that you add the number you choose to your business cards, contact cards, and email signature as a business line.

CompleteYourMarketing Profile
Once you set up your Marketing Profile in Command, your information is automatically added to marketing content you send to consumers and to your KW App and Site This helps you work faster because your information is reused on marketing content without you updating it each time Your profile includes your photo, logo, contact information, and other details you choose that allow you to stand out as an expert agent
Adding information to this profile will not change any of the information on your KW White Pages or KWConnect profiles.
To complete or update your KW Marketing Profile:
Access
1
2
3
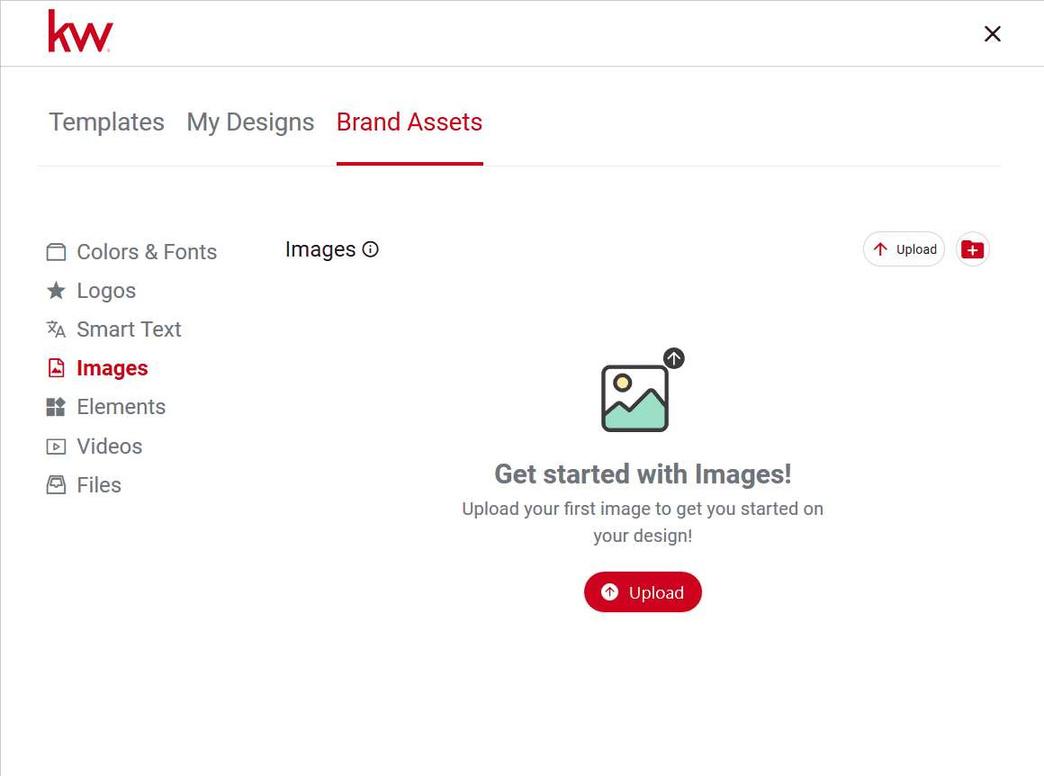
Branding and Images
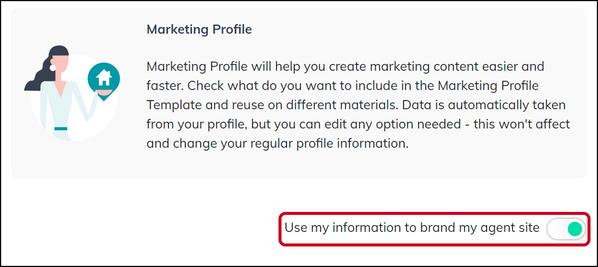
1 At the top right of the profile, you will see a toggle button labeled "Use my information to brand my agent site "
This toggle button must be turned on in order for your KW Agent Site to display the personalization that you created.
your Name in the top right corner, and then select Settings
Click
Log in to https://agent kw com with your Keller Williams login credentials
Click the drop-down arrow besides Connect Settings and select Marketing Profile
KW Answers
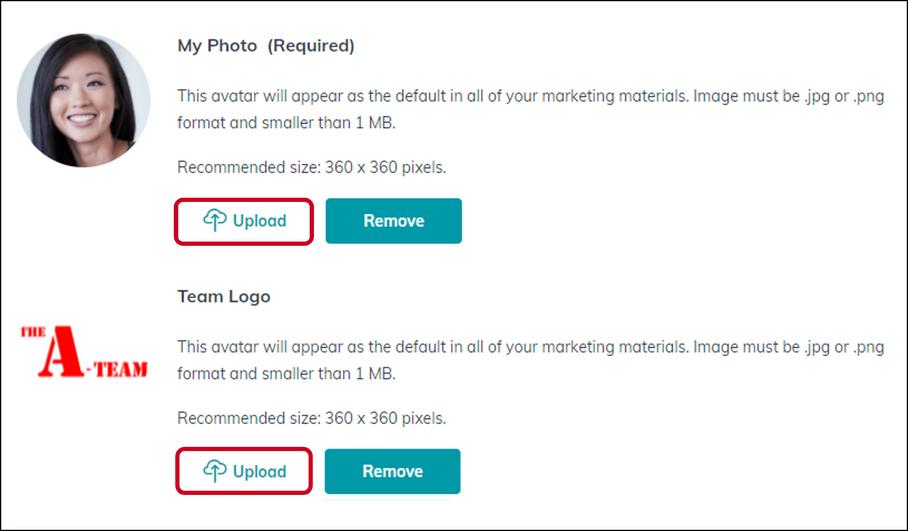
2 Click to upload your agent profile photo (My Photo) which is required, and to upload your Team Logo, if you have one You can also remove your agent photo and team logo if necessary
My Details
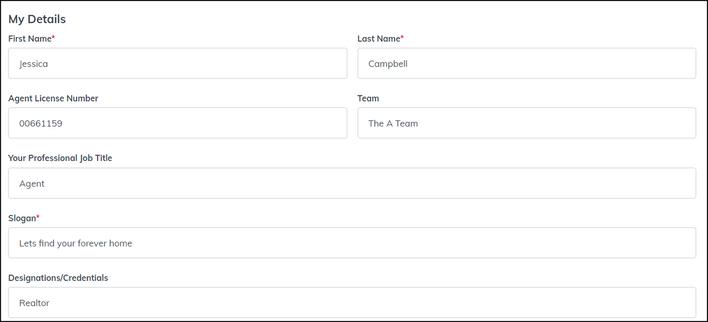
1 The first part of this section includes primary details about you as an agent, which populates KW Agent Sites and the KW App You must enter a first name, last name, and slogan The other fields are optional:
The Agent License Number field is not required, but if you are going to use the Promote My App SmartPlan, you must complete this field There is a merge-tag included, in the first email that will send out, that will cause a sending error if this field is blank.
The Slogan field will not visible to consumers as of now, but there are plans to display that information in the near future
2. Next, you will see the Military Affiliation field. This focuses on military service, past or present, military spouses, Gold Star Family members, and more. Use the drop-down to select any number of combinations.
As this is a brand new field, it hasn't been connected to any public facing profiles, but there is a Military filter that utilizes this field when agents search for referral partners in Command
KW Answers
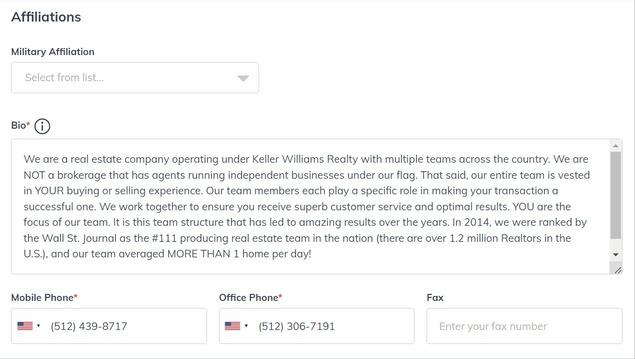
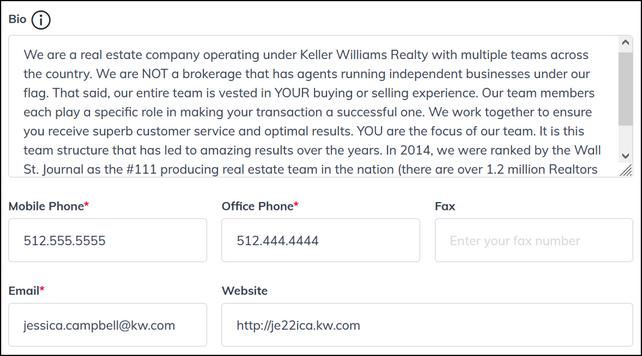
3 The last part of the My Details section include your biography and contact information These details will display on your KW Agent Site, KW App, and our public facing agent profiles
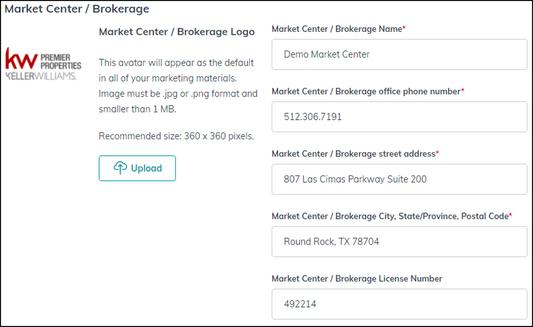
Market Center / Brokerage
Enter your Market Center information and DBA logo. This will not only populate the KW Agent Site and App, but also paid social ads and will be available in design templates. If you don't have access to your Market Center DBA logo, you can find these on the KW Logos and Branding resources page. The Market Center/Brokerage
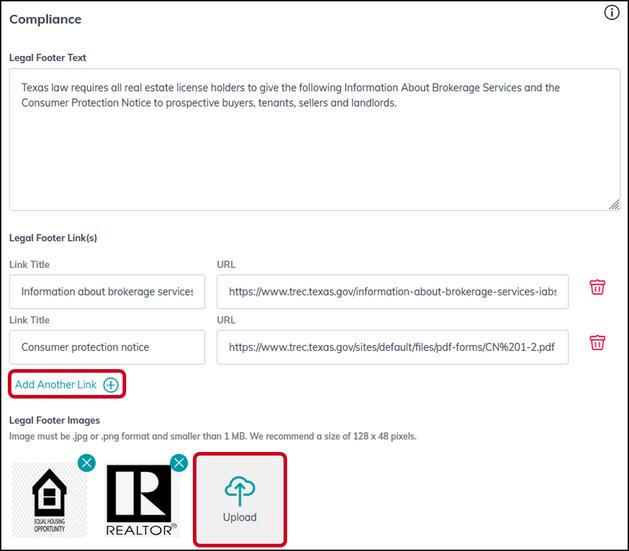
Compliance
Enter any national, state, or local legal information or images needed to stay in compliance, with regard to your KW Agent Site This will populate the footer of every page on your KW Agent Site
KW Answers
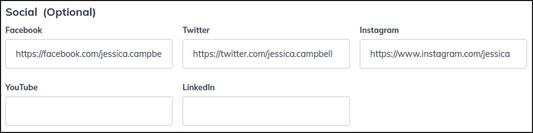
Social
Add social media profiles to your profile, making sure to add the full web address of the profile. These will populate on your KW.com agent profile, KW Agent Site homepage footer and navigation drop-down, so clients can easily access and connect
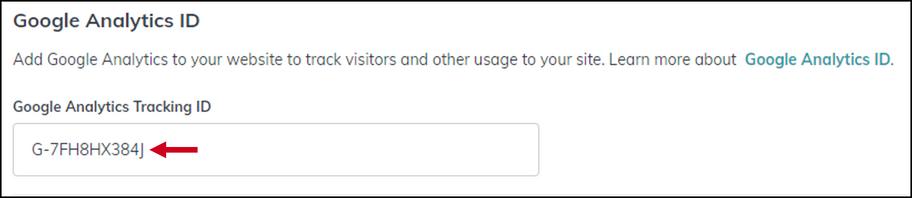
Google Analytics
Add your Google Analytics tracking ID This will pull user data from your KW Agent Site and give you more insight into visitor activity
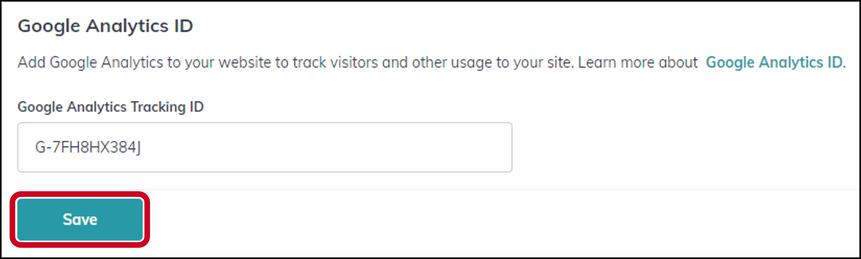
Save
Once you are ready, click Save Any changes made will take a few hours to populate on KW com, KW Agent Sites, and the KW App
KW Answers
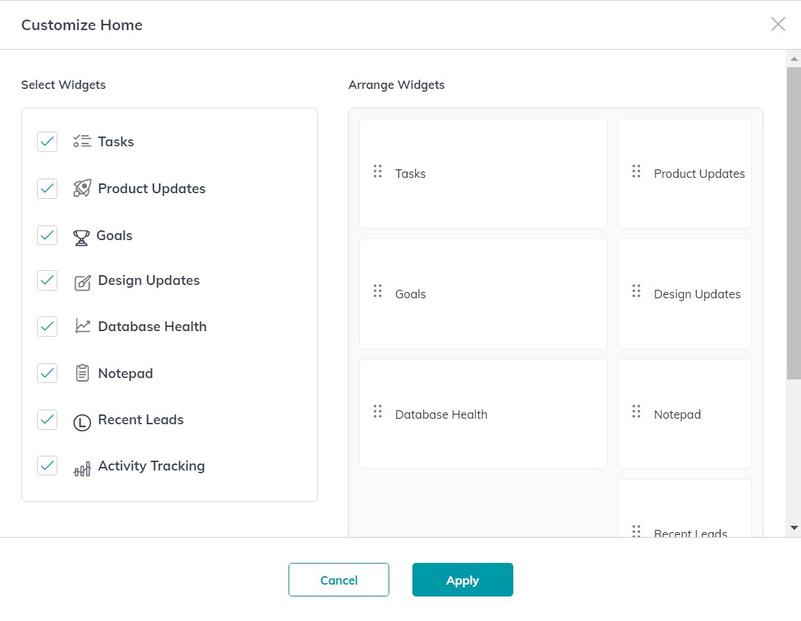
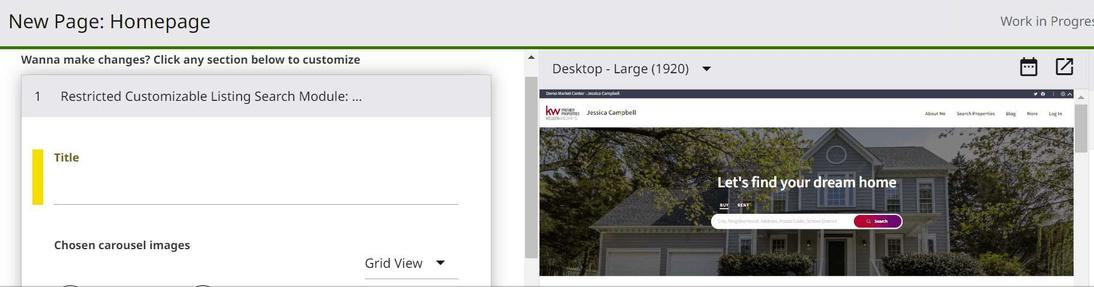
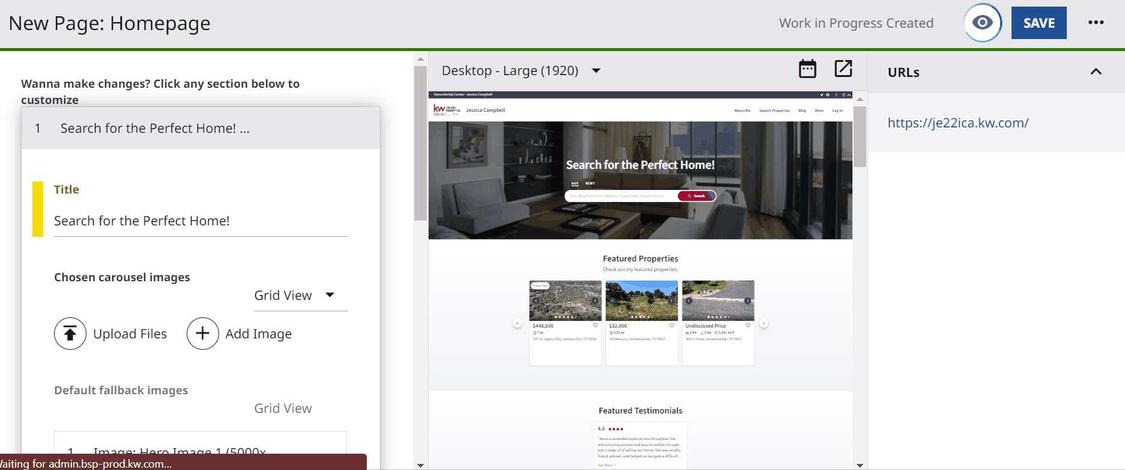
Customize Your Command Homepage
You can now customize your Command Homepage to select what widgets you want to see and the order you see them in when you initially log in to Command.
To customize your Command Homepage follow the steps below:
1. Log in to https://agent.kw.com with your Keller Williams login credentials.
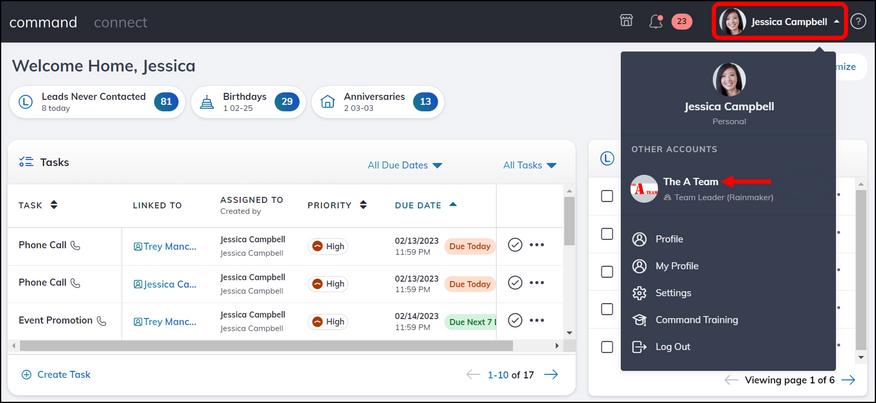
2 If you are on a team, you can switch between your personal and team Command accounts and customize the homepage of each account separately
3. At the top right of the page, click Customize.
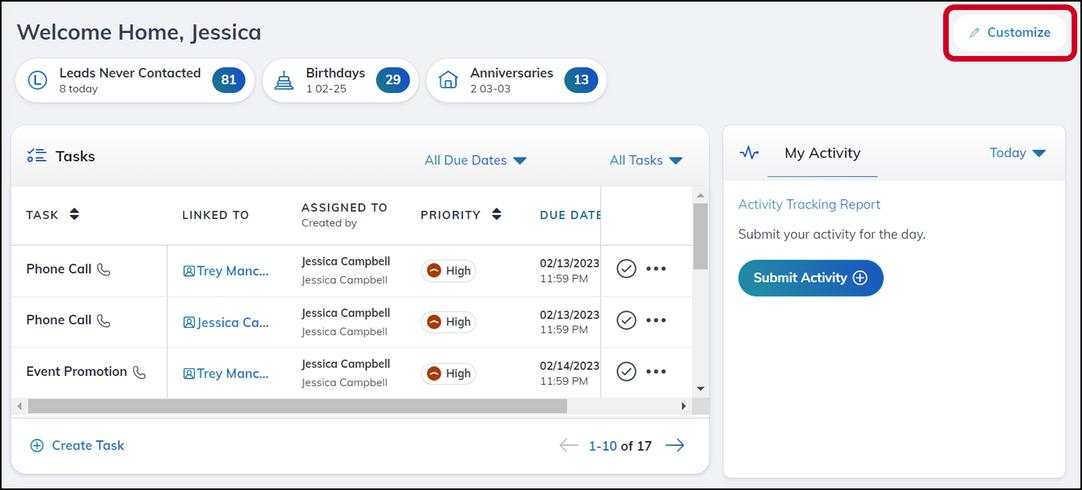
4. Customize your Command Homepage:
Choose which widgets you want displayed by selecting/unselecting the checkbox beside the widget name
Rearrange the order of the widgets by using the drag and drop functionality.
You can rearrange the widgets vertically but not horizontally.
KW Answers
5. Click Apply once you're done.
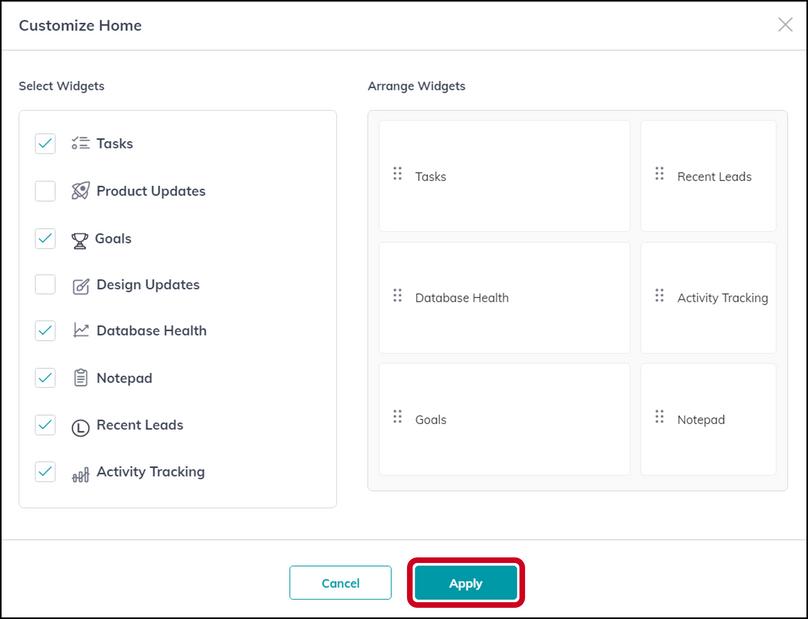
Once you have confirmed your changes they will stay in place indefinitely, but you can change it again at anytime.
KW Answers

KW Answers
KW Answers
KW Answers
KW Answers
KW Answers

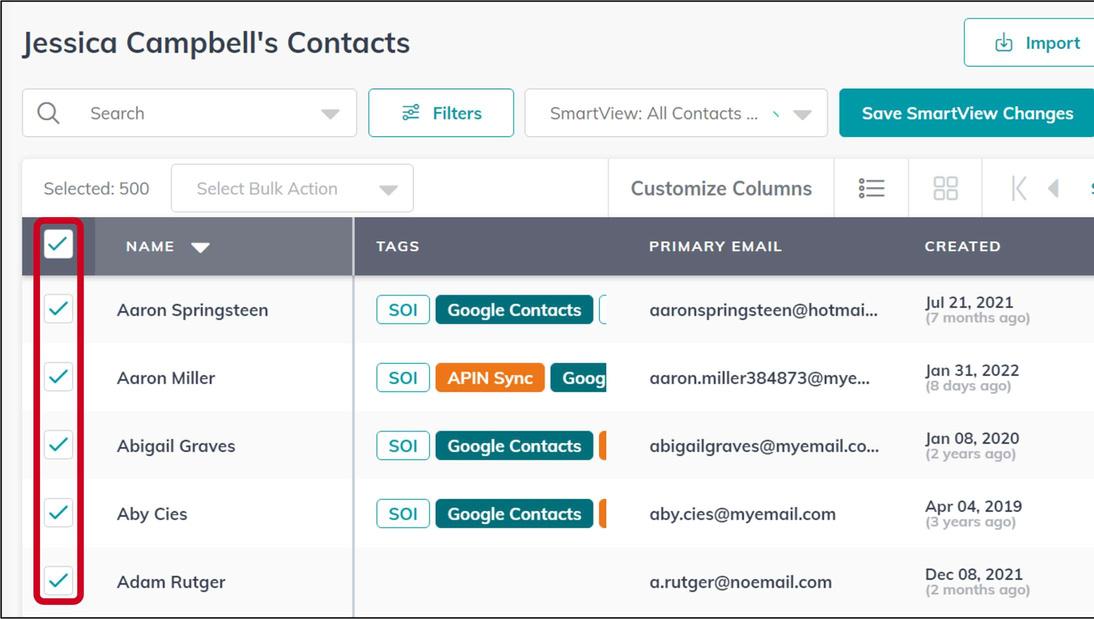
Contacts

KW Answers


KW Answers


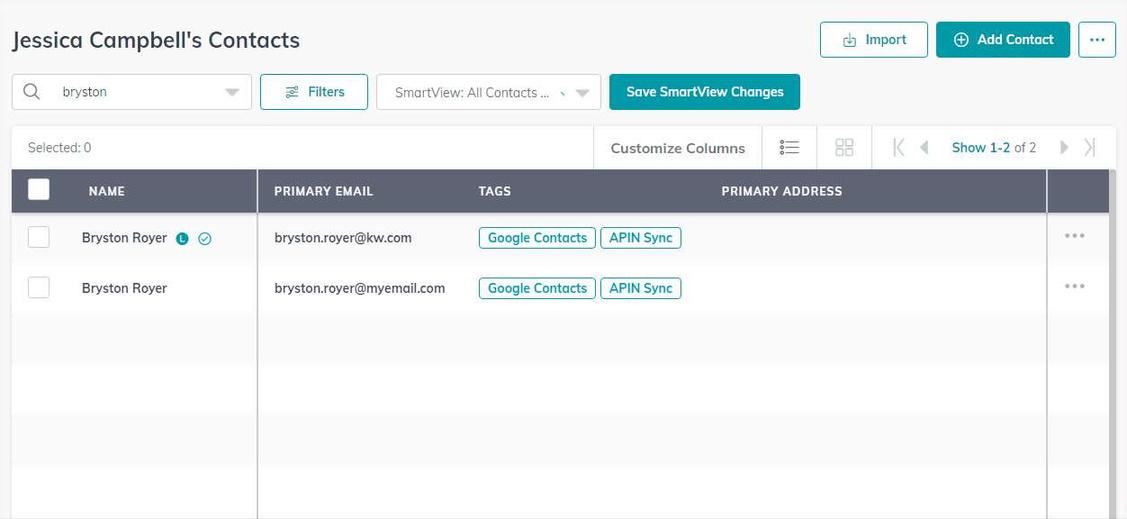
Name-20% PhoneNumber-20% EmailAddress-20% PhysicalAddress-20% SocialMediaProfile-4% Tags-4% LeadSource-4% Birthday-4% WorkInformation-4% AdditionalBestPracticeItems: SetNeighborhoodsforNeighborhoodNurtureSmartPlan UtilizetheTimelineand/orNotessectionforeachContact
Answers
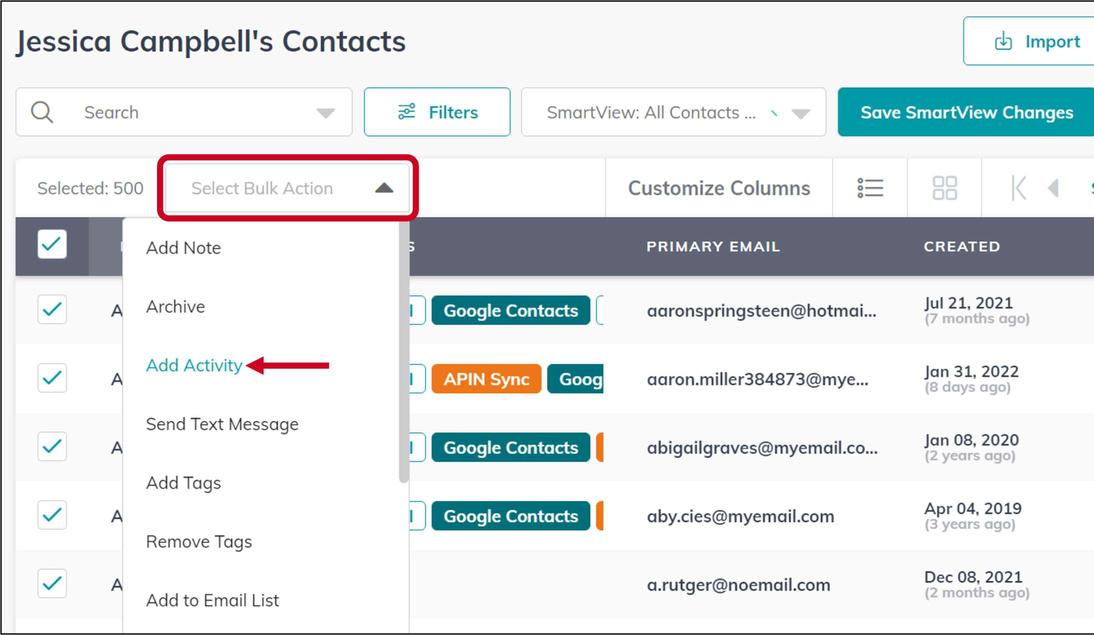
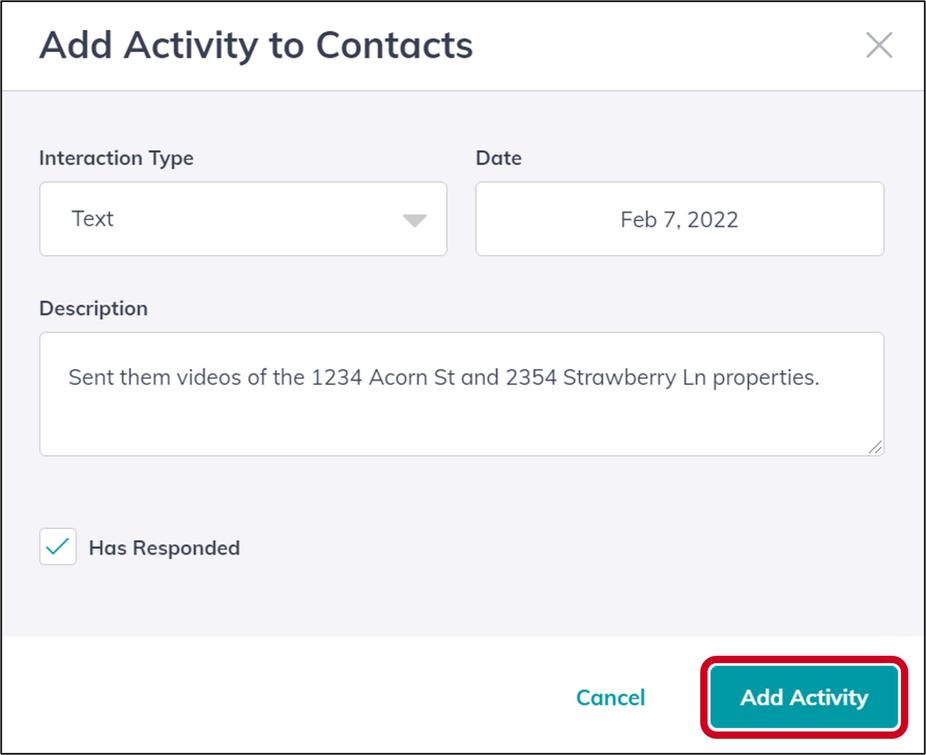
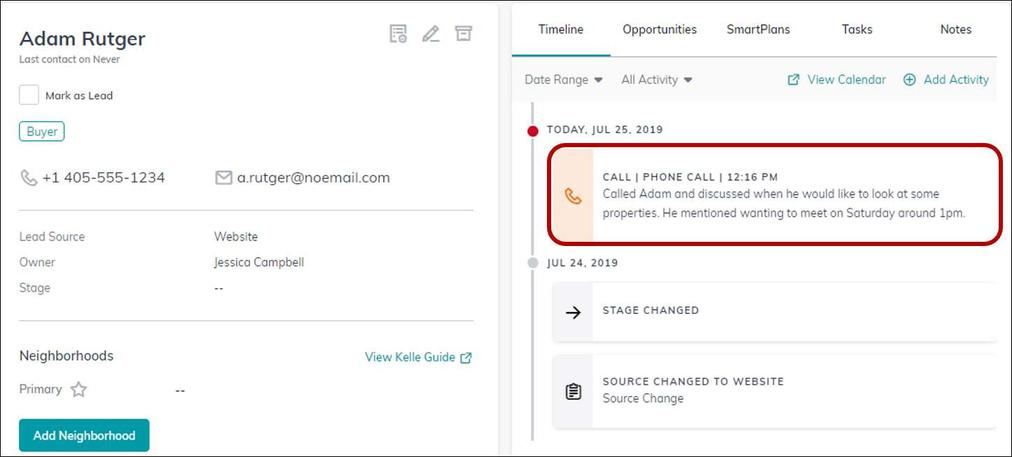
WhatisaCompleteContact?
UtilizeTwiliowhentextingContacts KW
KW Answers
KW Answers


KW Answers
KW Answers
KW Answers
KW Answers

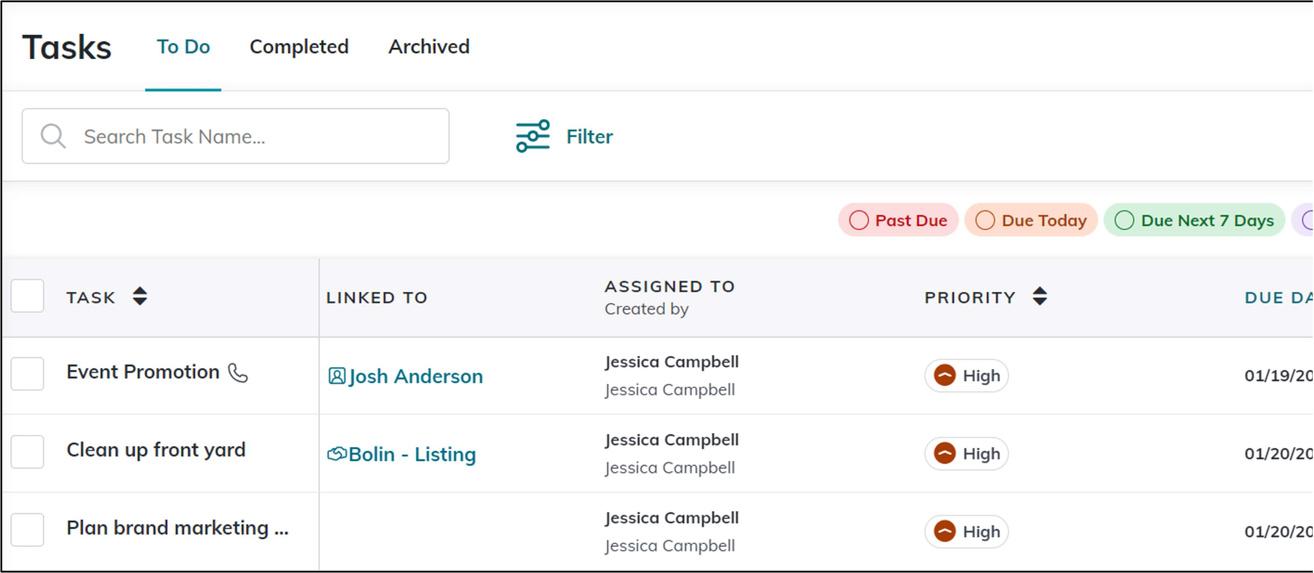
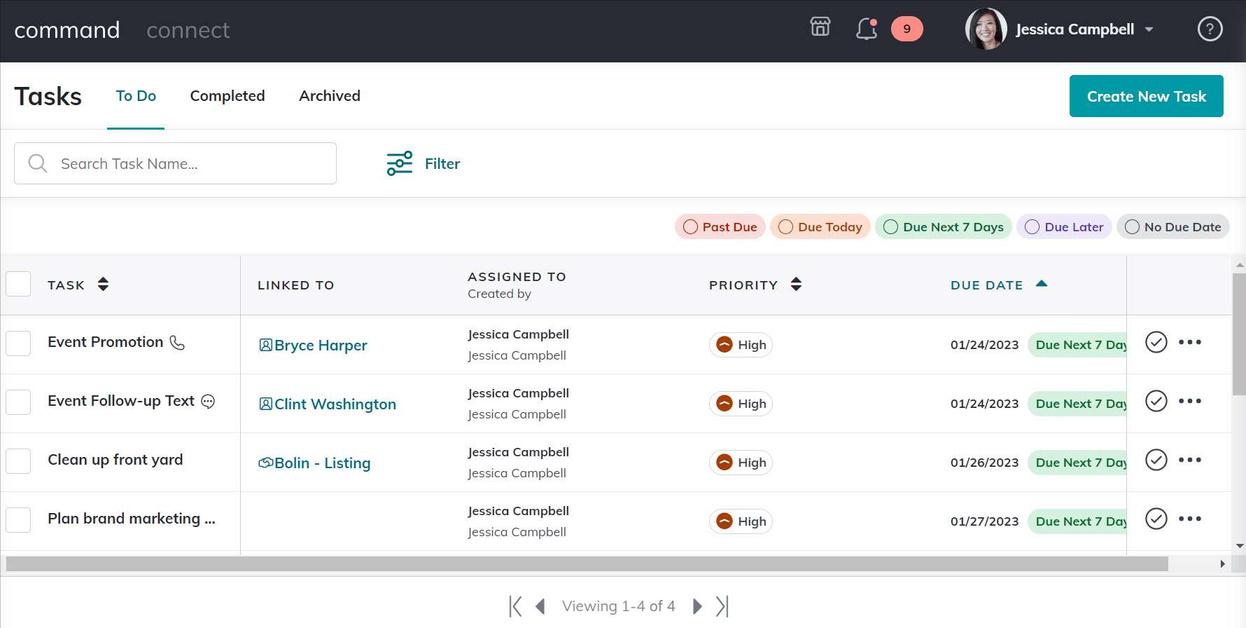
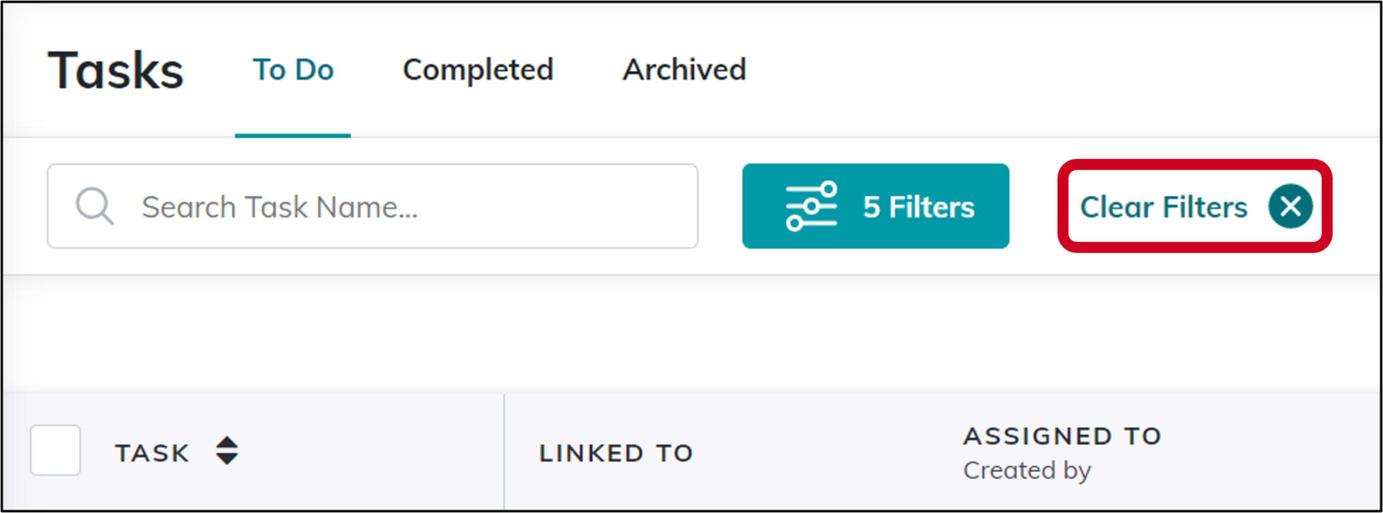
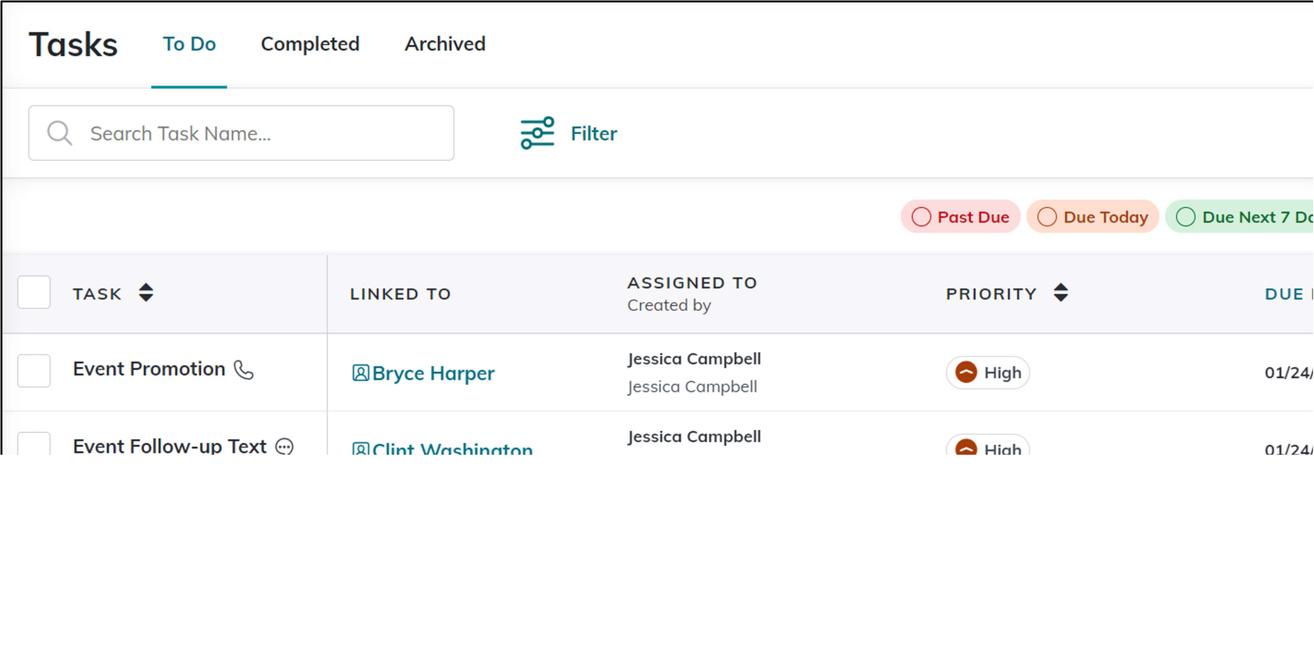
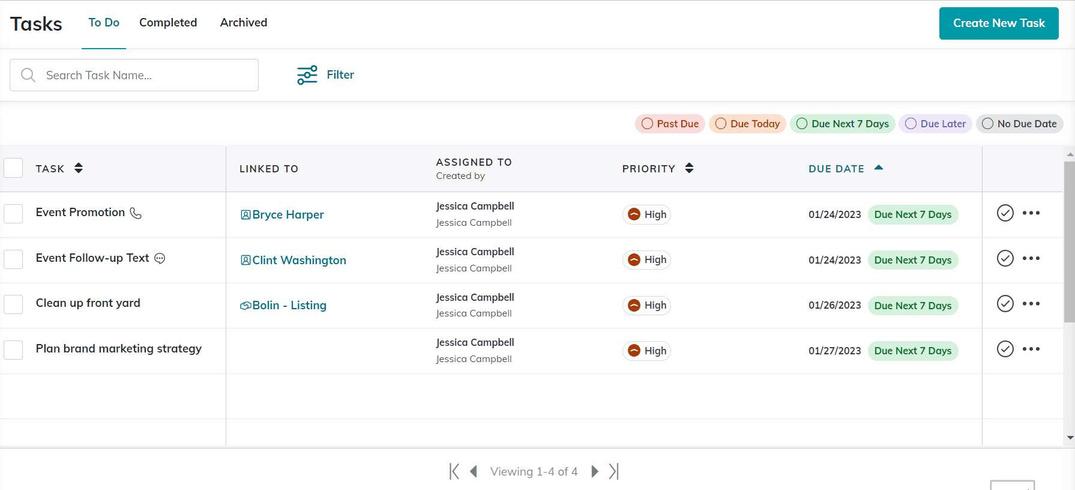
Tasks

KW Answers
KW Answers
KW Answers
KW Answers
KW Answers
KW Answers
KW Answers
KW Answers
KW Answers

KW Answers

KW Answers
KW Answers

KW Answers
KW Answers
KW Answers

SmartPlans
KW Answers
KW Answers
KW Answers
KW Answers
KW Answers

KW Answers


KW Answers


KW Answers
KW Answers
Lexie Hildebrand
Lexie Hildebrand


KW Answers
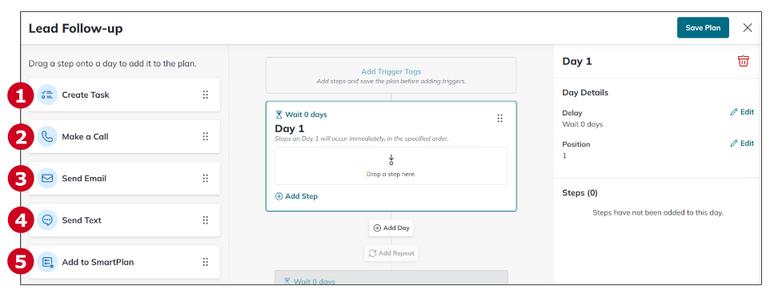
Add Days and Steps
1 Find where you want to add a new Day, then click + Add Day.
2. When you are ready to add a step, find the step on the left side of the page, then click and drag it to the day you want to add it to:
There are 5 types of steps you can add. Once you add the step, you will need to configure and save that step, on the right side of the page, before you can continue:
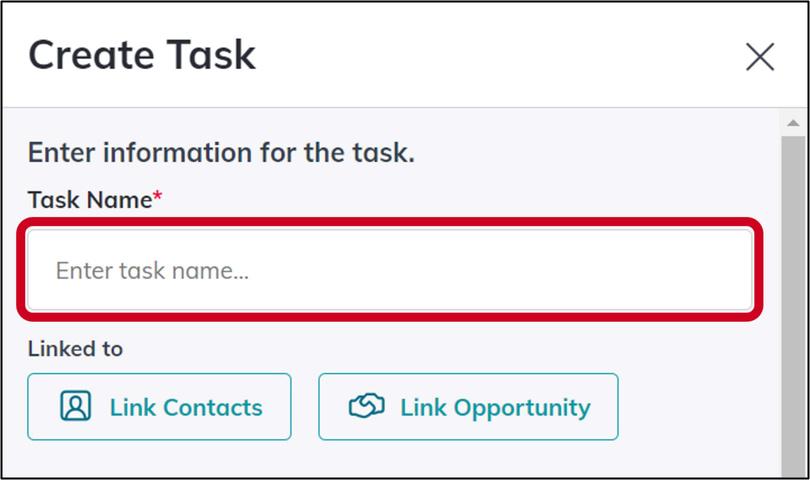
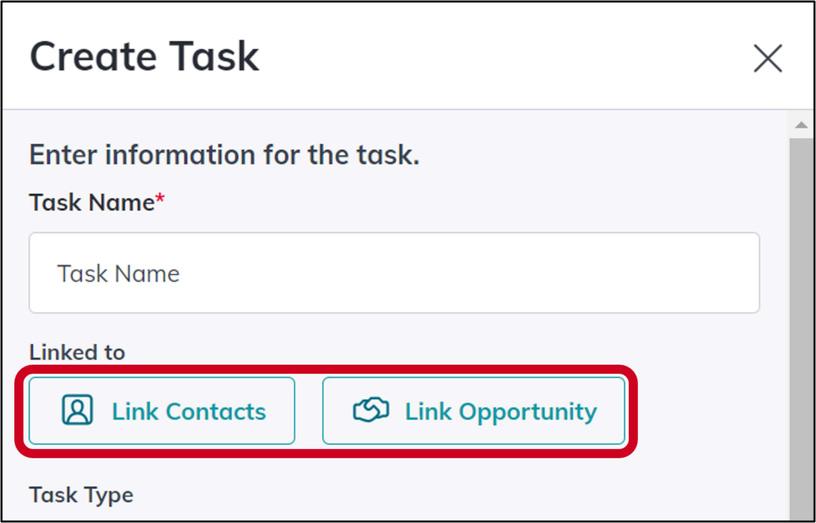
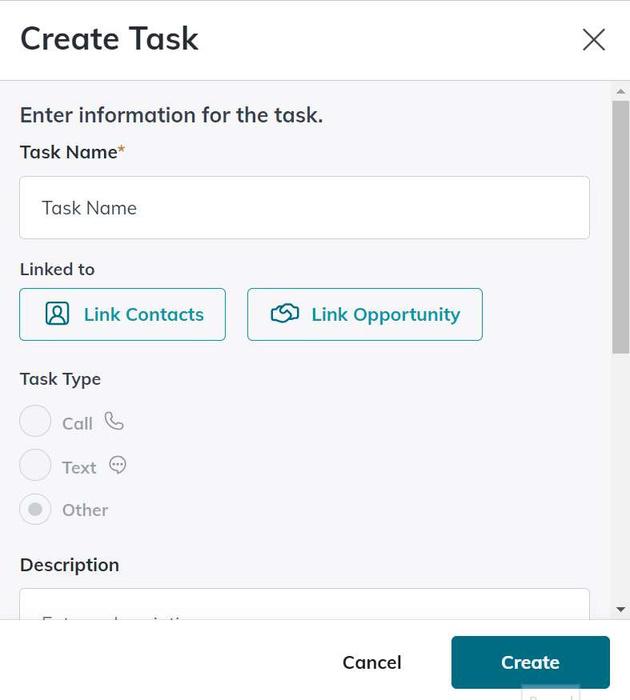
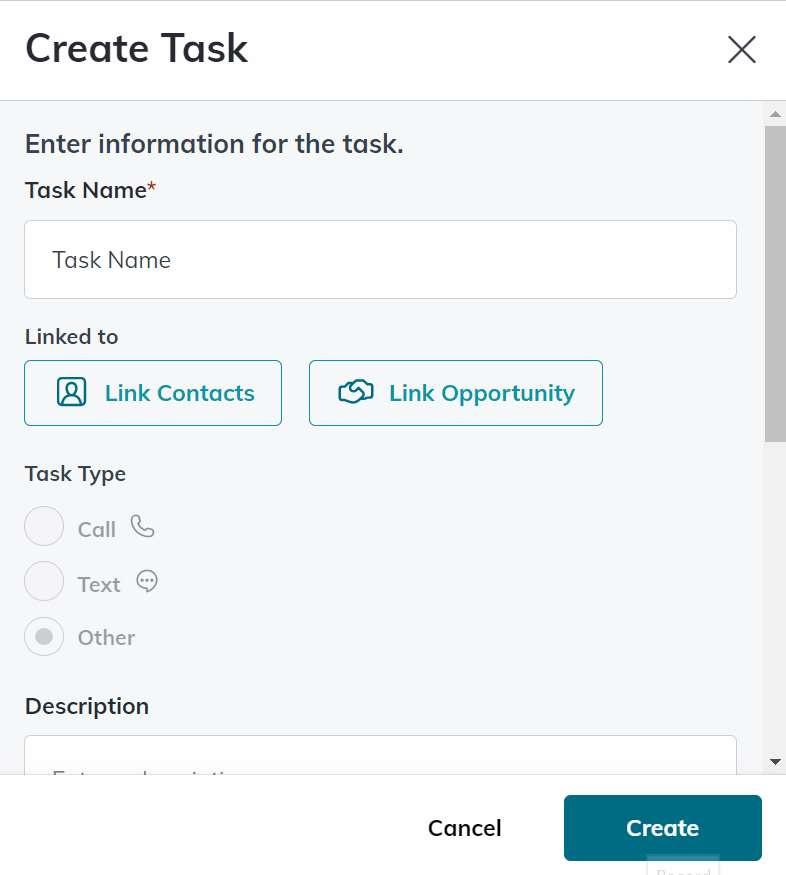
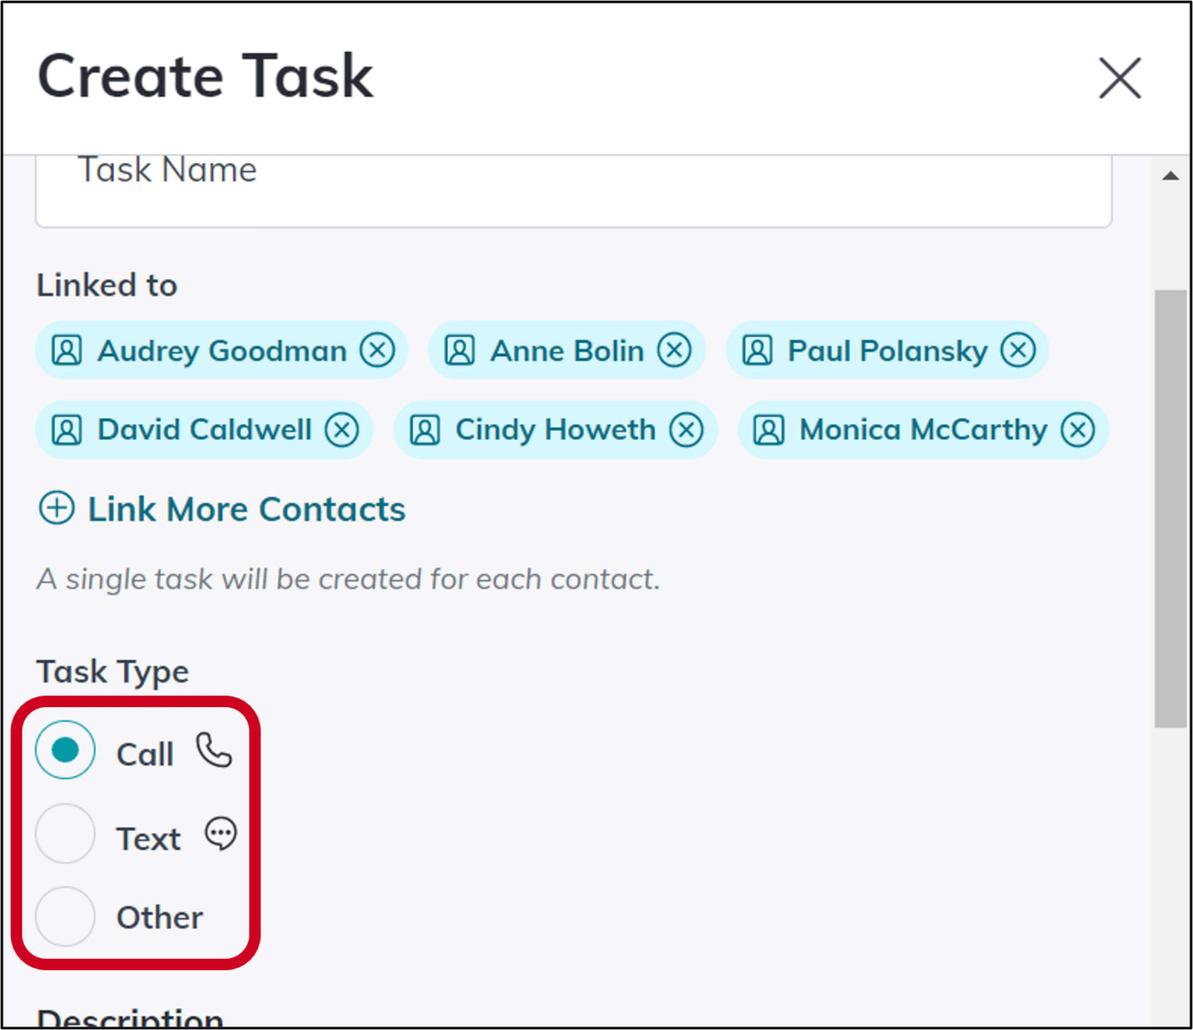
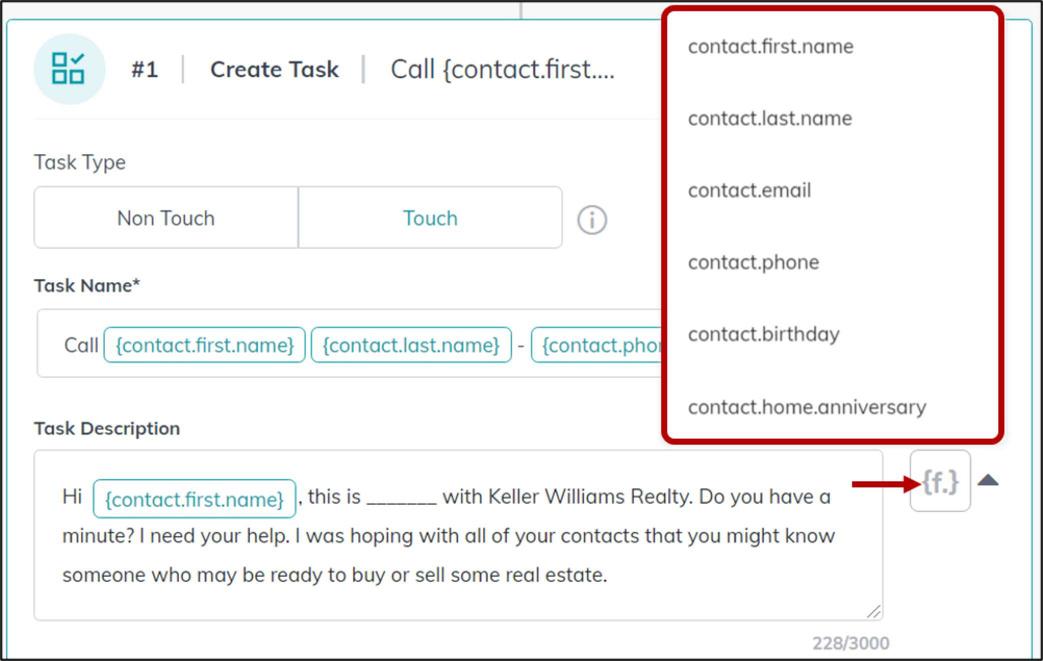
Create Task
Make a Call
Send Email
Send Text
Add to SmartPlan

1 Enter the Task Name, and select whether this is a Touch Task using the checkbox.
You have the ability to use the Add Merge Tag drop-down, below the Task Name field, which gives you the ability to have contact specific information in the task name (e g "Social Interaction with {contact first name} {contact last name}")
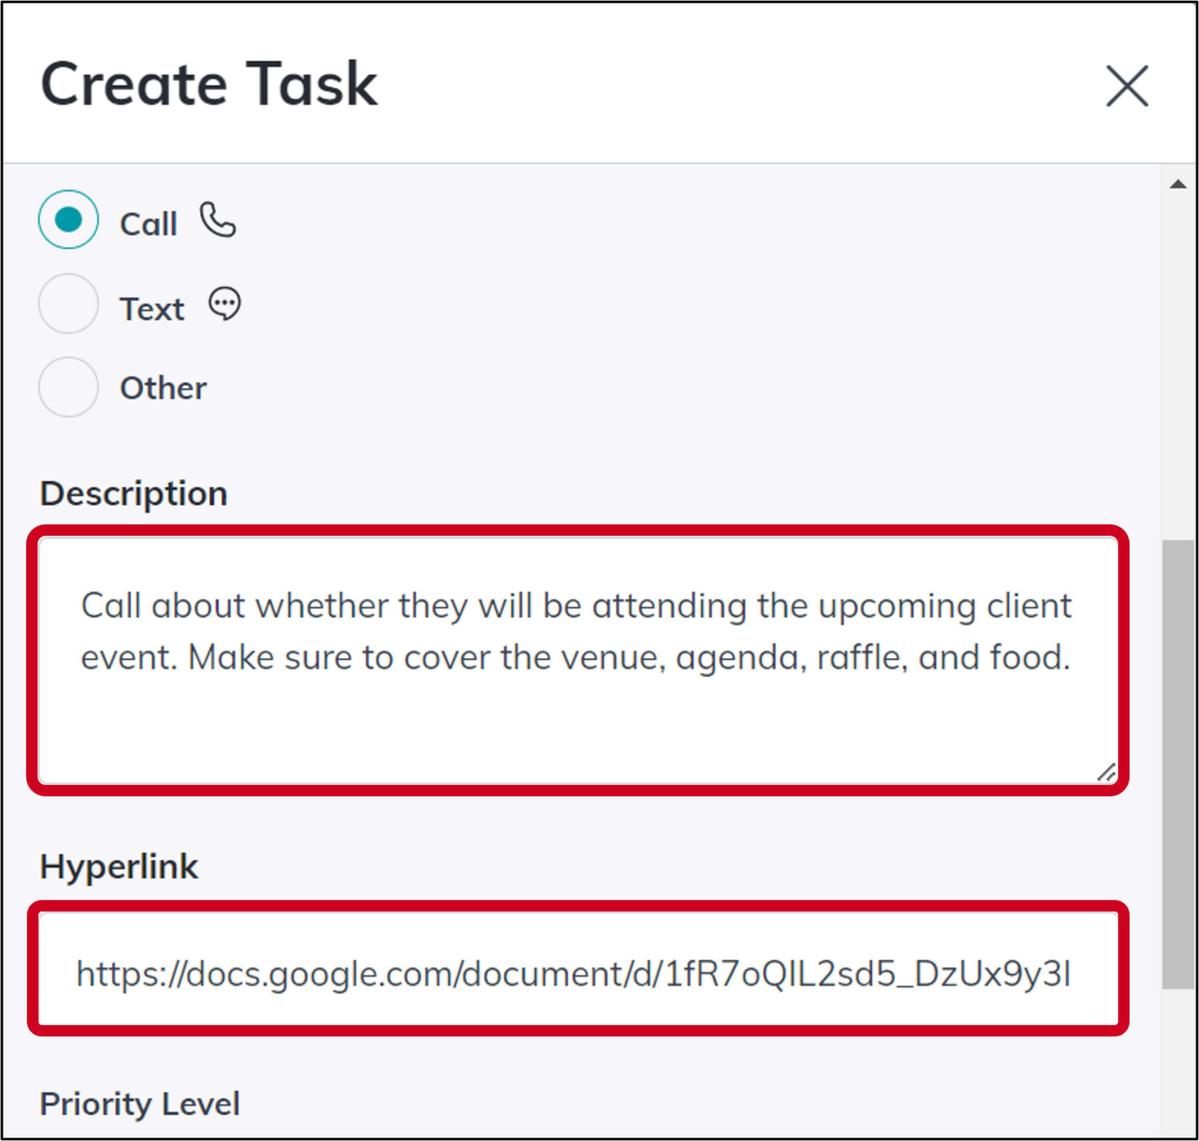
2. Enter a Task Description.
There is a 3000 character limit for Task Descriptions. You have the ability to use the Add Merge Tag drop-down, below the Description field, which gives you the ability to have contact specific information in the description like name, phone number, email, etc (e g "Reach out to {contact first name} at {contact phone}")
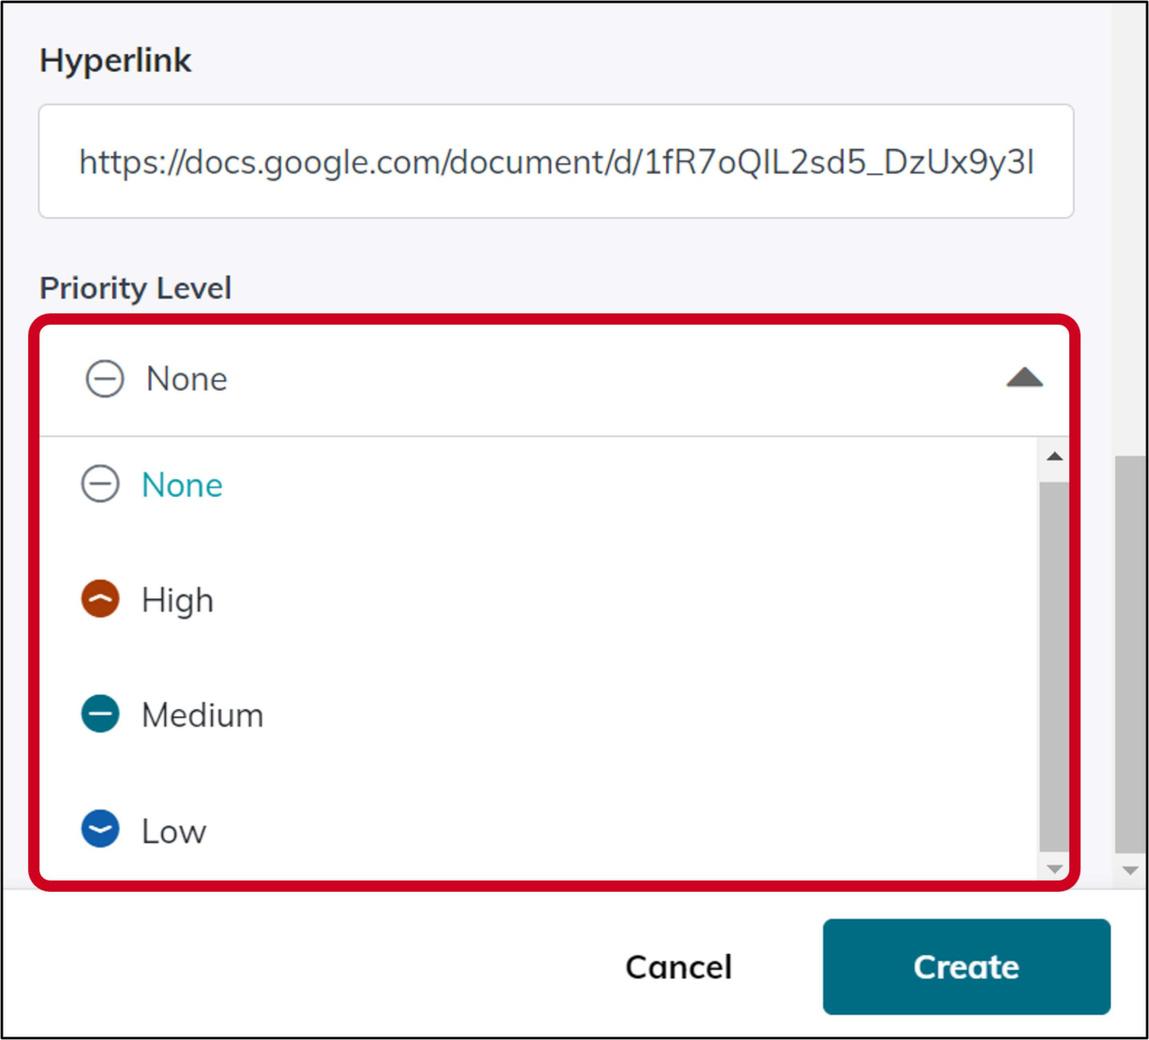
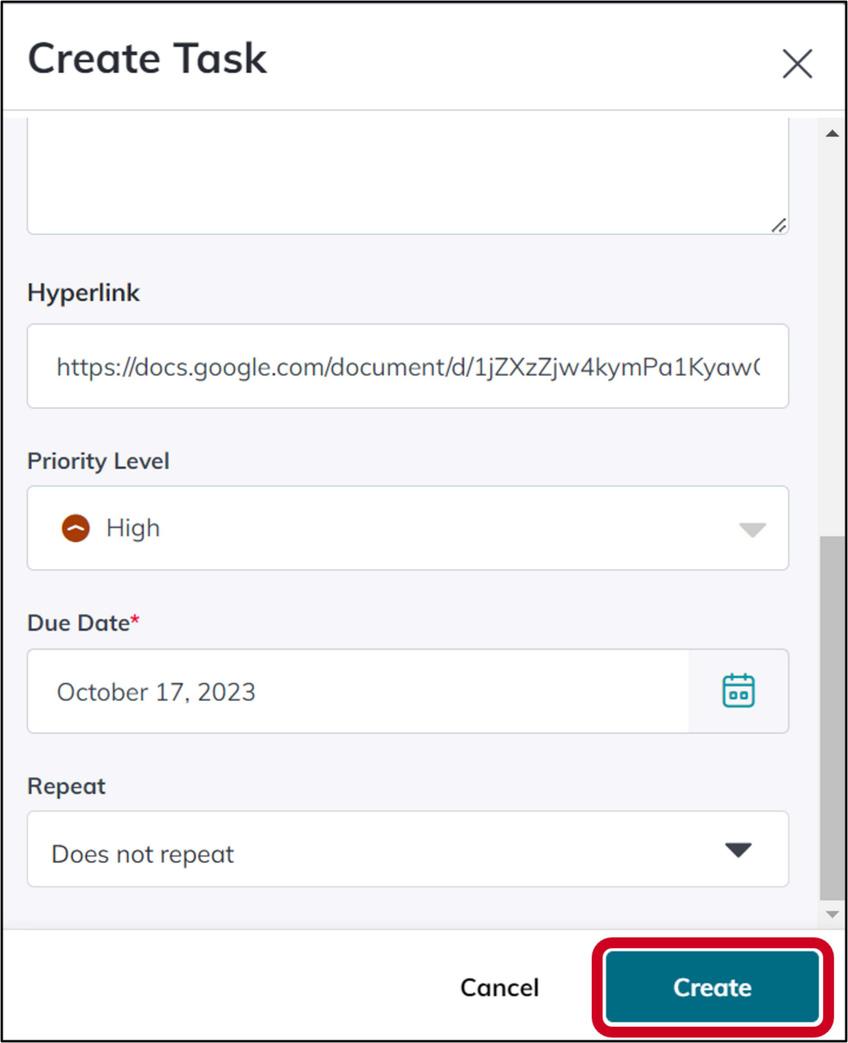
3. Next, you have the option of entering a Hyperlink and set the Priority Level for the task.
The hyperlink field is useful if there is a web page you want to let a contact know about on a phone call, or maybe you are setting an internal task for yourself and want to link to the resource you need while actually completing the task
The priority level is a way to organize your tasks, where you can use filters to view what is most important, in the moment.
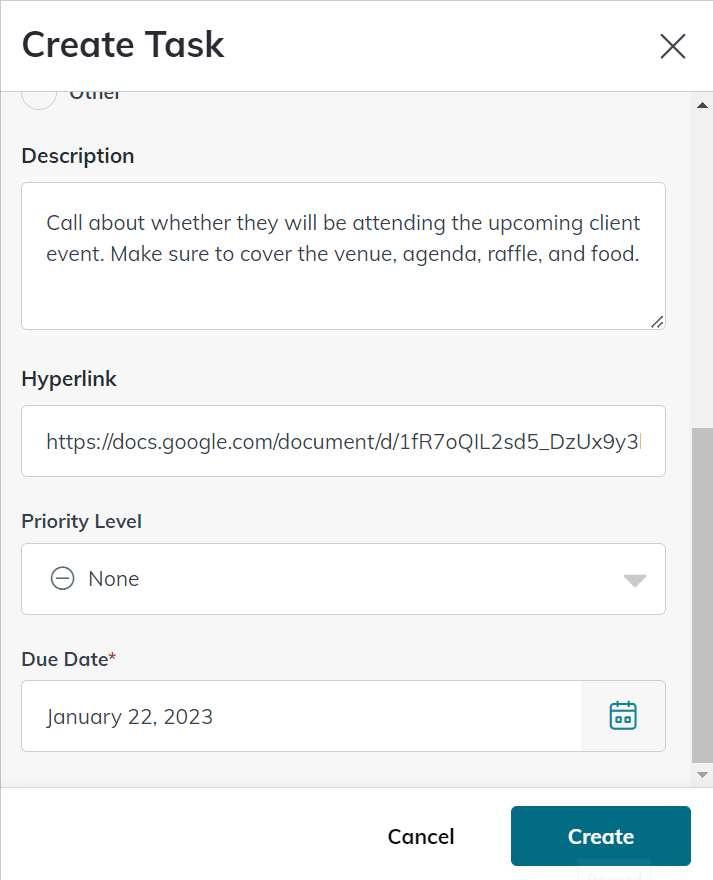
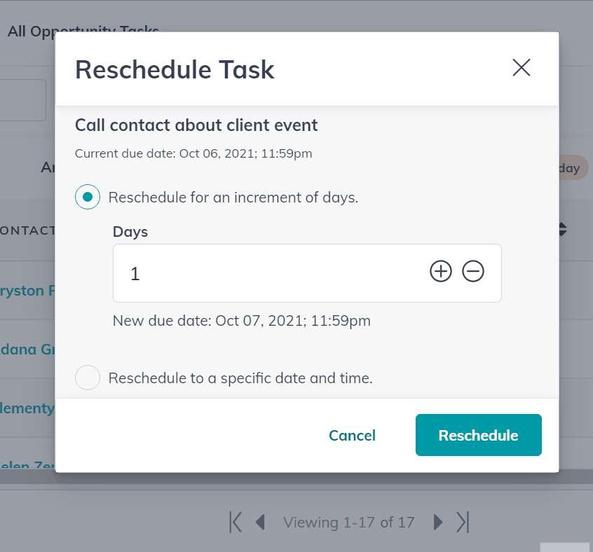
4 In the "When is the task due?" field, select how you want the due date of the task handled Once the task populates, use the drop-down to select when it should be due (from Same Day to 14 days) and then select what time you want the task to be due
By default, tasks are due at 11:59 PM (All Day), but you can uncheck the All Day checkbox and adjust this as needed
KW Answers
5 In the "When should the task be created?" field, select the Time of Day you want the task to populate You can also use the Day drop-down to move the step to a different day, but you also have the ability to drag and drop the step later, which might be easier
6 Click Add Step, at the bottom right of the page

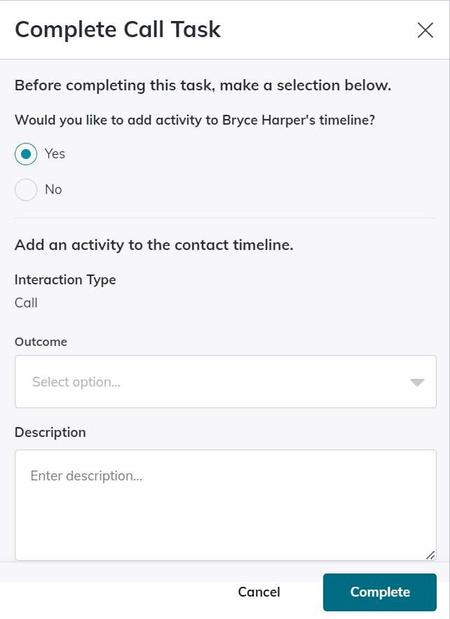
Make a Call
1 Enter the Task Name, and select whether this is a Touch Task using the checkbox
You have the ability to use the Add Merge Tag drop-down, below the Task Name field, which gives you the ability to have contact specific information in the task name (e g "Social Interaction with {contact first name} {contact last name}")
2. Enter a Task Description.
3 Next, you have the option of entering a Hyperlink and set the Priority Level for the task
4. In the "When is the task due?" field, select how you want the due date of the task handled. Once the task populates, use the drop-down to select when it should be due (from Same Day to 14 days) and then select what time you want the task to be due
5. Click Add Step, at the bottom right of the page.

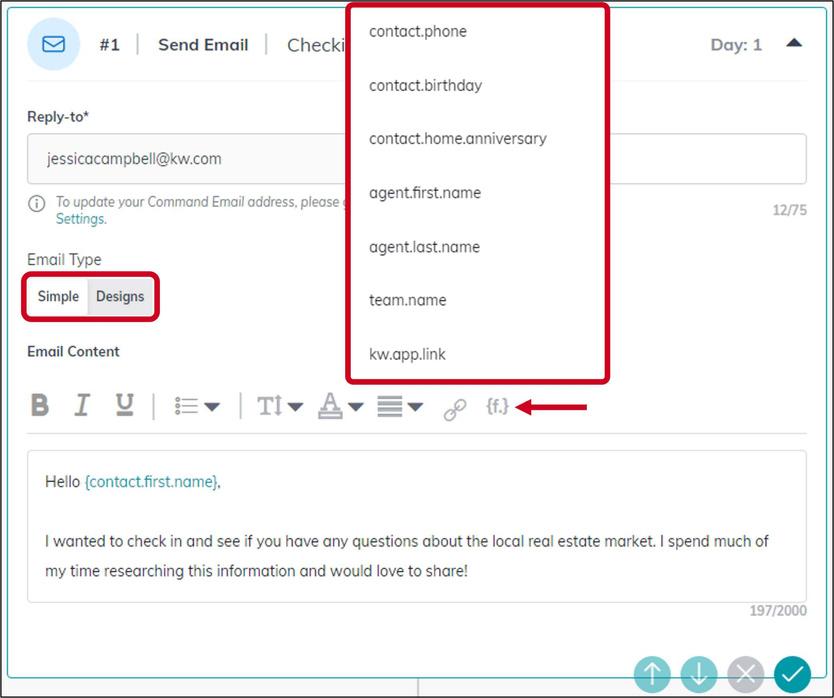
1 When creating an email step, you will see two email types: Simple or Designs. Select the type of email you want to send, enter a subject and then enter or select the body of the email
Simple - with this option, you will just type out your email message and you have some basic formatting tools available, as well as the ability to use Merge Tags and create Hyperlinks.
Designs - with this option, you will be able to select a template from Designs and edit it from within the SmartPlan editor Once you are done editing, close out of the template (using the X at the top right of the page) and you will see the email load into the SmartPlan step.
2. In the "When should the email be sent?" field, select the Time of Day you want the email to be sent (Any Time, Early Morning, Morning, Afternoon, Evening)
3. Click Add Step, at the bottom right of the page.

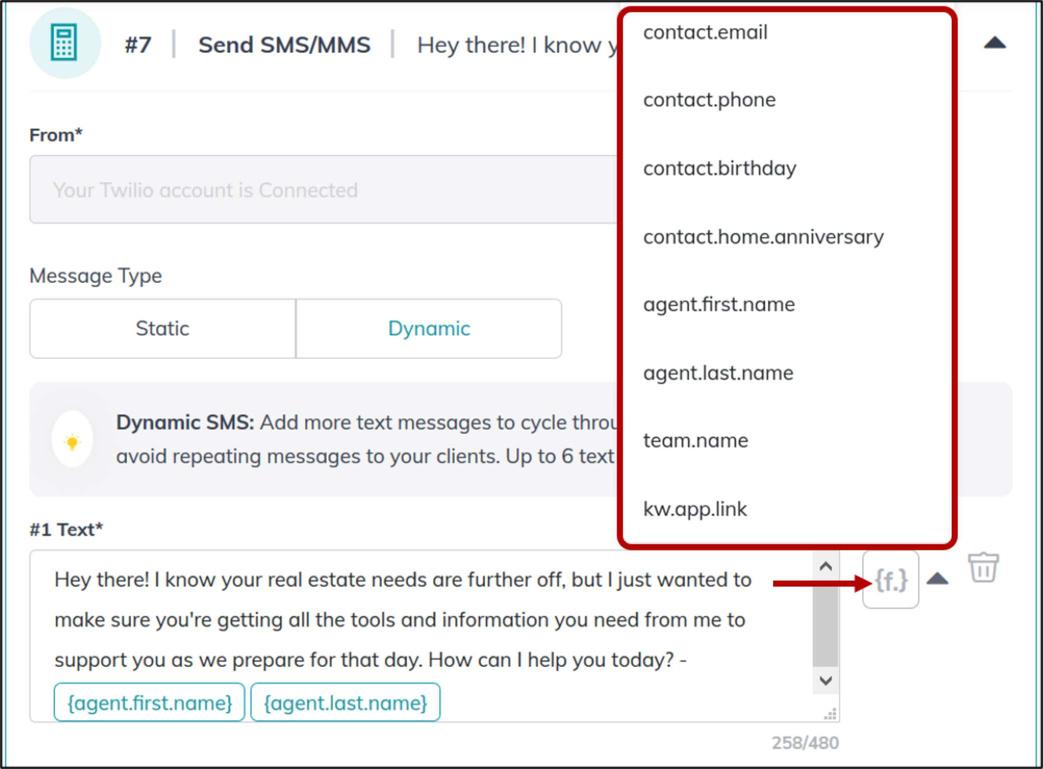
1 Choose to send an automated text message from your SmartPlan, using Twilio, or create a text task If you choose to create a text task, the workflow will be the same as the Call section above.
2. If you choose to send an automated text message, using Twilio, select whether you want to use a Static or Dynamic Text Type, then enter the Text Content
Static - with this option, you can set one text message that will be sent in this step, which will repeat if the SmartPlan repeats.
Dynamic - with this option, you can add multiple text messages for the same step Each time the SmartPlan repeats, it will send a different text message to your contact, when this step is triggered
3 In the "When should the text be sent?" field, select the Time of Day you want the text to be sent (Any Time, Morning, Afternoon, Evening).
4 Click Add Step, at the bottom right of the page
KW Answers

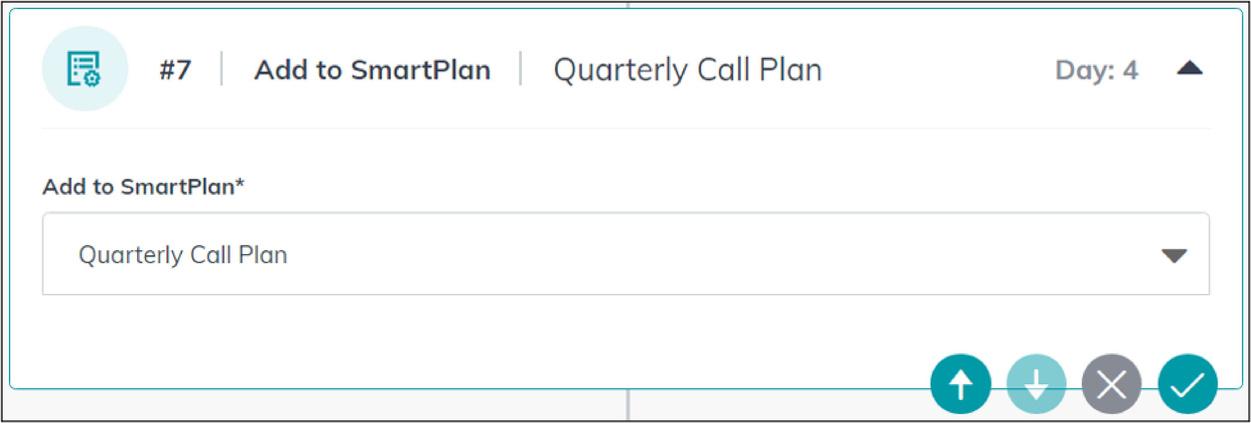
Add to SmartPlan
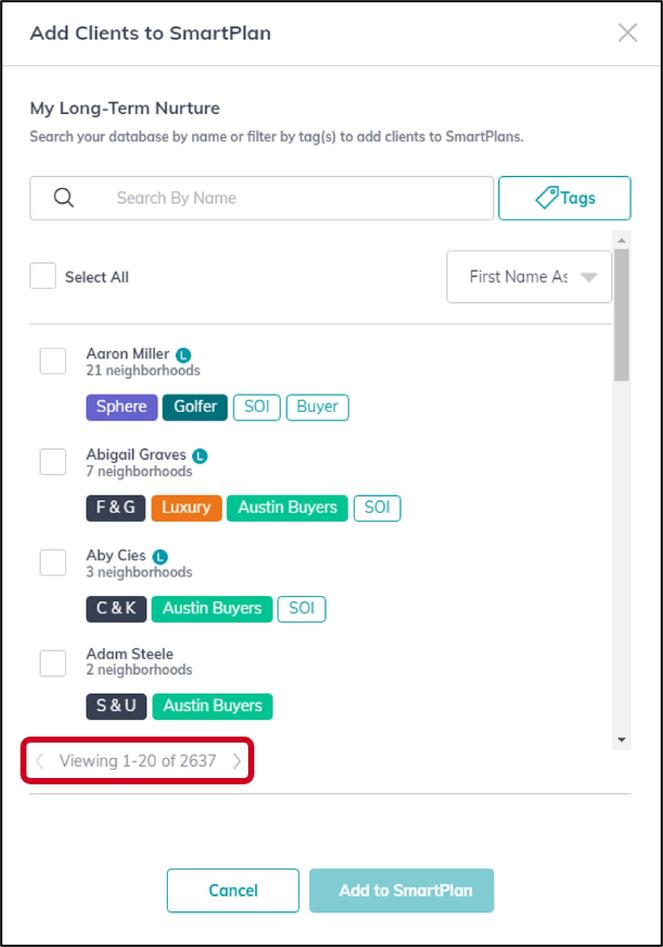
1. Use the "Add To" drop-down to select the existing SmartPlan you want to add the contact to, in this step
2 In the "When should the contact be added to the SmartPlan?" field, select the Time of Day you want this action to take place (Any Time, Early Morning, Morning, Afternoon, Evening).
You can also use the Day drop-down to move the step to a different day, but you also have the ability to drag and drop the step later, which might be easier.
3 Click Add Step, at the bottom right of the page
Manage the SmartPlan Schedule
1. Once you've added a step to a day, you can click on the Day Card to take a few actions:
At the top left of the card, you see the delay settings for that day. Click to select how many days should elapse, after the previous step, before this day launches. Once you make a change, you will see the Day Number change to reflect the new schedule
You can click Add Step, at the bottom left of the card, to add another step to that day.
Ensure the Time of Day settings line up correctly. You will see an error if a step with a later Time of Day setting is set before a step with an earlier Time of Day setting
Within the Day card, you can click and drag the steps to reorder them, for that day.
Edit a Step
1 To edit a step, find and click on the step you want to edit the details for, then click the Edit icon, , at the top right of the page.
2 Make the changes, then click Save Changes, at the bottom right of the page
Remove Days and Steps
1. To remove a step, find and click on the step you want to remove, then click the Delete icon, at the top right of the page
2. A confirmation will appear, click Delete.
3 To remove an entire day, find and click on the Day card, then click the Delete icon, at the top right of the page.
4. A confirmation will appear, click Delete.
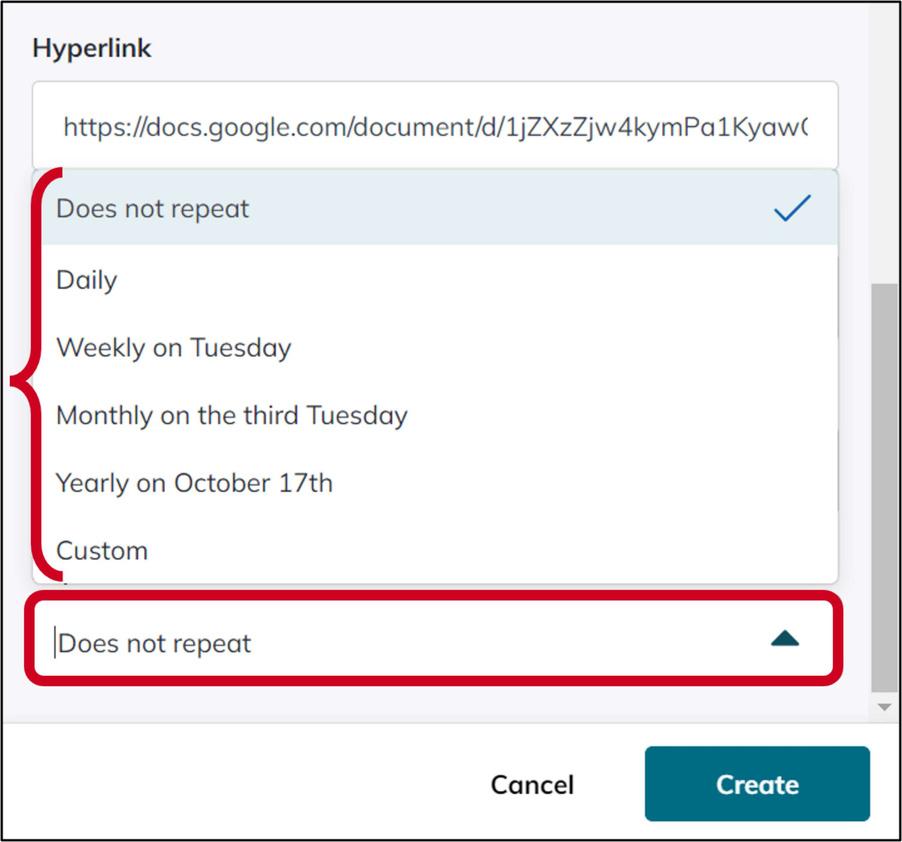
Add a Repeat (end of the SmartPlan)
At the end of a SmartPlan, you have the option of setting the SmartPlan to repeat, either 1 - 6 times, or to repeat without end:
1. At the bottom of the SmartPlan workflow, click Add Repeat.
2 At the top of the "Add Repeat" panel, use the Delay field to set the number of days you want to wait before the plan repeats, once it gets to the end of the last step. You can delay the repeat anywhere from 0 - 369 days.
If you choose to not set a delay (if you set it at 0 days), make sure you are aligned with the first step of the plan as it will immediately repeat and launch the first step, based on how that first step is set up
3. Use the Number of Repeats drop-down to select how many times you want the plan to repeat. You can choose anywhere from 1 - 6 repeats, or Unlimited for it to repeat continuously.
KW Answers
4. Click Add Repeat, at the bottom right of the page.
5. If you want to edit/delete the repeat settings, you can either:
Hover over the Repeat card and click the Delete icon.
Click on the Repeat card , make edits, then click Save Changes.
Save the SmartPlan
1 Once you are ready, click Save Plan, at the top right of the page
You can edit the SmartPlan Name before saving, at the top right of the page.
Add Trigger Contact Tags
Once you save a SmartPlan for the first time, you have the ability to add Trigger Contact Tags. You click
Add Trigger Tags, then select the tags you want to be a trigger. Once saved, any lead/contact you add that tag to, going forward, will be automatically added to the SmartPlan
You must add at least one step and save, before you are able to add triggers.
This is a "going forward" trigger, meaning that if a lead/contact already has the tag, they won't be automatically added to the SmartPlan.
You can add up to 10 contact tag triggers to a SmartPlan
This is only to add people to a SmartPlan If you remove a tag from a lead/contact, it will not remove them from the SmartPlan.
If you edit a tag in your Command Settings, that tag trigger will update automatically in SmartPlans
Deleting a tag in Settings will also remove the trigger from the SmartPlan automatically.
Publishing a SmartPlan to the Shared Library will remove all contact tag triggers from the SmartPlan
KW Answers
Select Your Time Zone for SmartPlans in Command
We now have time zone settings, in Command, that will enable agents to utilize SmartPlans no matter what part of the world they are based out of. SmartPlan text steps, that utilize Twilio, are limited to sending texts between 8am and 8pm This enables agents across the world to ensure that window is specific to their local area. Also, we now have time-based SmartPlans steps that allow an agent to set the general time a SmartPlan step executes (morning, afternoon, evening, etc.), and this ensures it goes out in the set timeframe specific to their local time zone
The default system time zone is UTC-6:00 (CST) America/Chicago. To select your time zone for SmartPlans:
1 Log in to https://agent kw com with your KW login credentials
2. Click your name, at the top right of the page, then select Settings from the drop-down.
3. On the left side of the page, open Command Settings, then open SmartPlans, and select Time & Date
4. Use the drop-down to select the time zone you want the system to use when sending out SmartPlans
The default system time zone is UTC-6:00 (CST) America/Chicago.
5. Click Save Changes, at the top right of the page.
KW Answers

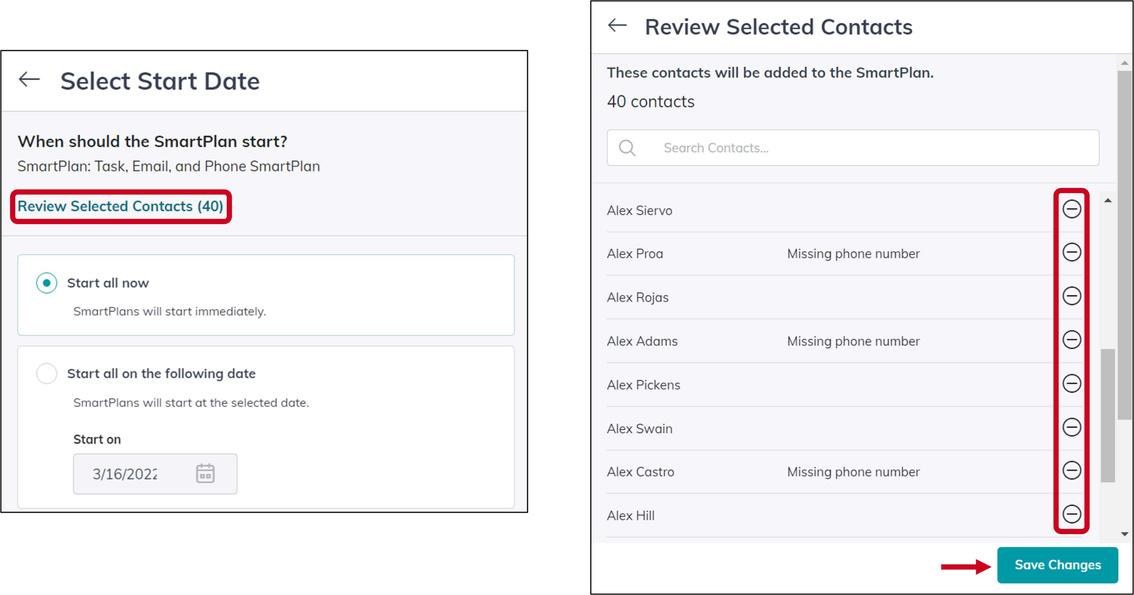
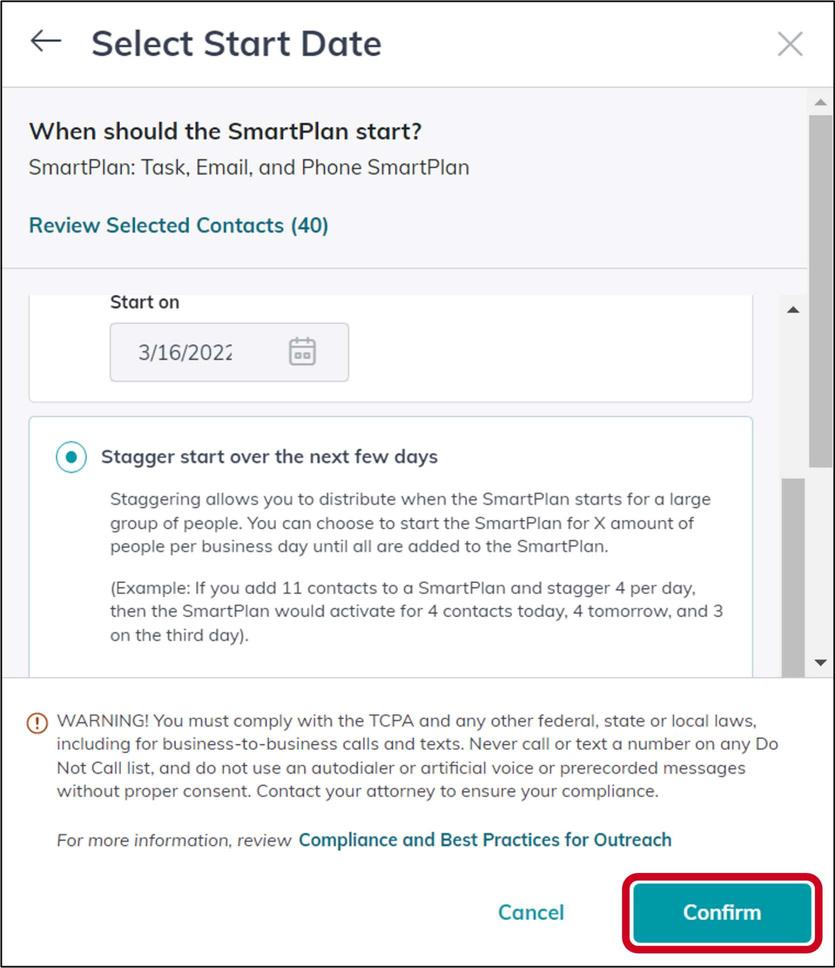
KW Answers Add Contact to a SmartPlan from within a Contact
KW Answers
KW Answers
KW Answers


KW Answers
KW Answers
KW Answers
KW Answers
KW Answers
KW Answers

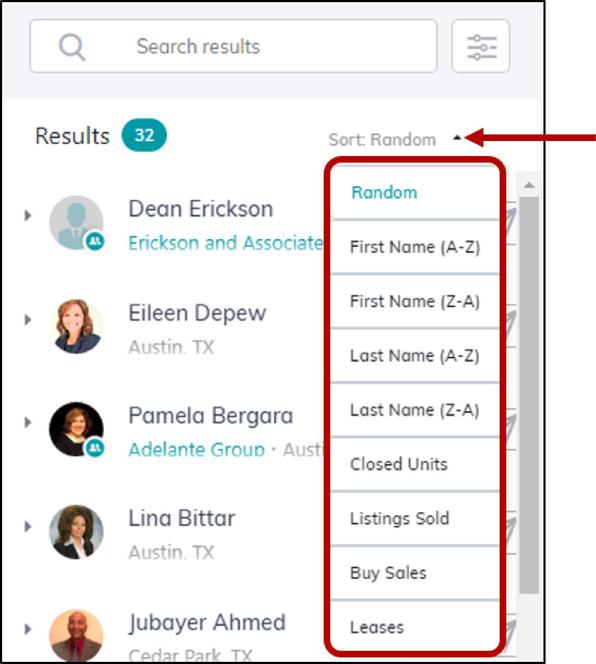
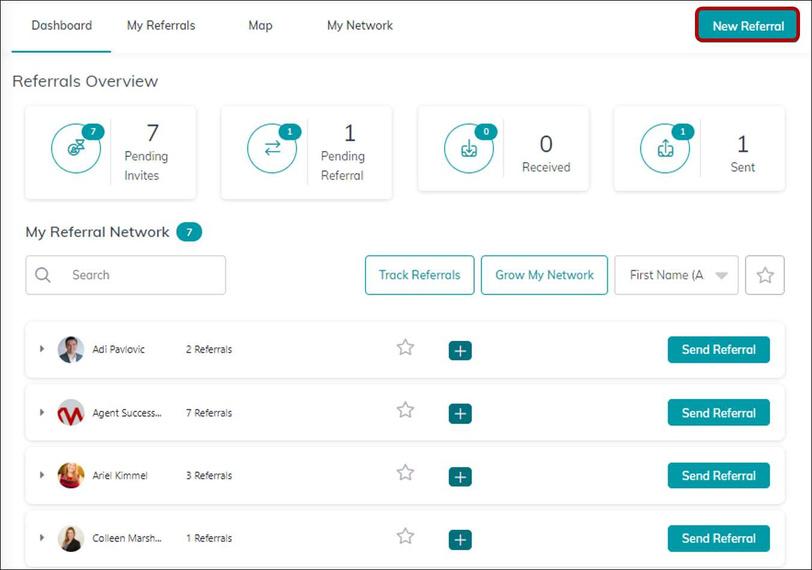
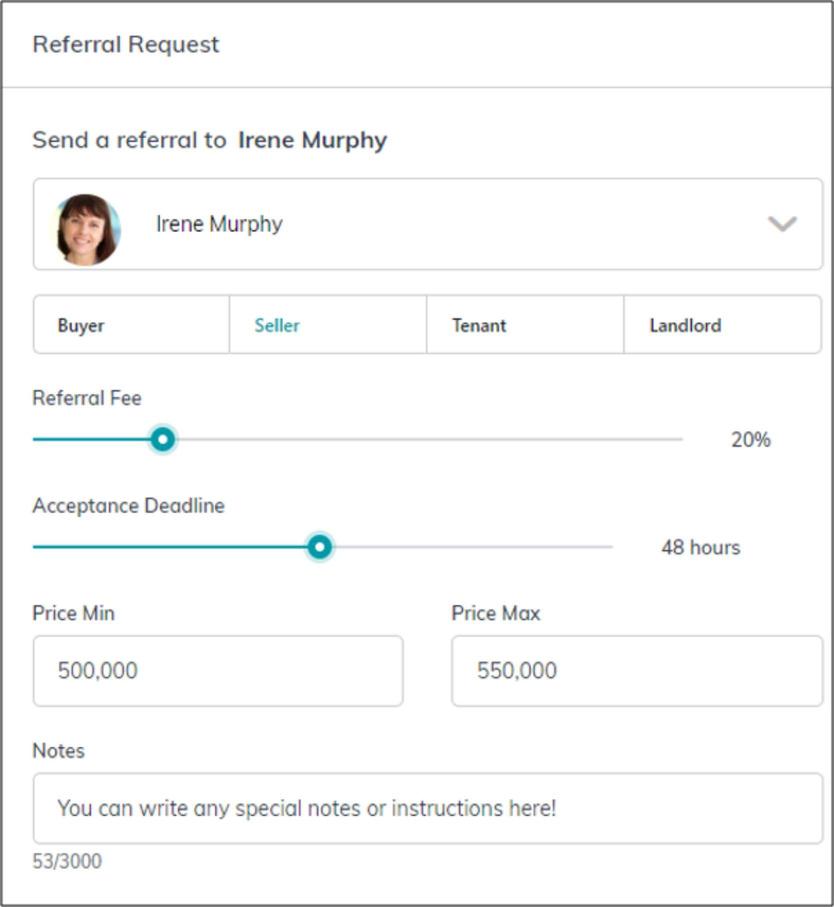
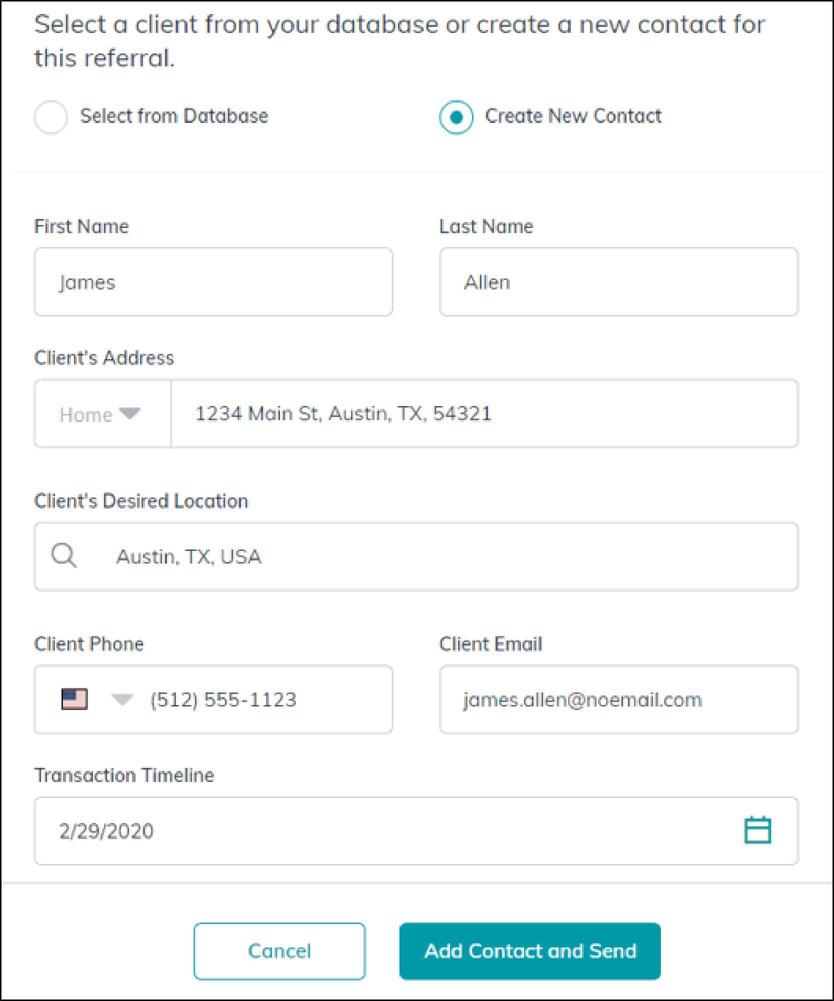
Referrals


KW Answers


KW Answers

KW Answers
KW Answers
KW Answers

Opportunities
How to Create an Opportunity and a Loop:
Go to your contacts tab in command (it is the second tab down)
1. Go to the buyer or sellers contact, if they do not have one, hit create contact and input the appropriate information
2. On the right hand side of the contact card, in the second column you’ll see opportunity: click on that then click new opportunity
3. From here fill out all of the required information
4. Additionally, under the opportunity phase, please make sure it is active. NOTE- If you know the property address you’re buying or selling, please make that the opportunity name. At this point, you have your opportunity. If it is a listing, in the top left, you should see a button that says select listing. Go ahead and click and select your listing
5. To start your loop, go to the documents tab
6. In the top right corner, click on Start Transaction NOTE- If it gives you the option between Dotloop or Docusign, or you have multiple dotloop profiles and have not set this up with the MCA, please email them.
7. If you have successfully done that, you should be able to click Go to Transaction, it should have taken the place of Start Transaction
9.
8. Now you have successfully created your opportunity and loop, and any document that you edit in dotloop can be brought straight into the loop
How to Submit Documents for Compliance:
1.
Once you have signatures on the templates we provide in dotloop, you have to have them approved by compliance
To do this, go to the documents tabs. There are three different sets of documents to submit. It will take you to the first set. You should be able to click on a drop down box and select the corresponding document
2. Once you have all the required documents in, check the box by the status column and click submit to MC in the top right corner. It usually takes 24-48 hours for compliance to review these documents
4.
3 Repeat steps for the under contract and closed tabs on the left. Each section requires different documents for you to submit. Make sure that under each tab you submit those documents, so you should submit them a total of three times NOTE- In the closed category, there is a digital copy of DA. This will act as a receipt for your commission. The MCA will attach this document when you are paid.
If everything looks good, hit submit Sometimes, it will ask you for a contract date, to input this click the light gray pencil above the first box on the screen
To the right of the documents tab, click on offers and commissions 1. Click create new offer 2. Add the property address 3. Click the blue parties button 4. It is important to note that all this information is internal and for reference only. The more complete your records are, the more you have to come back and reference. Fill out the parties tab accordingly and click terms 5. Input the amount of cash the client is putting down and how much the financing amount was. If this was input correctly, the sales price in command should match the actual sales price on the contact 6 Below that, input the earnest money amount then move forward to agent analysis 7. You have the option to leave some notes on the Co-op agent for our reference 8. You have now created your offers and commissions, click accept, now click manage commission 9. This will show you a
of your
NOTE- If you have an
or agent on this deal, you
that. Click edit
How to Submit an Offers and Commissions:
breakdown
commission
additional bonus, deduction, referral,
will need to include
agent payment and scroll to the bottom to input that. If you have a referral, please email a copy of the W-9 for the referral company to the MCA 10.
11
Listing:
Required Documents
Kentucky Fair Housing Brochure
Guide to Agency Relationships
Agency Consent- Seller/Lessee
Exclusive Right to Sell
MLS Input Sheet
APHW Pamphlet/Waiver
Lead Based Paint (if older than 1979)
Seller Disclosure of Property Condition (signed by both parties)
Residential Real Estate Purchase and Sale Contract - Signed by Both Parties
Inspection Agreement Form - Signed by all parties
Settlement Statement
Final Walk Through
Purchase:
Kentucky Fair Housing Brochure
Guide to Agency Relationships
Agency Consent - Buyer/Lessee
Buyer Representation Agreement
APHW Pamphlet/Waiver
Residential Real Estate Purchase and Sale Contract - Signed by Both Parties
Seller's Disclosure - Signed by Both Parties
Copy of Escrow Check
Inspection Agreement Form
Lead Based Paint (if older than 1979)
Settlement Statement
Final Wallkthrough

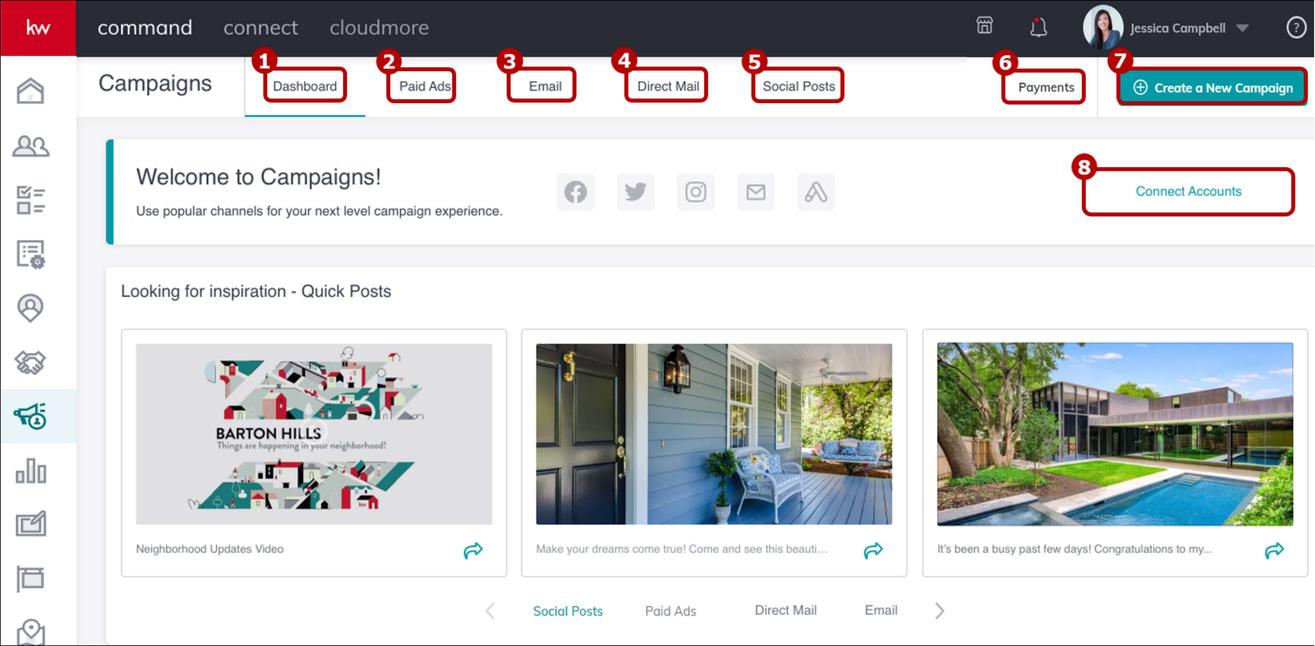
Campaigns
What’s available in the Campaigns applet?
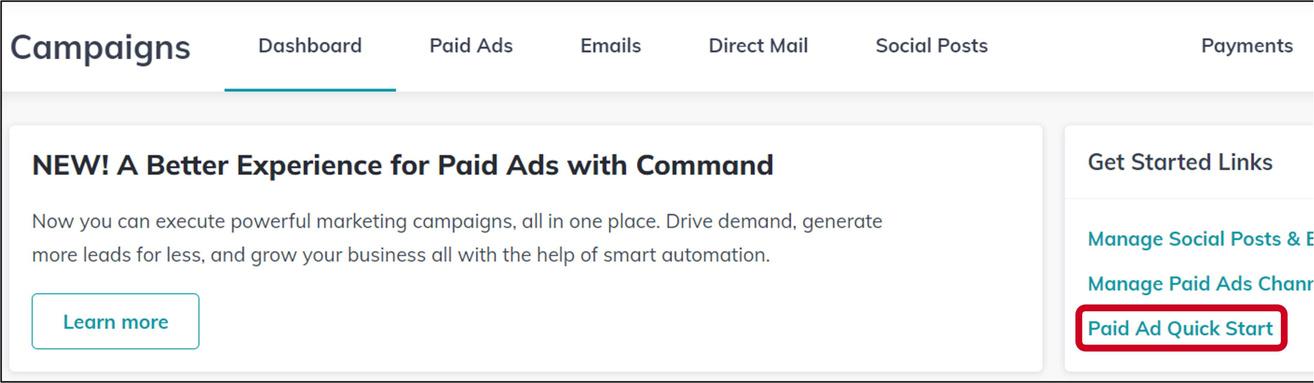
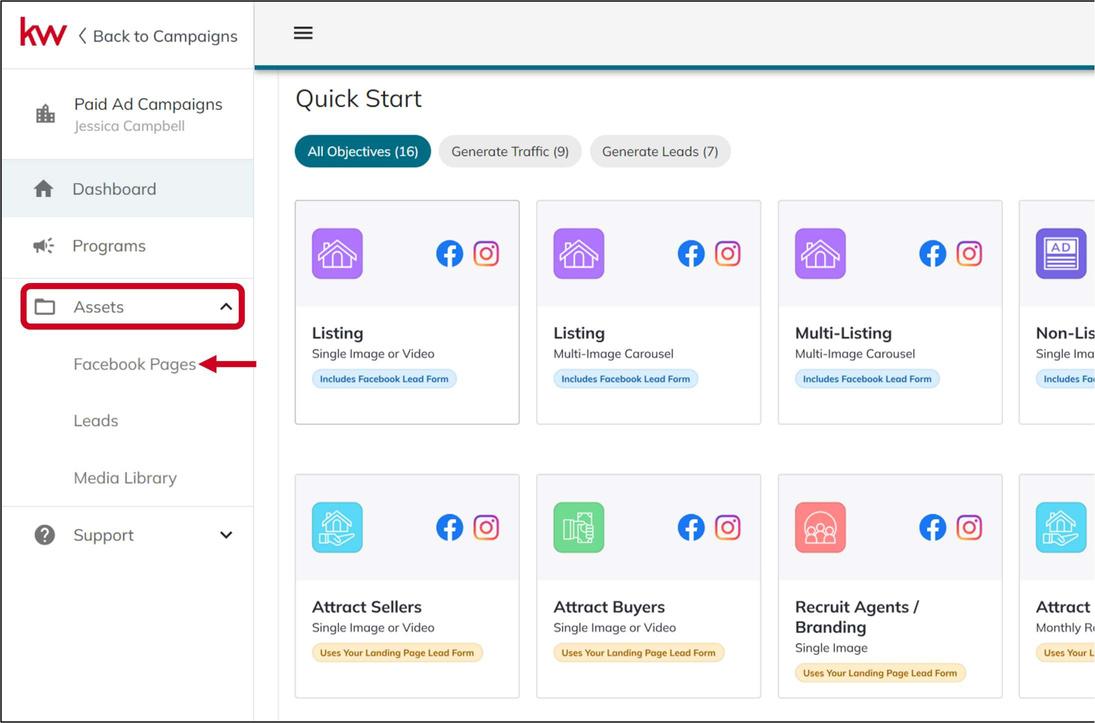
Paid Ads Manager
Next Page
Email Campaigns
Utilize Designs to create email campaigns sent out through Command. This portion of the applet tracks sent, opened, clicks, unsubscribed and more for individual email campaigns.
Direct Mail
Create mailers, select addresses, and pay.
Command with print and post your mailers.
Social Media Scheduler
Schedule your social media posts on Instagram and Facebook through Command.

Scan to access a blank Content Calendar.


KW Answers

KW Answers
KW Answers
KW Answers
KW Answers


KW Answers
KW Answers

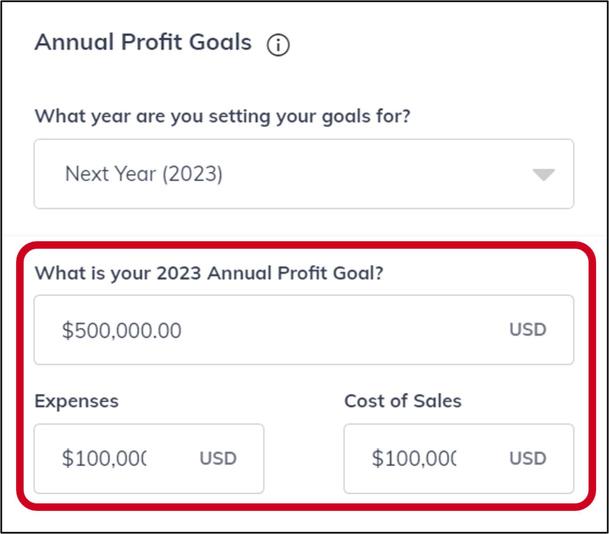
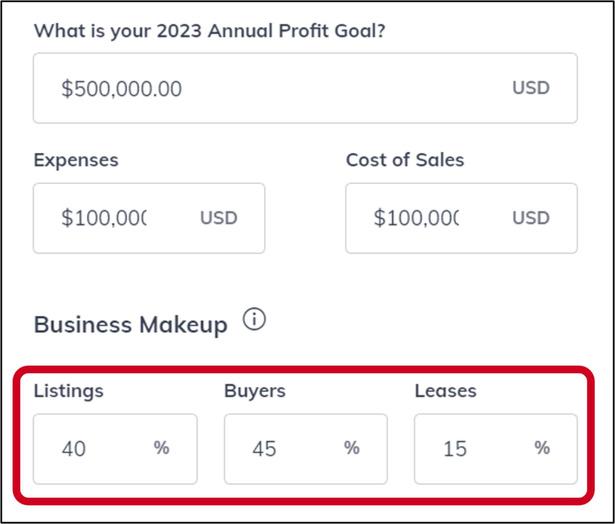
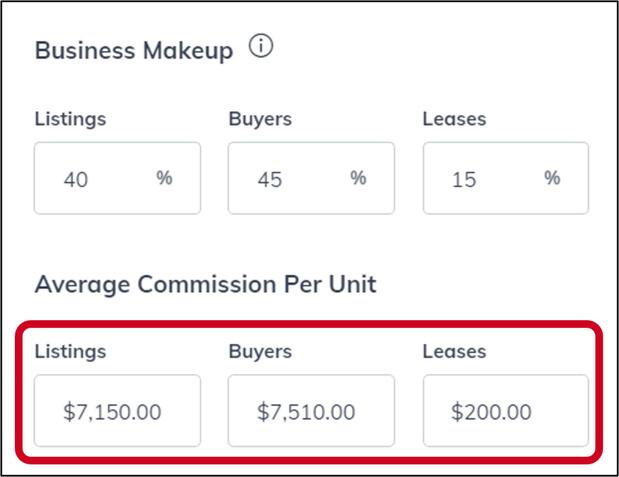
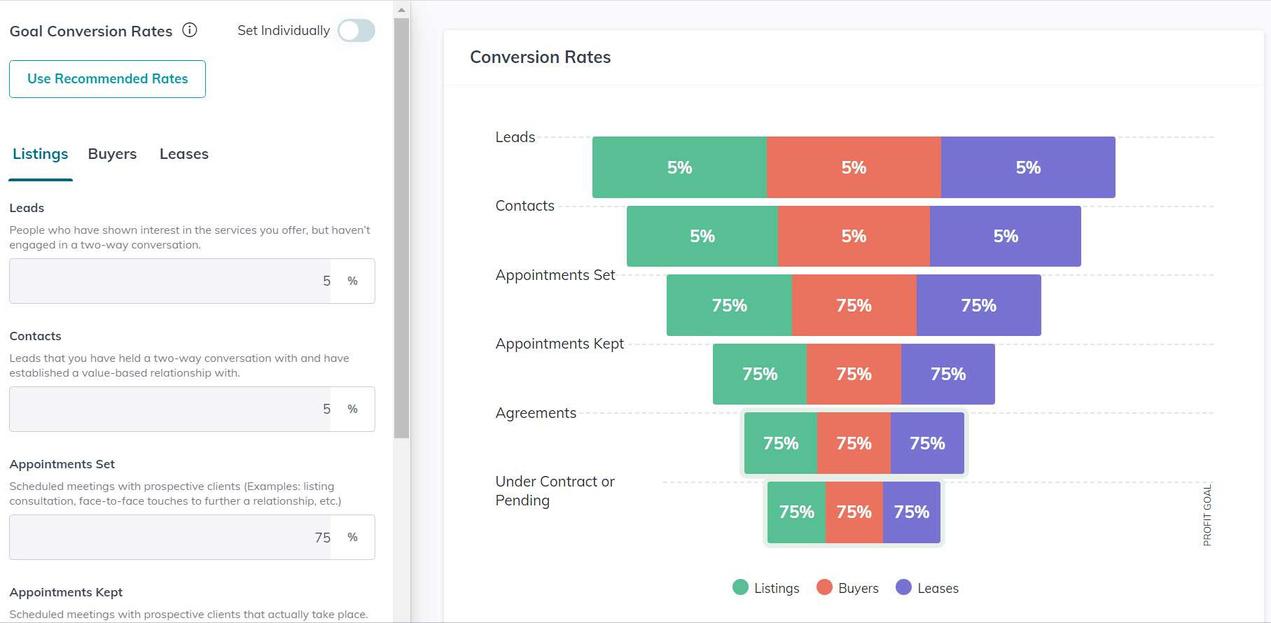
Reports


KW Answers
KW Answers
KW Answers

Designs


KW Answers

KW Answers

KW Answers
KW Answers
KW Answers
KW Answers

KW Answers
KW Answers

KW Answers

KW Answers

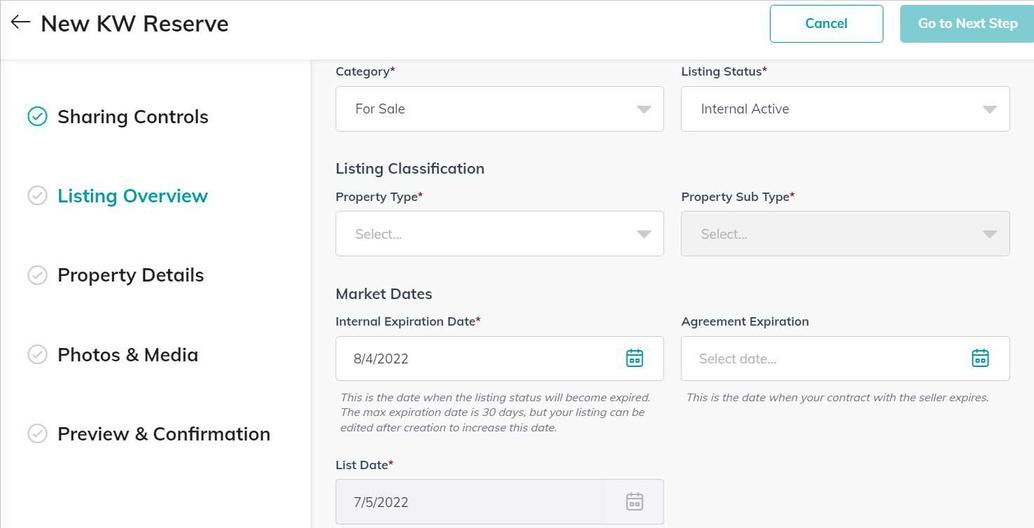
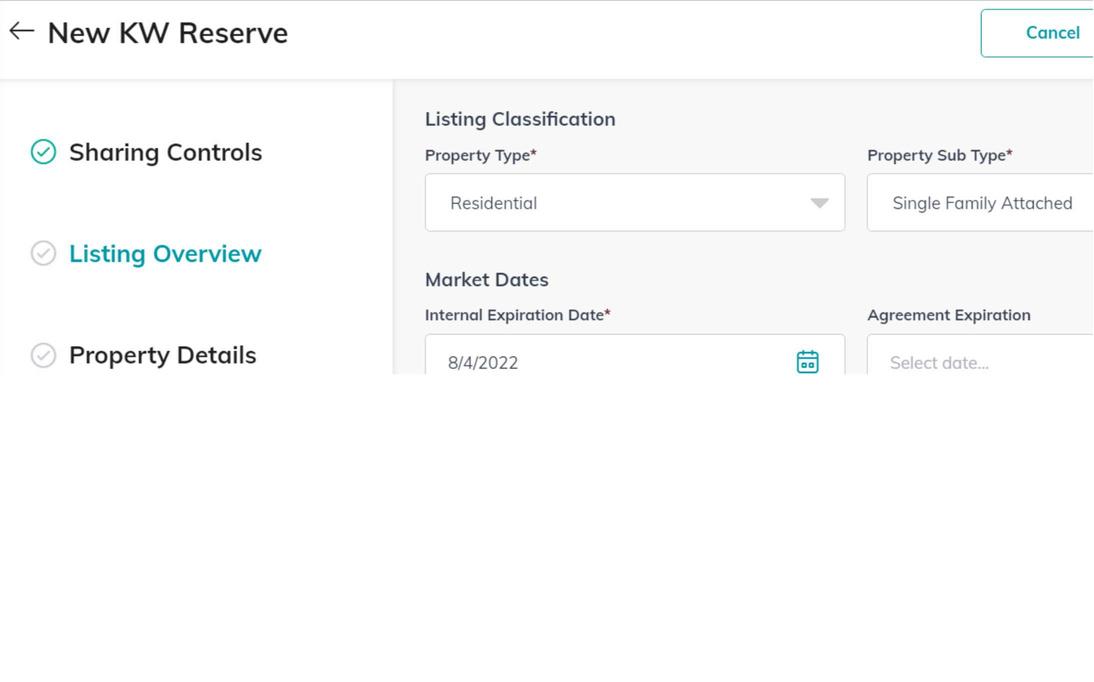
Listing

KW Answers
KW Answers
KW Answers
KW Answers
KW Answers
Sync MLS
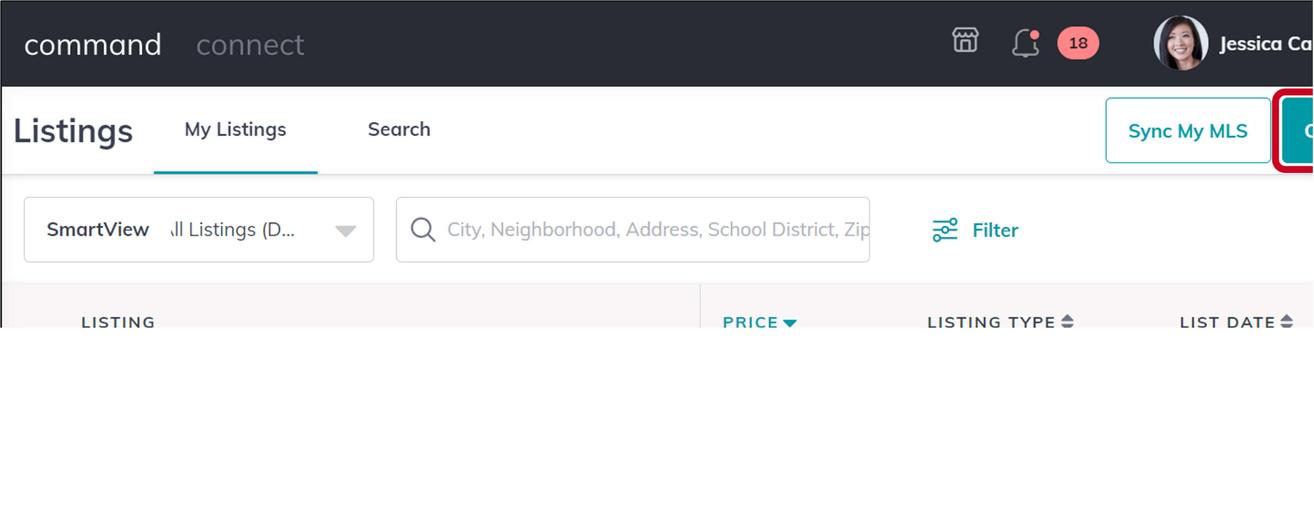
Click the Listings icon, on the left sidebar (or any other applet that is connected to the listings feed like Campaigns or Opportunities).
2.
1. Click Sync My MLS.
3
Enter a listing address or an MLS number into either of the corresponding fields then click Search. Only one listing is required to link all your listings from an MLS to Command.
4.
Select the listing from the list of results and then click Next.
5. A confirmation message will appear stating the verification email has been sent.
Select whether you're the Primary Listing Agent or the Co-Listing Agent and click Next. An email will be sent to primary listing agent's email address that is on file within that MLS, regardless of the option selected.
6
Click OK. If there is another MLS the user needs to add click Sync Another MLS & Listing. The MCA and primary agent will receive a Command bell notification indicating a request has been made.
7.
If you are the primary listing agent, proceed to access the email that was sent to the email address on file. It will be sent from noreply@kw.com. If you recognize the request, click Confirm.

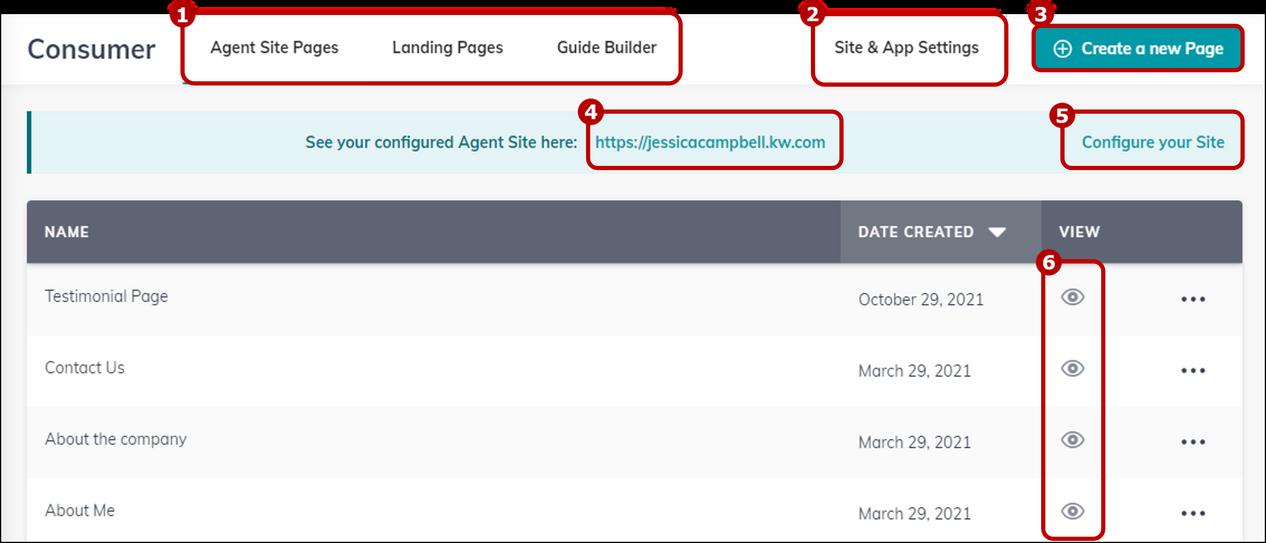
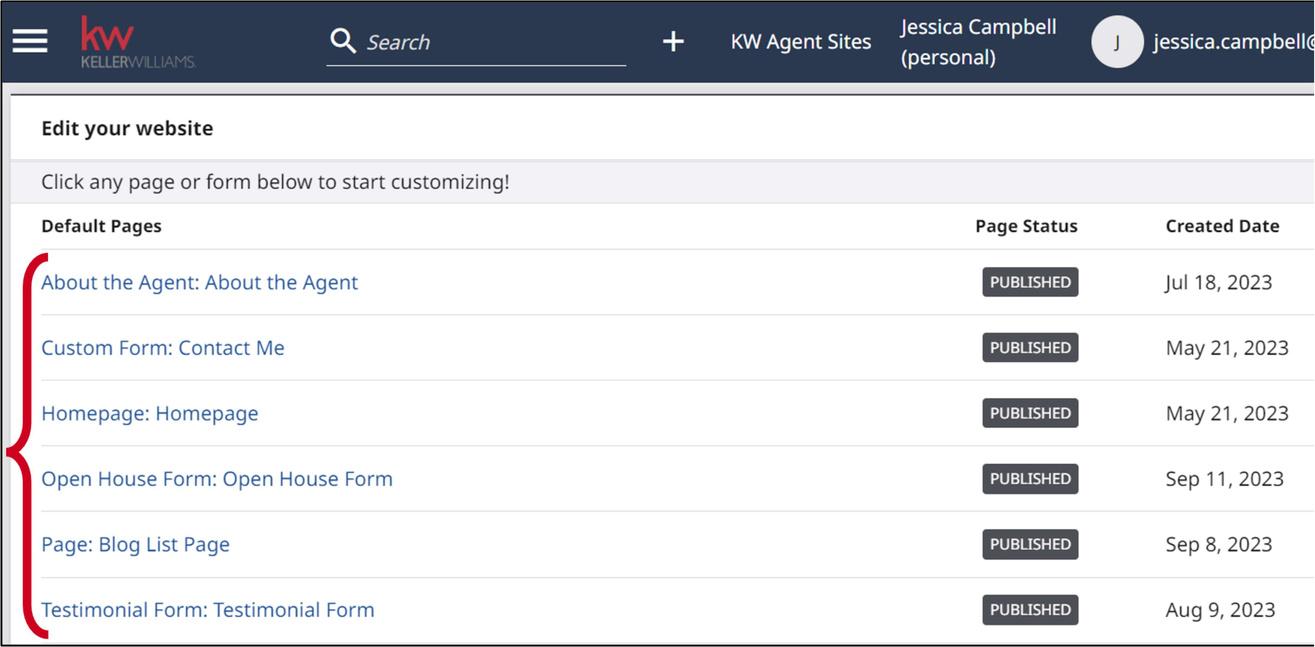
Consumer


KW Answers


KW Answers
KW Answers

KW Answers

KW Answers
KW Answers
KW Answers
KW Answers
KW Answers
KW Answers
KW Answers
KW Answers

KW Answers
KW Answers
KW Answers
KW Answers

KW Answers
More Command Resources


Scott LeRoy Marketing Command Cheat Sheets
Scott LeRoy Marketing YouTube Channel
KW Answers: Command
CommandJumpPackwascreatedbyLexie Hildebrand,DASofKellerWilliamsCommonwealth, usingself-producedmaterialsandKWAnswer articles Forupdatedversions,pleasereachouttoher

LEXIEHILDEBRAND
DirectorofAgentServicesandTechnology
8592290349
LexieH@kw.com
Telephone Consumer Protection Act (TCPA)
The TCPA regulates telemarketing calls, voicemails, and texts. There is no B2B exception to the TCPA
TCPA Liability:
$500 - $1,500 per violation, with lawsuits often brought as class actions
How to Comply:
Before calling or texting, confirm the number:
Is not on the national Do Not Call registry
Is not on any state, county, or local Do Not Call list
Is not on any internal (market center and region) Do Not Call list
Before calling or texting any number using an autodialer or artificial voice or prerecorded message, obtain or confirm prior express written consent
Know and follow all state/provincial laws in addition to the TCPA
Engage TCPA counsel to confirm compliance with all applicable laws and requirements
Command is the proprietary CRM of Keller Williams Realty International. All rights are reserved and usage is granted by permission from KWRI.
