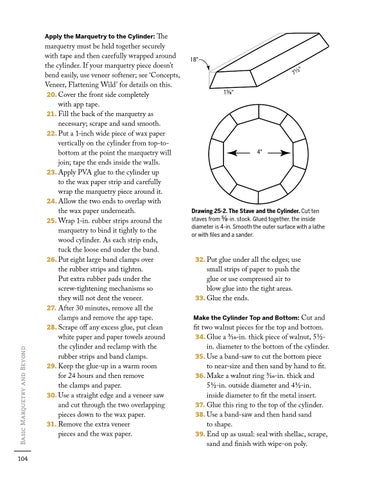
18°
The marquetry must be held together securely with tape and then carefully wrapped around the cylinder. If your marquetry piece doesn’t bend easily, use veneer softener; see ‘Concepts, Veneer, Flattening Wild’ for details on this. 20. Cover the front side completely with app tape. 21. Fill the back of the marquetry as necessary; scrape and sand smooth. 22. Put a 1-inch wide piece of wax paper vertically on the cylinder from top-tobottom at the point the marquetry will join; tape the ends inside the walls. 23. Apply PVA glue to the cylinder up to the wax paper strip and carefully wrap the marquetry piece around it. 24. Allow the two ends to overlap with the wax paper underneath. 25. Wrap 1-in. rubber strips around the marquetry to bind it tightly to the wood cylinder. As each strip ends, tuck the loose end under the band. 26. Put eight large band clamps over the rubber strips and tighten. Put extra rubber pads under the screw-tightening mechanisms so they will not dent the veneer. 27. After 30 minutes, remove all the clamps and remove the app tape. 28. Scrape off any excess glue, put clean white paper and paper towels around the cylinder and reclamp with the rubber strips and band clamps. 29. Keep the glue-up in a warm room for 24 hours and then remove the clamps and paper. 30. Use a straight edge and a veneer saw and cut through the two overlapping pieces down to the wax paper. 31. Remove the extra veneer pieces and the wax paper.
" 7½
Basic Marquetry and Beyond
Apply the Marquetry to the Cylinder:
104
18°
15⁄8"
" 7½ 15⁄8"
4"
4" Drawing 25-2. The Stave and the Cylinder. Cut ten staves from 5/8-in. stock. Glued together, the inside diameter is 4-in. Smooth the outer surface with a lathe or with files and a sander.
32. Put glue under all the edges; use
small strips of paper to push the glue or use compressed air to blow glue into the tight areas. 33. Glue the ends.
Cut and fit two walnut pieces for the top and bottom. 34. Glue a 3/16-in. thick piece of walnut, 5 1/2in. diameter to the bottom of the cylinder. 35. Use a band-saw to cut the bottom piece to near-size and then sand by hand to fit. 36. Make a walnut ring 3/16-in. thick and 5 1/2-in. outside diameter and 4 1/2-in. inside diameter to fit the metal insert. 37. Glue this ring to the top of the cylinder. 38. Use a band-saw and then hand sand to shape. 39. End up as usual: seal with shellac, scrape, sand and finish with wipe-on poly.
Make the Cylinder Top and Bottom: