Service
Shutdown SIS
Previous Screen
Product: BACKHOE LOADER
Model: 416D BACKHOE LOADER CXP
Configuration: 416D Backhoe Loader CXP00001-00939 (MACHINE) POWERED BY 3054 Engine
Disassembly and Assembly
416D, 420D, 424D, 428D, 430D, 432D, 438D and 442D Backhoe Loaders Power Train
Solenoid Valve (Transmission) - Remove
SMCS - 5479-011-T3
Removal Procedure for Powershift Transmission Arrangement
Personal injury can result from hydraulic oil pressure and hot oil.
Hydraulic oil pressure can remain in the hydraulic system after the engine has been stopped. Serious injury can be caused if this pressure is not released before any service is done on the hydraulic system.
Make sure all of the attachments have been lowered, oil is cool before removing any components or lines. Remove the oil filler cap only when the engine is stopped, and the filler cap is cool enough to touch with your bare hand.
NOTICE
Care must be taken to ensure that fluids are contained during performance of inspection, maintenance, testing, adjusting and repair of the product. Be prepared to collect the fluid with suitable containers before opening any compartment or disassembling any component containing fluids.
Refer to Special Publication, NENG2500, "Caterpillar Tools and Shop Products Guide" for tools and supplies suitable to collect and contain fluids on Caterpillar products.
Dispose of all fluids according to local regulations and mandates.
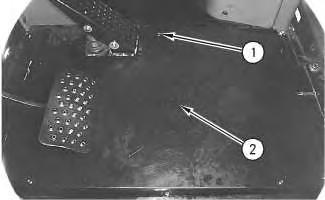
1. Remove four bolts (1) and floorplate (2) .
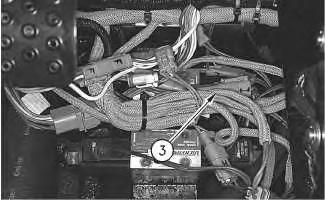
2. Disconnect all the wire harnesses on the three solenoid valves. Remove four plugs and bolts (3) from each of the control valves (4). Remove the three solenoid valves.
Copyright 1993 - 2019 Caterpillar Inc.
Rights Reserved.
Network For SIS Licensees.
Illustration 1 g00780369 Illustration 2 g00780371Shutdown SIS
Previous Screen
Product: BACKHOE LOADER
Model: 416D BACKHOE LOADER CXP
Configuration: 416D Backhoe Loader CXP00001-00939 (MACHINE) POWERED BY 3054 Engine
Disassembly and Assembly
416D, 420D, 424D, 428D, 430D, 432D, 438D and 442D Backhoe Loaders Power Train
Solenoid Valve (Transmission) - Remove
SMCS - 5479-011-T3
Removal Procedure for Direct Drive Solenoid Valve
Personal injury can result from hydraulic oil pressure and hot oil.
Hydraulic oil pressure can remain in the hydraulic system after the engine has been stopped. Serious injury can be caused if this pressure is not released before any service is done on the hydraulic system.
Make sure all of the attachments have been lowered, oil is cool before removing any components or lines. Remove the oil filler cap only when the engine is stopped, and the filler cap is cool enough to touch with your bare hand.
NOTICE
Care must be taken to ensure that fluids are contained during performance of inspection, maintenance, testing, adjusting and repair of the product. Be prepared to collect the fluid with suitable containers before opening any compartment or disassembling any component containing fluids.
Refer to Special Publication, NENG2500, "Caterpillar Tools and Shop Products Guide" for tools and supplies suitable to collect and contain fluids on Caterpillar products.
Dispose of all fluids according to local regulations and mandates.
Note: The transmission has been removed for photographic purposes.
1. Remove the floorplate.
2. Disconnect wiring harness (2) .
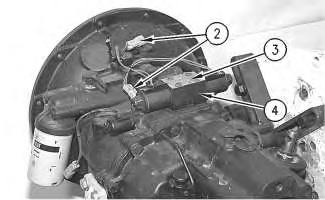
3. Remove four caps (3) and bolts under each cap.
4. Remove transmission solenoid valve (4) .
Illustration 1 g00780351 Illustration 2 g00780353Illustration 3
g00780356
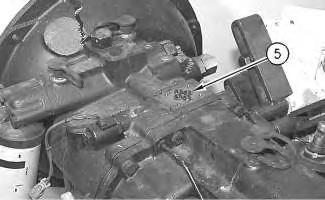
5. Check the four O-rings (5) for wear. Replace the O-rings if the O-rings are in poor condition.
Copyright 1993 - 2019 Caterpillar Inc. All Rights Reserved. Private Network For SIS Licensees.
Mon Aug 26 19:10:40 UTC+0800 2019
Shutdown SIS
Previous Screen
Product: BACKHOE LOADER
Model: 416D BACKHOE LOADER CXP
Configuration: 416D Backhoe Loader CXP00001-00939 (MACHINE) POWERED BY 3054 Engine
Disassembly and Assembly
416D, 420D, 424D, 428D, 430D, 432D, 438D and 442D Backhoe Loaders Power Train
Solenoid Valve (Transmission) - Disassemble
SMCS - 5479-015-T3
Disassembly Procedure
Start By:
A. Remove the transmission solenoid valve. Refer to Disassembly and Assembly, "Solenoid Valve (Transmission) - Remove".
NOTICE
Care must be taken to ensure that fluids are contained during performance of inspection, maintenance, testing, adjusting and repair of the product. Be prepared to collect the fluid with suitable containers before opening any compartment or disassembling any component containing fluids.
Refer to Special Publication, NENG2500, "Caterpillar Tools and Shop Products Guide" for tools and supplies suitable to collect and contain fluids on Caterpillar products.
Dispose of all fluids according to local regulations and mandates.
Note: Cleanliness is an important factor. Before the disassembly procedure, the exterior of the component should be thoroughly cleaned. This will help to prevent dirt from entering the internal mechanism.
Illustration 1
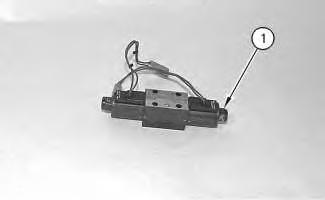
1. Remove nut (1) .
g00763378
Illustration 2
g00763380
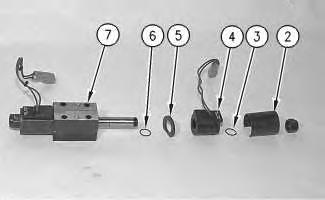
2. Remove cover (2), O-ring seal (3), solenoid (4), washer (5), and O-ring seal (6) from valve body (7) .
3. Repeat Steps 1 and 2 for the opposite side of the transmission solenoid valve.
Copyright 1993 - 2019 Caterpillar Inc. All Rights Reserved. Private Network For SIS Licensees.
Mon Aug 26 19:11:29 UTC+0800 2019
Shutdown SIS
Previous Screen
Product: BACKHOE LOADER
Model: 416D BACKHOE LOADER CXP
Configuration: 416D Backhoe Loader CXP00001-00939 (MACHINE) POWERED BY 3054 Engine
Disassembly and Assembly
416D, 420D, 424D, 428D, 430D, 432D, 438D and 442D Backhoe Loaders Power Train
Solenoid Valve (Transmission) - Assemble
SMCS - 5479-016-T3
Assembly Procedure
NOTICE
Care must be taken to ensure that fluids are contained during performance of inspection, maintenance, testing, adjusting and repair of the product. Be prepared to collect the fluid with suitable containers before opening any compartment or disassembling any component containing fluids.
Refer to Special Publication, NENG2500, "Caterpillar Tools and Shop Products Guide" for tools and supplies suitable to collect and contain fluids on Caterpillar products.
Dispose of all fluids according to local regulations and mandates.
Note: Cleanliness is an important factor. Before assembly, all parts should be thoroughly cleaned in cleaning fluid. Allow the parts to air dry. Wiping cloths or rags should not be used to dry parts. Lint may be deposited on the parts which may cause later trouble. Inspect all parts. If any parts are worn or damaged, use new parts for replacement.
Note: O-rings, gaskets, and seals should always be replaced. A used O-ring may not have the same sealing properties as a new O-ring. Use 1U-6396 O-Ring Assembly Compound during the assembly procedure.
Illustration 1
g00763380
1. Install O-ring seal (6), washer (5), solenoid (4), O-ring seal (3), and cover (2) on valve body (7) .
Illustration 2
g00763378
2. Install nut (1). Tighten nut (1) to a torque of 5.6 ± .6 N·m (49.6 ± 5.3 lb in).
3. Repeat Steps 1 and 2 for the opposite side of the transmission solenoid valve.


End By: Install the transmission solenoid valve. Refer to Disassembly and Assembly, "Solenoid Valve (Transmission) - Install".
Copyright 1993 - 2019 Caterpillar Inc.
All Rights Reserved.
Private Network For SIS Licensees.
Mon Aug 26 19:12:19 UTC+0800 2019
Shutdown SIS
Previous Screen
Product: BACKHOE LOADER
Model: 416D BACKHOE LOADER CXP
Configuration: 416D Backhoe Loader CXP00001-00939 (MACHINE) POWERED BY 3054 Engine
Disassembly and Assembly
416D, 420D, 424D, 428D, 430D, 432D, 438D and 442D Backhoe Loaders Power Train
Solenoid Valve (Transmission) - Install
SMCS - 5479-012-T3
Installation Procedure for Direct Drive Solenoid Valve
Personal injury can result from hydraulic oil pressure and hot oil.
Hydraulic oil pressure can remain in the hydraulic system after the engine has been stopped. Serious injury can be caused if this pressure is not released before any service is done on the hydraulic system.
Make sure all of the attachments have been lowered, oil is cool before removing any components or lines. Remove the oil filler cap only when the engine is stopped, and the filler cap is cool enough to touch with your bare hand.
NOTICE
Care must be taken to ensure that fluids are contained during performance of inspection, maintenance, testing, adjusting and repair of the product. Be prepared to collect the fluid with suitable containers before opening any compartment or disassembling any component containing fluids.
Refer to Special Publication, NENG2500, "Caterpillar Tools and Shop Products Guide" for tools and supplies suitable to collect and contain fluids on Caterpillar products.
Dispose of all fluids according to local regulations and mandates.
Note: The transmission has been removed for photographic purposes.
1. Check the four O-rings (5) for wear. Replace the O-rings if the O-rings are in poor condition.
2. Install four caps (3) and bolts under each cap.
3. Connect wiring harness (2) .

4. Install the transmission solenoid valve (4) .
 Illustration 1
g00780356
Illustration 2
g00780353
Illustration 3
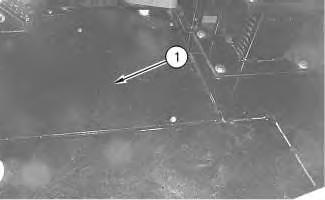
5. Install the floorplate (1) .
Copyright 1993 - 2019 Caterpillar Inc. All Rights Reserved. Private Network For SIS Licensees.
g00780351
Mon Aug 26 19:13:09 UTC+0800 2019

Shutdown SIS
Previous Screen
Product: BACKHOE LOADER
Model: 416D BACKHOE LOADER CXP
Configuration: 416D Backhoe Loader CXP00001-00939 (MACHINE) POWERED BY 3054 Engine
Disassembly and Assembly
416D, 420D, 424D, 428D, 430D, 432D, 438D and 442D Backhoe Loaders Power Train
Solenoid Valve (Transmission) - Install
SMCS - 5479-012-T3
Installation Procedure for Powershift Transmission Arrangement
Personal injury can result from hydraulic oil pressure and hot oil.
Hydraulic oil pressure can remain in the hydraulic system after the engine has been stopped. Serious injury can be caused if this pressure is not released before any service is done on the hydraulic system.
Make sure all of the attachments have been lowered, oil is cool before removing any components or lines. Remove the oil filler cap only when the engine is stopped, and the filler cap is cool enough to touch with your bare hand.
NOTICE
Care must be taken to ensure that fluids are contained during performance of inspection, maintenance, testing, adjusting and repair of the product. Be prepared to collect the fluid with suitable containers before opening any compartment or disassembling any component containing fluids.
Refer to Special Publication, NENG2500, "Caterpillar Tools and Shop Products Guide" for tools and supplies suitable to collect and contain fluids on Caterpillar products.
Dispose of all fluids according to local regulations and mandates.
1. Connect all the wire harnesses on the three solenoid valves. Install four plugs and bolts (3) from each of the control valves (4). Install the three solenoid valves.

2. Install four bolts (1) and floorplate (2) .

Copyright 1993 - 2019 Caterpillar Inc. All Rights Reserved. Private Network For SIS Licensees.
Mon Aug 26 19:13:59 UTC+0800 2019
Illustration 1 g00780371 Illustration 2 g00780369Previous Screen
Product: BACKHOE LOADER
Model: 416D BACKHOE LOADER CXP
Configuration: 416D Backhoe Loader CXP00001-00939 (MACHINE) POWERED BY 3054 Engine
Disassembly and Assembly
416D, 420D, 424D, 428D, 430D, 432D, 438D and 442D Backhoe Loaders Power
Transmission (Direct Drive) - Remove
SMCS - 3030-011-DD
Removal Procedure
Start By:
A. Remove the front drive shaft. Refer to Disassembly and Assembly, "Drive Shaft (Front)Remove and Install".
B. Remove the rear drive shaft. Refer to Disassembly and Assembly, "Drive Shaft (Rear)Remove and Install".
C. Remove the piston pump. Refer to Disassembly and Assembly, RENR3585, "Piston Pump (Implement and Steering) - Remove".
1. Use a suitable lifting device in order to raise the machine to a height of 91.4 mm (36 inch) between the ground and the side step.
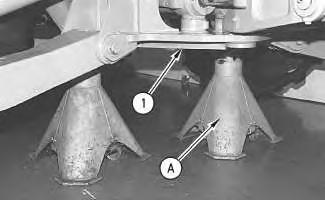
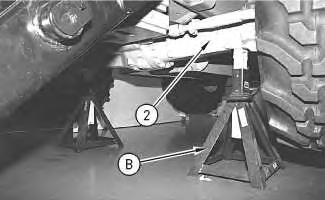
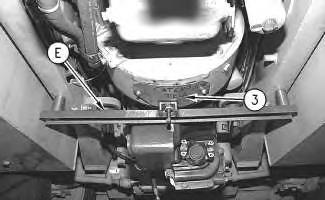 Illustration 1
g00760888
2. Place tooling (A) under rear frame (1) .
Illustration 2
g00760890
3. Place tooling (B) under front axle (2) .
Illustration 3
4. Remove inspection plate (3). Install tooling (E) in order to support the engine.
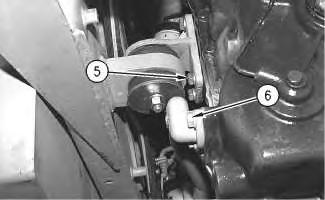
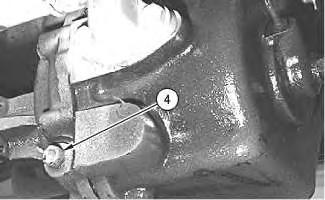
Illustration 4
5. Remove plug (4) and drain the transmission oil into a suitable container. The capacity of the transmission is 18.5 L (4.9 US gal).
Illustration 5
6. Remove four bolts (5) .
7. Repeat Step 6 for the opposite side.
8. Remove two bolts (6) .
g00762355 g00762357 g00762358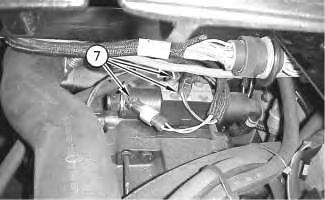
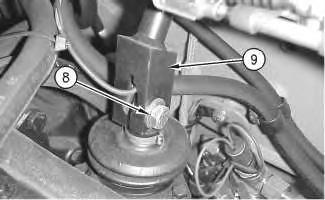
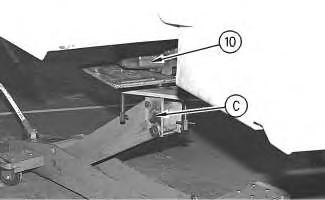 Illustration 6 g00762561
9. Disconnect three electrical connectors (7) .
Illustration 7 g00762562
10. Loosen bolt (8) and slide rod assembly (9) off the transmission lever.
Illustration 8
g00762359
Suggest:
If the above button click is invalid.
Please download this document first, and then click the above link to download the complete manual.
Thank you so much for reading

Illustration 9
g00762473
11. Support transmission (10) with tooling (C), as shown.
12. Attach tooling (D) to tooling (C) and transmission (10) in order to maintain a good balance.
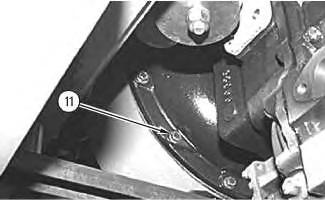
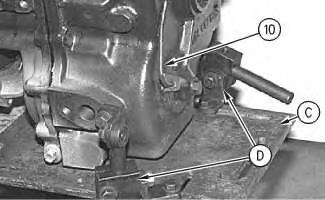
Illustration 10
13. Remove fourteen bolts (11) .
g00762479
14. Carefully move transmission (10) away from the engine in order to clear the torque converter. Lower transmission (10) to the ground. The weight of transmission (10) is 185 kg (408 lb).
Copyright 1993 - 2019 Caterpillar Inc.
All Rights Reserved.
Private Network For SIS Licensees.
Mon Aug 26 19:14:50 UTC+0800 2019
