Shutdown SIS
Previous Screen
Product: MINI HYD EXCAVATOR
Model: 303.5E2 MINI HYD EXCAVATOR JWY
Configuration: 303.5E2 Mini Hydraulic Excavator JWY00001-UP (MACHINE) POWERED BY C1.7 Engine
Disassembly and Assembly
C1.7, C1.8 and C2.4 Tier 4 Interim and EU Stage 3A Engines for Caterpillar Built Machines
Inlet and Exhaust Valve Springs - Remove and Install
SMCS - 1108-010
Removal Procedure
Table 1
Required Tools Tool
7F-4292 Valve Spring Compressor 1 9U-6144 Adapter 1
Start By:
a. Remove the rocker shaft and push rod.
NOTICE
Keep all parts clean from contaminants.
Contaminants may cause rapid wear and shortened component life.
Note: The following procedure should be adopted in order to remove the valve springs when the cylinder head is installed to the engine. Refer to Disassembly and Assembly, "Inlet and Exhaust Valves - Remove and Install" for the procedure to remove the valve springs from a cylinder head that has been removed from the engine.
Note: Ensure that the appropriate piston is at top dead center before the valve spring is removed. Failure to ensure that the piston is at top dead center may allow the valve to drop into the cylinder bore.
Personal injury can result from being struck by parts propelled by a released spring force.
Make sure to wear all necessary protective equipment.
Follow the recommended procedure and use all recommended tooling to release the spring force.
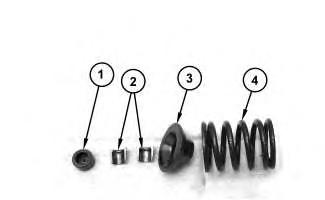 Illustration 1
g02725096
Illustration 2
g02725099
Ensure that the valve spring is compressed squarely or damage to the valve stem may occur.
1. Follow Step 1.a through Step 1.d in order to position the appropriate piston at top dead center.
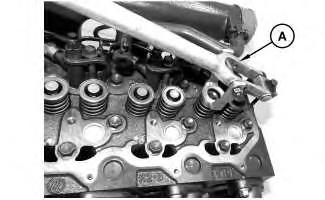
a. Install Tooling (A) in position on the cylinder head in order to compress a valve spring (4) for the appropriate piston.
b. Use Tooling (A) in order to compress valve spring (4) and open the valve slightly.
Note: Do not compress the spring so that valve spring retainer (3) touches the valve stem seal.
c. Rotate the crankshaft carefully, until the piston touches the valve.
Note: Do not use excessive force to turn the crankshaft. The use of force can result in bent valve stems.
d. Continue to rotate the crankshaft and gradually release the pressure on Tooling (A) until the piston is at the top dead center position. The valve is now held in a position that allows the valve spring to be safely removed.
Note: If all valve springs require replacement, the procedure can be carried out on two cylinders at the same time. The procedure can be carried out on the following pairs of cylinders. 1 with 4 and 2 with 3. Ensure that all of the valve springs are installed before changing from one pair of cylinders to another pair of cylinders.
NOTICE
Do not turn the crankshaft while the valve springs are removed.
2. Remove valve cap (1). Apply sufficient pressure to Tooling (A) in order to allow removal of valve keepers (2).
Note: Do not compress the spring so that valve spring retainer (3) touches the valve stem seal.
3. Slowly release pressure on Tooling (A).
4. Remove valve spring retainer (3) and remove valve spring (4).
Illustration 3
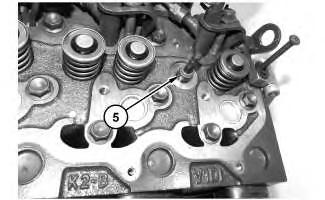
5. Remove Tooling (A).
6. Remove valve stem seals (5).
g02725101
7. Repeat Step 2 through Step 5 in order to remove the remaining valve springs from the appropriate cylinder.
Installation Procedure
1. Install the inlet and exhaust valve springs (4) in the reverse order of removal.
a. Inspect valve springs (4) for damage and for the correct length. Refer to Specifications, "Cylinder Head Valves " for further information.
Shutdown SIS
Previous Screen
Product: MINI HYD EXCAVATOR
Model: 303.5E2 MINI HYD EXCAVATOR JWY
Configuration: 303.5E2 Mini Hydraulic Excavator JWY00001-UP (MACHINE) POWERED BY C1.7 Engine
Disassembly and Assembly
C1.7, C1.8 and C2.4 Tier 4 Interim and EU Stage 3A Engines for Caterpillar Built Machines
Inlet and Exhaust Valves - Remove and Install
SMCS - 1105-010
Removal Procedure
Table 1
Required Tools
Tool Part Number Part Description Qty
A 5S-1330 Valve Spring Compressor 1
Start By:
a. Remove the cylinder head.
NOTICE
Keep all parts clean from contaminants.
Contaminants may cause rapid wear and shortened component life.
1. Clean the bottom mating surface of the cylinder head. Check the depth of the valves below the face of the cylinder head before the valve springs are removed. Refer to Specifications, "Cylinder Head Valves" for the correct dimensions.
2. Place a temporary identification mark on the heads of the valves in order to identify the correct position.
3. Use a suitable lifting device to position the cylinder head with the valve springs upward. The weight of the cylinder head is approximately 23 kg (51 lb).
Personal injury can result from being struck by parts propelled by a released spring force.
Make sure to wear all necessary protective equipment.
Follow the recommended procedure and use all recommended tooling to release the spring force.
4. Install Tooling (A) in position on cylinder head (2) and compress the valve spring in order to remove inlet and exhaust valves (1).
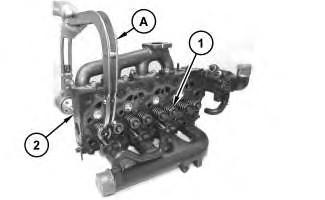 Illustration 1
g02722926
Illustration 2
Ensure that the valve spring is compressed squarely or damage to the valve stem may occur.
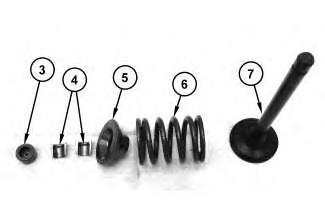
5. Remove valve cap (3). Apply sufficient pressure to Tooling (A) in order to remove valve keepers (4).
6. Slowly release pressure on Tooling (A).
7. Place a temporary identification mark on valve spring (3) in order to identify the correct position.
8. Remove valve spring retainer (5). Remove valve spring (6).
9. Repeat Step 4 through Step 8 for the remaining valves.
10. Remove Tooling (A).
Illustration 3
g02722928
11. Remove valve stem seals (8) from cylinder head (2).
12. Use a suitable lifting device in order to turn over cylinder head (2).
13. Remove the inlet and exhaust valves.
Installation Procedure
1. Install inlet and exhaust valves (4) in the reverse order of removal.
2. Clean all components of the cylinder head assembly. Ensure that all ports, all coolant passages, and all lubrication passages in the cylinder head are free from debris. Follow Step 2.a through Step 2.d in order to inspect the components of the cylinder head assembly. Replace any components that are worn or damaged.
a. Inspect the cylinder head for wear and for damage. Refer to System Operation, Testing and Adjusting, "Cylinder Head Inspect" for the correct procedure.
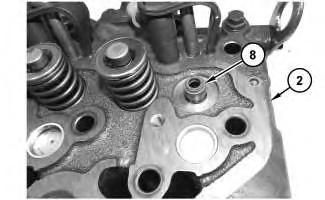
b. Inspect the valve seats for wear and for damage. Refer to Specifications, "Cylinder Head Valves" for further information.
c. Inspect the valve guides for wear and for damage. Refer to Specifications, "Cylinder Head Valves" and System Operation, Testing and Adjusting, "Valve Guide - Inspect" for further information.
d. Inspect the valves for wear and for damage. Refer to Specifications, "Cylinder Head Valves" for further information.
e. Inspect valve springs (3) for damage and for the correct length. Refer to Specifications, "Cylinder Head Valves " for further information.
3. Lubricate the stems of valves (8) with clean engine oil. Install valves (8) in the appropriate positions in the cylinder head. Check the depth of the valves below the face of the cylinder head. Refer to System Operation, Testing and Adjusting, "Valve Depth - Inspect" for more information.
Shutdown SIS
Previous Screen
Product: MINI HYD EXCAVATOR
Model: 303.5E2 MINI HYD EXCAVATOR JWY
Configuration: 303.5E2 Mini Hydraulic Excavator JWY00001-UP (MACHINE) POWERED BY C1.7 Engine
Disassembly and Assembly
C1.7, C1.8 and C2.4 Tier 4 Interim and EU Stage 3A Engines for Caterpillar Built Machines
Inlet and Exhaust Valve Guides - Remove and Install
SMCS - 1104-010
Removal Procedure
Table 1
Required Tools
Tool Part Number Part Description Qty
A 387-1311 Valve Guide Driver Kit 1
Start By:
a. Remove the inlet valves and the exhaust valves.
NOTICE
Removal and installation of the valve guide and valve seat must be carried out by personnel with the correct training. Also special machinery is required. For more information, refer to your authorized Caterpillar dealer.
NOTICE
Keep all parts clean from contaminants.
Contaminants may cause rapid wear and shortened component life.
Illustration 1
g02720116
1. Remove inlet and exhaust valve seals (1). Use Tooling (A) in order to remove valve guides (2) from cylinder head (3).
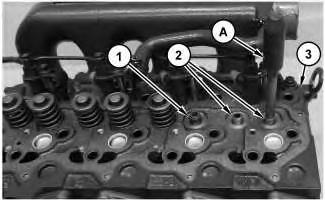
2. Repeat the Step 1 for the remaining valve guides.
Installation Procedure
Note: Ensure that the cylinder head is clean and free from machining debris. Clean the parent bores in the cylinder head and lubricate the new valve guides.
1. Install inlet and exhaust valve guides (2) in the reverse order of removal.
a. Use Tooling (A) to install inlet and exhaust valve guides (2).
Shutdown SIS
Previous Screen
Product: MINI HYD EXCAVATOR
Model: 303.5E2 MINI HYD EXCAVATOR JWY
Configuration: 303.5E2 Mini Hydraulic Excavator JWY00001-UP (MACHINE) POWERED BY C1.7 Engine
Disassembly and Assembly
C1.7, C1.8 and C2.4 Tier 4 Interim and EU Stage 3A Engines for Caterpillar Built Machines
Inlet and Exhaust Valve Seat Inserts - Remove and Install
SMCS - 1103-010
Removal Procedure
Required Tools Tool
A
Table 1
B 389-7514 Exhaust Valve Seat Extractor Tool 1
Start By:
a. Remove the inlet and exhaust valves.
NOTICE
Keep all parts clean from contaminants.
Contaminants may cause rapid wear and shortened component life.
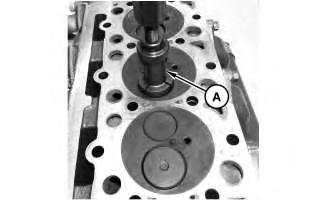
1. Use Tooling (B) to remove exhaust valve seat inserts (1).
Note: The bigger valve seat inserts (1) are for the inlet valves. The smaller valve seat inserts (1) are for the exhaust valves.
2. Use Tooling (A) to remove inlet valve seat inserts (1).
Installation Procedure
NOTICE
Keep all parts clean from contaminants. Contaminants may cause rapid wear and shortened component life.
1. Install new inlet and exhaust valve seat inserts (1) in the reverse order of removal.
Note: The bigger valve seat inserts (1) are for the inlet valves. The smaller valve seat inserts (1) are for the exhaust valves.
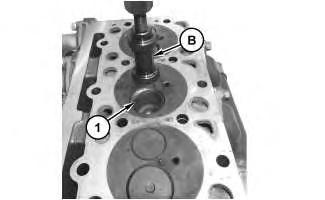 Illustration 1
g02731130
Illustration 2
g02731132
2. If necessary, correct the seat surface with the valve seat cutter. Refer to System Operation, Testing and Adjusting, "Valve Guide - Inspect".
Shutdown SIS
Previous Screen
Product: MINI HYD EXCAVATOR
Model: 303.5E2 MINI HYD EXCAVATOR JWY
Configuration: 303.5E2 Mini Hydraulic Excavator JWY00001-UP (MACHINE) POWERED BY C1.7 Engine
Disassembly and Assembly
C1.7, C1.8 and C2.4 Tier 4 Interim and EU Stage 3A Engines for Caterpillar Built Machines
Engine Oil Relief Valve - Remove and Install
SMCS - 1315-010
Removal Procedure
Start By:
a. Remove the engine oil filter.
NOTICE
Keep all parts clean from contaminants.
Contaminants may cause rapid wear and shortened component life. Illustration
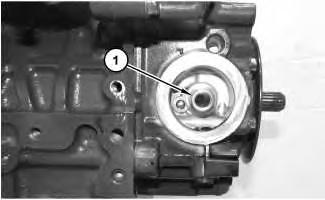
g02720288
1. Remove adapter (1).
Personal injury can result from being struck by parts propelled by a released spring force.
Make sure to wear all necessary protective equipment.
Follow the recommended procedure and use all recommended tooling to release the spring force.
2. Remove relief valve assembly (2).
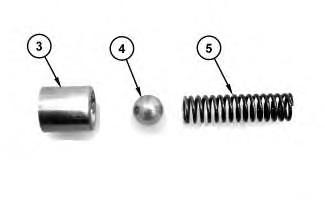
3. Use long nose pliers to remove sleeve (3) from the housing. Remove ball (4) and spring (5) from the bore for the relief valve.
Installation Procedure
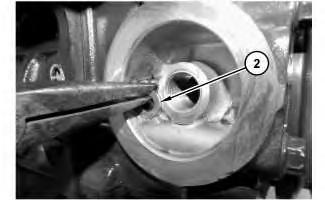 Illustration 2
g02720291
Illustration 3
g02720293
Note: Ensure that all components are clean and free from wear or damage. If necessary, replace any components that are worn or damaged. If the bore for the relief valve in the housing is worn or damaged, the complete relief valve assembly must be replaced.
1. Install the engine oil relief valve in the reverse order of removal.
Shutdown SIS
Previous Screen
Product: MINI HYD EXCAVATOR
Model: 303.5E2 MINI HYD EXCAVATOR JWY
Configuration: 303.5E2 Mini Hydraulic Excavator JWY00001-UP (MACHINE) POWERED BY C1.7 Engine
Disassembly and Assembly
C1.7, C1.8 and C2.4 Tier 4 Interim and EU Stage 3A Engines for Caterpillar Built Machines
Engine Oil Pump - Remove
SMCS - 1304-011
Removal Procedure
Table 1
Required Tools
Tool Part Number Part Description Qty
A 1P-2321 Puller As. 1
Start By:
a. Remove the front housing.
NOTICE
Keep all parts clean from contaminants.
Contaminants may cause rapid wear and shortened component life.
NOTICE
Care must be taken to ensure that fluids are contained during performance of inspection, maintenance, testing, adjusting and repair of the product. Be prepared to collect the fluid with suitable containers before opening any compartment or disassembling any component containing fluids.
Dispose of all fluids according to local regulations and mandates.
Illustration 1
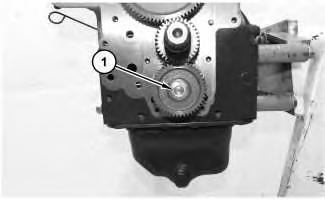
1. Remove nut (1) and the washer.
Illustration 2
2. Use Tooling (A) and remove gear (2).

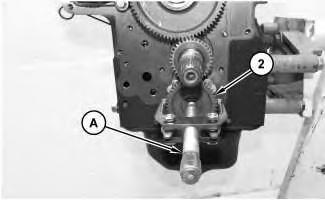
Illustration 3
 g02718964
g02718965
g02718966
Suggest:
If the above button click is invalid.
Please download this document first, and then click the above link to download the complete manual.
Thank you so much for reading

Shutdown SIS
Previous Screen
Product: MINI HYD EXCAVATOR
Model: 303.5E2 MINI HYD EXCAVATOR JWY
Configuration: 303.5E2 Mini Hydraulic Excavator JWY00001-UP (MACHINE) POWERED BY C1.7 Engine
Disassembly and Assembly
C1.7, C1.8 and C2.4 Tier 4 Interim and EU Stage 3A Engines for Caterpillar Built Machines
Engine Oil Pump - Install
SMCS - 1304-012
Installation Procedure
NOTICE
Keep all parts clean from contaminants.
Contaminants may cause rapid wear and shortened component life.
NOTICE
If any part of the engine oil pump is worn or damaged, the complete assembly of the engine oil pump must be replaced.
1. Ensure that all components of the engine oil pump are clean and free from wear and damage.
