
Sign Up for KidKare Accounting for Homes
Last Modified on 01/21/2022 11:10 am CST
KidKare Accounting provides an entire suite of accounting features to better help you track and manage your finances If you already have a KidKare account, you can sign up for KidKare Accounting directly inside KidKare
1. From the menu to the left, click Accounting. If you do not already have a subscription, the Sign Up page opens
2. Click Start My Free 30-Day Trial.
3 Provide your billing information and follow the on-screen prompts
4. Once the process is complete, access accounting features from the menu to the left.
Watch the video below for a brief overview of how to use your new Accounting features

Note: If you do not already have a KidKare account, you can sign up for KidKare Accounting at https://www kidkare com/daycare-accounting-software/
Complete KidKare Accounting Handbook
Last Modified on 11/18/2021 5:02 pm CST
This is an interactive handbook you can use to learn how to navigate KidKare Accounting It contains links out to useful information, as well as short video tutorials embedded right in the PDF Click the brackets (Fullscreen) in the bottom-left of the window below to view the PDF in full-screen mode
[VIDEO] Welcome to KidKare Accounting!
KidKare Accounting provides an entire suite of accounting features to better help you track and manage your finances Watch our video below for a brief overview of the KidKare Accounting feature Then, click the links that follow for more detailed information!
Manage Invoices | Create & Verify an ePay Account | Manage Expenses | Calculate Time-Space % | Accounting Reports
Get Started with Accounting
This article provides the basic steps to get started, as well as links to more detailed instructions and tutorial videos
Last Modified on 01/03/2022 2:00 pm CST
Click here to view the complete KidKare Accounting Handbook.
1. Enroll Children: Each invoice you create must be assigned to a child. This means that you must enroll children before you can begin creating invoices You enroll children from the Kids page See Enroll a Child for more information.
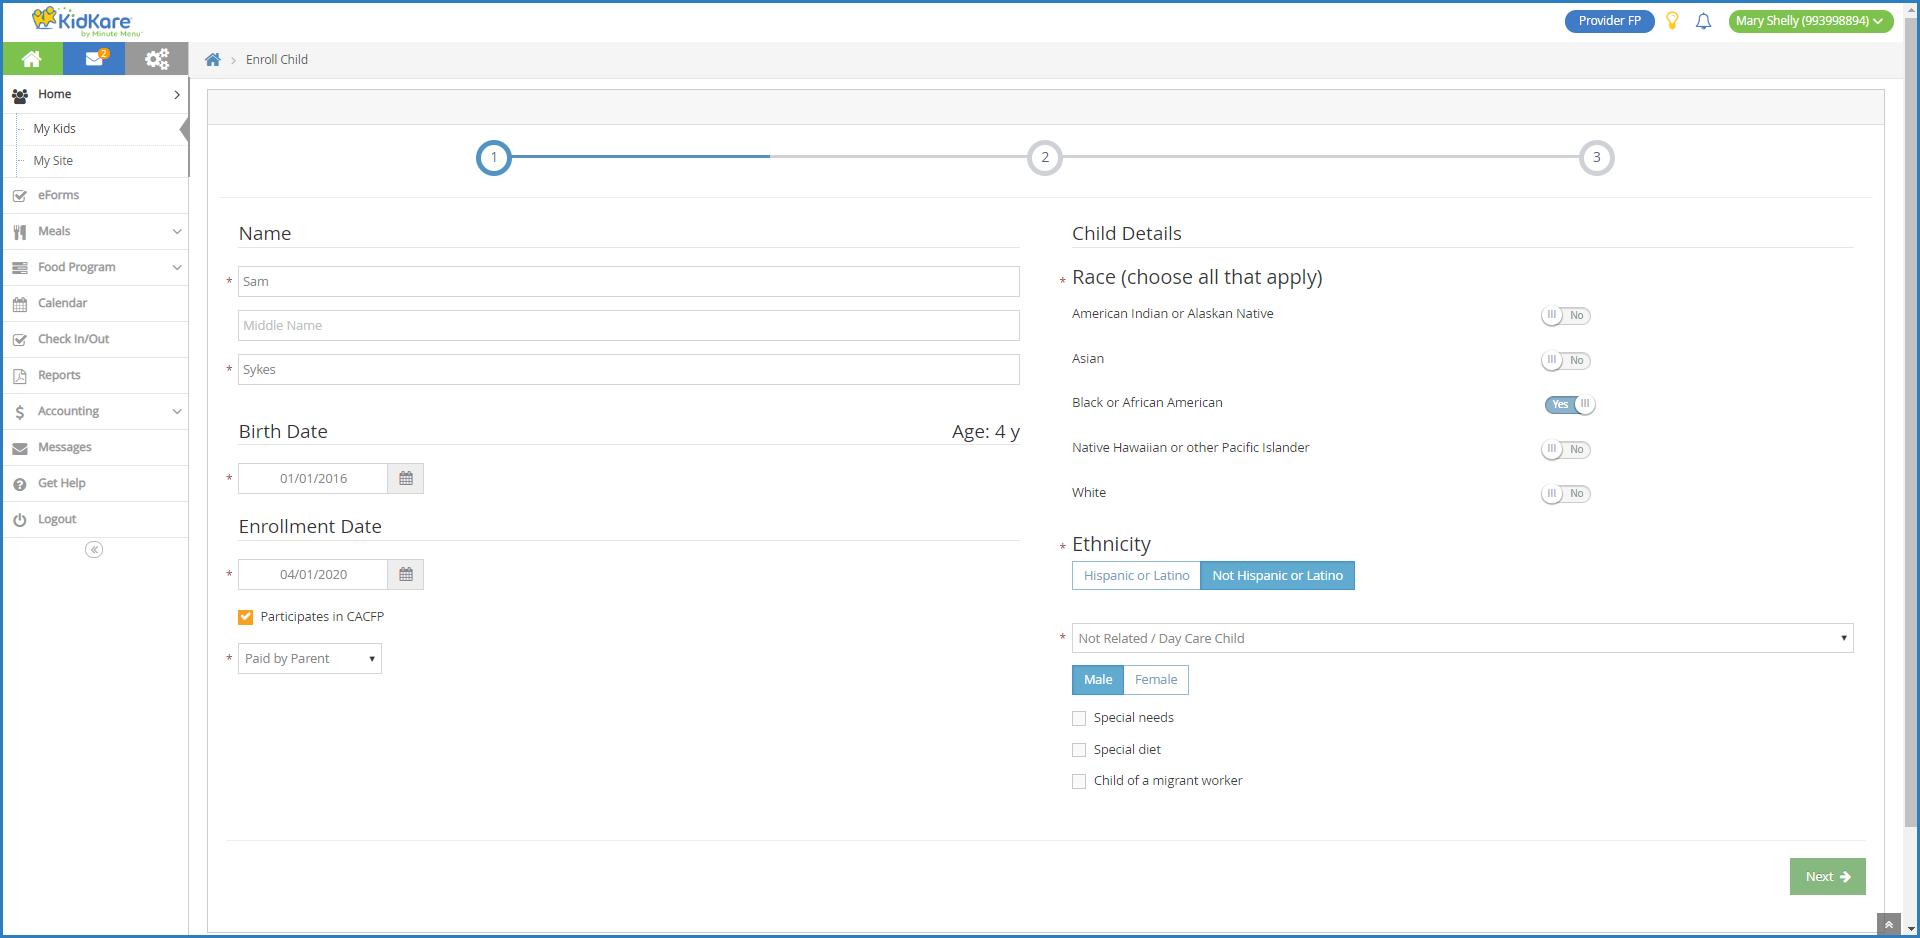
2. Designate Payers: Each child must have at least one designated payer assigned to their file. A payer is the person or entity responsible for paying for the child's care When designating payers, you can assign a certain percentage for which the payer is responsible. You can designate payers during the enrollment process, or you can designate payers from the Child Information page See Designate Payers for Invoices for more information.
Once you have enrolled children and designated payers, you can begin using KidKare's accounting features You can now:
Create Invoices: Create invoices on a daily, weekly, or monthly basis. You can also create recurring invoices Parents/guardians who use ePay and receive recurring invoices can approve automatic payments once they receive their first invoice. For more information, see Create an Invoice and Create a Recurring Invoice
Record Invoice Payments: When a payer makes a payment in-person, you record the payment on the payer's unpaid or partially-paid invoices For more information, see Record Invoice Payments
Record Expenses: Record business expenses in KidKare to hep with your tax deductions each year. This includes expenses related to activities, advertising, rent, appliances, and so on You can also track mileage on vehicles used for your business. For more information, see Record Expenses.
Calculate Time/Space %: Your Time/Space percentage represents the proportion of your home that you use for business purposes. This figure is then used to determine how much of your shared business and
personal expenses can be deducted as a business expense For more information, see Enter Time/Space
Calculations
Run Reports: Generate and print accounting reports on the Reports page Available reports include various expenses reports and worksheets, Form W-10, Time/Space reports, and more
Set User Permissions for Accounting
Last Modified on 02/09/2023 8:19 am CST
As a center administrator, you can control which of your employees has access to the accounting information in KidKare Accounting This setting is managed on the User Permissions page in KidKare
1. From the menu to the left, click Setup.
2 Click User Permissions The User Permissions page opens

3. In the Accounting Access column, click to enable or disable access to Accounting. Your changes are saved automatically
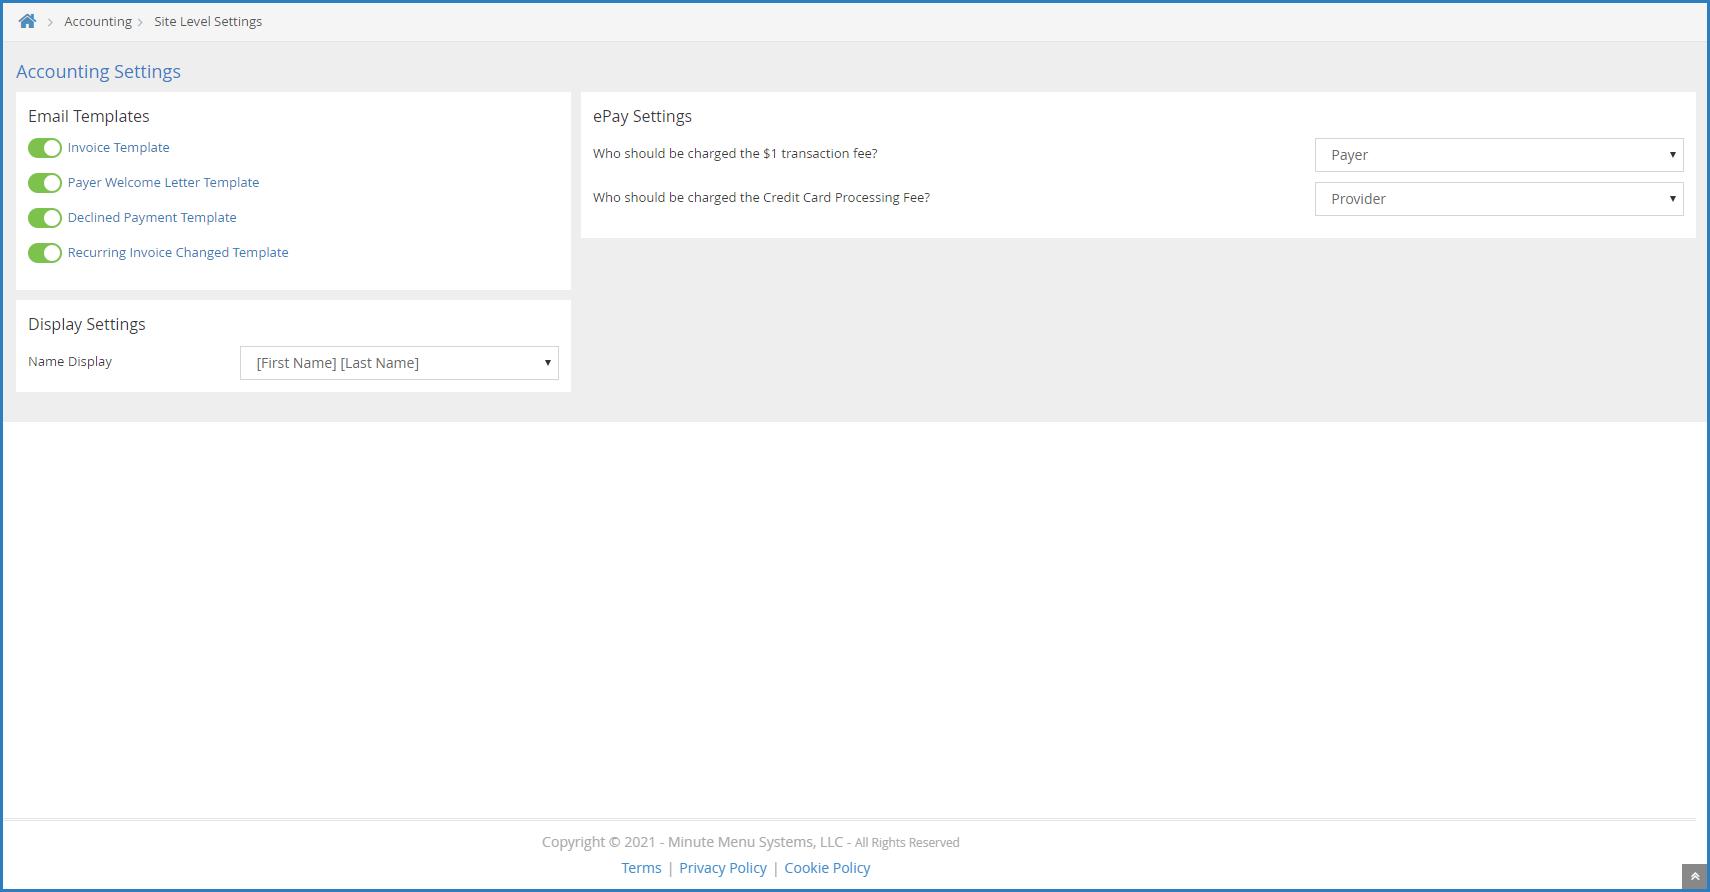
Manage Your Accounting Settings
Last Modified on 02/09/2023 8:09 am
Accounting settings are stored on the Site Level Settings page On this page, you can customize email templates, update display settings, set your starting invoice number, and sign up for ePay If you are already signed up for ePay, this is where you specify who pays transaction and credit card processing fees. Changes made to this page save automatically, unless otherwise specified.
1 From the menu to the left, click Accounting
2 Click Settings The Site Level Settings page opens

3 In the Email Templates section, enable/disable and customize email templates For details, see Customize Email Templates
4 In the Display Settings section, click the Name Display drop-down menu and select [First Name] [Last Name] or [Last Name] [First Name] Names on the invoice list display in the order you select here If you are a home childcare provider, go to Step 6. If you run a commercial childcare center, continue to Step 5
5 In the Starting Invoice Number section, select the invoice number with which to start The default starting invoice number is 10001
a Click

b. Click the Starting Invoice Number box and enter the new starting invoice number. You can use any number you wish However, if you have existing invoices and change this value, the new starting number must be greater than the highest invoice number that currently exists for your site. For example, if Invoice #10068 exists and you enter 10060 in this box, you are prompted to select a different number.
c Click

6 In the ePay Settings section, specify who pays transaction and credit card processing fees
a Click the Who Should be Charged the $1 Transaction Fee drop-down menu and select Payer or your
user name
b Click the Who Should be Charged the Credit Card Processing Fee drop-down menu and select Payer or your user name

Note: Step 6 only applies to users who have signed up for ePay If you are not currently signed up for ePay, you can do so here For more information, see Sign Up for ePay
Transfer Your Data to an Independent Account

Note: This article pertains to home childcare providers using accounting who have been recently removed by their sponsor If this situation does not apply to you, see Sign Up for KidKare Accounting for Homes to learn how to sign up to KidKare Accounting.
Once your food program sponsor removes you, you have up to 60 days to continue using KidKare and complete any outstanding claims After all outstanding claims are processed, transfer your accounting data to an independent account to continue using KidKare Accounting. A message detailing this requirement will display when you log in to KidKare, and you will have the option to continue claiming or transfer now. After 60 days have passed, you must either transfer your data or cancel your accounting subscription
Note that your food program data will not be transferred.To comply with USDA record-keeping requirements, print and retain three years of claimed food and attendance history prior to transferring your account (or within 60 days of removal, if you plan to cancel). We recommend that you create a folder on your computer in which to store these PDF reports. See What to Print After Account Deactivation for more information.
Transferring Your Data
1 Log in to app.kidkare.com The Account Changes message displays
2. If you have completed all claims, or if your 60 days have passed, click Transfer My Data.
Note: If 60 days have not passed and you need more time to complete your claims, click I Need More Time to continue using KidKare Note that this option is no longer available once 60 days have passed
3 Enter a new username for your account
4 Enter a new password for your account
5 Click Complete Transfer
6 Click OK at the confirmation prompt
After clicking Complete Transfer, your new independent account is automatically created, and the transfer process begins
Removed Providers with Inactive Accounting Subscriptions
If you have an inactive accounting subscription, your data is automatically migrated to an independent account after 60 days. When you log in to KidKare, you will be presented with the Reactivate page. When you reactivate, you will continue to use the same username and password
Removed Providers without Accounting Subscriptions
If you do not and have never had an active accounting subscription, you can create an independent account and sign up for a 30-day free trial of Accounting once all claims processing is complete
Cancelling Your Subscription
If you do not wish to transfer your data to a new independent account to continue using KidKare Accounting, you can cancel it instead. If you plan to cancel your subscription, we strongly recommend that you print or save any data you need prior to cancellation.
1 Log in to app.kidkare.com The Account Changes message displays
2. Click Cancel My Subscription.
3 At the Are You Sure prompt, click Yes, Cancel My Subscription Your subscription is cancelled, and you will no longer be able to access KidKare.
Customize Accounting Email Templates
Last Modified on 02/09/2023 8:03 am
KidKare Accounting for Homes and Centers both come with several default email templates used when you email invoices to payers and designate guardians as payers If you also use ePay, payers receive emails when payment is declined and when you make changes to recurring invoices Personalize these emails to fit your business and branding needs. You can also enable and disable them.
Edit Accounting Email Templates
Customize email templates to fit your business and branding needs
1. From the menu to the left, click Accounting.
2 Click Settings The Site Level Settings page opens
3 Click the template to update For example, to customize the invoice email template, you would click Default Invoice Template The Email Template pop-up opens

4. Click Edit.
5 Update the Subject, From, and Message boxes, as needed Variables you can use to fill-in certain information are listed at the bottom of the editor (#Payerid, #Email, #id, and so on). To add one of these
variables to your text, type @ and begin typing the variable to use A list of available items displays as you type, so you can select the variable you need For example, to populate the Subject with the recipient's invoice number, you would type @InvoiceNumber in the Subject box
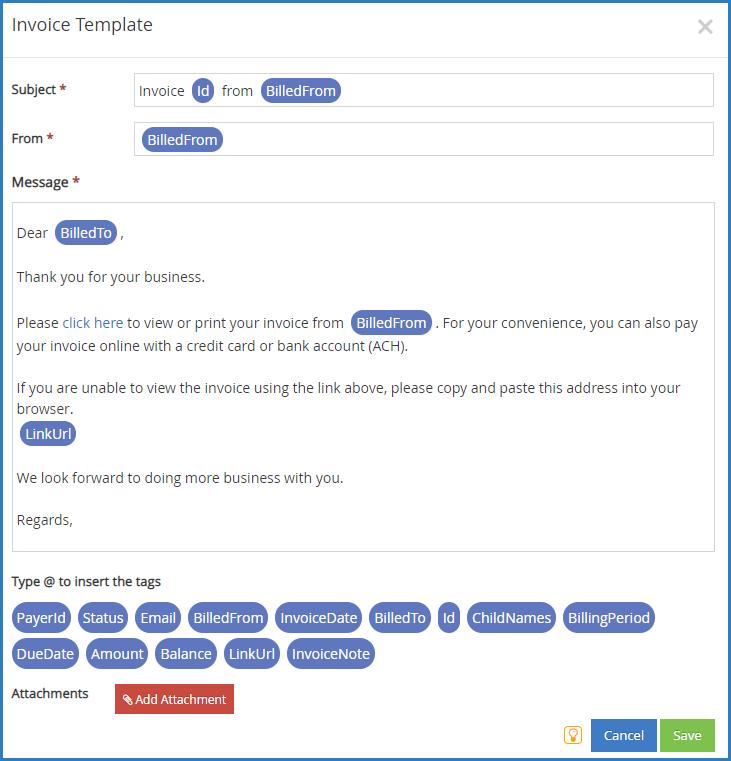
6 To add an attachment:
a Click Add Attachment
b Click Choose

File Type & Size Limits: You can attach the following file types: JPG, JPEG, PNG, DOC, DOCX, XLS, XLSX, PPT, PPTX, and PDF The maximum file size for an individual file is 10MB, and the total size for all attachments is 25MB
c Browse to the attachment on your computer, and click Open
7. When finished, click Save.
Return to Top
Enable & Disable Accounting Email Templates
You can enable and disable email templates you do not wish to use. For example, if you do not plan on emailing invoices to parents, you could disable the Default Invoice Template.
1 From the menu to the left, click Accounting
2. Click Settings. The Site Level Settings page opens. If an invoice is enabled, the slider is green. If the invoice is currently disabled, the slider is red
3 Click to enable the template

4. Click to disable the template.

Your changes are saved automatically on this page
Return to Top
Set Up a PIN for Your Financial Data
Last Modified on 01/19/2022 10:28 am CST
To protect your financial data, you must set a PIN for your billing information if you are a sponsored home childcare provider or a childcare center Providers who are using KidKare Accounting without a sponsor do not have to set a PIN After you set your PIN, you are required to enter it before you can access the Income page. After you enter your PIN the first time, KidKare will remember it until you clear your cache.
PIN Requirements
PINs must meet the following requirements:
Four digits
No sequential numbers (such as 1234. 5678, etc.)
No repeating numbers (such as 1111, 1112, etc )
Set a PIN
To set your PIN:
1 From the menu to left, click Accounting
2 Click Income The Set PIN pop-up opens
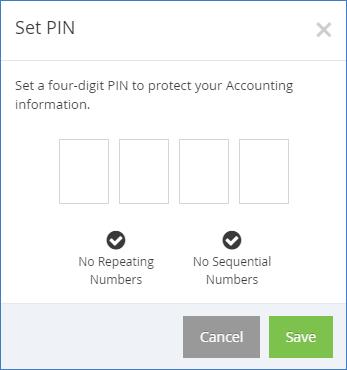
3. Enter a single digit in each of the boxes. Your cursor automatically advances to the next box as you type.
The checkmarks turn green as requirements are met
4. Click Save. You will be prompted to enter your PIN the next time you log in and access the Invoices page.

Reset Your PIN
If you forget your PIN, you can reset it from the My Account page.
1 Click Home
2 Click My Site The My Site page opens
3 In the Business Detail section, click Click to Reset next to PIN An email is sent to the email address on file

4 Click the link in the email You are logged in to KidKare and presented with the Set PIN pop-up
5 Enter your new PIN
6 Click Save
Note: If you enter the wrong PIN when accessing the Invoices page, you can click the Click Here to Reset Your PIN link to go to the My Site page and reset your PIN
Set Up Siblings in KidKare
Before you can add multiple children to a single invoice, those children must have the same contact in their enrollment information This contact can then be added as a Payer on the Accounts page Children with the same Payer will populate the secondary Select Child drop-down menu when you’re creating an invoice and select Add Child.
Set Up Siblings in KidKare for Homes
To set up siblings in KidKare using an existing contact:
1. From the My Participants page, select the child to update.
2 Click Edit in the Primary Guardian section
3 Click + Add Another Contact
4 Click Existing
5 Click the Select Existing Contact drop-down menu and select the contact to associate with this account
6 Select Primary Guardian, Guardian, or Other
7 When finished, click Update
8 Designate the contact as a Payer of invoices See Designate Payers for Invoices for more information
Return to Top
Set Up Siblings in KidKare Food Program
If you are a commercial childcare center, use these instructions to set up siblings in KidKare
1 From the Participants page, select the child to update The View Participant page opens
2 Click Add Contact in the Contacts tab
3 Enter the contact's name in the First Name and Last Name boxes These must match the contact on the sibling record
4 Click the Relationship drop-down menu and select this contact's relationship to the participant
5. Click Save.
6 Designate the contact as a Payer of invoices See Designate Payers for Invoices for more information
Return to Top
Designate Payers for Invoices
Before you can create an invoice for a participant, you must designate at least one Payer on the participant record
1. From the menu to the left, click Accounting.
2 Click Accounts The Account Details page opens
3. Select a participant. The Participant Account Details page opens and displays information for the last participant you viewed
4. Click the drop-down menu at the top of this page to select the participant for whom to add a payer.
5 Click in the Contacts section to the left If you are updating an existing contact, select the contact from the Contacts section to the left
6 In the Contact Details section, check the Payer of Invoices for Participant Care box If you are entering a new contact, complete the contact's details

7 Click Save
8. To send a welcome letter to this payer, click the Actions drop-down menu and select Send Welcome Letter
Understand Invoice Statuses
Your invoices can be at any one of six statuses Review the table below to learn what each status means and when it is applied
Status Description
Draft
Partially Paid
Unpaid
Last Modified on 01/19/2022 11:06 am CST
The invoice was created, but has not yet been sent to the Payer The total amount of the invoice and the balance is visible
The invoice was created and sent to the Payer, and the Payer has paid only part of the total due
The total amount on the invoice is visible, and the Invoice Balance column shows less than the
Total Amount column
The invoice was created and sent to the Payer, but the Payer has not made any payments towards the balance. The total amount and the balance are both visible.
Paid The invoice was created and sent to the Payer, and the Payer has paid the balance in full
Declined
Deleted
The invoice was created and sent to a Payer who has auto-pay enabled on their account, but their form of payment was declined. The total amount and the balance are both visible.
You have deleted the invoice The total amount and the balance are both still visible If you do not want the balance to show in your total amount, close the invoice instead of deleting it. Closing an invoice erases the balance and prevents it from being shown in your total amount and on reports
Resolve the "Invalid Value Passed For Email" Error
Last Modified on 08/17/2020 2:01 pm
When you attempt to sign up for Accounting, you may see the following error message: Invalid Value Passed for Email This error means that there is no email address tied to your KidKare account
1. From the menu to the left, click Home.
2 Click My Site The My Site page opens
3. In the Provider Detail section, click Edit.
4 Click the Email box and enter your email address
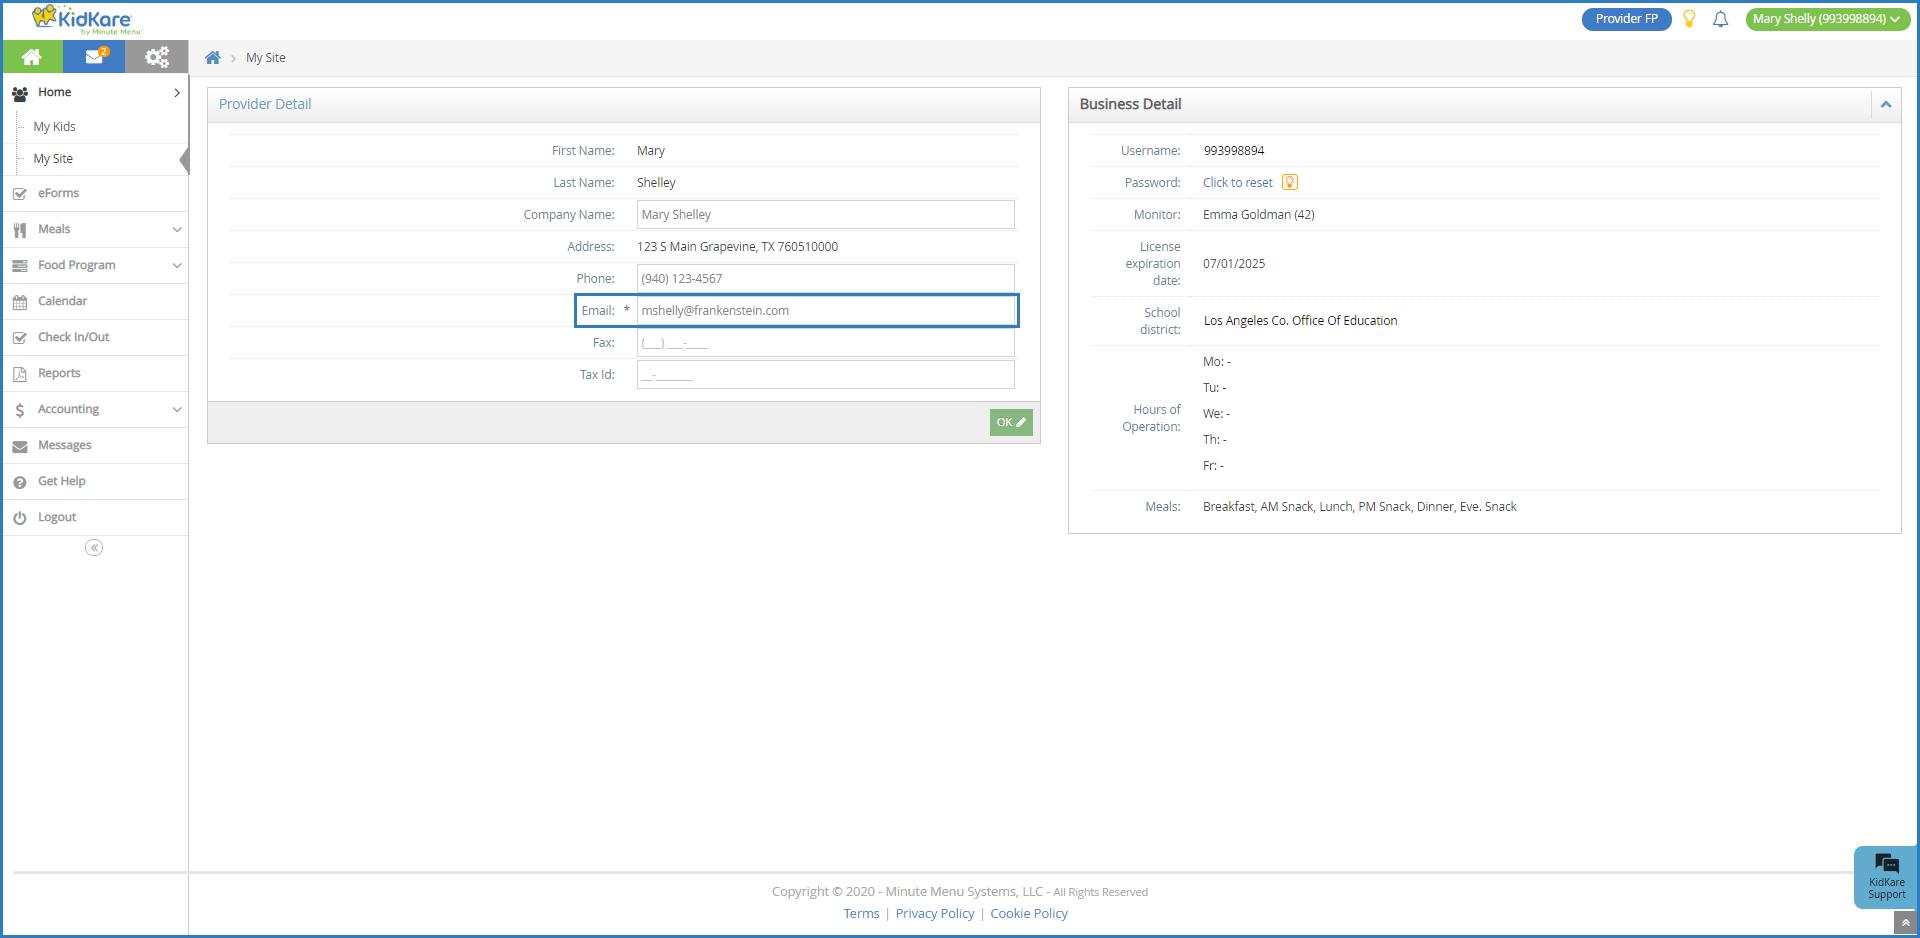
5 Click OK
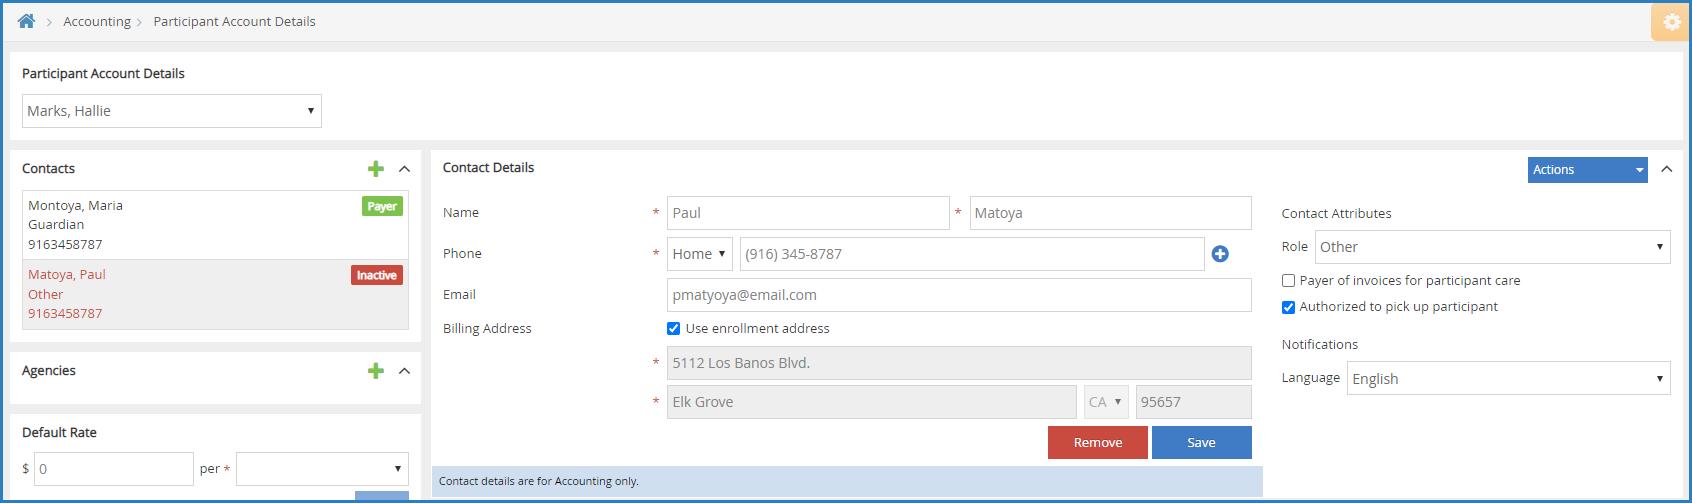
Manage Contacts
Last Modified on 02/09/2023 8:05 am
All contacts for a participant account can be found on the Participant Account Details page Here, you can manage contact status, add contacts, and update contacts Contacts can be at one of the following statuses:
Payer: This contact can pay invoices.
Other: This is a non-payer contact
Inactive: This contact is no longer a payer on the participant account.

Note: Contact details entered on the Participant Account Details page are for accounting purposes only. This information does not affect enrollment data To update enrollment data, see Edit Participant Enrollment Information
Click a link below to jump to a specific ic.
Add Contacts
Before you can create invoices for participants, you must first add accounting contacts to the participant account and designate at least one of them as a payer of invoices This means that the contact can receive and pay invoices for the participant account. If you need to add an agency to a participant account, see Manage Agencies.
1 From the menu to the left, click Accounting
2. Click Accounts. The Participant Account Details page opens and displays information for the last participant you viewed

3 Click the drop-down menu at the of the page and select the participant for whom to add a contact
Note: Click Filters to filter the participants included in the drop-down menu by Active, Pending, or Withdrawn status
4 Click in the Contacts section to the left
5 In the Contact Details section:
Note: If this section does not display, click to expand it

a Click Existing or New If you select Existing, you can select a contact you've entered previously

b Click the Name boxes and enter this contact's first and last name
c. Click the Phone drop-down menu and select Home, Mobile, or Work. Then, enter the phone number in the corresponding box To add additional contact numbers, click
d Click the Email box and enter the contact's email address
e Click the boxes in the Billing Address section and enter the contact's billing address You can also check the Use Enrollment Address box to use the address stored in the participant's enrollment record
6 In the Contact Attributes section:
a Click the Role drop-down menu and select Guardian or Other
b If this contact can pay invoices for the participant account, check the Payer of Invoices for Participant Care box.
Note: When you mark a contact as a Payer, you can specify the dollar amount or percentage they pay for care in the Payment Settings section of this page For more information, see Manage Payment Settings
c If this contact can pick the participant up from care, check the Authorized to Pick Up Participant box
7 In the Notifications section, set notification preferences for this participant
a Click the Language drop-down menu and select English or Spanish
b Select the notification type: Email or Text Message
8 Click Save
9 If this contact is a Payer, click the Actions drop-down menu and select Send Welcome Letter The contact receives an email at the address you specified in Step 5d

Note: You can customize the welcome letter contacts receive For more information, see Customize Accounting Email Templates.
Return to Top
Edit Contacts
You can update contact details at any time. Remember, adding or updating contacts on the Participant Account Details page only updates accounting information for that contact. Enrollment information is not affected.
1 From the menu to the left, click Accounting
2. Click Accounts. The Participant Account Details page opens. The Participant Account Details page opens and displays information for the last participant you viewed
3. Click the drop-down menu at the of the page and select the participant for whom to manage contacts.
4 From the Contacts section to the left, click the contact to change The Contact Details section displays the current information for this contact.
Note: If this section does not display, click to expand it
5 Click each box in the Contact Details section, and enter new information over the existing information
6. Update your selections in the Contact Attributes section, as needed.
7 When finished, click Save
Return to Top
Set Contacts to Inactive
When you set a contact to inactive, it means they are no longer a payer on the participant account This person
is still a contact for the participant, but does not pay invoices
1 From the menu to the left, click Accounting
2. Click Accounts. The Participant Account Details page opens. The Participant Account Details page opens and displays information for the last participant you viewed
3. Click the drop-down menu at the of the page and select the participant for whom to manage contacts.
4 From the Contacts section to the left, click the contact to change The Contact Details section displays the current information for this contact.
Note: If this section does not display, click to expand it
5 In the Contact Attributes section, clear the Payer Invoices for Participant Care box
6. When finished, click Save. The contact is set to inactive status.
Return to Top
Remove a Contact
To remove an contact from a participant account:
1. From the menu to the left, click Accounting.
2 Click Accounts The Participant Account Details page opens and displays information for the last participant you viewed.
3 Click the drop-down menu at the of the page and select the participant for whom to remove a contact
4. In the Contacts section, select the agency to remove. Their information displays in the Contact Details section
5. Click Remove.
6 At the Are You Sure prompt, click Yes The contact is removed
Return to Top
Manage Agencies
If a participant's care is paid partially or in full by an agency, add the agency to the participant's account Adding or updating agencies on the Participant Account Details page only updates accounting information for that contact Enrollment information is not affected
Last Modified on 02/09/2023 7:56 am CST
Agencies can be at one of the following statuses:
Agency Payer: This agency can pay invoices
Inactive: This agency is no longer a payer on the participant account.
You can also split payments between contacts and agencies For more information, see Manage Payment Settings
Add Agencies
1 From the menu to the left, click Accounting
2 Click Accounts The Participant Account Details page opens and displays information for the last participant you viewed
3 Click the drop-down menu at the top of the page and select the participant for whom to add an agency
4. Click in the Agencies section to the left.
5 In the Agency Details section:
Note: If this section does not display, click to expand it.
a. Click Existing or New. If you select Existing, you can select an agency previously. This is useful if one agency pays invoices for multiple participants
b Click the Name boxes and enter the agency representative's first and last name
c Click the Phone box and enter the agency's phone number
d Click the Billing Address boxes and enter the agency's billing address
6 In the Agency Attributes section, check the Payer of Invoices for Participant Care box
7 Click Save
Edit Agencies
You can update agency details at any time Remember, adding or updating agencies on the Participant Account Details page only updates accounting information for that contact. Enrollment information is not affected.
1 From the menu to the left, click Accounting
2 Click Accounts The Participant Account Details page opens The Participant Account Details page opens and displays information for the last participant you viewed
3 Click the drop-down menu at the top of the page and select the participant for whom to manage agencies
4 From the Agencies section to the left, click the contact to change The Agency Details section displays the current information for this agency
Note: If this section does not display, click to expand it.
5 Click each box in the Agency Details section, and enter new information over the existing information
6 Update your selections in the Agency Attributes section, as needed
7. When finished, click Save. Return to Top
Set Agencies to Inactive
When you set an agency to inactive, it means they are no longer a payer on the participant account For example, if an agency is no longer paying for Participant A, but is paying for Participant B, you would set that agency inactive for Participant A.
1 From the menu to the left, click Accounting
2. Click Accounts. The Participant Account Details page opens. The Participant Account Details page opens and displays information for the last participant you viewed
3. Click the drop-down menu at the top of the page and select the participant for whom to manage agencies.
4 From the Agencies section to the left, click the contact to change
Note: If this section does not display, click to expand it
5. In the Agency Attributes section, clear the Pays Invoices for Participant Care box.

6. When finished, click Save. The agency is set to inactive for this participant.
Return to Top
Remove Agencies
To remove an agency from a participant account:
1. From the menu to the left, click Accounting.
2 Click Accounts The Participant Account Details page opens and displays information for the last participant you viewed.
3 Click the drop-down menu at the top of the page and select the participant for whom to remove an agency
4. In the Agencies section, select the agency to remove. Their information displays in the Agency Details section
5. Click Remove.
6 At the Are You Sure prompt, click Yes The agency is removed
Return to Top
Set a Default Rate for Invoices
Each participant can have a default rate charged to their account When you assign a default rate in the participant account record, invoices created for that participant default to this rate
Last Modified on 02/09/2023 8:02 am CST
1. From the menu to the left, click Accounting.
2 Click Accounts The Participant Account Details page opens and displays information for the last participant you viewed.
3 Click the drop-down menu at the top of the page and select the participant to update
4. In the Default Rate section, click the $ box and enter the base charge.
5 Click the Per drop-down menu and choose from the following: Hour Half Day Day Week Two Weeks Month Attendance
6 Click Save

Split Payments Between Payers
Last Modified on 02/09/2023 8:06 am CST
KidKare Accounting allows you to split payments between contacts and agencies, as needed This allows you to divide payments between payers and agencies, agencies and agencies, or payers and payers This division can be done on a percentage or dollar amount basis
Note: You must have multiple contacts/agencies set as payers on a participant account before you can see this option
1 From the menu to the left, click Accounting
2. Click Accounts. The Participant Account Details page opens and displays information for the last participant you viewed
3. Click the drop-down menu at the top of the page and select the participant to change.
4 In the Payment Details section, select Percentage or $ Amount
5. Enter the percentage or dollar amount each contact/agency is responsible for paying in the corresponding boxes Percentage amounts must add up to 100%
6. If you selected $ Amount in Step 4, click the If the Invoice Total Exceeds the Amounts List Above What Should Happen drop-down menu and choose the contact/agency to whom to apply charges

7 When finished, click Save
Now, when you create an invoice for this participant, any payers designated on the account appear on the Add Invoice page Note that all payers are selected by default, and their payment amounts display
Manage Account Credits
Last Modified on 02/09/2023 8:10 am CST
When a contact or agency overpays an invoice, a credit is added to their account You may also have issued a refund in the form of account credit This page also lists any credits used towards invoice payments You can view and manage these credits from the Participant Account Details page
1. From the menu to the left, click Accounting.
2 Click Accounts The Participant Account Details page opens and displays information for the last participant you viewed.
3 Click the drop-down menu at the top of the page and select the participant to update
4. Select a contact from the Contacts section or an agency from the Agencies section.
5 Scroll to the Credits Of section (to the right) If this section does not display, click to expand it
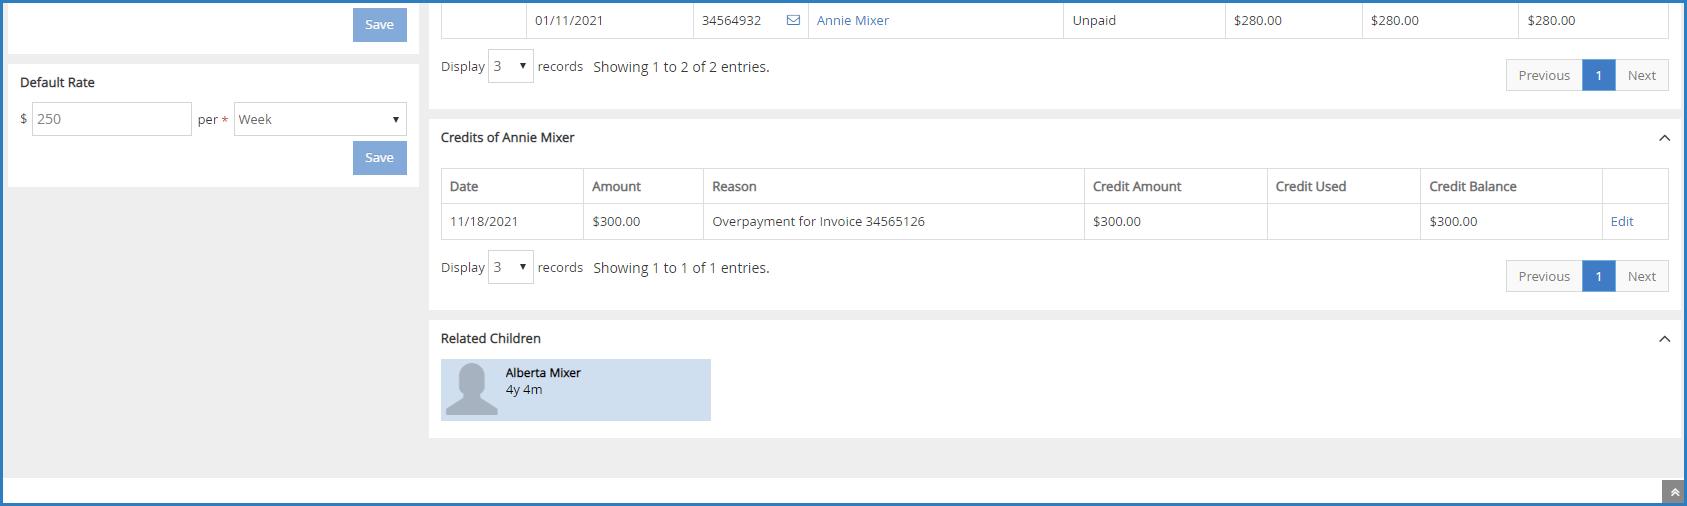
The following details for each credit displays:
Date: This is the date the credit was issued or used.
Amount: This is the total amount of the credit issued or used
Reason: This is the reason the credit was issued or used. For example, if the credit was issued for overpayment, this column would state Overpayment for Invoice #### (where #### is the affected invoice number). If it was used as a payment, this column would say Credit Used for Invoice #### (where #### is the affected invoice number)
Credit Amount: This is the total credit amount issued. This column is blank for credits used as payment
Credit Used: This is the amount of account credit this contact/agency used to pay an invoice.
Balance: This is the remaining credit balance for the contact/agency
6. To update a credit: a Click Edit on the credit row to change The Edit Credit Account Transaction pop-up opens
Note: You can only edit credits issued not credits used
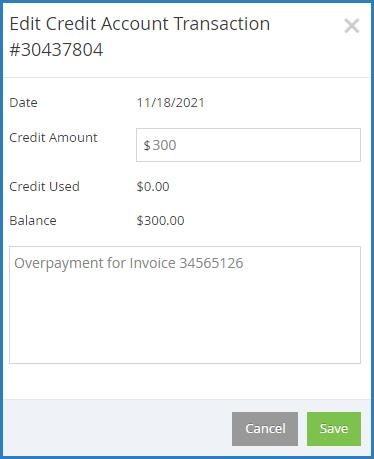
b Click the Credit Amount box and enter a new amount
c Click the Notes box and enter additional notes, as needed
d When finished, click Save
Manage Invoices on Participant Accounts
Last Modified on 02/13/2023 1:55 pm CST
The Participant Account Details page lists all invoices associated with the selected participant, so you can see which invoices are outstanding, paid, and so on A total account balance also displays above the invoice table, giving you a snapshot of the participant's account status This includes the total received, and pending amounts, as well as the account balance and account totals.
1 From the menu to the left, click Accounting
2 Click Accounts The Participant Account Details page opens and displays information for the last participant you viewed
3 Click the drop-down menu at the top of the page and select the participant for whom to view invoices
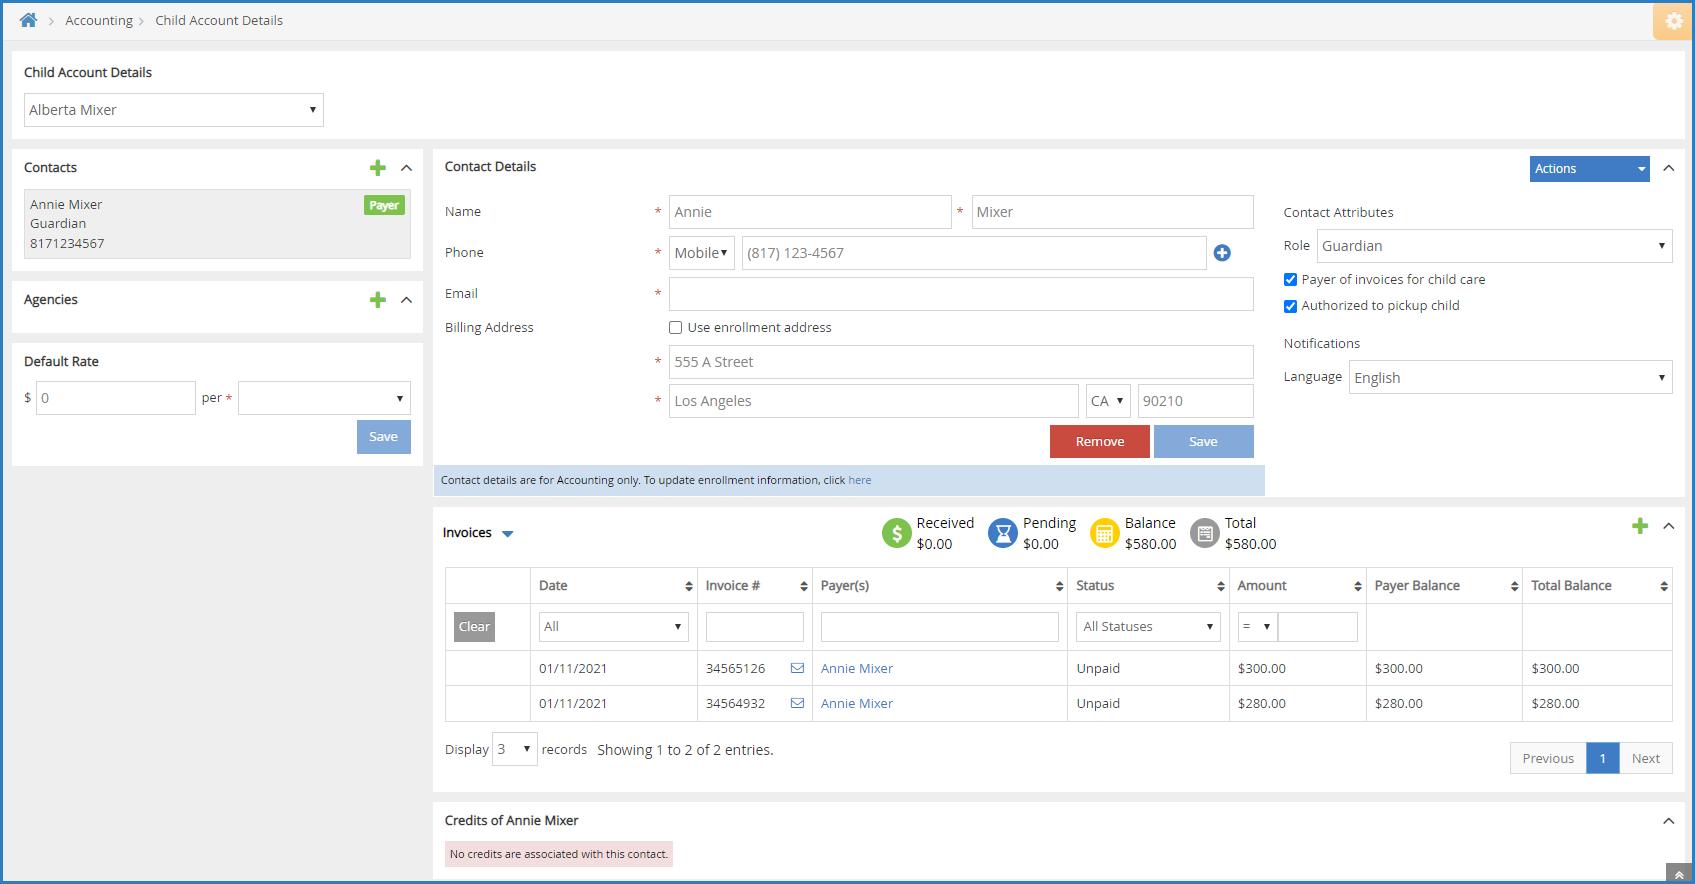
4 Scroll to the Invoices section If this section does not display, click to expand it The following columns display: Date Invoice # Payer(s) Status Amount Payer Balance Total Balance

5 Click and select Recurring Invoices to view any recurring invoices associated with this participant account.
The following information displays for recurring invoices: Payer(s)
6 You can filter invoices and recurring invoices by each column Simply use the drop-down menus to filter, or type in the text boxes
7 Click each column header to sort in ascending or descending order
8 Click Previous and Next to navigate between pages of invoices
9 Click the Display drop-down menu to change the number of invoices that display by default You can select
3, 10, 20, 50, or 100.
10 Click to add an invoice from this page For more information, see Create an Invoice

Note: As of 2/8/2023 a new option will be added to the Settings section of Accounting that allows Providers to enable Payer permissions by default In the settings section it will have a check box next to “Payer Permission access granted by default”. All providers who enable Accounting after 2/8 will have this box checked automatically. All Providers with Existing accounts will not have this box checked automatically but will have the ability to check the box and enable the setting.
Send a Statement of Account
Last Modified on 02/09/2023 8:02 am CST
The Statement of Account lists a payer's current unpaid and paid invoices, any payments made, and any relevant notes It also includes the total billed, total paid, and total account balance You can email this report directly to payer contacts
1. From the menu to the left, click Accounting.
2 Click Accounts The Participant Account Details page opens and displays information for the last participant you viewed.
3 Click the drop-down menu at the top of the page and select the participant for whom to add a contact
4. From the Contacts section to the left, click the contact to whom to send the report.
5 Click the Actions drop-down menu and select Send Statement of Account

Create a New Invoice
Last Modified on 12/19/2023 3:36 pm CST
You can create invoices and email them to payers You can either create an invoice each day/week/month, or you can create recurring invoices In this article, we discuss how to create a single invoice For more information about creating recurring invoices, see Create a Recurring Invoice
Creating Invoices
When creating invoices, you can invoice siblings at the same time, and you have the option to invoice withdrawn children.
1 From the menu to the left, click Accounting
2. Click Income.
3 Enter your Accounting PIN and click Go
Note: If you do not have an Accounting PIN set, you are prompted to set one.
4. Click Add Invoice. The New Invoice page opens.
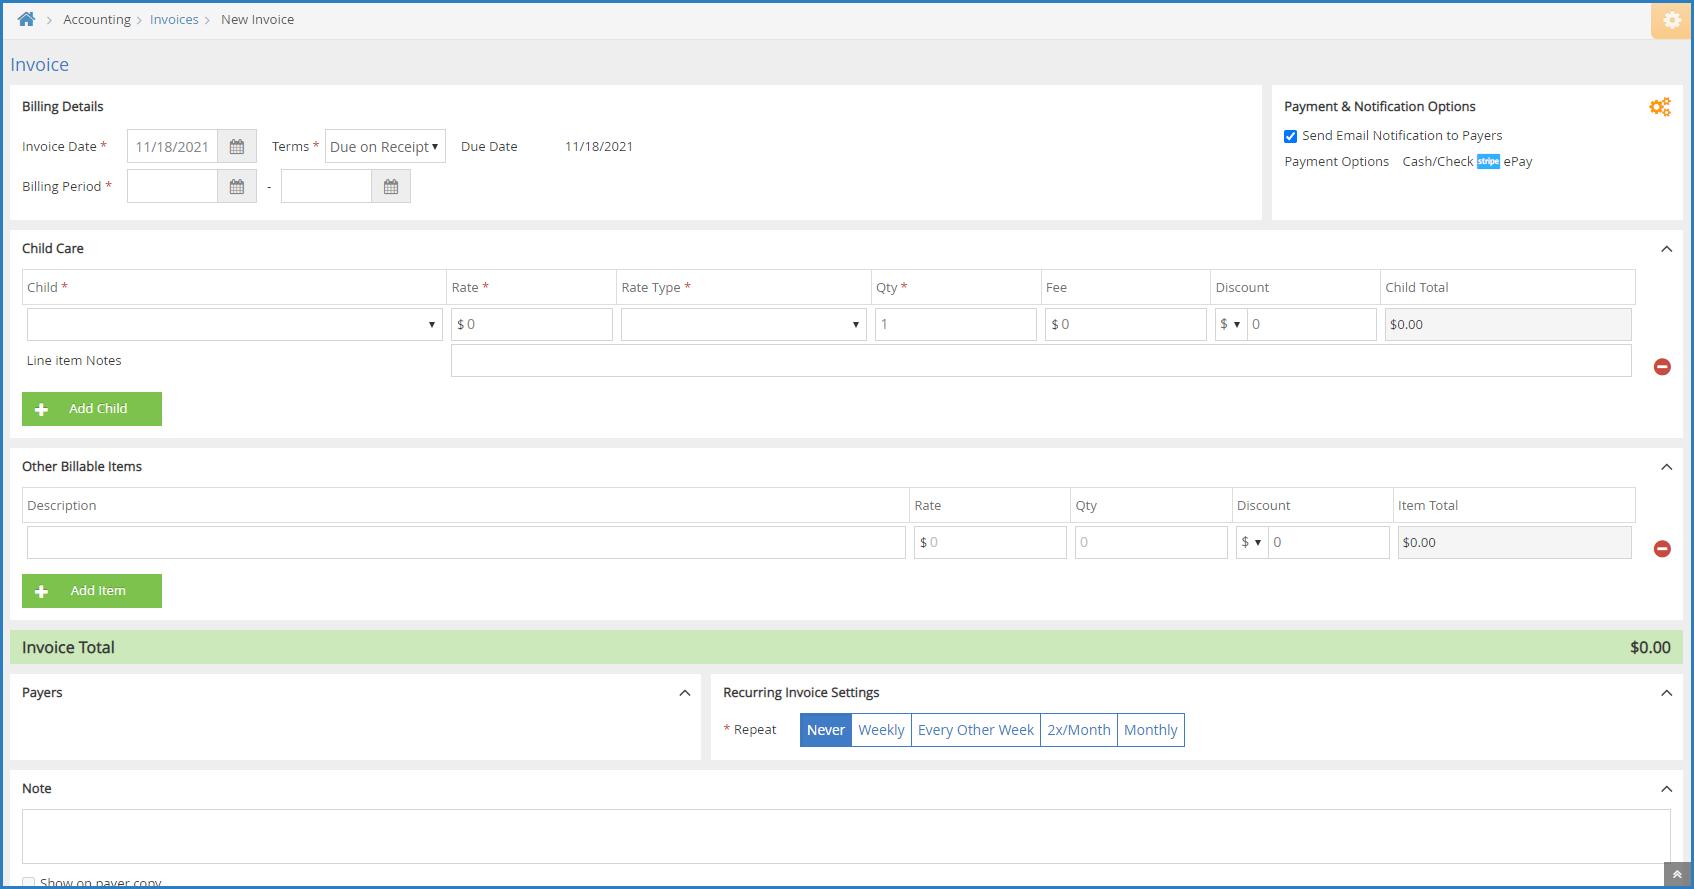
5. In the Billing Details section:
a Click the Invoice Date box and select the invoice date from the calendar This defaults to today's date.
b Click the Terms drop-down menu and choose from the following:
Due on Receipt
Due in 7 Days
Due in 15 Days
Due in 30 Days
c If you selected Custom in Step 5b, click the Due box and enter the number of days from the invoice date that this invoice is due The Due Date field to the right updates automatically
d Click the Billing Period boxes and set the first and last day of the billing period for this invoice
6 In the Payment & Notification Options section:

a. Click . The Payment Options dialog box opens.
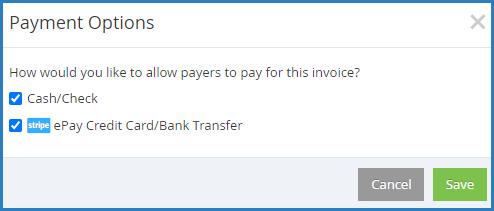
b Check the box next to each payment method to allow for this invoice
c. Click Save. The Payment Options dialog box closes.
d Check the Send Email Notification to Payers box to send an email to payers once this invoice is completed
7 In the Participant Care section:
a Click the Participant drop-down menu and select the participant to add to this invoice If there is a default rate set on the participant's account, the Rate and Rate Type boxes populate automatically
Note: If you need to create an invoice for a Pending participant, click Filters in the top-right corner, and select Pending This will include Pending participants in the Participant drop-down menu

b Click the Rate box and enter the base rate to charge for this participant
c Click the Rate Type drop-down menu and choose from the following:
Hour
Half Day Day
Week
Two Weeks Month
Attendance
d. Click the Qty box and enter the number of units charged. For example, if you selected Day in Step 6c, this would be the number of days for which you are charging
e. Click the Fee box and enter any additional fees charged.
f Click the Discount box and enter any discounts that apply This can be a dollar amount or percentage. To change it, click the $ drop-down menu and select %.
g Click the Line Item Notes box and enter any notes about the charges
h. To add another participant to the invoice, click Add Participant and repeat Steps 6a-6g. Participants must be set up as siblings before you can add them to the same invoice
8. In the Other Billable Items section:
a Click Description box and enter a description of the billable item For example, you may be charging for diapers.
b Click the Rate box and enter the rate charged for this time
c. Click the Qty box and enter the amount of this item to bill.
d Click the Discount box and enter any discounts that apply This can be a dollar amount or percentage. To change it, click the $ drop-down menu and select %.
e Click Add Item and repeat Steps 7a - 7d for each billable item to add
9. In the Payers section, check the box next to each payer who should receive this invoice.

10 If a payer has an account credit, click next to the credit to apply it to this invoice
11 Click the Note box and enter any notes about this invoice To show this note on the payer's copy, check the Show on Payer Copy box
12 Choose from the following options:
Click Save as Draft to save this invoice as a draft and return to working on it later
Click Preview to preview the invoice If you checked the Send Email Notification to Payers box in Step 6d, you can customize the email the payer receives before sending the invoice
Click Create Invoice to create the invoice without previewing it The invoice is created at Unpaid status and you are returned to the invoices list If you checked the Send Email Notification to Payers box in Step 6d, the invoice is sent to the payer
Once you create or create and send an invoice, it moves from Draft status to Unpaid status Once the guardian makes a payment, you can record a payment to the invoice For more information, see Record Invoice Payments
[VIDEO] Create a Recurring Invoice
Last Modified on 02/09/2023 8:08 am
You can create invoices and email them to guardians You can either create an invoice each day/week/month, or you can create recurring invoices Creating recurring invoices allows KidKare to automatically generate invoices for you using the billing frequency you choose
Note: Do you need to edit a recurring invoice instead of creating one? Click here to learn how!
Watch the short video below to learn more, or scroll down for step-by-step instructions.
Create Recurring Invoices
1 From the menu to the left, click Accounting
2. Click Income.
3 Enter your Accounting PIN and click Go
Note: If you do not have an Accountung PIN set, you are prompted to set one.
4. Click and select Recurring Invoices.
5 Click The New Invoice page opens
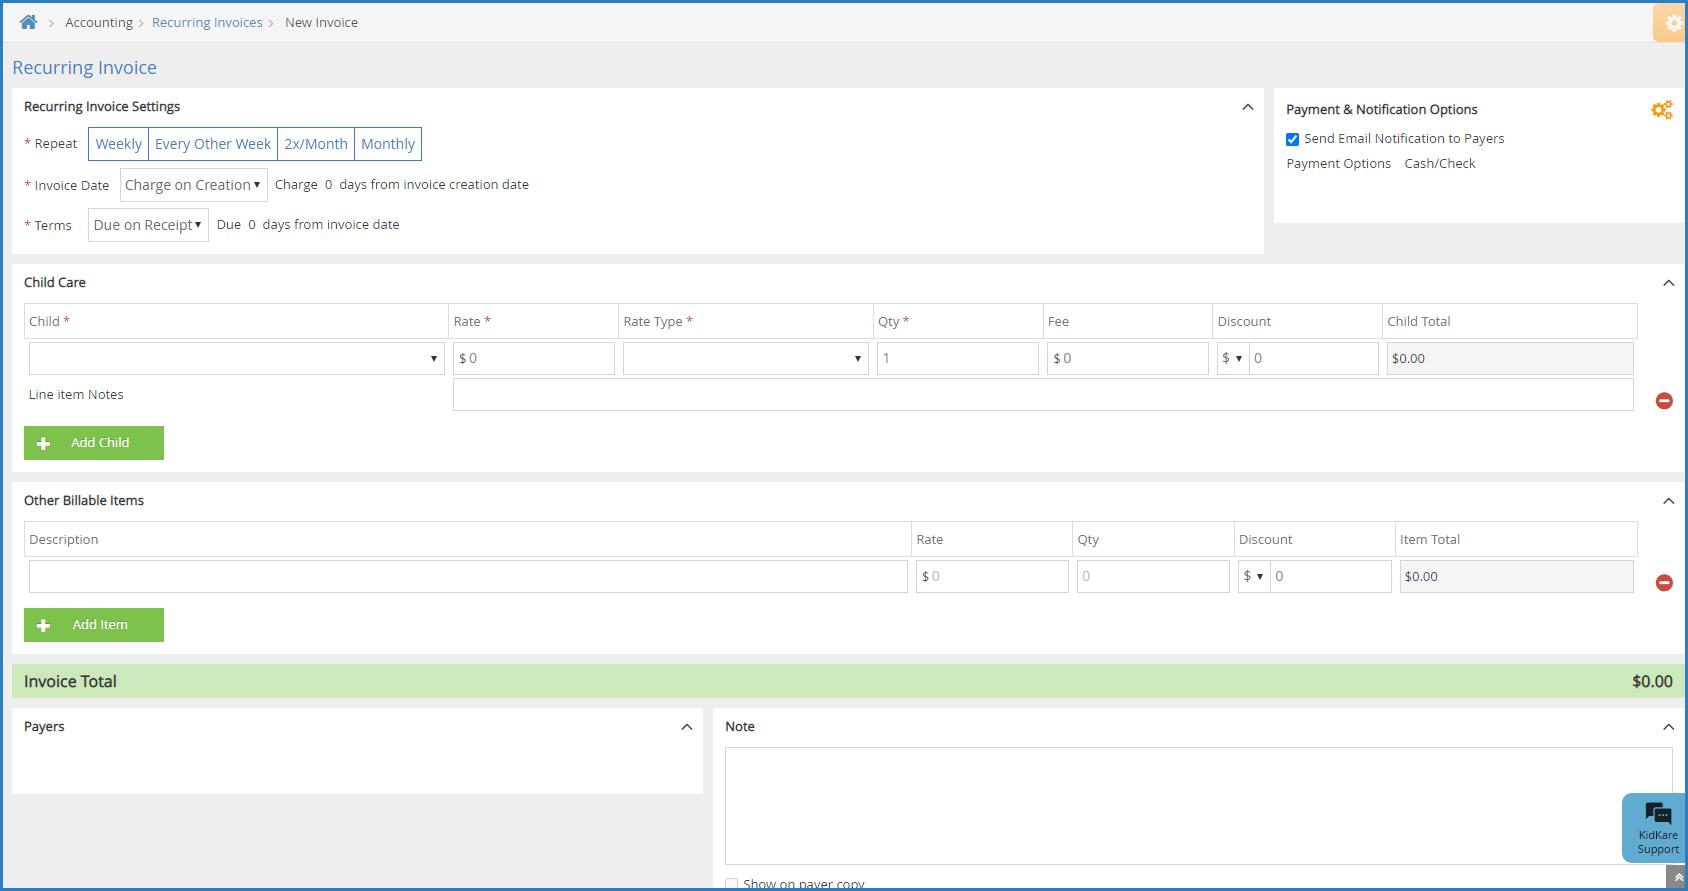
6 In the Recurring Invoice Settings section:
a Select the repeat schedule for this invoice You can choose from the following: Weekly
Every Other Week 2x/Month
Monthly
b Click the Repeat On drop-down menu(s) and specify when this invoice should repeat For example, if you selected Weekly in Step 6a, you would select the day on which to generate this invoice for the week
c Click the First Invoice Billing Period box and select the start date for the first recurring invoice's billing period The end date populates according to your selection in Step 6a

d. Click the Terms drop-down menu and choose from the following:
Due on Receipt
Due in 7 Days
Due in 15 Days
Due in 30 Days
Custom
e. If you selected Custom in Step 5d, click the Due box and enter the number of days from the invoice date that this invoice is due The Due Date field to the right updates automatically
7. In the Payment & Notification Options section:
a Click The Payment Options dialog box opens
b Check the box next to each payment method to allow for this invoice
c. Click Save. The Payment Options dialog box closes.
d Check the Send Email Notification to Payers box to send an email to payers once this invoice is completed.
8 In the Participant Care section:
a Click the Participant drop-down menu and select the participant to add to this invoice If there is a default rate set on the participant's account, the Rate and Rate Type boxes populate automatically
Note: If you need to create an invoice a Pending participant, click Filters to the top-right, and select Pending This will include Pending participants in the Participant drop-down menu
b Click the Rate box and enter the base rate to charge for this participant
c. Click the Rate Type drop-down menu and choose from the following: Hour
Half Day Day Week
Two Weeks Month
Attendance
d Click the Qty box and enter the number of units charged For example, if you selected Day in Step 6c, this would be the number of days for which you are charging
e Click the Fee box and enter any additional fees charged
f Click the Discount box and enter any discounts that apply This can be a dollar amount or percentage To change it, click the $ drop-down menu and select %
g Click the Line Item Notes box and enter any notes about the charges
h To add another participant to the invoice, click Add Participant and repeat Steps 6a-6g Participants must be set up as siblings before you can add them to the same invoice
9 In the Other Billable Items section:
a. Click Description box and enter a description of the billable item. For example, you may be charging for diapers
b. Click the Rate box and enter the rate charged for this time.
c Click the Qty box and enter the amount of this item to bill
d. Click the Discount box and enter any discounts that apply. This can be a dollar amount or percentage To change it, click the $ drop-down menu and select %
e. Click Add Item and repeat Steps 8a - 8d for each billable item to add.
10 In the Payers section:
a. Check the box next to each payer who should receive this invoice.
b Click the Pay boxes and adjust the amount for which the selected payers are responsible
11. Click the Note box and enter any notes about this invoice. To show this note on the payer's copy, check the Show on Payer Copy box
12. Click Create. The invoice is created and the Recurring Invoices page opens again.
Create Recurring Invoices from the Invoice Details Page
You can make past invoices recurring invoices from the Invoice Details page, if needed This means you do not have to set up all invoice details just the recurring invoice schedule.
1 From the menu to the left, click Accounting
2 Select Income
3 Enter your Accounting PIN and click Go
Note: If you do not have an Accounting PIN set, you are prompted to set one
4. Locate the invoice to make recurring.
5 Click the invoice to update The Invoice Details page opens
6. Click the Invoice Actions drop-down menu and select Make Recurring. The Edit Invoice page opens.

7. In the Recurring Invoices section:
a Select the repeat schedule for this invoice You can choose from the following: Weekly Every Other Week 2x/Month Monthly
b. Click the Repeat On drop-down menu(s) and specify when this invoice should repeat. For example, if you selected Weekly in Step 9a, you would select the day on which to generate this invoice for the week
8 Review the invoice details and make changes, as needed
9 Click Create Return to Top
Apply Credits to New Invoices
If a guardian has a credit on their account, you can apply it to a new invoice as you create it
1. From the menu to the left, click Accounting.
2 Click Income The invoices page opens
3. Enter your Accounting PIN and click Go.
Note: If you do not have an Accounting PIN set, you are prompted to set one
4 Click New Invoice
Last
5. Begin setting up the invoice as you normally would. For more information, see Creating an Invoice or Create a Recurring Invoice
6. Select the child from the drop-down under Child.
7 If there is a credit on the payer's account, the credit will display in the lower left corner under Payers. The credit is applied by default. If you do not want to apply the credit to this invoice, you must click to remove it

Note: If you apply a credit to a new recurring invoice, any credits on the parent account will always be automatically applied to the next invoice.

8. When finished building the invoice, click Preview.
9 Click Create or Create and Send.
Note: If you apply a credit to a new invoice, it is created as a Partially Paid invoice, instead of as an Unpaid invoice. On the Invoices page, make sure you set the Status filter to include invoices that are at the
Add Comments to Invoices
You can add internal comments to each invoice Comments are stored on with the invoice, along with invoice history and payment activity This allows you to keep a log of any pertinent information regarding payment
Last Modified on 02/09/2023 8:04 am CST
1. From the menu to the left, click Accounting.
2 Click Income
3. Enter your Accounting PIN and click Go.
Note: If you do not have an Accounting PIN set, you are prompted to set one
4 Use the filters to locate the invoice to view
5 Click the invoice number for the invoice to view The View Invoice page opens
6 Scroll to the Invoice Activity section
7 Ensure that the Comments tab is highlighted blue
8 Click + Add Comment
9 Click the text box that displays and enter your comments

10. Click Add Comment.
Note: Comments cannot be removed from invoices once added.
View Invoices
All invoices are stored on the Invoices page, including recurring invoices This page gives you an overall view of pending and paid invoices, a total balance summary, and allows you to access invoice details and balance details
Last Modified on 02/09/2023 8:07 am CST
View the Invoice List
1 From the menu to the left, click Accounting
2 Click Income
3 Enter your Accounting PIN and click Go
Note: If you do not have an Accounting PIN set, you are prompted to set one
4. The Invoices page opens.

The following information displays for each invoice:
Date: This is the date the invoice was created
Invoice #: This is the invoice number.
Billing Period: This is the period for which the invoice was issued
Participant(s): These are the participants included on the invoice.
Payer(s): These are the payers associated with the invoice You can click the payer's name to quickly update that payer's contact information. These changes affect accounting data only enrollment data is not updated
Autopay: This column indicates whether the payer associated with the listed invoice is using Autopay
Status: This is the invoice's current status. See Understand Invoice Statuses for more information.
Settlement: This is the date the invoice was paid or deleted
Amount: This is the total amount billed
Balance: This is the remaining amount owed Click the amount in this column to view the Balance
Details pop-up This lists each payer on the invoice and the amount owed You can record payments and refunds from this pop-up
5 Use the boxes and menus at the top of the table to filter the invoices that display You can filter by every column except Billing Period
6 Click each column header to sort invoices in ascending or descending order
7. Click an invoice to view invoice details. See the View Invoice Details heading, below.
Return to Top
View Deleted Invoices
Deleted invoices do not display in the invoices list by default To display them:
1. From the menu to the left, click Accounting.
2 Click Income
3. Enter your Accounting PIN and click Go.
Note: If you do not have an Accounting PIN set, you are prompted to set one
4 Click Filters in the top-right corner
5 Select Include Deleted Invoices Deleted invoices are now included in the invoices list These rows are highlighted in red, so you can easily find them

6 Click Filters again to hide the display options
Return to Top
View the Recurring Invoices List
1. From the menu to the left, click Accounting.
2 Click Income
3. Enter your Accounting PIN and click Go.
Note: If you do not have an Accounting PIN set, you are prompted to set one
4 Click and select Recurring Invoices
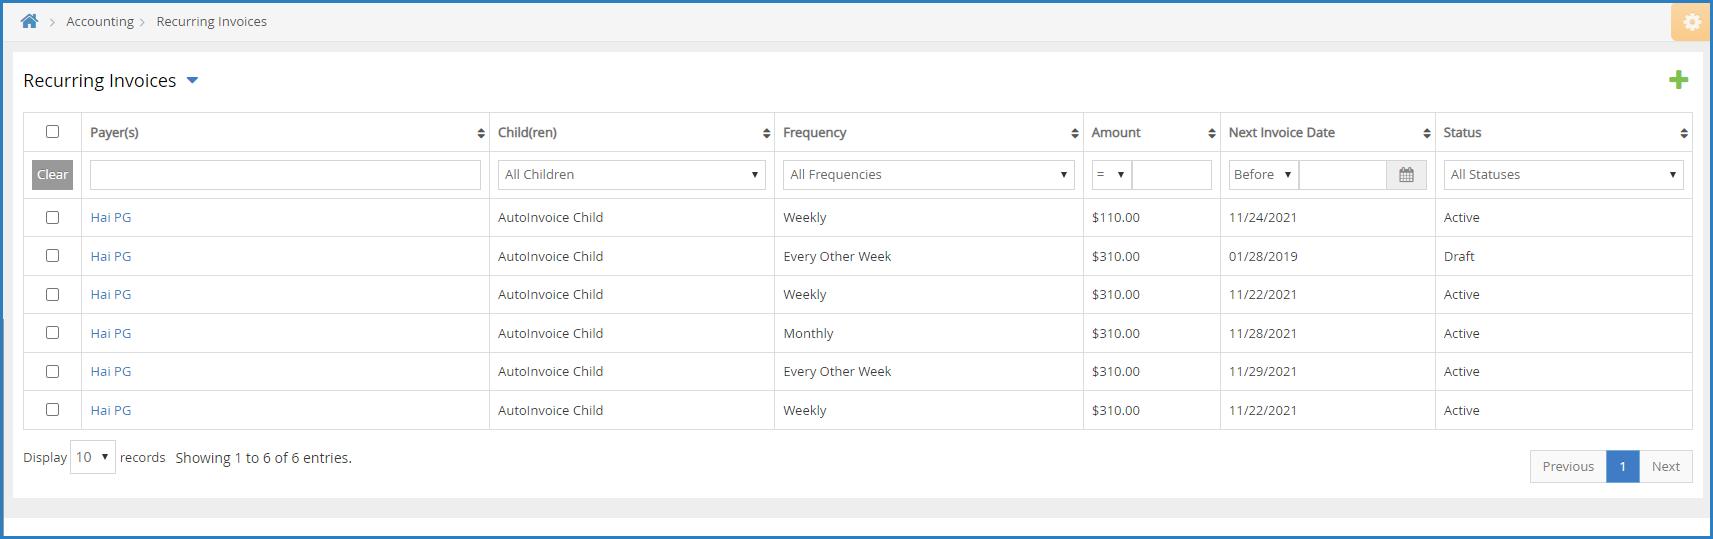
The following information displays for each invoice:
Payer(s): These are the payers associated with the invoice
Participant(s): These are the participants included on the invoice.
Frequency: This is the frequency with which the invoice is generated For example, this column would show Weekly for invoices that run each week.
Amount: This is the total amount billed
Next Invoice Date: This is the next date on which this invoice will run.
Status: This is the status of the recurring invoice This can be Draft, Active, or Deleted
5. Use the boxes and menus at the top of the table to filter the invoices that display.
6 Click each column header to sort invoices in ascending or descending order
7. Click an invoice to view invoice details. See the View Invoice Details heading, below.
Return to Top
View Invoice Details
1. From the menu to the left, click Accounting.
2 Click Income The Invoices page opens
3. Click the invoice to view.

The View Invoice page opens and displays the following:
Invoices: A list of other invoices associated with this participant displays to the left Each one includes status markers that tell you, at-a-glance, whether the invoice is unpaid, paid, partially paid, and so on You can click each invoice in this list to view the invoice details
Invoice: The invoice as the payer receives it displays to the right It includes all line items you set up, payments made, credits applied, and so on
Invoice Activity: This section lists all actions taken on this invoice to date You can filter this section to Payment Activity, Comments, and/or System Activity

Note: You can also access invoice details from the Invoices section on the Participant Account Details page To do so, click the invoice to view. The Invoice Details page opens.
Viewing Payment Status At-A-Glance
Payment status for all current invoices displays at the bottom of the Invoices list. These numbers are automatically updated as you apply filters, so you always seen payment status for the particular time period, invoices, and participants you are viewing
Status Definition
Received
This is the sum of all invoice payments for invoices where the invoice status is Paid, Partially Paid, or Declined
Pending
Balance
Total
Return to Top
This is the sum of all invoice payments for invoices where the invoice status is Paid or Partially Paid and the settlement is pending, and invoices that are at Declined status.
This is the sum of all invoice balances where the invoice status is Unpaid or Declined minus pending payments for all invoices at Partially Paid and Paid status
This is the sum of all invoice amounts where the invoice status is Partially Paid, Unpaid, Paid, Declined, or Closed
Edit Invoices
Last Modified on 02/09/2023 8:01 am CST
You can edit unpaid, paid, partially paid, and recurring invoices, as needed Note that you must remove payments from paid or partially paid invoices before you can edit them Click the links below to jump to a specific invoice type
Edit Unpaid Invoices
Editing unpaid invoices is relatively straightforward and does not require additional steps. You simply make changes to the invoice and provide the updated copy to the Payer.
1 From the menu to the left, click Accounting
2. Click Income.
3 Enter your Accounting PIN and click Go
Note: If you do not have an Accounting PIN set, you are prompted to set one.
4. Use filters to locate the invoice to change.
5 Click the invoice to update The View Invoice page opens
6. Click the Invoice Actions drop-down menu and select Edit Invoice. The Edit Invoice page opens.
7 Make changes, as needed For details, see Create an Invoice
8. When finished, click Update. The Preview Invoice page opens.
9 Review the updated invoice details and make changes to the email (to the right), as needed
10. Click Re-Send Invoice. The updated invoice is emailed to the Payer.
Return to Top
Edit Partially Paid or Paid Invoices
If you have recorded a payment on an invoice, you must first delete payments from it before you can change it When you delete payments, the paid amount is automatically recorded on the Payer account as an account credit that can be applied towards the update invoice/future invoices. You can also record a refund instead. See Record Refunds for more information.
1 From the menu to the left, click Accounting
2. Click Income.
3 Enter your Accounting PIN and click Go
Note: If you do not have an Accounting PIN set, you are prompted to set one.
4. Use filters to locate the invoice to change.
5 Click the invoice to update The View Invoice page opens You must either record a refund or delete
6 Click the Invoice Actions drop-down menu and select Delete Payments
7 At the Are You Sure prompt, click Delete
8 Click the Invoice Actions drop-down menu and select Edit Invoice The Edit Invoice page opens
9 Make changes, as needed For details, see Create an Invoice
10 When finished, click Update. The Preview Invoice page opens
11. Review the updated invoice details and make changes to the email (to the right), as needed.
12 Click Re-Send Invoice The updated invoice is emailed to the Payer
Return to Top
Edit Recurring Invoices
You can edit recurring invoices regardless of status
1 From the menu to the left, click Accounting
2. Click Income.
3 Enter your Accounting PIN and click Go
Note: If you do not have an Accounting PIN set, you are prompted to set one.
4. Click and select Recurring Invoices. The Recurring Invoices page opens.
5 Click the recurring invoice to update The Edit Invoice page opens

6. Make changes, as needed. For more information, see Create Recurring Invoices.
7 Click Update
Return to Top Note: If the recurring invoice you changed is at Draft status, click Create. This saves your changes and moves the recurring invoice to Active status.
Record Invoice Payments
When a Payer makes a cash or check payment, record it as a payment on unpaid or partially paid invoices If your Payer has account credits, you can also apply the credit toward the invoice payment
Last Modified on 11/18/2021 7:52 am CST
1. From the menu to the left, click Accounting.
2 Click Income
3. Enter your accounting PIN and click Go.
Note: If you do not have an account PIN set, you are prompted to set one
4 Locate the invoice for which to record payment Filter suggestions are below
Click the Status drop-down and select Unpaid and/or Partial to view only those invoices that have not been paid or have been partially paid
Click the Participant(s) drop-down menu and select the participant(s) to view If you know the invoice number, click the Invoice # box and type it
5 Click the row for the invoice to pay The View Invoice page opens
6 Click The Payment for Invoice pop-up opens

Click the Payment Date and select the date on which you received payment This defaults to today's date
When finished, click Record Payment If payment was made in-full, the invoice is moved to Paid status If a partial payment was made, the invoice moves to Partial status Note: The Account Credit option displays only if there is an existing account credit on the participant account
[VIDEO] Record Refunds
Last Modified on 11/18/2021 7:55 am CST
With KidKare Accounting, you can issue refunds to payers Refunds can be issued as cash, checks, or account credits Refunded credit card payments must be issued as one of the aforementioned methods of payment, as Stripe does not issue refunds Watch the quick video below or scroll down for step-bystep instructions to learn more.
1 From the menu to the left, click Accounting
2. Click Income.
3 Enter your Accounting PIN and click Go
Note: If you do not have an Accounting PIN set, you are prompted to set one.
4. Locate the invoice for which to record a refund. Filter suggestions are below. Click the Status drop-down and select Paid and/or Partial to view only those invoices that are paid or partially paid.
Click the Participant(s) drop-down menu and select the participant(s) to view If you know the invoice number, click the Invoice # box and type it.
5 Click the row for the invoice to refund The View Invoice page opens
6. Click the Invoice Actions drop-down menu and select Record Refund. The Refund for Invoice pop-up opens
7. Click the Payer drop-down menu and select the payer to which you are issuing a refund.

8 Select Cash, Check, or Account Credit
9. Click the Amount box and enter the amount you are refunding. This defaults to the total amount paid on the invoice If you selected Check in Step 7, you can also enter the check number in the Check Number box.
10 Click the Refund Date box and enter the date the refund was issued This defaults to today's date
11. Click the Notes box and enter any comments about this refund.
12 Click Record Refund The invoice status moves back to Unpaid or Partial
Email an Invoice
Last Modified on 05/26/2022 9:01 am
While you can email invoices when you create them, you can also email existing invoices This is useful if the payer did not receive the first email Before emailing invoices, verify that you have the correct email address on file for the payer
1. From the menu to the left, click Accounting.
2 Click Income
3. Enter your accounting PIN and click Go.
Note: If you do not have an account PIN set, you are prompted to set one
4 Filter to the invoices to email
5 Check the box next to the invoice(s) to email You can also check the box at the top of the column to select all invoices

6. Click in the top-right corner above the invoices list. The Review the Following Before Sending the Invoices Link popup opens
7 Confirm the displayed information is correct

8 Click Send
Note: Payers cannot pay invoices online unless you have set up ePay in KidKare and have approved the specific payer for ePay
Print Invoices
You can print invoices of any status from the invoices list or from the View Invoice page Click a link below to jump to a specific method
Print Invoices from the Invoices List
1. From the menu to the left, click Accounting.
2 Select Income
3. Enter your Accounting PIN and click Go.
Note: If you do not have an Accounting PIN set, you are prompted to set one
4 Filter to the invoice(s) to print
Last Modified on 11/18/2021 8:37 am
5 Check the box next to the invoice(s) to print You can also check the box at the top of the column to select all invoices

6. Click . Your browser's print options display.
7 Click Print
Print Invoices from the View Invoice Page
This can be useful if a payer requests a receipt for payment
1. From the menu to the left, click Accounting.
2 Select Income
3. Enter your Accounting PIN and click Go.
Note: If you do not have an Accounting PIN set, you are prompted to set one
4 Select the invoice to print The View Invoice page opens

5. Click . Your browser's print options display.
6 Click Print
Delete Invoices
Last Modified on 01/03/2022 11:39 am CST
You can delete invoices from the Invoices page, the Recurring Invoices page, and the View Invoice page However, if an invoice is at Paid or Partial status, you must refund or delete the payments recorded to that invoice before you can delete it For more information about recording refunds, see Record Refunds. For information about deleting payments, see the Delete Paid and Partially Paid Invoices heading, below.
Click a link below to jump to a specific topic

Notes: Did you delete an invoice in error? Restore it! See Restore Deleted Invoices for more information. Also remember, you are prompted to enter your Accounting PIN when accessing invoices If you do not have a PIN set up, you are prompted to enter one
Delete Invoices from the Invoices Page
You can delete multiple invoices at once from the Invoices page as long as they do not have any payments recorded to them. If you need to delete an invoice that is at Paid or Partial status, see the Delete Paid and Partially Paid Invoices heading, below.
1 From the menu to the left, click Accounting
2. Click Income.
3 Check the box next to the invoices to delete
4 Click

5. At the Are You Sure prompt, click Delete. The invoices you selected are moved to Deleted status.
Return to Top
Delete Invoices from the View Invoice Page
1 From the menu to the left, click Accounting
2 Click Income
3. Click the invoice to delete. The View Invoice page opens.
4 Click
5. At the Are You Sure prompt, click Delete. The invoice is moved to Deleted status.
Return to Top
Delete Recurring Invoices from the Recurring Invoices
1. From the menu to the left, click Accounting.
Click
3. Click and select Recurring Invoices. The Recurring Invoices page opens. 4 Check the box next to the invoices to delete
Click
At the Are You Sure prompt, click Delete The invoices you selected are moved to Deleted status
Delete Recurring Invoices from the Edit Invoices Page
4 Click the recurring invoice to delete The Edit Invoice page pens 5. Click Delete at the bottom of the page. The recurring invoice is deleted.
Delete Paid and Partially Paid Invoices
Before you can delete invoices at Paid or Partial status, you must first refund or delete the payments recorded to those invoices This article covers deleting payments For more information about recording refunds, see Record Refunds
5 At the Are You Sure prompt, click Delete If the parent paid this invoice via credit card, the payment is automatically credited back to their account as an accounting credit If the invoice was paid via cash or check, no refund is issued in KidKare The payment is simply deleted
Click 7. At the Are You Sure prompt, click Delete. The invoice is moved to Deleted status.
Restore Deleted Invoices
Last Modified on 05/12/2022 1:09 pm
If you delete an invoice or recurring invoice in error, you can restore it When you restore an invoice, it is restored to its original status Click a link below to jump to a topic
Display Deleted Invoices
Before you can view and restore your deleted invoices, you must update your page settings to show deleted invoices. To do so:
1 From the menu to the left, click Accounting
2 Click Income
3 Enter your Accounting PIN and click Go
Note: If you do not have an Accounting PIN set, you are prompted to set one
4. Click Filters in the top-right corner.
5 Select Include Deleted Invoices Deleted invoices are now included in the invoices list These rows are highlighted in red, so you can easily find them
6. Click Filters again to hide the display options. Return to Top
Restore a Deleted Invoice
1. From the menu to the left, click Accounting.
2 Click Income
3. Enter your Accounting PIN and click Go.
Note: If you do not have an Accounting PIN set, you are prompted to set one
4 Click the Status drop-down menu and select Deleted Only deleted invoices display
5. Click the invoice to restore. The View Invoice page opens.
6 Click the Invoice Actions drop-down menu and select Restore
7. At the Are You Sure prompt, click Restore. The invoice is restored to its original status.
Return to Top
Restore a Deleted Recurring Invoice
1. From the menu to the left, click Accounting.
2 Click Income
3. Enter your Accounting PIN and click Go.
Note: If you do not have an Accounting PIN set, you are prompted to set one
4 Click and select Recurring Invoices. The Recurring Invoices page opens
5. Click the Status drop-down menu and select Deleted. Only deleted invoices display.
6 Click the invoice to restore
7. At the Are You Sure prompt, click Restore. The recurring invoice is restored to its original status.
Return to Top
Understand & Get Started with ePay
Last Modified on 12/19/2023 3:37 pm
ePay allows payers to pay their invoices electronically with a credit card, or with ACH Once ePay is set up, payers can also set up auto-pay so invoices are paid automatically Money is deposited directly into your account, so you do not have to worry about depositing checks or cash Since payers can see their invoices online, you also no longer need to print invoices.
How It Works
1 You email invoices to the payers
2. Payers log in to KidKare and pay their invoices with a credit card or their bank account. They can also set up automatic payments
3. Payments are deposited directly into your bank account.
4 Payments are automatically recorded and the corresponding invoices are marked paid
Accepted Credit Cards
Stripe ePay accepts the following major credit cards:
Options & Fees for ePay
Transaction Fees
Every online payment has a $1 00 fee charged for using the service This fee can be paid by the payer or by the provider
Debit and Credit Card Fees
All debit card or credit card transactions have a 2 95% variable fee, in addition to the $1 00 transaction fee noted above This fee can be paid by the payer or by the provider ACH payments do not require this fee, which makes it the more cost-effective option
Example
For example, if a payer makes a $100 debit or credit card payment, there is a $1.00 transaction fee + 2.95% debit/credit card fee. 2.95% of $100 is $2.95.
$2 95 (credit/debit card fee) + $1 00 (transaction fee) = $3 95 in total fees
Other Fees
The following are additional fees Stripe may charge:
ACH Returns & Notices of Charge: $4 00 per return (to the provider's account)
Customer-Initiated Returns: $25 00 per return (to the provider's account)
Debit or Credit Card Chargebacks: $40 00 per return (to the parent's account)
Payers who have additional questions about fees for online payments should talk directly to their care provider
To get started, see Create and Verify an ePay Account
[VIDEO] Create & Verify ePay Account
The first step towards accepting payments online is to set up a Stripe account Watch our video for more information, or scroll down for text instructions!
1. From the menu to the left, click Accounting.
2 Click Settings The Site Level Settings page opens
3. In the Setup Stripe ePay to Accept Online Payments section, click Apply Now.
4 Enter your phone number and your email address
5. Click Continue. Stripe will text or email a verification code to you.
6 Once you receive the verification code, enter it You must enter this code before you can continue the account creation process. If you do not receive a text, check that you entered your phone number correctly. You can also click Resend Code
7. Now, enter your legal name (first and last) and date of birth.
8 Specify where to send funds (debit card or bank account)
9. Depending on what you selected in Step 9, enter either your card number and expiration date, or your bank account number and routing number
10. Save your information.
Additional Information Requirements
Stripe may require additional information when setting up your account to comply with US law. This information may include basic details, such as a valid address or date of birth. They may also require information regarding what is referred to as Beneficial Owners of your businesses Such owners can include the owner of your business, any executives, and any representatives For details, see Stripe's Beneficial Owner and Direct Definitions

Note: Stripe may also ask you for your social security number, tax ID number, and/or a photo ID. This information is used to verify your identity when creating your account Stripe will never ask you to email this information you can upload a copy of your driver's license or other form of acceptable identification directly into Stripe's secure dashboard
Next Steps
Your Stripe account is now created Your first electronic payment will take 7-10 days to deposit into your account Stripe takes measures to verify your account during this preliminary elongated period See Account Verification, below.
After your first payment has deposited into your account, you can then expect for credit card payments to
generally deposit into your account in three (3) business days, while ACH payments typically deposit into your account in four (4) business days
Once you have created your stripe account, you are returned to KidKare There are a few additional settings to confirm.
1 Specify who pays the transaction fee: Provider (you) or Parent
2 Specify who pays the credit card processing fee: Provider (you) or Parent
3 Click Save
Account Verification
Stripe will make two small deposits into your account Once you receive these deposits:
1. In KidKare, click Accounting from the menu to the left.
2 Click Payment Settings
3. Select Bank Account.
4 Click Verify
5. Enter the deposit amounts you received.

Note: You must verify your Stripe account to receive payments. You must still complete this step even if you have already started to receive payouts. If you do not verify your account within 10 days, you will stop receiving payouts
Edit Your Stripe ePay Account
Last Modified on 11/18/2021 7:38 am
When you first set up ePay for your account, you specify who is responsible for transaction and credit card processing fees: you or the payer You can change this option at any time on the Edit Stripe ePay Account page
Note: See Options and Fees for ePay for more information about transaction and credit card processing fees
1 From the menu to the left, click Accounting
2. Click Settings. The Site Level Settings page opens.
3 In the ePay Settings section, click the Who Pays the $1 Transaction Fee drop-down menu and/or the Who Pays the Credit Card Processing Fee drop-down menu and choose from the following:
4 When finished, click Save
Record Other Income
Other income is income not already tracked on your invoices You can record and track this income on the Other Income page This could be claim reimbursements, spousal income, grants, registration fees, side business income, and more
Last Modified on 11/18/2021 7:58 am CST
1. From the menu to the left, click Accounting.
2 Click Income
3. Enter your accounting PIN and click Go.
Note: If you do not have an account PIN set, you are prompted to set one
4 Click and select Other Income The Other Income page opens
5. Click . The Other Income pop-up opens.
6 Click the Select a Day box and enter the date on which the income was earned
7. Click the Category box and enter the income category. This could be food program, donation, grant, and so on
8. Click the Amount box and enter the dollar amount received.
9 Click the Received From box and enter the name of the person/entity that paid you
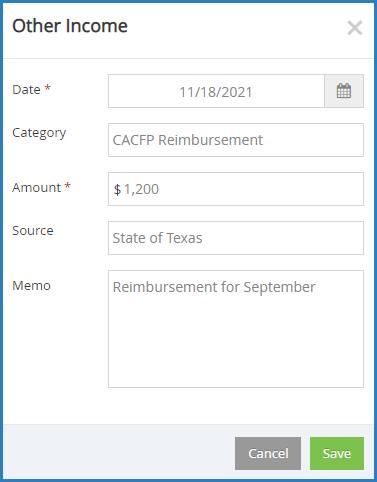
10 Click Save
View Other Income
Your Other Income entries are listed on the Other Income page You can set filters to locate specific entries especially if you need to print only certain entries out of a long list
Last Modified on 11/18/2021 8:01 am CST
1. From the menu to the left, click Accounting.
2 Click Income
3. Enter your accounting PIN and click Go.
Note: If you do not have an account PIN set, you are prompted to set one
4 Click and select Other Income The Other Income pages opens

The following information displays for each entry (assuming you provided it):
Date: This is the date the income was received
Category: This is the category to which you assigned the income.
Source: This is the source of the income you assigned to this entry
Amount: This is the dollar amount of the income.
Memo: This displays any notes you entered about the other income entry
5. You can filter by the following:
Date: Click the drop-down menu and select the time period to view To set a custom date range, select Custom and enter start and end dates in the boxes that display.
Note: To clear a custom date filter, click the Date drop-down menu and select a different time period to view, or you can select All to display all entries. You can also click Clear in the far-left column to clear all applied filters
Category: Click the box at the top of this column and begin typing a category name
Source: Click the box at the top of this column and begin typing a source
Amount: Click the drop-down menu and select an operator You can choose equals (=), greater than (>), Then, click the corresponding text box and enter an amount For example, to find all Other Income over $100, you would select > in the first box and then type 100 in the corresponding text box
Memo: Click the box at the top of this column and begin typing a memo
6 To clear any applied filters, click Clear in the far-left column
7 Click each column header to sort in ascending or descending order
Edit Other Income
1 From the menu to the left, click Accounting
2 Click Income
3 Enter your accounting PIN and click Go
Note: If you do not have an account PIN set, you are prompted to set one
4 Click and select Other Income
5 Click the entry to change The Other Income pop-up opens
6 Enter new information over the existing information
7 Click Save
Delete Other Income
You can delete Other Income entries, when needed There is no need to zero any amounts before proceeding
1. From the menu to the left, click Accounting.
2 Click Income
3. Enter your accounting PIN and click Go.
Note: If you do not have an account PIN set, you are prompted to set one
Last Modified on 11/18/2021 8:02 am CST
4 Click and select Other Income
5. Check the box next to the other income entries to delete. You can also check the box at the top of the table to select all entries
6 Click
7 Click OK at the Are You Sure prompt
Print Other Income
To print your Other Income entries for your records:
1 From the menu to the left, click Accounting
2 Click Income
3 Enter your Accounting PIN and click Go
Note: If you do not have an Accounting PIN set, you are prompted to set one
Last Modified on 11/18/2021 8:03 am
4 Click and select Other Income The Other Income page opens
5 Check the box next to each income entry to print
6. Click . Your browser's printer settings open.
7 Select your printer and adjust your printing settings, as needed
8. Click Print.
Record New Expenses
Record business expenses in KidKare to help you with your tax deductions each year Some examples of expenses you could enter include, but are not limited to:
Activity Expenses (Admission Fees to Amusement Parks, Museums, Etc)
Advertising (Business Cards, Flyers, Ads, Etc)
Apartment/Home Rent
Appliances (Washer, Dryer, Etc)
Cleaning Supplies (Detergent, Paper Towels, Soap, Etc)
Business Software (Including KidKare)
Office Equipment (Computer, Printer, Desk, Fax Machine, Etc)
Food
Furniture
Home Repairs and Maintenance
Last Modified on 12/19/2023 3:39 pm CST
You can also claim expenses purchased second-hand from garage sales and resale websites. Document the purchase when you pick the item up. Include the item purchased, date of purchase, purchase price, address/location of the purchase, a photo of the purchased item (if possible), and any other relevant or identifying information For more information about reporting expenses, see Tom Copeland's blog
1. From the menu to the left, click Accounting.
2 Click Expenses The Expenses page opens
3 Click The Add/Edit Entry page opens
4. Click the Category drop-down menu and select the expense category.


Note: If you notice expense categories you do not need, you can hide them from this list To do so, click next to the category to hide and respond to the confirmation prompt. If you hide an expense category, you must create a custom category to return it to the list For more information, see Add a Custom Expense Category.
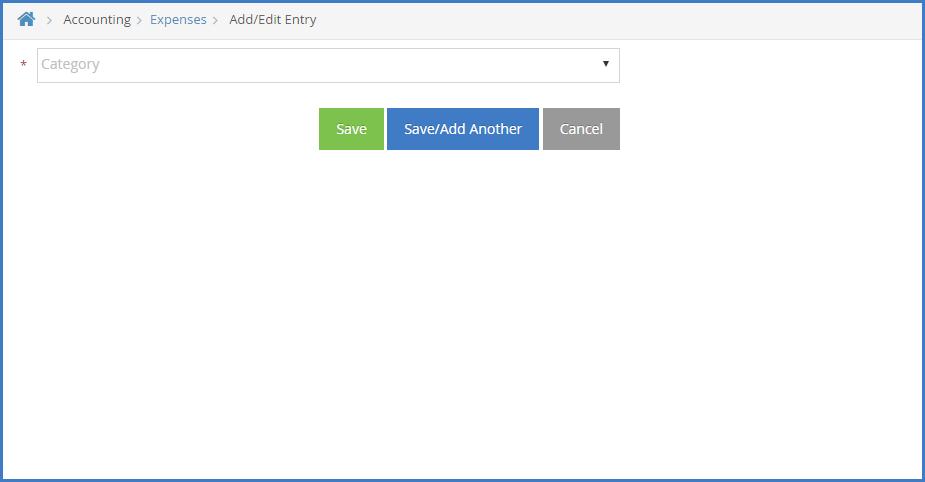
5 Click the Select a Day box and enter the date of the purchase/expense
6 Click the Amount box and enter the dollar amount of the expense
7 Click the Paid To box and enter the name of the entity/person you paid for the product or service
8 Click the Item Description box and enter a brief description of the purchase, if needed
9 Click the Business Use drop-down menu and choose from the following: 100% Business Use: The expense was used only for business purposes
Actual Business Use: The expense was used for both business and personal If you select this option, indicate the exact percentage that was used for business Time/Space %: The expense was used for both business and personal If you select this option, you can use the time/space percentage to calculate the amount used for business You calculate the Time/Space % on the Time/Space tab.
Note: If you selected Wages Paid to Employee in Step 4, the Business Use drop-down menu is disabled
10. Click next to Do You Want to Add Mileage to the Expenseif you want to record mileage. Once you save this entry, you will be taken to the Mileage tab to add the mileage

11 When finished, click Save You can also click Save and Add Another to save this entry and immediately add a new one.
Add a Custom Expense Category
Last Modified on 06/09/2022 9:31 am
KidKare comes with default expense categories for you to select, but you may find that you need a category that isn't listed In this case, you can create a custom expense category
You can also add a custom expense category if you hide an expense category in error. For example, if you hide Activity Expenses by accident, simply follow the steps below to add Activity Expenses back to the category list.
1 From the menu to the left, click Accounting
2. Click Expenses.
3 Click New Entry
4. Click the Category box and enter the name of your custom category. Make sure you type in the Category box and not the Type to Search box

5 Complete the rest of your expense entry as you normally would For more information, see Record Expenses
6 Click Save or Save/Add Another
Track Food & Vehicle Expenses
Last Modified on 11/19/2021 2:14 pm
Note: Consult with your accountant or tax preparer on how to properly track and deduct your expenses
Food Expenses
Below is a brief description of the two basic ways food expenses are recorded for income tax purposes. Food expenses are included on Schedule C reports as a standard allowance.
1 Standard Meal Allowance: The IRS has developed a standard food deduction for individuals operating a childcare business. This based on Tier 1 rates in effect at the beginning of the calendar year (January 1December 31) You can apply this meal rate to all meals served to children There are two reports in KidKare that calculate the amount of this expenses deduction:
Provider Tax Report: This report is available to all providers on the food program It also includes food program reimbursement amounts.
Standard Meal Allowance Report: This report is available to all providers with an Accounting subscription.
2 Actual Food Expense: With this method, you keep track of the actual amount of money spent on food As there are multiple ways to determine business food expenses when using this method, you should consult your tax preparer to determine the best way to deduct food costs A few examples are listed below
If you can completely separate business food expenses from personal food expenses, use the 100% Business food expense listed on the report
If you have Shared food expenses, determine what percentage of these expenses are business
Then, add them to the 100% Business food expenses listed
Determine your own average cost per meal per child by pricing out several Breakfast, Lunch, and Snack sample menus Multiply your average cost per meal by the total number of meals and snacks served
Note: The total expenses entered in KidKare for actual food expenses is reported on the Actual Food Expenses report.
Vehicle Expense
There are two methods for deducting vehicle expenses for tax purposes Vehicle expenses are included on Schedule C reports as a standard allowance
1 Standard Mileage Method: With this method, you would add all business miles and multiply them by the IRS standard mileage rate for each year The KidKare Vehicle Mileage report provides a total for all business miles you've recorded with KidKare
2 Actual Vehicle Expense: With this method, you would track all car expenses The Vehicle Deduction
Comparison report can help you decide which deduction to use Share this report with your tax preparer
However, note that you must enter the following information to KidKare for this report to have usable data:
Business mileage recorded under the Mileage tab on the Expenses page
Starting and Ending mileage for the year recorded under the Vehicles tab on the Expenses page
Actual vehicle expenses recorded under the Expenses tab on the Expenses page
Add and Manage Vehicles
Add vehicles you use for your child care business to KidKare via the Vehicles page This allows you to track yearly mileage for tax purposes
Adding Vehicles
1 From the menu to the left, click Accounting
2. Click the Expenses. The Expenses page opens.
Last Modified on 03/25/2021 9:38 am
3 Click and select Vehicles
4 Click The Add/Edit page opens
5. Click the Date First Used for Business box and enter the day you first used this vehicle for your business.
6 Click the Name of Vehicle box and enter a name for this vehicle This is to help you identify this vehicle later.
7 Click the Make/Model box and enter the vehicle's make and model
8. Click the Purchase Price box and enter the original purchase price of this vehicle. This box is optional.

9 Click the Fair Market Value When First Used for Business box and enter the fair market value of the vehicle when you began using it for your child care business This information should either be in your lease/financing contract, or you can use a resource like Kelley Blue Book to find the fair market value of the vehicle for the year you started using it for your business This box is optional
10 If you plan to track the vehicle's mileage for tax purposes, enter the current odometer readings in the Mileage History section You should typically update your odometer reading each year For more information, see Tom Copeland's blog It's Time to Record Your Vehicle's Odometer Reading
a Click the Odometer Start Date box and enter the date of the first odometer reading
b Click the Odometer Reading at Start Date box and enter the odometer reading as of the date you entered in Step 9a
c. Once you enter a mileage, the Odometer End Date box automatically updates to 12/31 of the current
year Return at the end of the year and record the updated mileage in the Odometer Reading End Date. The total miles driving between the Start and End date displays.
11 Click Save or click Save/Add Another
Updating Odometer Readings
At the end of each year, you should record the odometer reading for your car.
1 From the Vehicles page, click the vehicle to update The Add/Edit page opens and displays details for the vehicle you selected
2 In the Mileage History section, click the Odometer End Date box and enter the date for your ending odometer reading When entered the odometer starting reading, the Odometer End Date box defaulted to 12/31 of the current year
3 Click the Odometer Reading At End Date box and enter the odometer reading as of the end of the year
4. Click Update. If you need to add a new mileage interval for a new year:
1. Click Add Mileage Interval at the top of the page. An empty Mileage History section is added.

2. Click the Odometer Start Date box and enter the starting date for this new interval. For example, if your ending reading date was 12/31/18, the new start date would be 1/1/19
Note: Odometer start and end dates must be within the same year.
3 Click the Odometer Reading at Start Date box and enter the new odometer reading For example, you could enter the odometer reading as of your ending reading date
4. Click Update. Next year, return and update the ending date and reading in this section.
Removing Vehicles
If you no longer use a particular vehicle for your child care business (for example, you may have traded it in), you can remove the vehicle record If the vehicle has existing mileage records, you are prompted to confirm that you still want to delete the vehicle. Ensure that you do not need to retain mileage records for the vehicle before proceeding.
1 From the Vehicles page, check the box next to the vehicle to delete
2. Click .
3 At the Are You Sure prompt, click OK
Note: You can also delete vehicles from the Add/Edit page To do so, click the vehicle to delete The Add/Edit page opens Click Delete at the bottom of the window and respond to the confirmation prompt
Add and Manage Mileage Records
Last Modified on 03/25/2021 9:39 am
Record mileage for trips made for business purposes on the Mileage page If you have set up vehicles on the Vehicle page, you can assign mileage to a particular vehicle For more information about adding vehicles, see Add and Manage Vehicles
Adding Mileage Records
When you add mileage records, the only required information is the miles traveled. However, it is useful to add additional information, such as the vehicle used, the origin, your destination, and so on so you have a more complete record of miles traveled for business purposes
1 From the menu to the left, click Accounting
2. Click Expenses.
3 Click and select Mileage
4 Click The Add/Edit page opens
5. Click the Date box and enter the date for this record. This defaults to the current date.
6 Click the Vehicle drop-down menu and select the vehicle to which to assign this record
7. Click the Origin box and enter the starting point of this trip. For example, if you are starting from your home, you could enter Home
8. Click the Destination box and enter your destination. For example, you could enter the name of a grocery store
9. Click the Miles box and enter the total mileage for a one-way trip. For example, if your destination is 10 miles from your origin, you would enter 10 in this box This is the only box that is required
10. Click the Purpose box and enter a reason for this trip, if needed.
11 Check the Round Trip box to automatically calculate round trip miles (to your destination and back to your origin). For example, if you entered 10 in the Miles box, the mileage change to 20 when you check this box.
12 Click Save or Save/Add Another
Managing Mileage Records
Each mileage record you enter is stored on the Mileage page You can filter this page to view specific mileage records for specific date ranges.
To filter this list:
1 Click the Date Range drop-down menu and select a date range to view You can choose from the following:
Current Month
Current Quarter
Current Year
Previous Month
Previous Quarter
Previous Year
2. Click Go. The display updates.
Note: To set a custom date range, click the From and To boxes and enter the date range to view. Then, click Go
Updating Mileage Records
To update or correct a mileage record:
1. From the Mileage page, click the record to update. The Add/Edit page opens.
2 Enter new information over the existing information
3. Click Update or Save/Add Another.
Removing Mileage Records
To remove a mileage record (for example, you might have entered mileage in error):
1 From the Mileage page check the box next to the record to delete
2. Click .
3 Click OK at the confirmation prompt
Note: You can also delete mileage records from the Add/Edit page To do so, click the record to delete The Add/Edit page opens Click Delete at the bottom of the window and respond to the confirmation prompt
Enter Time/Space Calculations
Your Time/Space percentage represents the proportion of your home that you use for business purposes You use this figure to determine how much of your shared business and personal expenses can be deducted as a business expense For more information about Time/Space %, see Tom Copeland's blog The Time-Space Percentage Quiz.
The Time/Space % is determined by the following formula:
Last Modified on 02/01/2023 3:52 pm CST
EXCLUSIVE SPACE PERCENTAGE + (REGULAR USE AREA SPACE PERCENTAGE * TIME PERCENTAGE) = TIME/SPACE PERCENTAGE
Before you begin, ensure that you have recorded your time in KidKare. Please see Add Participant Hours to Time/Space Calculations and Record Work Hours When Participants are not Present for more information
To determine your Time/Space %:
1. From the menu to the left, click Accounting.
2 Click Expenses
3 Click and select Time/Space
4. Click to the right and select Time/Space Calculation.
5 Click the Total Square Feet in Your Home box and enter the total square footage of your home
6. Click the Square Feet of Rooms Used 100% for Business and enter the total square footage of only those rooms you use exclusively (100%) for business This could include the daycare room, the play room, and so on.
7 Click the Square Feet of Rooms Regularly Used for Business box and enter the total square footage of those rooms you use for both home and business. This could include the kitchen, bathroom, and so on. Do not include rooms that are for personal use (such as your bedroom)
8. If your child care business was in operation for only a portion of the current year:
a Check the My Participant Care Business was in Operation for only a Portion of YEAR box (YEAR reflects the current year).
Note: Depending on your account settings, this option may read something different, such as My Child Care Business was in Operation for only a Portion of YEAR. See Set Display Settings for more information
b Click the Business Start Date box and enter your business start date
c. Click the Business End Date and enter your business end date.
9 Click Calculate % The calculation displays

Add Participant Hours to Time/Space Calculations
You can add participant hours to the Time/Space % To do so:
1 From the menu to the left, click Accounting
2 Click Expenses
3 Click and select Time/Space
4. Click to the right and select Children Present Hours.
5 Select the Date Range you are needing to enter Time/Space for
6. Click the red Go box. Make sure that the year in the Month column updates.

7 Choose how to calculate hours You can choose from the following: Attendance Records: Click Attendance Records in the Auto Calculate By column to automatically calculate children present hours by attendance records for the month Hours of Operation: Click Hours of Operation in the Auto Calculate By column to automatically calculate hours of operation for the month using the hours on your My Site page If your hours of operation vary from what is shown on the My Site page, click in the Hours column on the row for the month to change The Hours of Operation pop-up opens Click the Open and Close boxes for each day of the week and enter your actual hours of operation for that month Leave both boxes blank for each day you are closed

8. Click in the Actions column.
Record Work Hours When Participants are not Present
Last Modified on 05/20/2021 8:09 am
There are things you must do to manage your child care business even when children are not present in your home, such as cleaning, paperwork, and so on Use KidKare to record the number of hours you spend doing business activities in your home when the children in your care are not present. These hours will then be added to the hours you care for children to calculate your Time/Space %.
1 From the menu to the left, click Accounting
2 Click Expenses
3. Click and select Time/Space.
4 Click to the right and select Other Hours
5 Click The Add/Edit Entry page opens
6 Click the From and To boxes and select the dates the work was done To select one day, select the same date in both boxes
7. Click the Start box and enter the time you started working. You can also click to use arrows to adjust the time up and down
8 Click the End box and enter the time you stopped working You can also click to use arrows to adjust the time up and down
9 Click the Activity box and enter the activity you did You can also select an existing activity from the list that displays
10 Click the Notes box and enter any notes about the activity, if needed

11. When finished, click Save. You can also click Save/Add Another to save your entry and begin adding a new one
About Accounting Reports
KidKare Accounting comes with several reports To print them:
1 From the menu to the left, click Reports The Reports page opens
2 Click the Select a Category drop-down menu, and select Accounting Reports
3 Click the Select a Report drop-down menu and select the report to print
The following reports are available:
Last Modified on 12/19/2023 9:24 am CST
Actual Food Expenses: This report lists any expenses you've recorded under the Actual Food Expenses category on the Expenses page It includes the date, expense category, paid to, total amount, and business use percentage Use this report to calculate your actual business food expenses instead of using the standard meal allowance rate
Depreciation Worksheet: This worksheet is for all of your Form 4562 depreciated expenses Form 4562 is an IRS tax form used to claim deductions or amortization of a piece of property. This worksheet will include depreciation information for your Home, as entered under the Home category on the Expenses page. This worksheet will also include vehicles you have entered in Expenses.
Form 8829 Detailed Expenses: This report is for your house-related expenses It includes taxes and totals Use this form to figure the allowable expenses for your home on Schedule C.
Form 8829 House Worksheet: This report is for your house-related expenses It is the same report as Form 8829 Detailed Expenses, but does not contain the same level of detail. Use this form to figure the allowable expenses for your home on Schedule C
Form W-10: This report lists the total amount of payments a Payer has made for children in your care. This provides Payers with your correct name, address, and TIN Payers do not file this form on their taxes Instead, they use it when filing Form 1040 or Form 1040SR. Some Payers may also need this information if receive benefits under their employer's dependent care plan
Form W-10 (Blank):This report is a blank version of Form W-10.
Other Income: This report includes other income sources, such as donations, registration fees, or any other income generated outside of regular childcare payments. You record this information in the Other Income tab on the Expenses page
Schedule C Detailed Expenses: This report includes all recorded expenses that are not house expenses. This includes advertising costs, office expenses, activity expenses, and so on Use this report when filing Form 1040.
Schedule C Worksheet: This is the same report as Schedule C Detailed Expenses, but does not contain the same level of details Use this report when filing Form 1040
Standard Meal Allowance: This report totals all of the meals you recorded in the program and multiplies it by the IRS meal rate Compare this report with the Actual Food Expense report to see which one gives you
a higher deduction
Statement of Account: This report lists the parent/guardian's current unpaid and paid invoices, any payments made, and any relevant notes It also includes the total billed, total paid, and total account balance
Statement of Itemized Payments: This report lists all payments you have received on invoices for a selected time frame For example, you can print this report monthly Each payment is listed on a separate line and includes the invoice number, payment method, invoice total, payment total, and so on. The sum of all payment totals is also included
Time/Space - Hours Children are Present: This report lists the hours children were present for a specific year, as input in the Children Present Hours tab on the Expenses page
Time/Space Calculation: This report provides your time/space percentage as calculated by KidKare. It uses values you enter in the Time/Space tab on the Expenses page
Vehicle Deduction Comparison: This report provides you with a comparison of vehicle deduction using the the Standard Mileage Rate method and the Actual Vehicle Expenses method
Vehicle Mileage: This report lists the mileage you recorded in the Mileage tab on the Expenses page. It is divided by vehicle and includes the date, origin, destination, purpose, and mileage for each trip, as well as the rate of depreciation. Totals for mileage and depreciation are also included.
ePay Settlement Report: This report lists payments made through ePay It includes the payment status, invoice number, billed to, payment date, invoice amount, and payment amount.
Print an Account Statement
The Account Statement report lists all invoices and payments within a selected time frame
Last Modified on 12/19/2023 9:24 am CST
1. From the menu to the left, click Reports.
2 Click the Select a Category drop-down menu and select Accounting Reports
3. Click the Select a Report drop-down menu and select Statement of Account.
4 Click the All Parents drop-down menu and select the parent to include in this report
5. Click the Date Range drop-down menu and select the time frame for which to print the report. You can also set a custom date range in the From and To boxes
6. Click Run. The report displays.

7. To print it, click Print. Your browser's printer options display.
8 Adjust your printer settings, as needed, and click Print


Note: If you are printing this report, click to collapse the report header This saves space on your printed report
Year-End Tax Reports
Last Modified on 12/19/2023 9:24 am CST
KidKare Accounting provides several useful reports for your year-end accounting procedures This article details the reports you should print for your accountant, as well as reports you should print for your parents
To print these reports, click Reports from the menu to the left. When the Reports page opens, select Accounting in the Select a Category drop-down menu
Year-End Reports for Your Accountant
Note that the specific reports you should print and give to your accountant may vary according to how much of the Accounting feature you use If you make full-use of our Accounting features, print the following reports and provide them to your accountant:
1. Actual Food Expense: This report lists all food expenses. It is used to calculate your actual business food costs instead of using the standard meal allowance rate There are several ways to determine your business food expenses if you are using the Actual Food Expenses method. No matter which method you choose, IRS rules require you to save food receipts for all business and personal food expenses
If you can completely separate business food expenses from personal food expenses, use the 100% Business food expense listed on the report
If you have Shared food expenses, determine what percentage of these expenses are business.
Then, add them to the 100% Business food expenses listed
Determine your own average cost per meal per child by pricing out several Breakfast, Lunch, and Snack sample menus Multiply your average cost per meal by the total number of meals and snacks served.
2 Depreciation Worksheet: This report is for all Form 4562 depreciated expenses
3. Form 8829 House Worksheet or Form 8829 Detailed Expenses: These reports are for house-related expenses Both are the same, but Form 8829 Detailed Expenses contains additional details
4. Schedule C Worksheet or Schedule C Detailed Expenses: These reports are for all expenses, including house, vehicle, and food expenses Both are the same report, but Schedule C Detailed Expenses includes additional details
5 Standard Meal Allowance: This report totals all of the meals you recorded in the program and multiplies it by the IRS meal rate Compare this report with the Actual Food Expense report to see which one gives you a higher deduction
6 Time-Space Calculation: This report provides your time/space percentage as calculated by KidKare If your accountant wants to calculate your time/space percentage instead, print the Time-Space - Hours Children Present report and the Time-Space - Other Activities report
7 Vehicle Deduction Comparison: This report is for vehicle-related expenses It uses data from the following
parts of KidKare to determine vehicle expenses
Business mileage recorded under the Mileage tab on the Expenses page
Starting and Ending mileage for the year recorded under the Vehicles tab on the Expenses page
Actual vehicle expenses recorded under the Expenses tab on the Expenses page
Note: You can also print the Vehicle Mileage report for additional mileage details
Year-End Reports for Parents
You must print the Form W-10report for each of your parents. Form W-10 includes the parent's annual total for childcare They need this report to file their taxes
You can also print the Statement of Itemized Payments report or the Statement of Account report if they need a more detailed report of their payments
Form 1099-K
Understand Form 1099-K
Last Modified on 12/19/2023 9:25 am
If you received over $600 (over any number of transactions) in parent payments via ePay for a calendar year, you should have received a Form 1099-K information report This form lists the gross amount of all reportable card transactions/third-party network transactions
For more information about Form 1099-K and what you should use it for, see Understanding Your Form 1099K and Form 1099-K Frequently Asked Questionson the IRS website
1099 Fee Reconciliation Report
The 1099-K that Stripe creates includes transaction fees paid by either you, as the provider, or parents as well as the amounts received from Stripe Payouts This will look like one lump sum
In order to properly fill out the Expenses section of Part II of your Schedule C you will need to be able to separate out how much of the overall amount within the 1099-K should be considered Income vs Expenses Fees paid by either you or the parent can be considered Expense, payouts from Stripe are considered Income.
You can see the totals broken out in the 1099 Fee Reconciliation Report by navigating to the Reports section, selecting Accounting Reports, and clicking on 1099 Fee Reconciliation
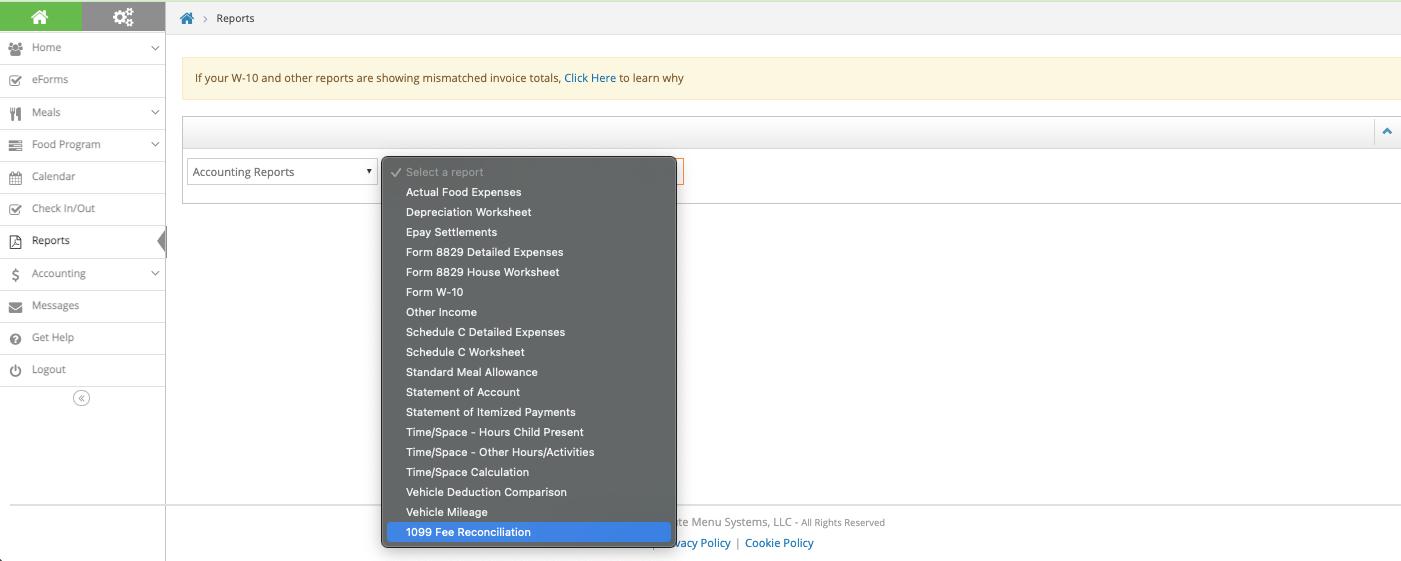
From here you can select which year you would like to run the report for, this report becomes available for the previous year at the end of January.
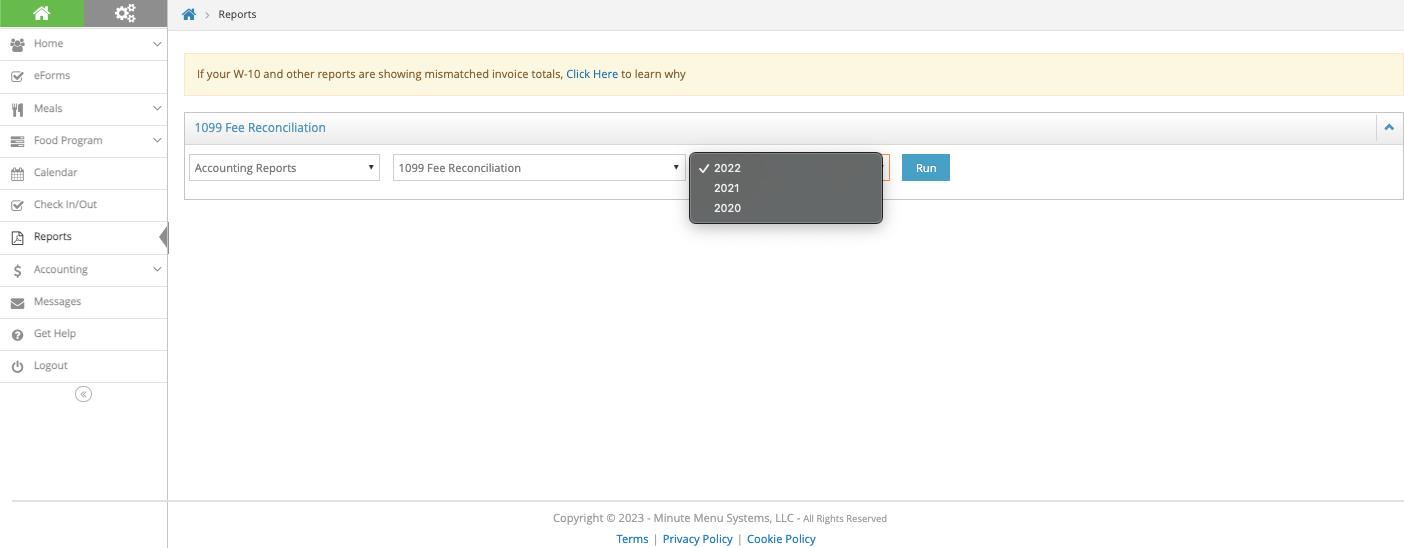
Print the ePay Settlements Report
Last Modified on 12/19/2023 9:25 am
The ePay Settlements report lists payments made through ePay It includes the payment status, invoice number, billed to, payment date, invoice amount, and payment amount
1. From the menu to the left, click Reports.
2 Click the Select a Category drop-down menu and select Accounting Reports
3. Click the Select a Report drop-down menu and select EPay Settlements.
4 Set the following filters, as needed:
Payer: Select a specific Payer for whom to run the report. To run this report for all Payers, select All.
Date Range: Select the date range for which to run the report The From and To boxes update as you change your selection. You can choose from the following:
Custom Week From Today
Current Week
Current Month
Current Year
Current Quarter
Current Fiscal Year
Previous Month
Previous Year
Previous Quarter
Previous Fiscal Year
5 Click Run The data for the report displays
Print W-10s for Payers
Last Modified on 12/19/2023 9:26 am CST
This report lists the total amount of payments a Payer has made for children in your care This provides Payers with your correct name, address, and TIN Payers do not file this form on their taxes Instead, they use it when filing Form 1040 or Form 1040SR Some Payers may also need this information if they receive benefits under their employer's dependent care plan.
1 From the menu to the left, click Reports
2 Click the Select a Category drop-down menu and select Accounting Reports
3 Click the Report drop-down menu and select Form W-10
4 Click the Display Your Name or Business Name on Form W-10 drop-down menu and select the name to print on the form
5 Click the Payers drop-down menu and select the payer for whom to print this report, or select All Payers You can also select Blank to print a blank W-10
6 Click the Select a Year box and select the year for which to print the report
7 Click Run A PDF downloads