
Middle Ages
Invictus Classical Press

Fine Arts: Middle Ages
© 2022 Invictus Classical Press
AUTHOR: K. Nicole Henry - All rights reserved.
No part of this curriculum may be reproduced or transmitted in any form by any meanselectronic, mechanical, photocopying, recording without written permission from Invictus Classical Press.
invictusclassicalpress@gmail.com www.invictusclassicalpress.com
CREATIVE DIRECTOR: Myriam Grimard
GRAPHIC DESIGNER: Laury Grimard
Printed in the city of Québec, Québec, Canada and Houston, Texas, USA.
Welcome to the Invictus Classical Press Ancient Art Projects!
We at ICP believe that there is truth, goodness, and beauty to be found in the Classical method and Charlotte Mason pedagogy. This curriculum seeks to bring what people love best of each, together into one comprehensive resource.
A Classical Charlotte Mason education is motivated by God’s glory and utilizes beautiful and true material within the Trivium-based method. Its goal is the formation and equipping of the whole person made in God’s image, who can learn, reason, and persuade people to the enduring truths of God and act virtuously toward their neighbor.
On the sixth day of creation, after speaking into existence planets and pollywogs and stars and slugs, God stooped down into the dust and made a man with His hands. Later, He put that man to sleep, scooped out a rib, and made a woman. When we claim that God is the Creator, we really mean it! He took nothing and made everything! He piled dust and created humanity. Because we are made in His image, we too have within us the desire to create. Children make pies out of mud and grass and slime out of glue and borax. They long to knead and knit and squish and sculpt and every time they do, they imitate our awesome, creative God. He is the ultimate Craftsman, and everything our children create aspires to the perfection that He is. How amazing that He has gifted humanity with His creative spirit so that we may play with color and texture and paint and clay!
When students sit down to create the art projects in this guide, they are not only imitating their Creator, they are learning patience, dexterity, creativity, problem solving, and appreciation for the process of creation. They are also having fun, learning to use different mediums, integrating the facts they have been learning, fleshing out the stories they have been reading, and gaining inspiration from amazing cultures and peoples that have come before them. Let’s explore just a few of the many benefits of creating art projects before jumping into the six included in this guide.
When we observe great art projects like the Bayeux Tapestry, the Hagia Sophia, and Notre Dame Cathedral, we are in awe of their splendor. We wonder, how did they do it? The answer is, with time, patience, and skill, none of which are learned overnight. Creating something from raw materials is challenging. The projects chosen for this guide, while fun to do, require some work, and so did the pieces they are imitating. Taking a very small project from start to finish in a very small amount of time that somewhat imitates what the original artist accomplished over a much longer period of time, gives students an appreciation for the process of creation. Unlike God, they cannot speak things into being.
They must, as He did with Adam and Eve, get their hands dirty with the nitty gritty so that they can appreciate that good things take time and effort and love. When the project is finished, they can hold it up and admire their handiwork, and they might even think it’s good!
There is no better way to learn than to incorporate all aspects of our being. Children, after all, are born persons with a mind, emotions, and will. It is our responsibility as educators to ensure that the feast laid before our students is not only a feast of knowledge, but of action and of wonder. Having our students recite a history prompt about the Vikings is important because they need to know who they were, what they did, and when they lived. Reading aloud from a living book of Viking mythology and listening to narrations afterward is beneficial, for it invites them into relationship with a people group that is most likely very foreign to them. But having them roll and smooth cool clay “stones” between their palms, then pressing them flat to indent runes on them, enables them to peel back even more layers of meaning as they imagine a-viking with Erik the Red through the North Sea with a pocket full of them clinking together as the boat rocks.
Now they have met the Vikings in a visceral way! The runes in their hands have opened doorways of mystery and fascination and hours of imaginative play - all because the teacher was intentional in laying the materials before the students, giving them minimal instruction, and letting them go!
What do Viking rune stones teach our children about the medieval culture and people of Scandinavia who left behind very little in writing? Can we discover more about a culture by first appreciating and then imitating their art - from the smallest carved stones to the largest stained glass windows? Absolutely, yes! By studying the artifacts these cultures left behind, children learn to value and appreciate the beauty and intelligence of diverse people groups that are otherwise far removed from them, both by time and geography. By imitating their art and handicrafts, while also contributing their own ideas and imagination to a piece, children learn about design and function and creativity. They also learn to compare and contrast and reflect critically on their own work. Most importantly, however, children
learn about the transfer of culture and the preservation of heritage through art and handicraft. Maybe one day a child in your family, or in your class, will be a great artist whose work is highly valued for its beauty and will transcend time and place and be studied and imitated by others. Wouldn’t that be amazing?
Each art project begins with the title and its corresponding Invictus Classical Press Memory Guide week(s). While the Invictus Guide is not necessary to complete the project, it is beneficial to have because the curriculum was written as a whole, and everything complements each other. However, again, children will enjoy and benefit from the projects regardless. The time frame to complete each project is approximately 60 minutes, though some may require drying time after completion.
The next thing you will see is a quote that pertains to the project in some way that has been chosen for its timelessness or beauty or importance to the subject. The quotes can be read aloud to the students and talked about if desired. Following the quote is a description of the project, a materials list (with picture), and a vocabulary list of words that are covered in the lesson.
The lesson is comprehensive and unless further detail is desired should be more than enough to set the stage for the project. Depending on the age and interest of the children you are teaching, you can decide what to teach and what not to. After the lesson, you will find detailed directions alongside pictures to accomplish the project. All necessary templates are provided in the lesson and can be copied as needed.
We recommend playing appropriate music or reading aloud during the student’s quiet work time. Integrated music listening suggestions, as well as read aloud and narration suggestions, can be found in the corresponding Invictus Classical Press Memory Guide.
(Correlates with Invictus vol. 2 MW: week 4, 6, 19, 24)
A house is built of logs and stone, of tiles and posts and piers; a home is built of loving deeds that stand a thousand years.
~ Victor Hugo
DESCRIPTION
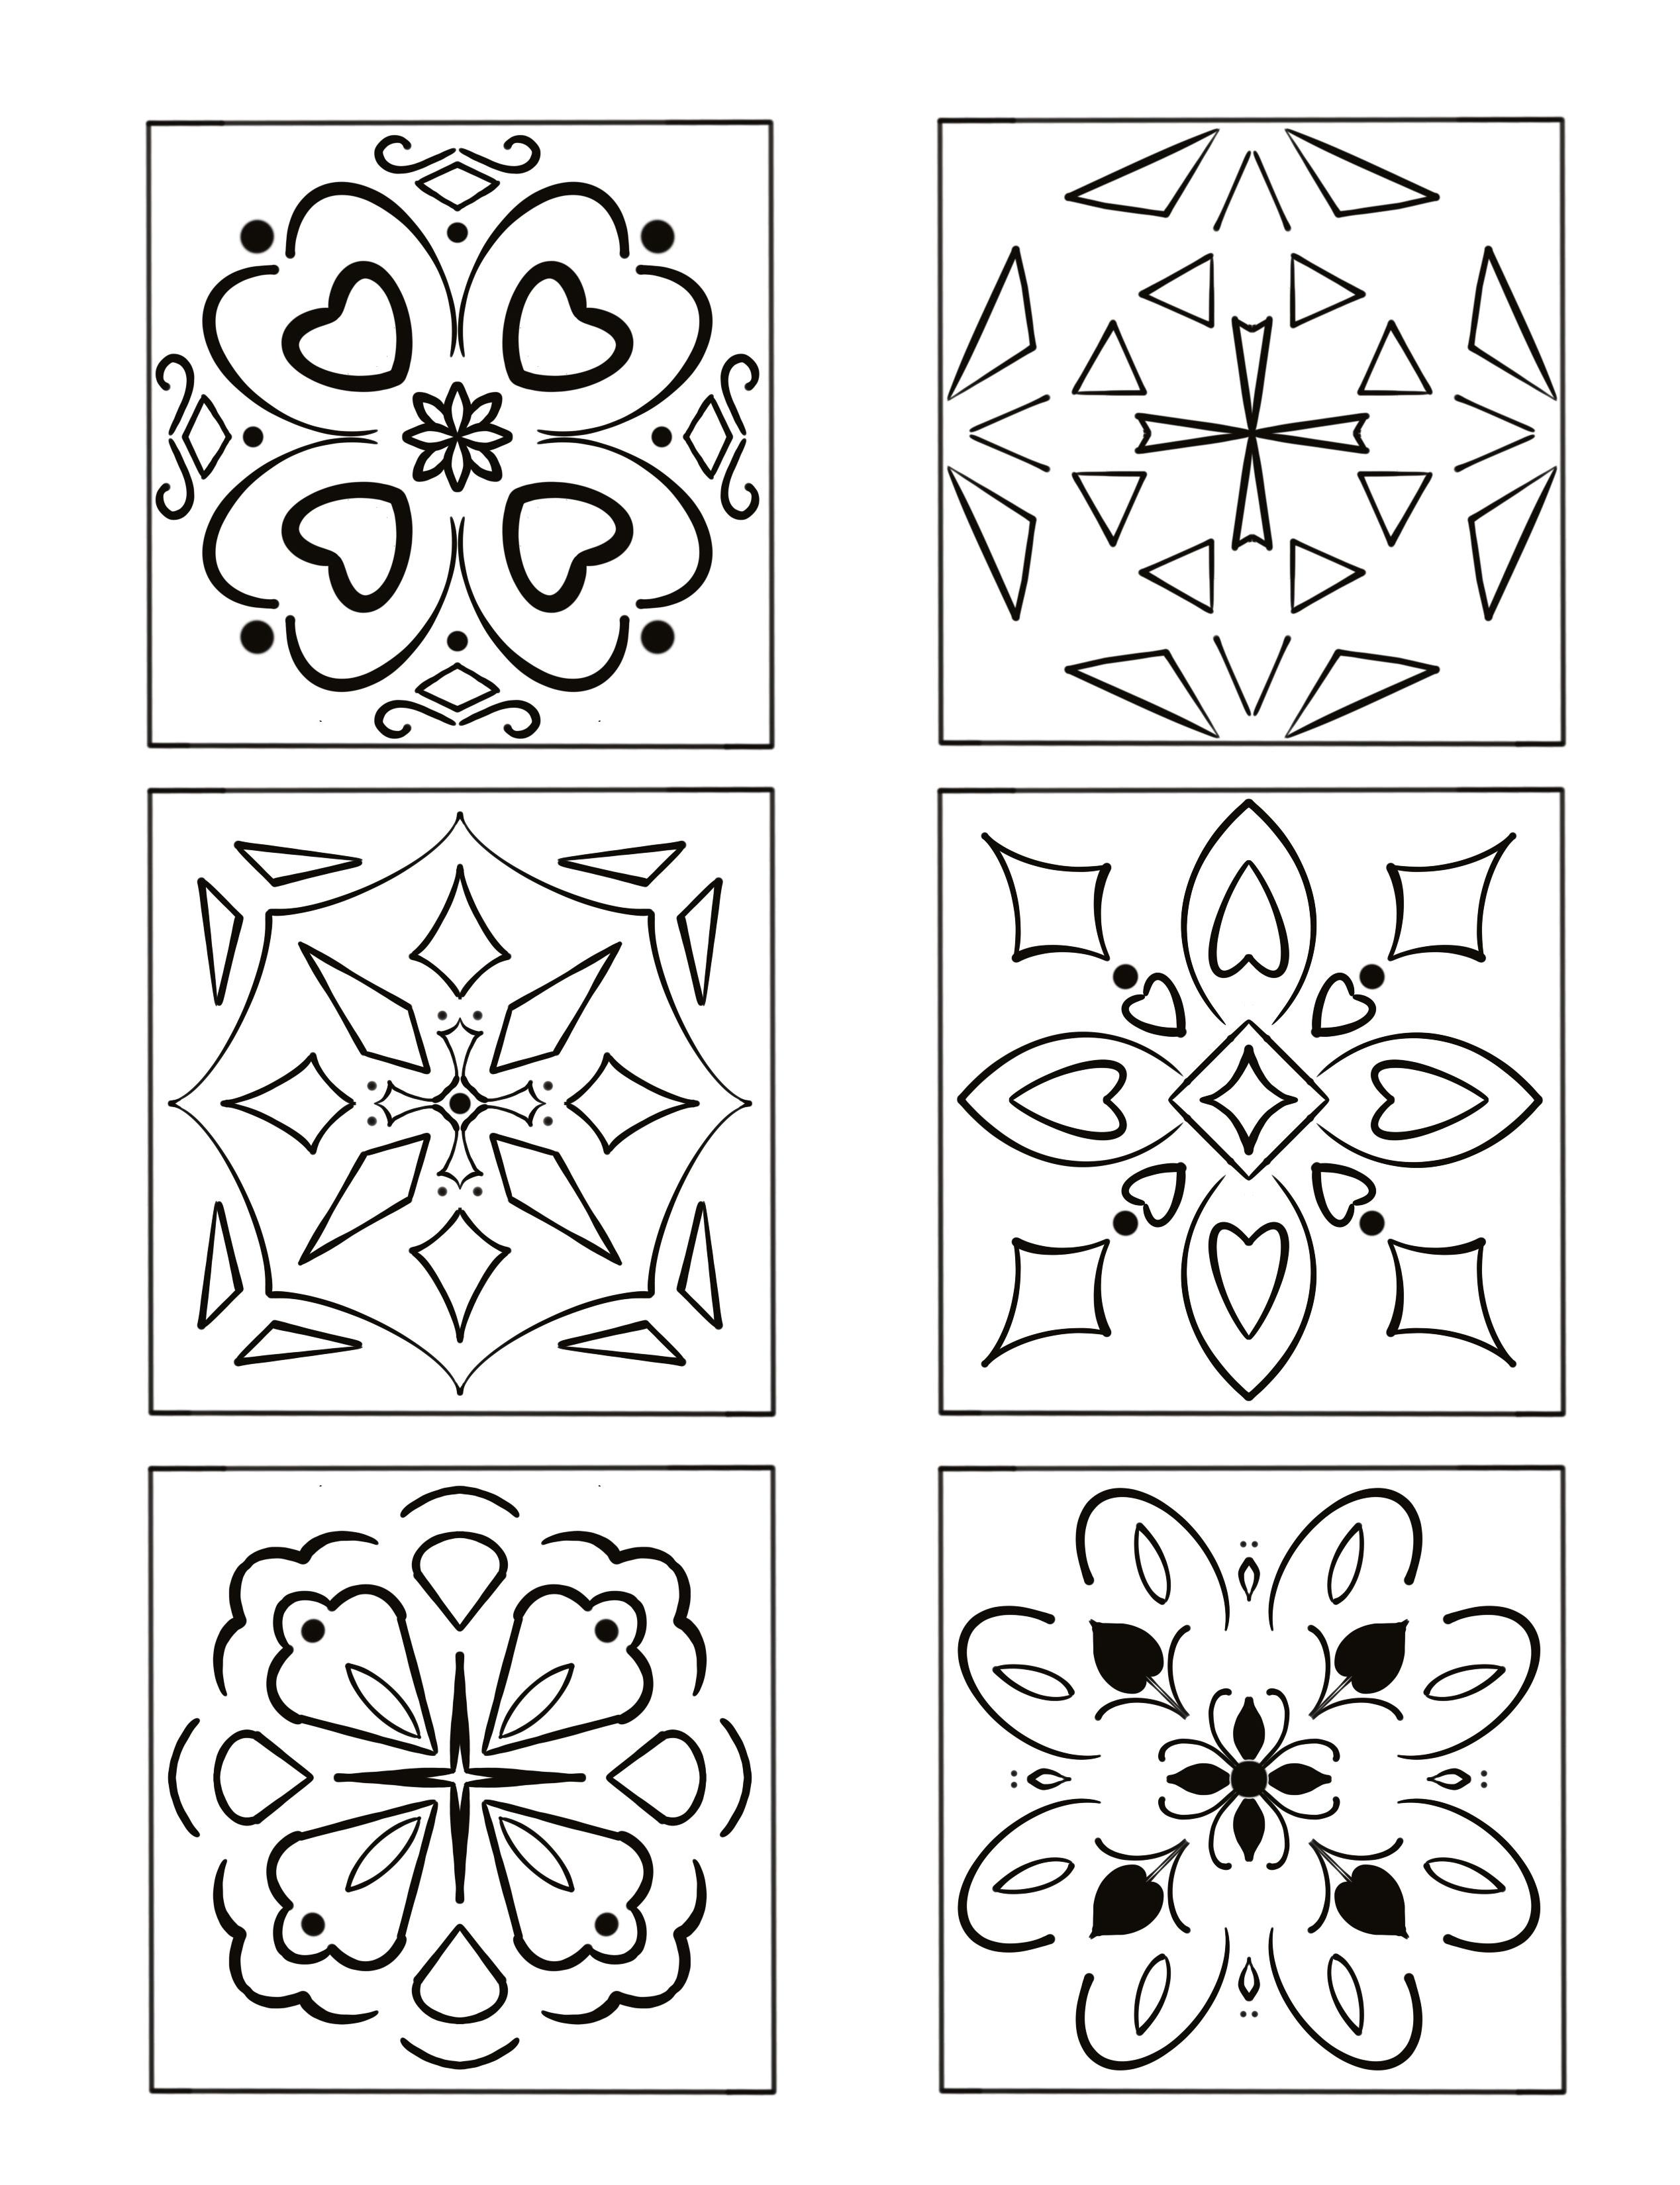
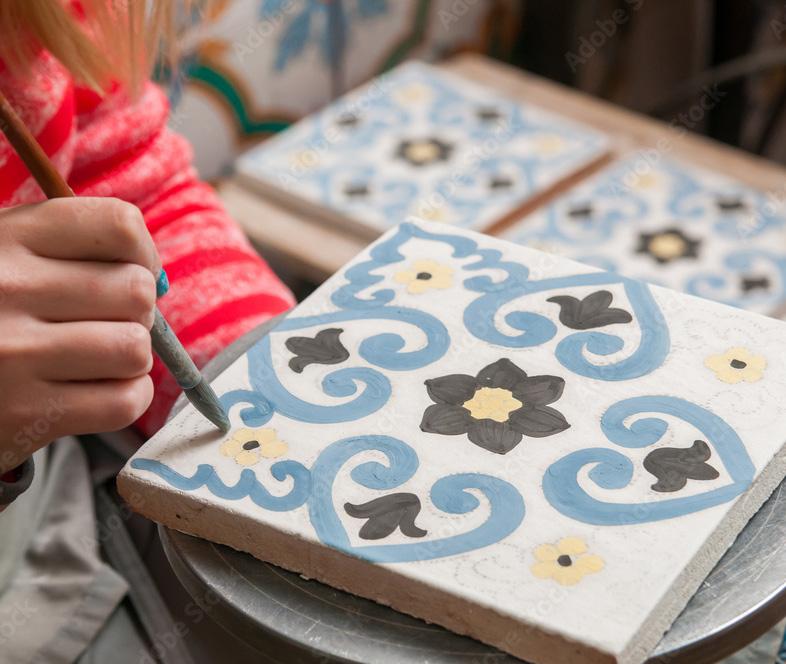
Students will learn about the general history of ceramic tile before focusing on Middle Eastern tile art. They will then design their own geometric or arabesque pattern and paint a set of tiles to take home.
• Invictus Fine Art Picture Study: Poetry in a Garden
• Invictus Template: Geometric tile designs (one/student)
• 4, 4 x 4 porcelain or ceramic tiles (one/student)
• Acrylic paint in various colors
• Paint brushes
• Paper plates (one/student)
• Acrylic Sealer (like Mod Podge)
• Rubbing alcohol
• Cotton fluffs or Q-tips
• Paper, pencils, and pencil crayons
• Adhesive cork backing (optional)
• Paper bags (1 per student)
• Painted tile samples
• Pictures of Middle Eastern tiles
• Library books about Middle Eastern art
Geometry: The branch of mathematics that studies the sizes, shapes, positions, angles, and dimensions of things.
Calligraphy: The art of beautiful writing.
1. Obtain supplies and then experiment with a few tiles at home so that you can help the students if required.
2. Print Invictus template.
3. Cut out paper tiles for the students to practice on (optional).
Explain to the students that in this lesson they will learn a little bit about the history of ceramic tiles and then focus on studying Middle Eastern tile art. Read the following paragraphs aloud to the class with enthusiasm and wonder. Remind them that you will only read the text ONE TIME, so they need to put their listening ears on so they can narrate to you when you are done. Depending on your age group and ability, pause after each section and ask for one or two narrations, or read a couple of sections then pause, or read the whole thing and then request narrations. Feel free to extend the discussion by asking if anyone has anything to add or any corrections.
Do you know what ceramic tiles are? I bet you have seen them around your house, especially in your kitchen or your bathroom! They are shiny and beautiful and protect your bathroom walls from sink and shower water damage, and your kitchen walls from spaghetti sauce splashes and other spatterings that can escape while you cook.
People around the world, from ancient times to today, have used ceramic tiles to beautify their living spaces, decorate their churches and tombs, and protect important surfaces. Archaeologists have
discovered ancient Egyptian tiles in tombs and in pyramids that are over 5,000 years old! Other ancient people, like the Assyrians and the Babylonians, also crafted tiles. The Babylonians used a cobalt glaze to create bright blue shiny tiles, which they carefully placed onto the walls of their important buildings, the most famous of which is the Ishtar Gate. The ancient Chinese people also made tiles, and used them for the roofs of their temples and pagodas.
Tile-making became an art and a craft outside of Mesopotamia, Africa, and Asia, as it made its way into medieval Europe. Prohibitively expensive, at first only the church, the monarchy, and wealthy individuals could afford to decorate with them, but as the materials became easier to obtain and the method was mastered and shared, simpler (and cheaper) tiles were produced, allowing more people to enjoy their beauty.

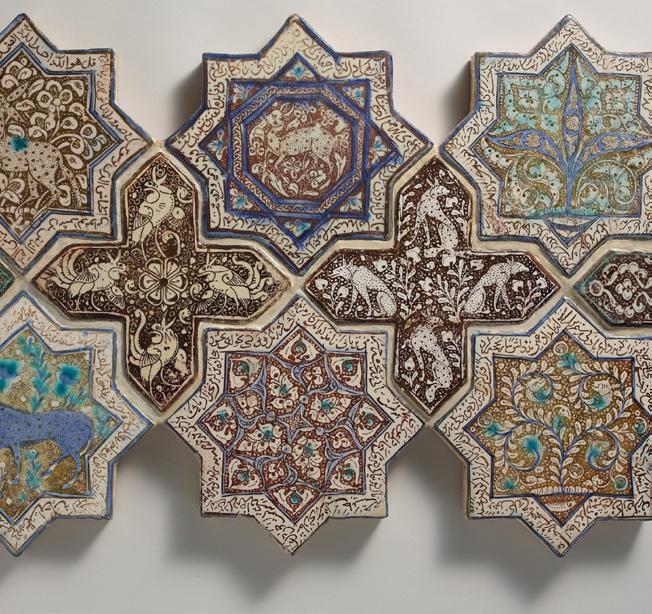
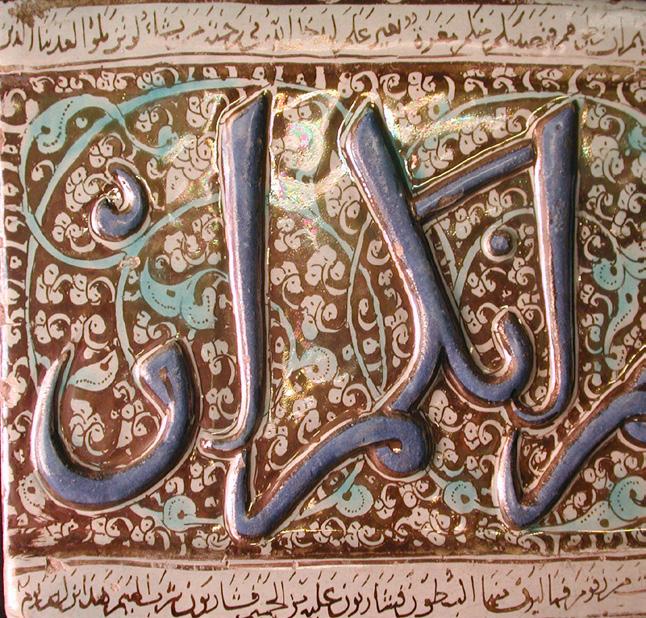
Tile with Image of Phoenix late 13th century
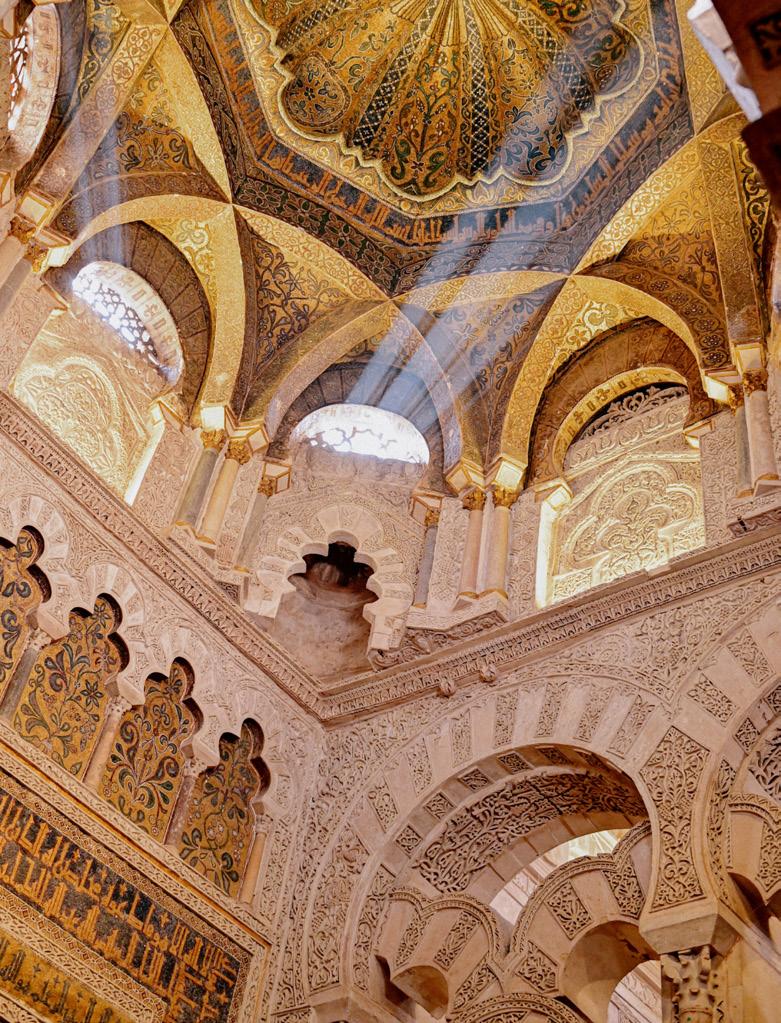
Great Islamic Mosque in Cordoba
Photo credit: https://unsplash.com/@girlwithredhat
From the early 16th century, the tile making of Morocco and southern Spain slowly worked its way north. Some of the most stunning Moorish ceramic work can be found at the Alhambra Palace in Granada, and in the Great Islamic Mosque in Cordoba. In the 14th century, tin glazed tile making spread from Holland over to England, and by the 19th century, the British Empire was mass producing many tile designs that became heirlooms of families in the American colonies. The fact that so many people from so many places over so many years used the same item to decorate and protect, leads to the conclusion that tiles must be pretty easy to make - and they are!
Ceramic tiles are made from natural red, brown, or white clay. Clay is a form of soil made from very small particles (less than 4 micrometers!) of aluminum silicate. It’s terrible for growing plants, but terrific for crafting tiles! Making clay tiles is as easy as finding some clay, forming it into the shape you want, firing it at a high temperature to reduce the water content, glazing it, then decorating it! That’s it! No wonder everyone was doing it! Terracotta tiles were the first to be made by the ancients. Terracotta, which literally means “baked earth,” was gathered from the banks of ancient rivers, carefully cut into flat shapes or finger-formed into pots, pitchers, and plates, then left in the blazing sun, or placed in the ashes of a hot fire to dry. We still use terracotta today for tiles, garden pots, roof shingles and more!
Of course, tile making has now become an exact science. Different kinds of clay with different mineral contents are used for different things depending on what qualities are desired in the final product. Finely ground sand and feldspar can be added to clay then fired at super high temperatures to create what is known as porcelain, a more expensive and harder clay than simple ceramic.
Ceramic comes from the Greek word keramic, meaning “of or belonging to pottery,” from keramos, which is variously translated as “potter’s earth; tile; earthen vessel, jar, winejar, and pottery.”
A ceramist is a person devoted to ceramics, the art of making things from clay that has been molded and baked.
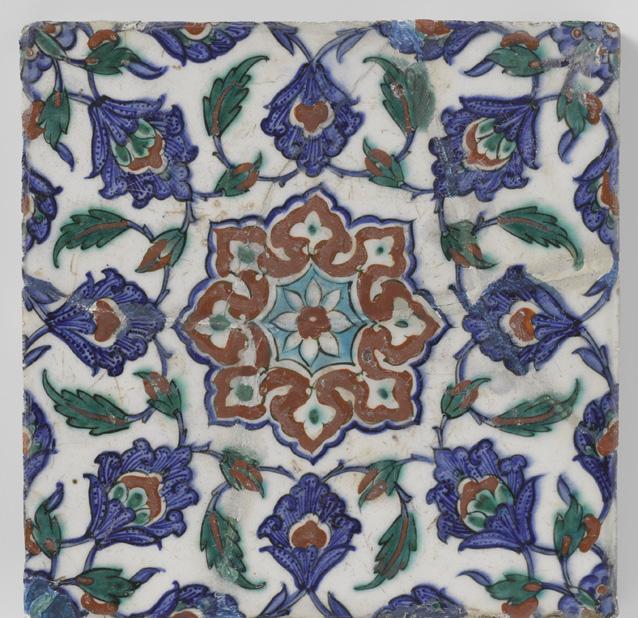
Middle Eastern tile art is an intricate, beautiful art form found in mosques, mausoleums, and other important buildings throughout the Middle East. Tile art found in the Middle East is often richly colored and intricately designed. It generally eschews any kind of human representation so that there is no danger of idolatry taking place, something that the muslims were very concerned with.
There are three common themes in Middle Eastern tile art: geometric designs, floral patterns, and calligraphy. The muslims of the Middle East were geometry geniuses! They were well versed in the
branch of mathematics that deals with sizes, shapes, positions, angles, and dimensions of things, and translated that knowledge into geometric designs made of regular lines and repeated shapes that they rotated and reflected to create repeating patterns. These lines, shapes, and patterns were used to express the intricate logic and order of the universe and if you observe them for any length of time, you can almost lose yourself in the complexity of the designs that seem to go on forever. They are almost kaleidoscopic in form, mesmerizing and beautiful all at once.
The floral and plant-like patterns of their tiles feature curving lines, flower and leaf motifs, vases, and vines. These patterns demonstrate appreciation for the created order of the universe and the beauty found in the natural world. Calligraphy, from the Greek words kallos (beauty) and graphia (writing) the “art of beautiful writing,” can be found on mosque and mausoleum tiles as well as in the Qur’an, the holy book of Islam. Calligraphy is often found interspersed within repeating geometric and floral patterns.
“Geometry is knowledge of the eternally existent.”
~ Pythagoras
When you have finished reading the selection and listening to a few narrations, take some time to show the students some examples of tile art by passing around some books depicting it, as well as
posting or projecting the Invictus Picture Study included in this lesson. Give them a couple of minutes to observe and appreciate the pictures. Have them trace the patterns with their fingers, then ask them what theysee. Talk about the colors and patterns and ask them how the picture makes them feel, what they wonder about, and how they think the artist started the project.
1. Hand out paper and pencils to the students. Depending on the size of the tiles you were able to obtain, have them measure out the length and width for each of the four tiles they are going to use. Alternatively, you could cut separate pieces for each student based on the size of tile you were able to find, then they can “arrange” them as they wish.

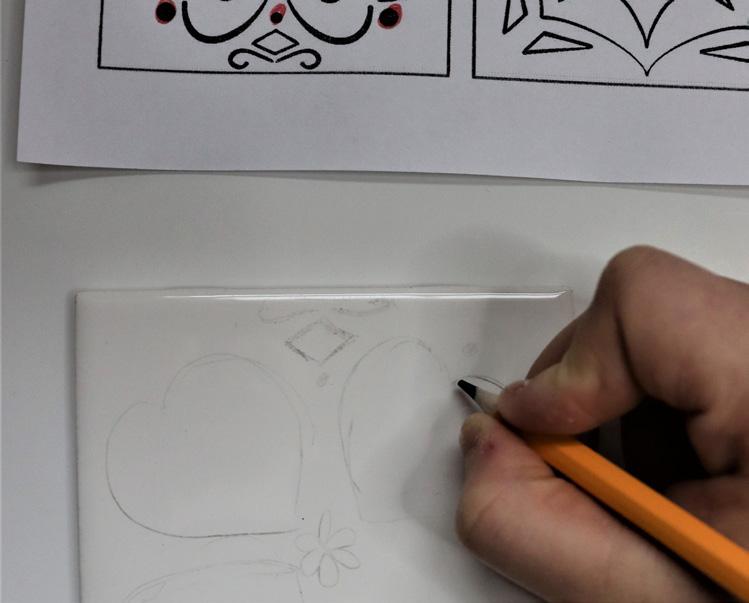
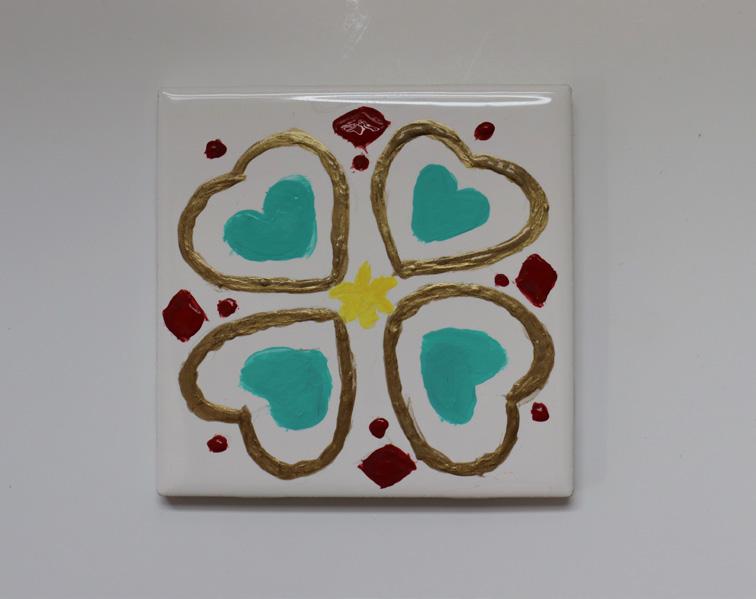
2. Older students should sketch their ideas for their four tiles on paper and experiment with colors before they paint. They may want to create a four-tile scene, or individual tiles. Encourage them to arrange the tiles in a way they are happy with: individual, four-high, four-wide, or four-square. The Invictus Template (included) is a great example of a four-square scene. Younger students can simply paint on the tiles as they desire, but do attempt to hold the older students to a higher standard of artistic skill and expression.
3. When the students are happy with their designs on paper, hand out the tiles, paint, and paintbrushes.
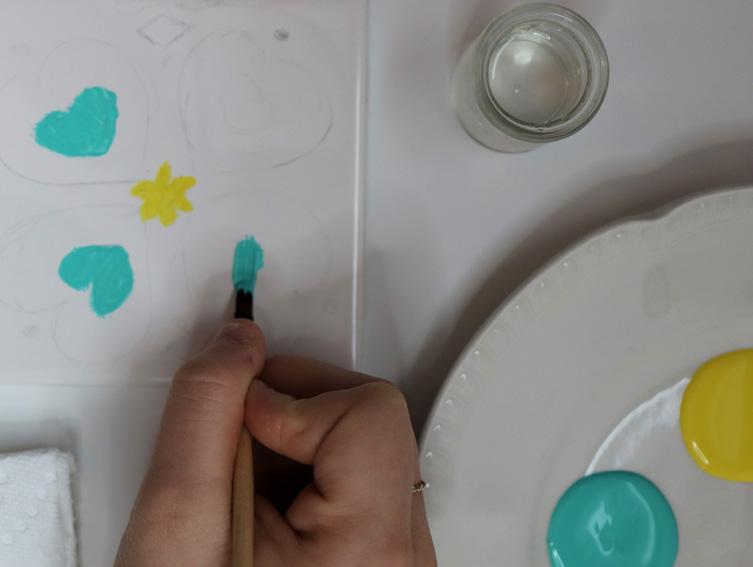
Encourage them to paint carefully, but if they do make a mistake, use the rubbing alcohol and cotton fluff to erase the paint before it dries.
4. Once the paintings are finished, set them aside and allow them to dry. When they are dry, spray them with the acrylic sealer and allow to dry further.
5. When completely dry, stick the adhesive cork backing on, take some pictures, and then place the tiles in the paper bags to go home.
As students work on their art project, consider playing one or all of the all of the Invictus music study suggestions from the Middle Ages Memory Guide, weeks 4, 6, 19; 24.