


◆ Seek, select and organise information for art creation
◆ Explore the painting techniques to express ideas and feelings
◆ Explain the idea using visual language
◆ Create visual arts for the expression of feelings and thoughts
◆ Interpret artworks based on techniques, visual elements and principles of organisation
Although we cannot fly to Hawaii right away, we can make our own ukulele! 3 1 2
I want to go to the beach!
Why so sudden?
Because I watched a video of people playing the ukulele in Hawaii.
Sun, sea, sand… and coconut!
Watch the video below to learn more about a ukulele! Online Resource Ukulele Music http://ct18.etextbook.hk/ee0511

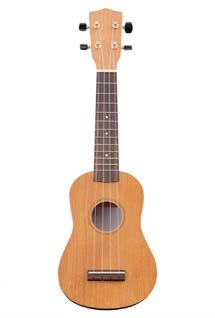
Ukulele looks like a mini guitar!
Ukulele and guitar are from the same instrument family .

Find ukulele decorating ideas using image search. Record and explain the ideas or elements that you want to use in your design.
Online Resource Google Images http://ct18.etextbook.hk/ee0512
Try to answer the following questions.
1. What search terms or topics did you use?
2. How does the information inspire you?
Online Resource
Acrylic Painting Techniques http://ct18.etextbook.hk/ee0513
Online Resource
Examples of Ukulele Draft http://ct18.etextbook.hk/ee0514
1 Try to find more inspiration from the video about acrylic painting techniques .
2 Draft your design on the right.
3 Choose at least 2 painting techniques and explain how you will apply them in your draft.
4 Explain your idea below. State at least TWO visual elements and TWO principles of organisation that you apply in your design.
You can refer to P .11 if you do not know how to explain your idea using visual language . REMINDER
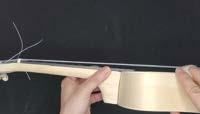
I want to draft my design before painting. But I cannot draft perfectly on the wood!
Video Demo Transfer Images onto Wood
http://ct18.etextbook.hk/ee0516
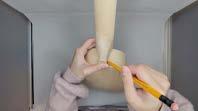
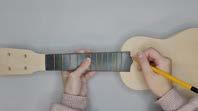
1 Draw or print pictures on a sheet of paper.
2 Use a pencil to scribble all over the backside of the paper.

3 Place the paper onto the ukulele.
4 Trace over the pictures using a pencil.


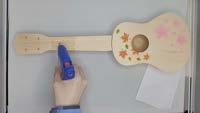
It ’s time to paint and decorate your ukulele !
But the ready -made colour does not fit my need …
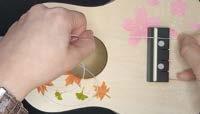
Before painting, we need to prepare the colours first. We can create new colours by mixing different colours together.
1 Decide the major colour combinations for your design.


Fig.4 Mixing different colours can create new colours
2 How will you mix the colours to create the selected colours? Explain your answer.
Example :
You can refer to P .13 if you do not know how to create the colours you need . REMINDER
Try to evaluate your classmates’ ukulele using visual languages.
Name
Comment
Which is your favourite ukulele design ? Why ?
1 Did you apply the appropriate techniques/visual elements/ principles of organisation to express your idea?
2 If yes, how? If not, what alternative visual effects do you want to explore?
Visual elements are the “building blocks” of art and design.
Element
Line
Definition
Connected points
Shape

Form

Colour

A 2D area created that is created by connected lines
A 3D shape created by using light, shadow or surrounding objects
An element made up of hue, value and intensity
Value

Texture

The lightness or darkness of a colour
The imagined feel or look of an object
Changing the organisation of visual elements can create different visual effects.
Principle Definition
Pattern

Contrast

Emphasis

Balance

Scale

Variety

A repetition of graphical elements such as shapes, lines and colour
The difference between graphical elements
The focal point in a design
The equality of weight or importance of elements
The relative size or number of one object compared to another
Using different elements
B Basic rules of colour mixing
1 Primary colours cannot be created through colour mixing.
2 Secondary colours are created through the mixing of primary colours.
3 Adding can lighten a colour while adding can darken a colour.
◆ Name the parts of a ukulele
◆ Make sure the required parts and tools are at hand
◆ Assemble the ukulele
◆ String the ukulele
Warm-up
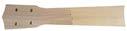
Neck
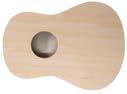
Body
Which part of the ukulele produces sound when we strike it?
Before you start assembling, it is important to check if all parts and tools are at hand.
1 Write the correct name for each of the following parts
2 Check the box if you have the correct number of parts


3 Check if you have the following tools with you


Watch the tutorial video. Fill in the blanks and assemble the ukulele. Video Demo Assemble the Ukulele http://ct18.etextbook.hk/ee0521
1 Attach the neck to the and draw a mark with a pencil

2 Put a thin layer of on the underside of the neck If you apply a thick layer of glue, it will expand and show on the outside edge.

3 Attach the neck to the body Hold two parts firmly together until the glue is completely dry.


1 Attach the to the ukulele and mark its position.
2 Apply glue on the marked area
3 Attach the fretboard to the ukulele. You can hold two parts firmly together by placing heavy objects on the back of the ukulele.
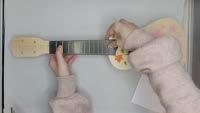

Fig.11 Attach neck to the body Fig.12 Hold two parts firmly together
1 Attach the to the bridge

Fig.13 Apply glue
2 Make sure the bridge is to the frets by using a ruler. Mark the position of the bridge
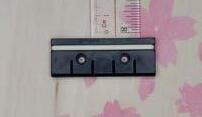
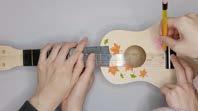
Mark the position of the bridge
3 Apply glue on the bridge and attach it to the ukulele

Fig.15 Apply glue

Fig.16 Attach the bridge to the ukulele
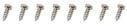
4 Fasten the bridge to the ukulele with screws (Size I)
5 Cover the holes with bridge pins

Screw the bridge to the ukulele

Attach the bridge to the ukulele
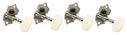
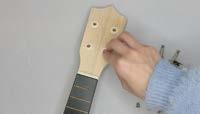
1 Put the tuner bushings into the holes
2 Put the into the holes from the backside Make sure the gears face down as shown below.

3 Fasten the tuning pegs to the ukulele with screws (Size II)
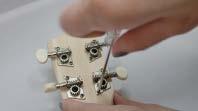
Fig.21 Screw the tuning pegs to the ukulele
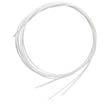
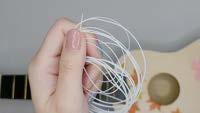
There are 4 strings on the ukulele.
Fig.22 The standard ukulele tuning
E C g
Fig.23 The ukulele strings
Watch the tutorial video. Fill in the blanks and string your ukulele. Video Demo String a Ukulele http://ct18.etextbook.hk/ee0522
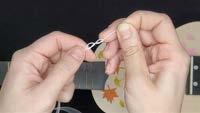
1 Untie the strings
2 Arrange the strings according to their thickness
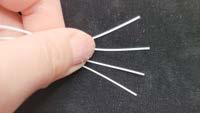
Note
Table 1 The relationship between the thickness of string and its pitch
3 Tie a knot at the end of the string.
4 Insert the string through the bridge and lock it with the knot.
5 Insert the other end of the string through the hole in the tuning pegs
6 Pull the string straight. Then, pull it frets back This gives us enough string to wind on the peg.
7 Turn the tuning peg to wrap the string around the tuning head
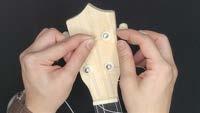
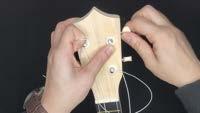
Fig.28 Insert string into the tuning peg Fig.29 Turn the tuning peg
8 Turn the tuning peg until the string is tight After tuning your ukulele with a tuner, cut off the excess strings about 1 cm away the tuning pegs.

Well done ! You have finished making your first ukulele !
When we pick a string, the string vibrates and produces .
Prepare a pen, a pencil box and a rubber band to do an easy sound experiment.
Video Demo Easy sound experiment http://ct18.etextbook.hk/ee0523
Higher / lower pitch
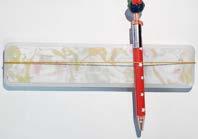
What did you find out in this easy experiment and your ukulele ?
Higher / lower pitch
1 The longer the string, the higher / lower the pitch.
2 The thicker the string, the higher / lower the pitch.
3 When we wrap the string around the tuning head, the string becomes tighter / looser .
4 The string , and affect the note it produces.
How do the following kinds of musical instrument produce sound? Choose an instrument and explain.
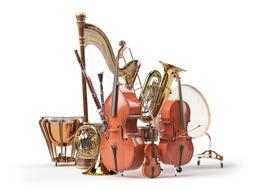
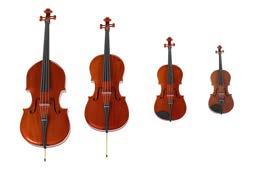
How does the size of a musical instrument affect its sound? Choose an instrument family and explain.
◆ Tune the ukulele with a tuner app
◆ Hold the ukulele in the correct position
◆ Basic fingerpicking patterns
◆ Read simple song tabs
◆ Play songs by picking single notes
I tried to follow the video and play the C major scale.
3 1 2
However, it doesn’t sound “right”...
It’s because your ukuleles are out of tune.
Lily and I played the lowest string together but our ukuleles sound different.
Can you sing the notes of the C major scale (C, D, E, F, G, A and B)?
The most popular ukulele tuning is gCEA.

Why is the “g ” written in lower case ?
The bottom-most string, g string, is commonly tuned up one octave.

Fig.35 The corresponding notes on a keyobard
Fig.36 The corresponding notation on a 5 -line staff
To help you remember the string names on the ukulele , you can use the mnemonic “Good Children Eat Apples .” REMINDER

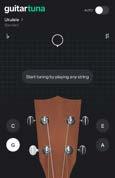
How does a tuner app work ?
1 Open “GuitarTuna” on your mobile device 2 Tap “Skip” and choose “Ukulele”


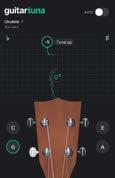
1 Toggle off “Auto” mode
2 Tap the string that you are tuning on the screen
3 Pluck the corresponding string of the ukulele
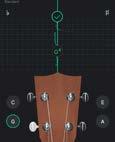
4 The app will show the pitch that you are playing and tell you to tune up or down
If the pitch reads flat (♭ ), it means the pitch is too low .

If the pitch reads sharp (♯ ), it means the pitch is too high .
5 Turn the tuning peg to raise or lower the pitch. Tuning (Tightening the string )
Clockwise Tuning (Tightening the string )
6 Repeat step 3 to step 5 until it is in tune and shows the tick symbol

Manual mode : It is useful when the strings are new or too out of tune . Auto mode : It is useful when you tune the strings for the second time .
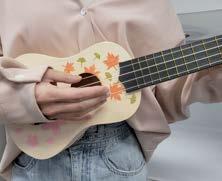
Before learning to play the ukulele, we need to learn to hold the ukulele properly first.
Online Resource How to hold the ukulele http://ct18.etextbook.hk/ee0531
1 Hold the ukulele gently with your right arm Do not hold the ukulele too tightly because it would be hard to move your wrist.
2 Let your right hand float above the soundhole You should be able to pick the string with your fingers without bending your wrist.

Fig.47 Hold the ukulele properly
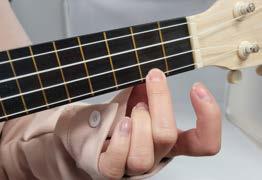
3 Place your left thumb behind the neck
If your hand is too small to reach all of the strings, put your thumb at the centre of the neck.
4 Wrap the neck with the remaining fingers of your left hand
Your fingers should float above the fret.

You should feel relaxed and comfortable when holding the ukulele . If your hands hurt , it may be because you are in the wrong position or holding the ukulele too tightly .
It ’s time to follow the tab and play the ukulele !
To play an open string note, simply pluck the string without pressing down the string on any frets. Try to play notes G, C, E and A.

Beginners are recommended to pluck the string with 3 separate fingers.

Thumb: G and C strings
Index finger: E string
Middle finger: A string
You can press the strings on the fretboard to play different notes. The fret number tells the player where to place a finger. The fret numbers count from the nut to the body.
If you are told to press down the 2nd fret of the A string , it means you need to press the A string in between the 1st and 2nd fret wires. Then, pluck the A string.
You can stabilise your right hand by placing your pinky below the soundhole lightly.
We have learnt standard musical notation on a 5-line staff. Tablature, or tab, is an easy way of music notation.

Fig.53 Standard notation and tablature
What are the advantages and disadvantages of tablature ?
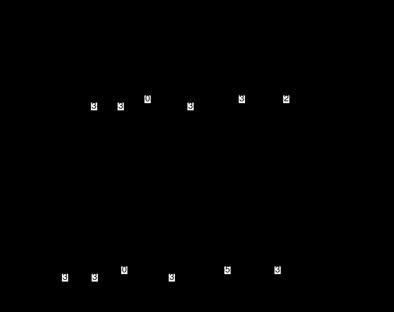
Tabs represent the fretboard and strings of a ukulele. The 4 horizontal lines tell you which strings to pluck while the numbers tell you which fret to press your finger down.
A-string
E-string
C-string
016
3
G-string 3rd fret, E-string Open A-string 1st fret, E-string
Fig.54 The ukulele tabs represent the fretboard and strings of a ukulele
Read the following tab and explain how to play the ukulele. Online Resource C major scale http://ct18.etextbook.hk/ee0532

1st note: example Open C-string
2nd note: example 2nd fret, C-string
3rd note:
4th note:
5th note:
6th note:
7th note:
8th note:
& T A
Play the following melodies and guess the songs!
Song:


Practice makes perfect !
◆ Read chord diagrams
◆ Strum ukulele chords
◆ Search and learn to play songs online
Warm-up
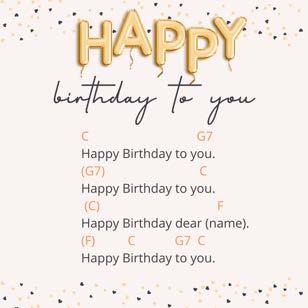
Fig.56 Happy Birthday song for ukulele
Ken finds the above image when he searches “how to play happy birthday on ukulele”. What do the alphabets mean?
A chord means playing multiple notes together at the same time. It can create harmony and add texture to the melody.

Fig.57 Chords are similar to seasonings
Many pop songs use only four chords: C, G, Am (A minor), and F . Online Resource Songs in 4 Chords http://ct18.etextbook.hk/ee0541
That ’s why many pop songs sound so similar .
Master these four chords and you can play hundreds of songs !
A chord diagram shows the front side of the neck of a ukulele.
The dots tell you what fret and string to press your finger down while the number refers to the finger that you should use.
Index finger
finger
A chord diagram
Once you know how to read chord diagrams , you can learn to play new chords and songs !
Let’s learn to play the C chord!
1 Based on the diagram, we should place our fingers on the fretboard as shown below:

2 Use your thumb to strum all strings from the top to the bottom.

If you are a beginner , play each string individually to see if it sounds good .
If not , try to adjust the angle or position to avoid your finger from touching other strings .
You can follow the ukulele chord tutorial videos below and learn more chords on your own!
Online Resource Ukulele Chord Tutorial http://ct18.etextbook.hk/ee0542
Online Resource Ukulele Chord Diagrams
http://ct18.etextbook.hk/ee0543
We have learnt 4 different chords. Now, it’s time to play them while singing. Let’s start practising with a 2-chord song.
Ma - ry had a lit - tle lamb, lit - tle lamb, lit - tle lamb, C C C C C C C G G G C C C


Fig.62 Ukulele chords on sheet music
The chords in blue are usually omitted as shown below. It means that only the first melody note of each chord change is stated.
Ma - ry had a lit - tle lamb, lit - tle lamb, lit - tle lamb, C G C
Fig.63 Only the first melody note of each chord change is stated
When we search for ukulele chords for songs, the beat and the melody of the song may also be omitted as shown below.
London bridge is falling down , C F
Falling down , falling down , F C F
London bridge is falling down , my fair lady .
Fig.64 Lyrics with ukulele chord
F C
Twinkle , twinkle little star
F C G7 C
How I wonder what you are
C G7 C G7
Up above the sky so bright
Fig.65 Twinkle Twinkle Little Star chords and lyrics
Search for “(song name) ukulele chords“ in a search engine. Practice and perform it in front of the class.

Fig.66 Search result example
We can also find ukulele chords for songs on the following website: Online Resource Ukulele Chords http://ct18.etextbook.hk/ee0544
1 What song did you learn?
2 What chords are used in this song?
3 Did you learn any new chords? Draw the chord diagram below and teach your classmate to play the new chords.
4 Did you have any difficulties learning this song? How did you overcome them?
Practice the song you found on the Internet and shoot a cover song video.
1 Design a thumbnail image for your video
2 Add song lyrics to your video

1 Write new lyrics to an existing song in a group
2 Record your ukulele with singing
3 Shoot a music video

Songwriting is like poetry writing. A rhyme scheme is the pattern of sounds that repeat at the ends of the lines.
1 Highlight the pairs of rhymes in different colours.
Rhyming scheme
AABB
ABAB
Examples
Twinkle, twinkle, little star How I wonder what you are Up above the world so high Like a diamond in the sky
Amazing Grace! How sweet the sound That saved a wretch like me I once was lost, but now am found Was blind but now I see
Table 2 Common rhyming schemes
Have you ever noticed that some lyrics repeat over and over throughout a song? Most pop songs have the following sections:
Verse
Chorus
• Uses the same melody but different lyrics
• Develops the story of the song
• Uses the same melody and same lyrics
• Serves as the climax to the song
Table 3 The verse and chorus section in a song That means it is unnecessary to write two versions for the chorus sections. Repeated choruses make the song more catchy.
◆ Observe and explain the design of the tuner
◆ Make a ukulele tuner using buzzer and micro:bit
◆ Tune the ukulele with the DIY tuner
My microphone doesn’t work. How can I tune my ukulele?
You can tune your ukulele by ear. How?
You just need to play the standard tuning from the tuner. Then , tune the strings until they sound similar.
What is the “standard” ukulele tuning?
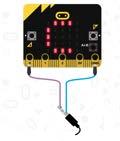
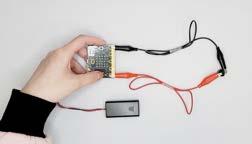
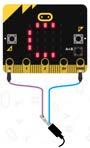
Fig.69 The micro :bit ukulele tuner
Reverse Engineering micro:bit Tuner http://ct18.etextbook.hk/ee0551
Watch the video and explain how the micro:bit ukulele tuner works with the help of the following questions:
1 What happens if button A is pressed?
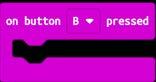
2 What happens if button B is pressed?
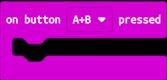
3 What happens if buttons A and B are pressed at the same time?
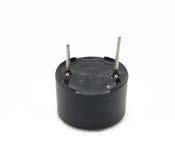
We will need a buzzer ( 蜂鳴器 ) and the “play tone” blocks to produce musical notes.
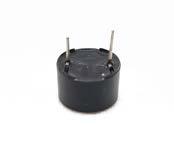
Fig.70 A buzzer
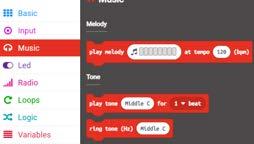
Fig.71 The “play tone ” block ” The “play tone” block has two parameters ( 參數 ): frequency and beat.
Beat: how long the sound lasts Frequency of sound: how high or low the tone is
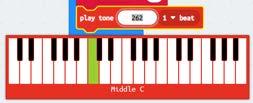
How do I know the frequency of the sound ?
We can simply choose a note from the piano keyboard instead of typing in the frequency.
We will use conditional statements ( 條件語句 ) and variables( 變數 ) to play tone G, C, E and A in order. Try to answer the following questions and create the tuner program with MakeCode editor.
Online Resource MakeCode editor http://ct18.etextbook.hk/ee0552
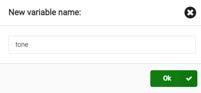
1 Create a new variable with the name “tone” Fig.72 Create a new variable Fig.73 Variable blocks
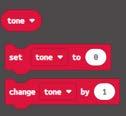
2 Set the value of the variable “tone” to
3 If button A is pressed, the value of the variable “tone” is changed by
4 The micro:bit plays and shows G, C, E, A according to a given number
The value of the variable “tone ”
5 When the screen shows text , everything is reset if button A is pressed
Before downloading your programs to a physical micro :bit , you can test the program using the simulator . REMINDER
If I want to replay the tone , I need to press button A again and again .
You are asked to make the tuner more user-friendly by adding a replay and reset button.
1 Write the program using the following blocks
2 Write your tuner program in the spaces below Mission 1 : Mission 2 :
After testing and debugging, you can now combine all components and make the ukulele tuner.
1 Connect your micro:bit to a USB port on your computer
2 Download your code to the micro:bit
Fig.75 The file will be downloaded to your micro :bit directly
3 Unplug micro:bit from the computer
4 Connect the micro:bit, buzzer and battery holder with wires The wires from the buzzer should be connected to pin GND and pin 0.
5 Test the program by pressing the buttons. Does it work as expected?
You have just made your first ukulele tuner ! Try to tune your ukulele with it .
Animation Variables http://ct18.etextbook.hk/ee0553
Variables are similar to the algebra we learnt in mathematics.
Fig.77 An example of algebraic equations
They can store values of various types, like numbers and strings.
Fig.78 variable is like a box that contains something
Variable names must be unique. Moreover, the value of a variable can be changed. Take the variable “Tone” that we have used before as an example. It changes according to the number of times you press a button.
Fig.79 It is bad to use the same variable names in one program