


Conducting a Light and Sound Show
Challenge
You and your team need to design an interactive light and sound show that responds to motion. You will conduct by moving your hand into and out of an open-faced rectangular prism (the Conductor’s Magical Box), thus varying the distance from a sensor— and in the process you will create a light and sound show. The design should include blinking lights along with music. There should be different musical tunes that play when your hand is at different distances. Each tune must have a minimum of 10 seconds of play time.


Materials
Cardboard
Glue gun
Tape
Ruler
Specifications (What the design has to do)
Constraints (things that limit your solution)
Hummingbird LED lights
Hummingbird distance sensor
Light and Sound Assessment Rubric
Criteria 1 – Beginning 2 – Developing 3 – Accomplished
Alternative Designs One design idea described. No explanation of how it meets the project goals or constraints.
Music Design One tune plays regardless of hand distance. Tune is less than 10 seconds long.
Light Design LEDs remain solid (on or off) during the show. No blinking or color changes.
Two design ideas described. Provides a reason why one design was chosen based on ease of implementation or expected performance.
Two different tunes are triggered at different distance zones (e.g., 0–20 cm and 21–40 cm). Each plays at least 10 seconds.
LEDs blink continuously during the show. Blinking is not tied to user motion or music.
Three or more design ideas clearly described. Preferred design selected and justified using at least two criteria (e.g., sensor effectiveness, light/sound coordination, user control).
Three or more distinct musical segments are triggered at clearly marked distance zones (e.g., 10–30 cm, 31–50 cm, 51–70 cm). Each segment plays for at least 10 seconds. Includes a silent zone (e.g., <10 cm or >70 cm) as part of the design.
LEDs are coded to blink in distinct patterns and/or colors for each distance-triggered musical segment. Patterns visibly change when the hand moves between marked distance zones. Lights are synchronized with hand movement and music transitions.
Final Design and Code
Includes a photo of the prototype and an unannotated screenshot of the final code.
Testing and Evaluation No structured testing. No explanation of what worked or didn’t.
Includes a photo and code with 1–2 sentence explanation of what the code does.
Conducted 1–2 test trials to check whether music/light respond to hand motion. Brief explanation of one success or failure.
Includes a photo of the final product, annotated code (e.g., comments in Snap), and a 3–5 sentence explanation of how the code triggers lights and music based on distance. The physical box includes clearly labeled distance zones in cm. Code uses if-else logic to vary output based on distance ranges.
Conducted at least three test trials. Documents exact outcomes for each distance zone (e.g., 'At 25 cm, tune 2 played and blue lights blinked.'). Explains fixes made after testing. Redesign Thinking No redesign is attempted or discussed.
Describes one change that might improve appearance or function (e.g., repositioning sensor). No changes implemented.
Reflection on Learning
Provides one vague or general statement (e.g., 'I learned how to code.')
Names two specific things learned (e.g., 'how to use the distance sensor' and 'how to blink LEDs').
Implements at least one redesign (e.g., code update, repositioned LEDs). Explains what was changed and how it improved performance.
Explains at least two learnings with specific examples from the project (e.g., 'I learned how to use “if-else” in Snap to switch between songs based on distance.')
Knowledge and Skill Builders (KSBs)

KSB 1 Preliminary Design. You will be conducting the ‘show’ by moving your hand in the Conductor’s box. A distance sensor will detect how far away your hand is from it and this information can be used by you to turn on lights and create and change sounds. The distance sensor operates most effectively between 10 80 cm, but you may want to make the box about 60 cm (about two feet) so it fits on a desk or table. You may want to measure and mark different distances on the box, so you will know where to move your hand. You may want to play different songs at different distances from the sensor, or you may elect to have the Hummingbird play different notes at varying distances. Simultaneously, your code will direct the microprocessor to turn on LED lights for the light show. You will decide how you want the LEDs displayed. Below is an example of a Conductor’s Box; notice the small opening at the end for the distance sensor to be inserted. The tape indicates a zone where no music is played.


This is the front of Conductor’s Magical Box. The LEDs are positioned in the center of the aluminum foil, which is used to spread out the light from the LED so it has a greater impact.
Now think about what you would like to have happen when you move your hand from the starting position. Do you want a defined starting position? Should a song play, or should individual notes sound? What kind of lighting effects would you like specific colors, blinking patterns, or color changes synchronized with the music?
Keep in mind that there is a lag time from when you move your hand until the sound starts; the LEDs are quicker to respond. So, you will need to consider this timing difference as you think about your design.
What are your initial thoughts as to what you want to happen when you move your hand? Think about the sequence of actions the computer must make, step-by-stepo, as your hand moves through the box.
KSB2 How the Distance Sensor Works
Here is a link from Birdbrain Technologies explaining the Distance Sensor.
https://learn.birdbraintechnologies.com/hummingbirdbit/snap/program/15-1

Take a screenshot of the code you wrote to make the sensor activate and insert below.
KSB3 How single color LED Works
Here is a link from Birdbrain Technologies explaining the single color LED
https://learn.birdbraintechnologies.com/hummingbirdbit/snap/program/6-1
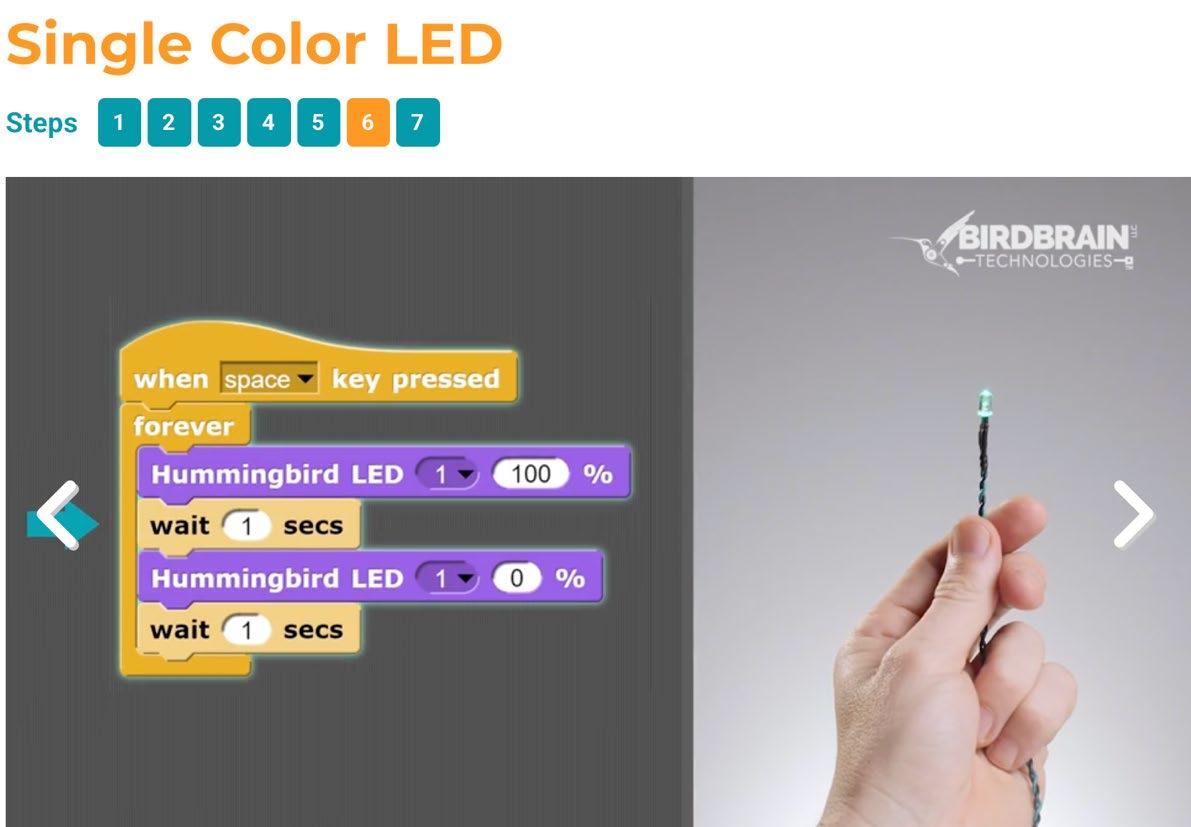
The code above is for one LED. Now write code to make two LEDs blink. Take a screenshot of the single color LED code you used and insert it below.
Alternative Light and Sound System Designs

Make a few sketches of different design ideas and include brief explanations of how the various designs will work. For instance, one might be a tune you create, and another might be an imported song segment. The size of the box can vary.
Optimum Light and Sound System—Part 1—The Structure

Which alternative design did you like best? This is the optimal design. Why do you think so? Please explain.
Optimal Light and Sound System Part 2 Light and Sound Code

Now you need to put everything together and create a Light and Sound Code that will allow you to play music and have lights blink as you move your hands in the Conductor’s Box. Often, as you write and test the code, you’ll need to make changes.
Now take a picture of your final code and paste it here.
Develop Your Prototype

Test and Evaluate

Now it is time to build your system the code, the controller, the lights, and the distance sensor. Take two photos of the final design. One that showswhat the audience would see, and the other that shows what you, as the conductor, would see.
Redesign Ideas
Did your solution work and meet the design specifications? Briefly explain why it did or did not. How did you test the design? Include a photo of your final code.

Engineers always seek to make devices more efficient, reliable, and effective. What are your ideas about how to improve your design?

What did you learn while building and testing your Conductor’s Box? For instance, did you realize that if you didn’t wait for one tune to end before starting another (by inserting your hand at a different point), thenthe tunes will play on top of each other?. Or did you create a melody where you wanted this to happen? Did you import music? How did that work? Light and Sound Assessment Rubric
Accomplished Alternative Designs
One design idea described. No explanation of how it meets the project goals or constraints.
Two design ideas described. Provides a reason why one design was chosen based on ease of implementation or expected performance.
Three or more design ideas clearly described. Preferred design selected and justified using at least two criteria (e.g., sensor effectiveness, light/sound coordination, user control).
Music Design
One tune plays regardless of hand distance. Tune is less than 10 seconds long.
Light Design LEDs remain solid (on or off) during the show. No
Two different tunes are triggered at different distance zones (e.g., 0–20 cm and 21–40 cm). Each plays at least 10 seconds.
LEDs blink continuously during the show. Blinking is not tied to user motion or music.
Three or more distinct musical segments are triggered at clearly marked distance zones (e.g., 10–30 cm, 31–50 cm, 51–70 cm). Each segment plays for at least 10 seconds. Includes a silent zone (e.g., <10 cm or >70 cm) as part of the design.
LEDs are coded to blink in distinct patterns and/or colors for each distance-triggered musical segment.
Final Design and Code
blinking or color changes
Includes a photo of the prototype and an unannotated screenshot of the final code.
Testing and Evaluation No structured testing. No explanation of what worked or didn’t.
Redesign Thinking No redesign is attempted or discussed.
Includes a photo and code with 1–2 sentence explanation of what the code does.
Patterns visibly change when the hand moves between marked distance zones. Lights are synchronized with hand movement and music transitions.
Includes a photo of the final product, annotated code (e.g., comments in Snap), and a 3–5 sentence explanation of how the code triggers lights and music based on distance. The physical box includes clearly labeled distance zones in cm. Code uses if-else logic to vary output based on distance ranges.
Reflection on Learning Provides one vague or general statement (e.g., 'I learned how to code.').
Conducted 1–2 test trials to check whether music/light respond to hand motion. Brief explanation of one success or failure.
Describes one change that might improve appearance or function (e.g., repositioning sensor). No changes implemented.
Names two specific things learned (e.g., 'how to use the distance sensor' and 'how to blink LEDs').
Conducted at least three test trials. Documents exact outcomes for each distance zone (e.g., 'At 25 cm, tune 2 played and blue lights blinked.'). Explains fixes made after testing.
Implements at least one redesign (e.g., code update, repositioned LEDs). Explains what was changed and how it improved performance.
Explains at least two learnings with specific examples from the project (e.g., 'I learned how to use “if-else” in Snap to switch between songs based on distance.').
Additional Teacher Information
Sample Codes

In this situation the decision control used was if…else. IF the distance from the sensor is less than 15 cm, the program turns on the LED and plays the following notes. ELSE, if the hand is not within that range, the LEDturns off the notes stop playing. The FOREVER loop surrounds the code because you want the sensor to continuously monitor the distance from your hand.
The same basic code can be used to play a melody, part of a song, or whatever musical pattern you would like to create. This also introduces how you can trigger different songs or sounds based on varying distances from the sensor, and coordinate the LED effects. In this case the decision code is inserted in the IF…ELSE block. If the distance is greater than 30 cm and less than 45 cm, then play the following melody. If not, turn off theLED and stop playing the melody.

Notice how the decision-making block allows the program to use both greater than and less than conditions in the same block of code. You can intersperse the LED color changes within the melody, as indicated in the following figure. Notice that different sprites are used. In this situation, each sprite controls one melody. All sprites are activated simultaneously, but each one only plays its meloday when your hand is in specific distance range assigned to that sprite. This enables designing each code separately, so there is not one screen with many codes.

Computer Lag
We tend to think of computers as very fast and they are. However, the microprocessors that are being used in this system (such as the micro:git) are less powerful that full-scale computers. Additionally, there are multiple steps in the communication process: signals must travel from the computer to the micro:bit via Bluetooth, and then from the microbit to the Hummingbird device. Hence, when you put your hand in the conductor’s box, there will be a slight delay before the music begins. Similarly, when you remove your hand, music will keep playing until the code that was transmitted ends. The sensor must detect that your hand is gone, send a signal to the microbit,which then communicates via Bluetooth to the computer. The computer then updates the code that is running to stop the sound. You may want to leave a space on the Conductor’s Magical Box where there is no sound playing.