16 minute read
TRAVELING


TRAVELING SAFE TRAVELING BREAK-1N PER10D BEFORE STARTINGTHE ENGINE.”...........””52
STARTING THE ENGINE AFTER START[NG THE ENGINE…‥‖……………”53
STARTING AND STOPPING THE LOADER…….54
HANDLING LOADERS W[TH AUTOMATLC TRANSM[SS10N TRANSPORTLNG THE LOADER…….‖…..…”,..…58
TOWING
MEASURESTO BETAKENIN AN EMERGENCY HANDLING LN COLDWEATHER…‖‖...………”.”64 HANDUNGT(RES
HANDuNG ONE-TOUCH COUPLER (HYDRAUICTYPES)
This ManualusesthefoL10WlngSafetyalertsymboIs. When you seethose symboIsin the text,foIIowthe SafetymessagetoavoidpersonalnJUryOrdeath・
Failure to f01]ow theinstructionsin the mes$age Willcau$ea$eriousaccidentordeath. a WARNlNG
Failure to follow the in$truCtions in the message might cau$e a$erious accident or death.
▲cAUTtON
Failure to foIJow theinstructionsin the message may cause personal injury or damage to the loader.
BeforetrylngtOOPeratetheloader,theoperator must know safe operating procedures and PrOhibited use$;Otherwise the operator might ln]ure himself or bystanders.The safety instructions gIVen On the pages that foLLow are JuSt a few of the rules and regulations you are requiredtoobservewhenoperatingthe10ader. 1f you have any questjons about the safety instructjons described herein,Pleasefeelfreeto askyourauthorizeddealer.
The marking Onthe pictures meansactions thatareprohibitedordangerous.
The pictures have been drawn based on our medium-Sizedwheel10aders.
Protecttheplanet!!
Do not make“jerky”starts or acce[eration;it wj”resuFtin bad fueleconomyanddjschargeofharmfulexhausts. OperatetheIoaderwhilekeepInginmindthatyoushouldbekind tothe environment.
Wearecommittedtoprotectingtheplanet.
ThenumbersnexttothesafetyrulesdonotindicatetheprlOrityoftherule,simportanceorthedegreeofriskassociatedwiththesituation・
Do notoffer rides to others.
6.Parkthe10aderon alevelsurfaceand apply theparkingbrakesecurely・Putthebucketon the ground fIatly,bLock the wheels and removetheenglneStarterkey・
7.Do notparktheloaderwhereexhaustorhot COmPOnentS Can COntaCt flammable debris (leaves,PaPer,etC・)・
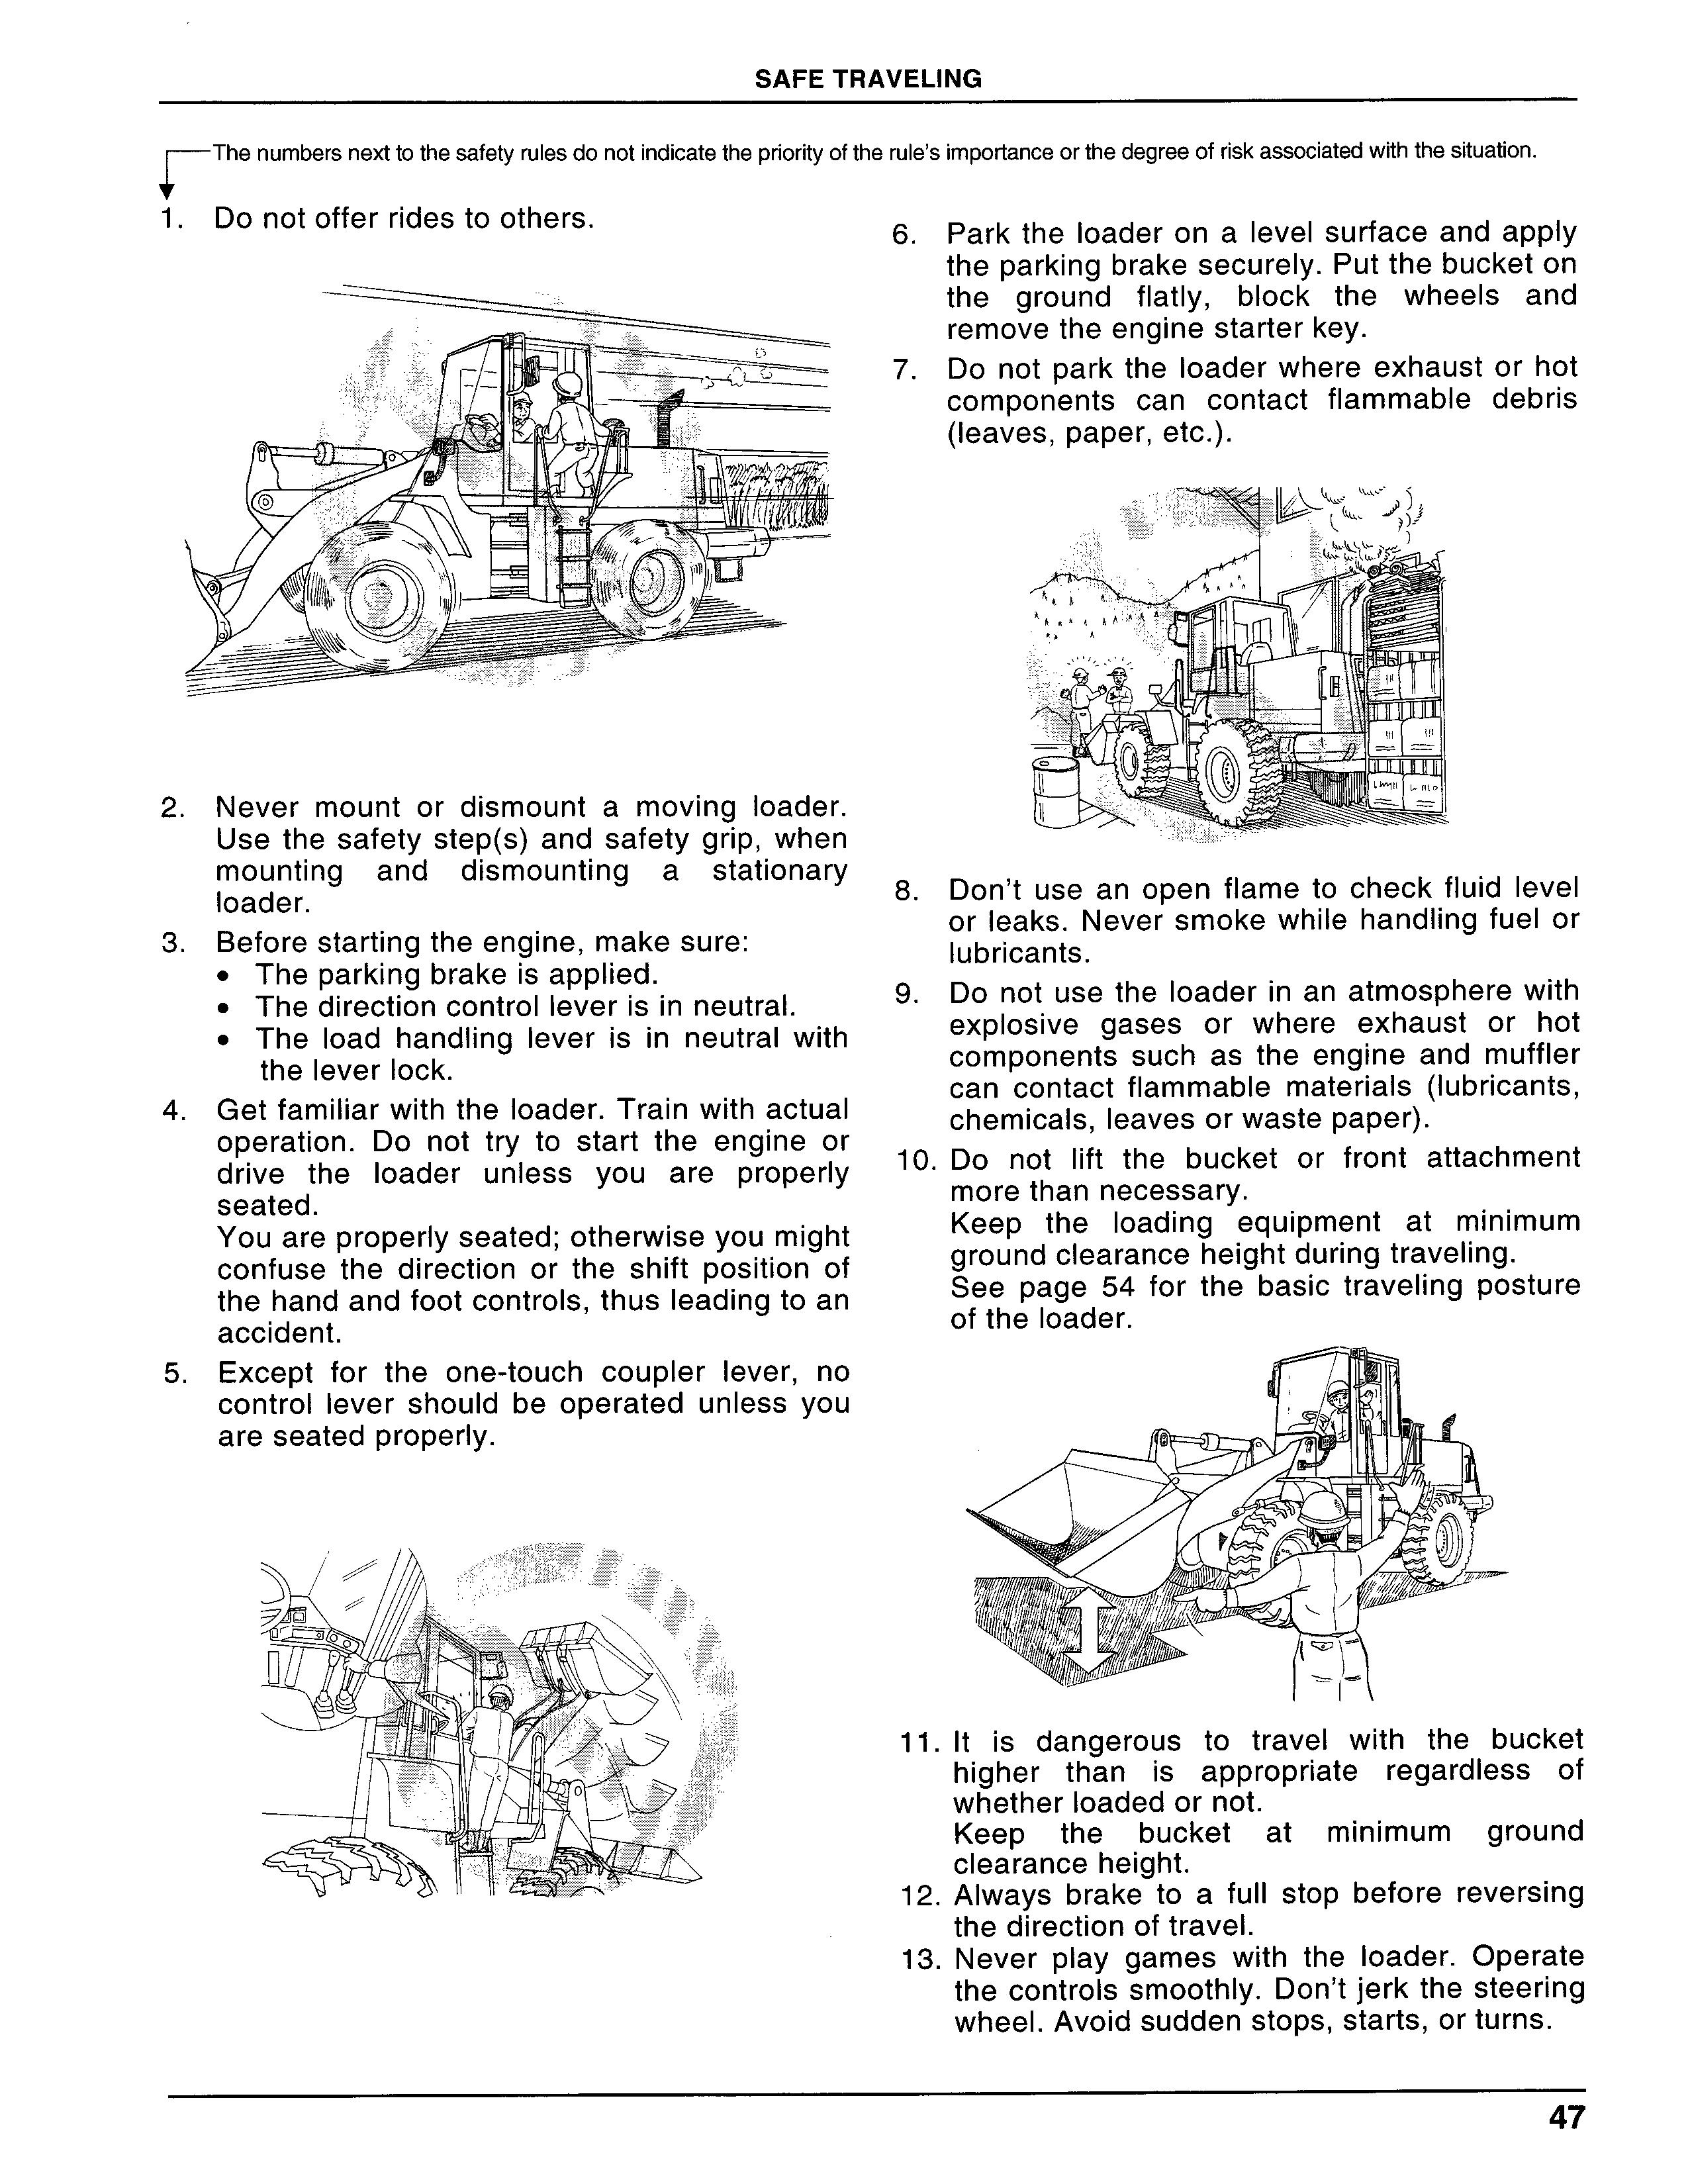
2.Never mount or dismount a movlngloader. Usethesafetystep(S)and safetygrip,When mounting and dismounting a stationary 10ader.
3.Beforestartingtheenglne,makesure:
・TheparkingbrakeisappLied.
● The direction controlleverisin neutral. The load handling lever is in neutral withth thelever Lock.
4.Get familiar with the]oader.Train with actuaI OPeration.Do not try to start the englne Or drive the10ader unless you are properly Seated.
Youareproperlyseated;Otherwiseyoumight COnfuse the direction or the shift position of thehandandfootcontroIs,thusleadingtoan accident.
5.Except for the one-tOuCh coupLerlever,nO COntrOllever should be operated unless you areseatedproperly.
8.Don’t use an open fJameto checkf]uidlevel Orleaks.Neversmokewhi[e handlingfue10r Lubricants.
9.Do notusethe10aderinan atmospherewith exp]osive gases or where exhaust or hot COmPOnentS SuCh as the englne and muffler CanOntaCtflammabLematerials(lubricants・ ChemlCals,leavesorwastepaper).
10.Do notlift the bucket or front attachment morethannecessary・
Keep theloading equlPment at minimum groundclearanceheightduringtraveling・ See page 54 for the basic traveling posture Ofthe10ader.
11.1tis dangerous to traveL with the bucket higher thanis appropriate regardless of WhetherLoadedornot.
Keep the bucket at minimum ground Clearanceheight.
12.A]ways brake to afullstop before reverslng the direction oftravel.
13.Never play games with the10ader・Operate thecontroIssmoothLy.Don’tjerkthesteerlng Wheel.Avoidsuddenstops,StartS,OrturnS・
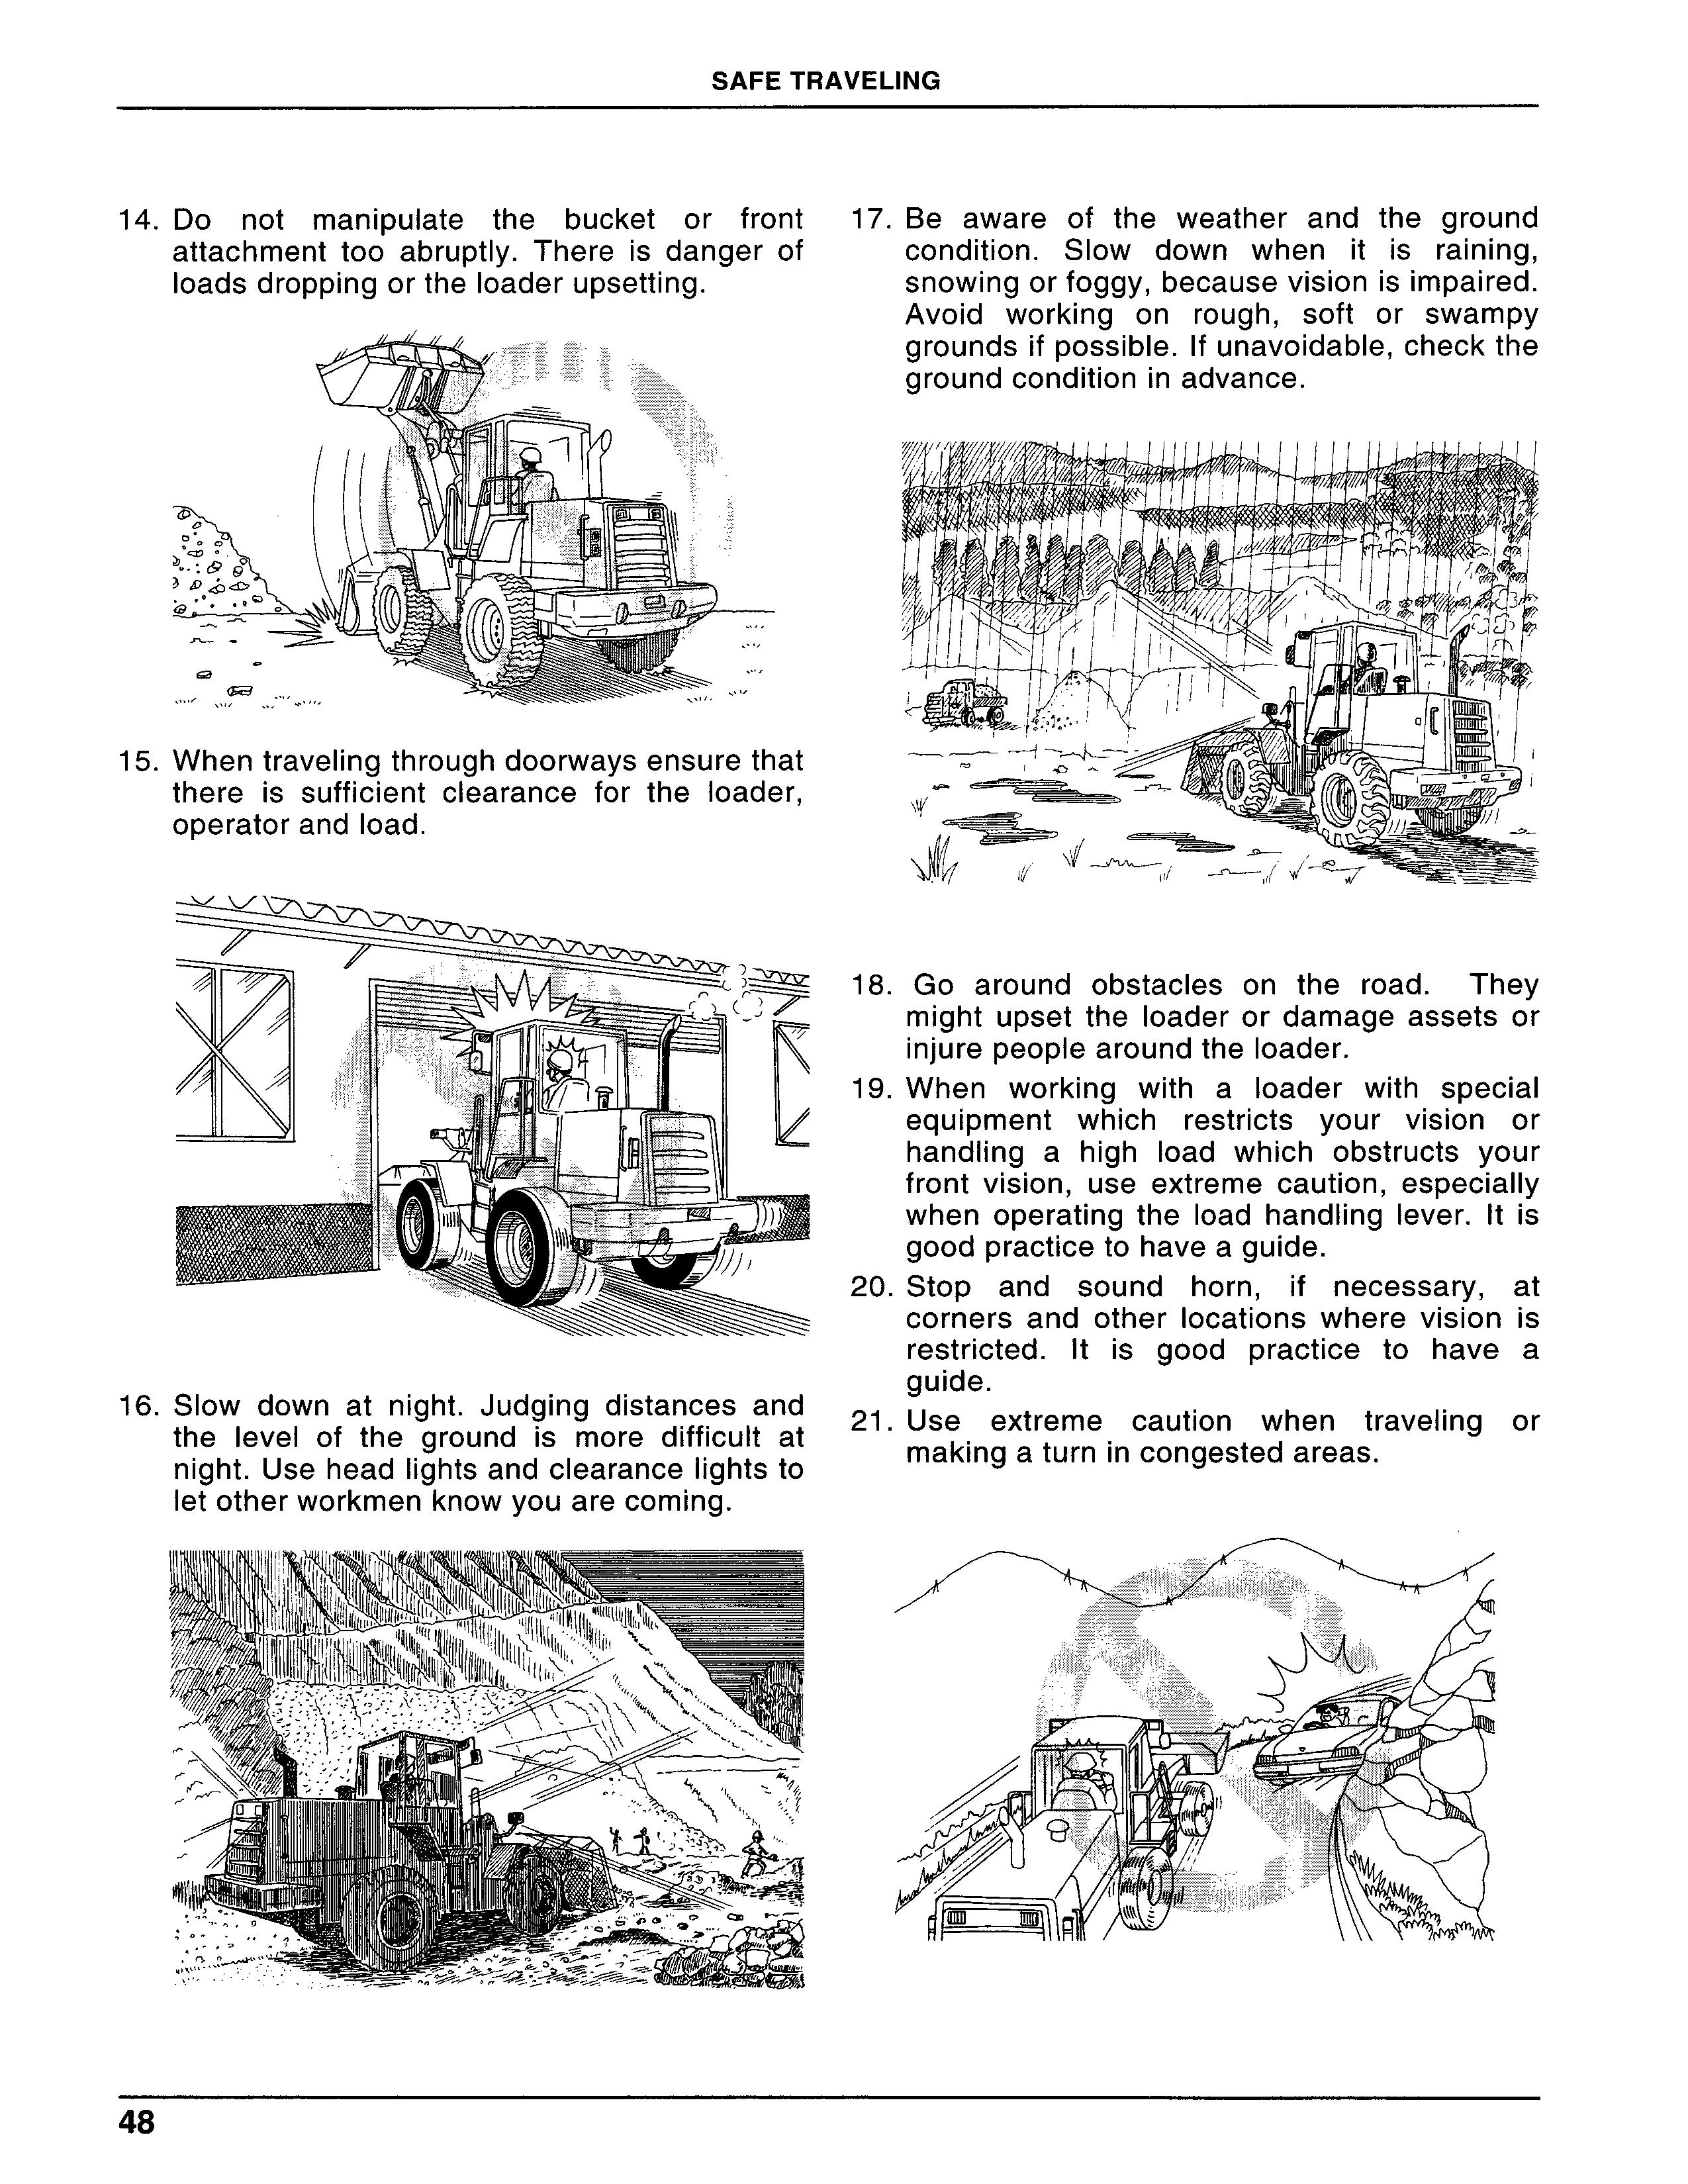
14.Do not manlPulate the bucket or front 17・ attachment too abruptly.Thereis danger of 10adsdropplngOrtheloaderupsetting.
Be aware of the weather and the ground COndition.Slow down whenitis rainlng, SnOW]ngOrfoggy,becausevisionisimpaired・ Avoid working on rough,SOft or swampy groundsifpossible.1funavoidable,Checkthe groundconditioninadvance.
15.Whentravelingthroughdoorwaysensurethat thereis sufficient clearance for the10ader, OPeratOrand10ad.
18.Go around obstacles on the road.They might upset the10aderordamage assets or lnJurePeOPlearoundthe10ader.
19.When working with a Loader with special equ[Pment Which restricts your vjsion or handling a high Load which obstructs your front vision,uSe eXtreme Caution,eSPeCially When operating the10ad hand[inglever.[tis goodpracticetohaveaguide.
20.Stop and sound horn,jf necessary,at corners and other locations where vision is restricted.1tis good practice to have a guide.
16.S10W down at night.Judging distances and thelevelof the groundis more difficult at night.Usehead[ightsandclearancelightsto letotherworkmenknowyouarecom[ng.
21.Use extreme caution when traveling or makingaturnincongestedareas.
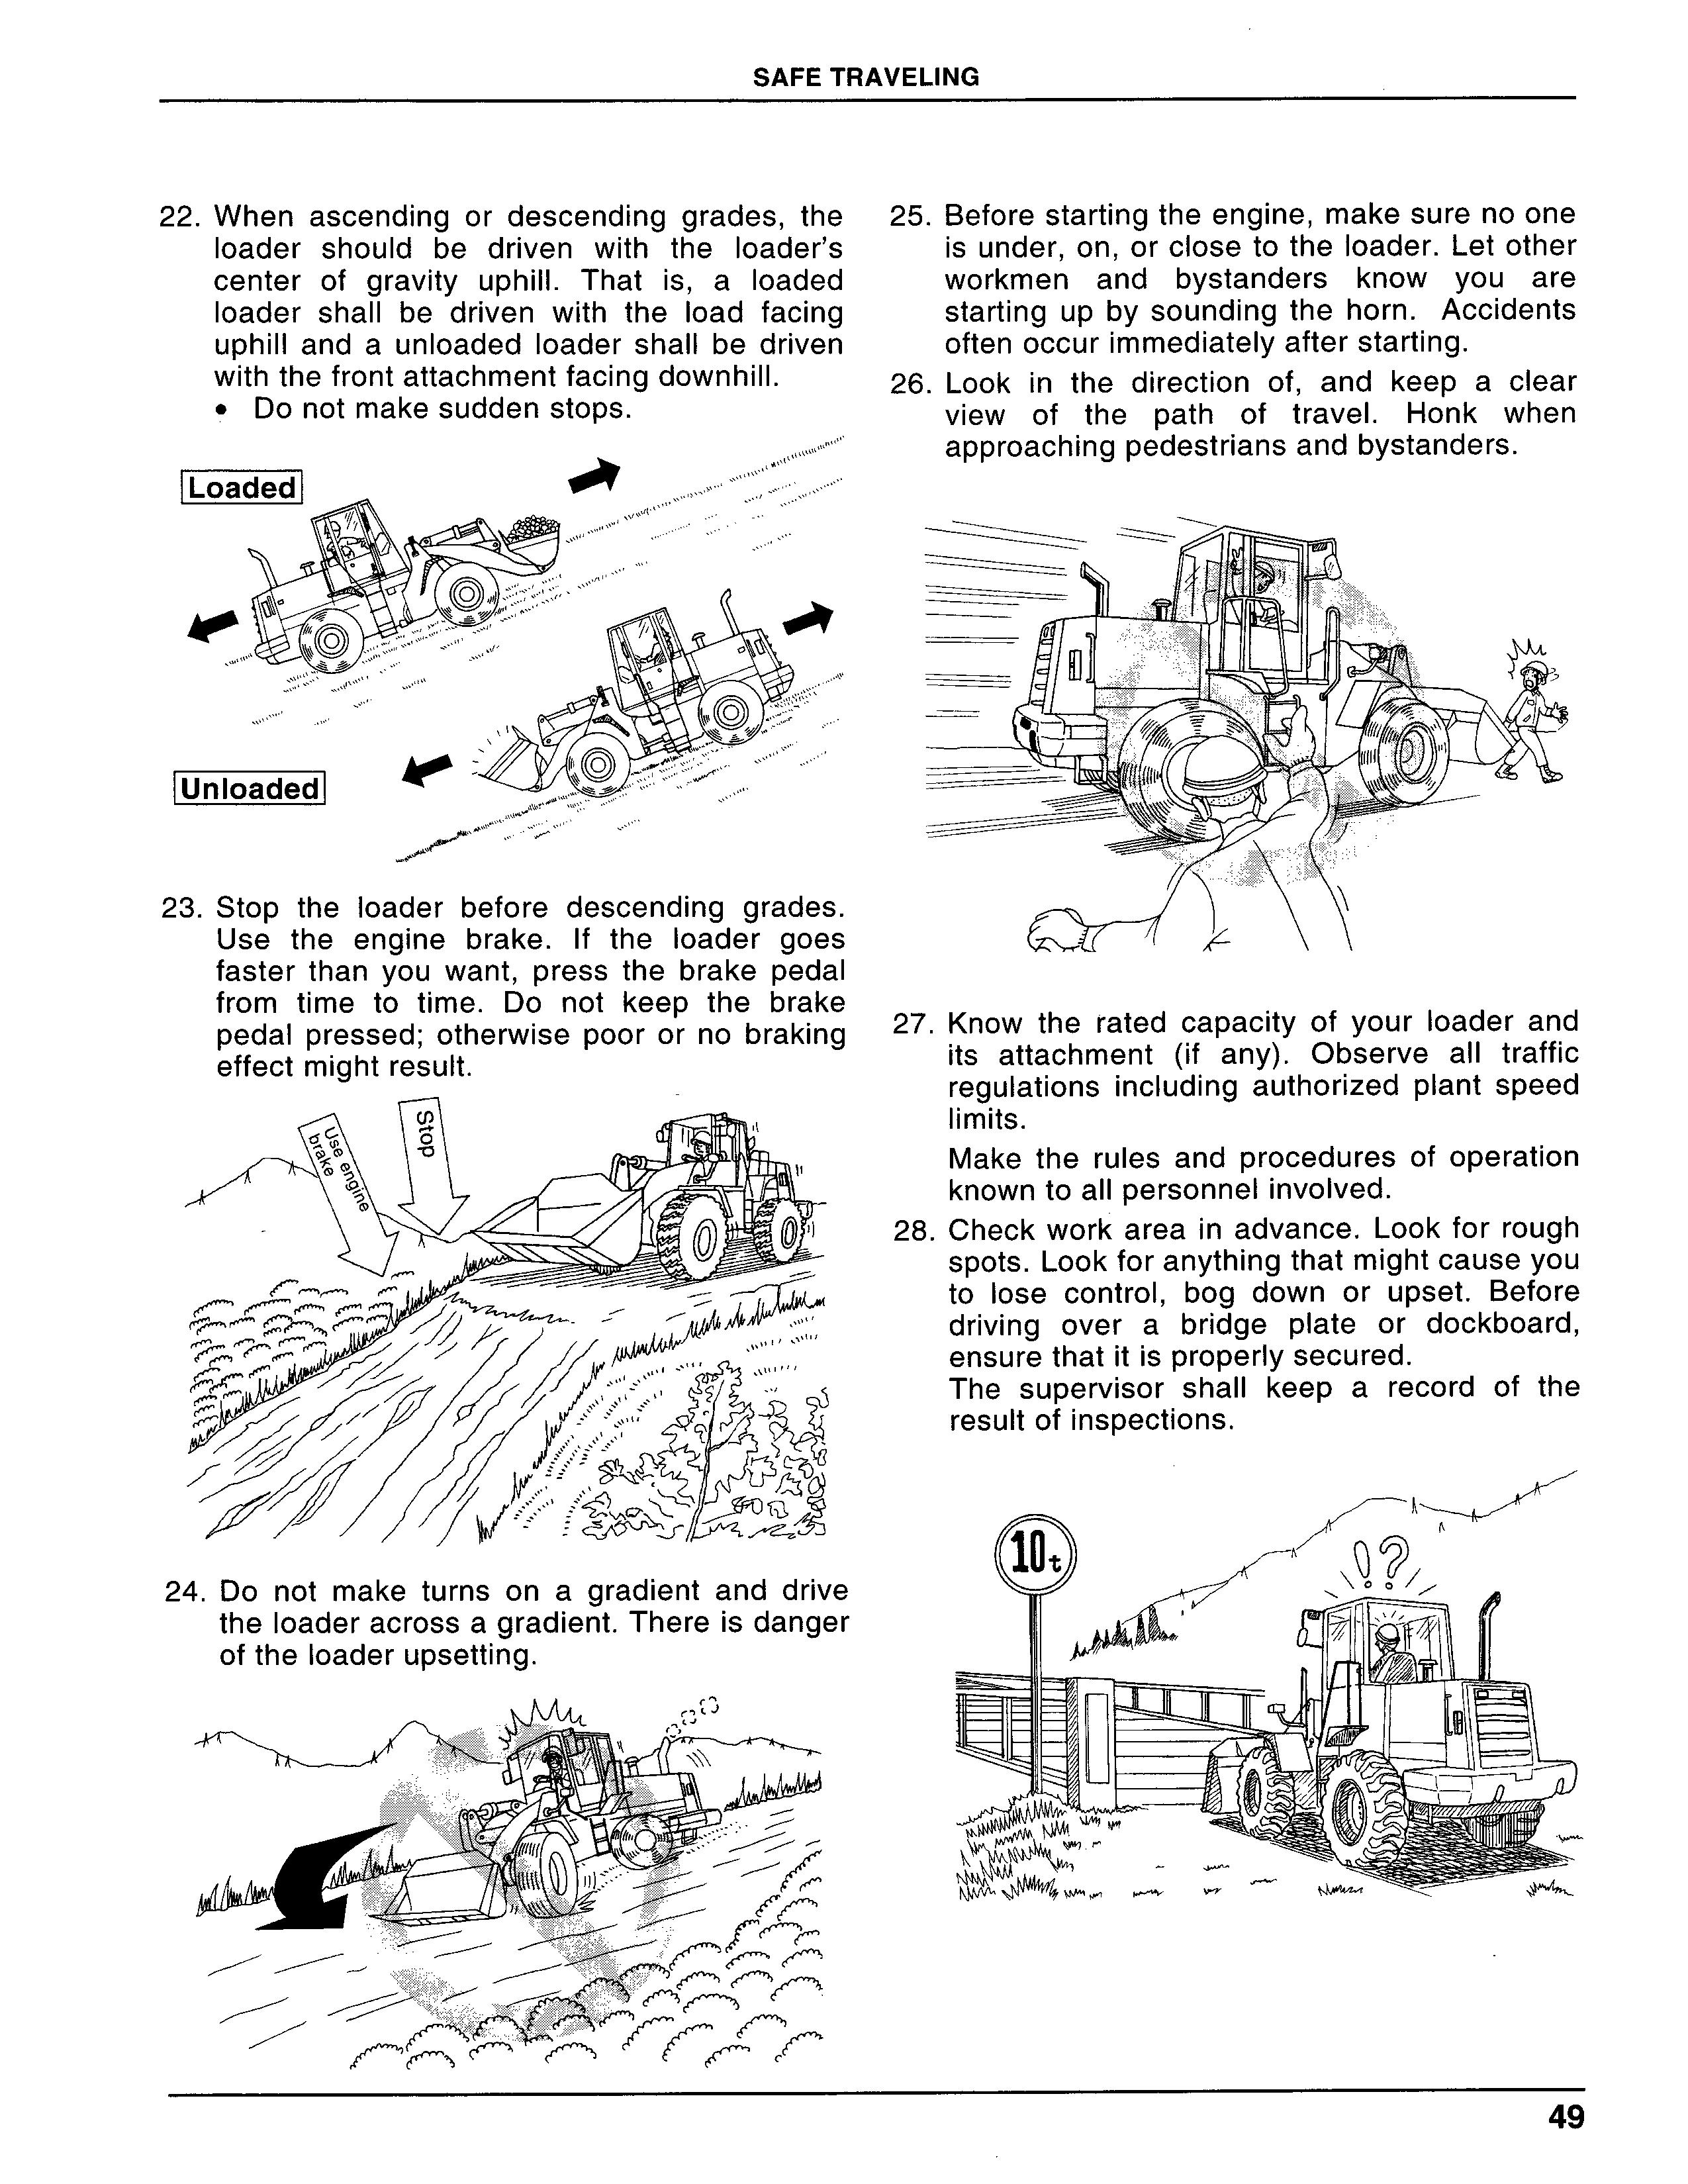
22.When ascending or descending grades,the 10ader should be driven with theIoader’s Center Of gravity uph‖.Thatis,a10aded 10ader shallbe driven with theload faclng uphilland a un10aded Loader shal[be driven Withthefrontattachmentfaclngdownhill. ・Donotmakesuddenstops.
25.BeforestartingtheengIne,makesurenoone is under,On,OrC10SetOthe]oader.Letother WOrkmen and bystanders know you are Starting up bysoundingthe horn・Accidents Oftenoccurimmediatelyafterstarting.
26.Lookin the direction of,and keep a clear View of the path of travel・Honk when approachingpedestriansandbystanders・
23.Stop theloader before descending grades. Use the englne brake.1f theloader goes fasterthan you want,PreSS the brake pedal from time to time.Do not keep the brake Pedalpressed;Otherwise pooror no braking effectmightresult.
27.Know the rated capacity of your10ader and its attachment(if any).0bserve a”traffic regulations including authorized plant speed limits.
Make the rules and procedures of operation knowntoa”personnelinvoIved・
28.Checkworkareajn advance.Lookforrough SPOtS.Lookforanythingthatmightcauseyou to10Se COntrOL,bog down or upset・Before driving over a bridge plate or dockboard, ensurethatitisproperlysecured. The supervisor shallkeep a record of the resultofinspections.
24.Do not make turns on a gradient and drive theLoaderacrossagradient.Thereisdanger Oftheloaderupsetting.
29.Any time you find that theloaderis not functionlngPrOPerly,mOVetOanOut-Oftraffic Place,rePOrtthe condition to the supervisor, and take necessary measures.0peration of the loader should be halted until the trouble is corrected.
30.Stayalert.
Don’tdrink.(andkeepyourse[fingoodshape beforeandduringwork,)
31.When youleave the10ader,remOVe the Starter key and keepit;Otherwise you will take responsibility when an accident occurs duetosomeoneoperatingtheloaderwithout Permission.
BREAK-IN PER10D
Our wheel loaders have been subjected to CarefuIinspectionandthoroughrunnlng-inbefore Shipplng.We,however,reCOmmend that you OPerate the10ader underlight conditions forthe firststageofoperation.
The10adershould beoperated especialLyforthe firststage ofoperation(forinitia1100hourヲOf OPeration)fol10Wing the requirements g[Ven betow:
・Be sure to perform BEFORE STARTING Checks EVERY DAY.
・AIwayswarm up the10adersufficiently before Puttingittoworkirrespectiveoftheseasons,
・Do not run the englne at high rpm without a load,eSPeCiallywhiletheeng[neiscold.
A Avoidsuddenstops,StartSOrturnS.
BEFORE STARTINGTHE ENG]NE lnspect the generalcondition of the10ader to Check for:
・Damageorbreakage
Foreign materialal
・Signsofoi10rWaterleakage
A wARNING lfitisdifficulttocheckforleak$duetodirt, Cleantheareayouaretryingtocheck.Start the englne tO See jf oi[or waterleakage
OCCurS.Hydraulic pre$Sure Can drive hydraulic oilthrough the skin.Nevercheck forleak$in the hydraulic system with your barehands.UseapleCeOfcardboard.
Check exhaust ga$eS Outdoors.1f exhau$t Checkis to be performedindoors,be sure to have good ventilation and wear a mask. Exhaustgasescan kj”.
STARTINGTHE ENG[NE
A PRE-STARTINGCHECK
・Make sure no oneis under,On OrC10Se tOthe 10ade「.
・lf water,greaSe Or Oilis sticking to the f100r, Pedals,levers,Or OPeratOr’s hands,Cleanit uP・
AFTERSTARTINGTHE ENG.NE
・Warm up the englne SufficientIy,atleast5 minutes,regardless of the ambient tempera- tu「e.
Checkthe general condition of the loaderandnd Shiftthe10ad handlinglevertochecktoseeif theloadhandlingsystemoperatesproperly・
● Checkexhaustsound and color.
・Make sure the shiftJever and10ad handling leverarein neutralandthattheparking brake knobispulled.
Starting
・lnsertthekeyintothestarterswitchandturnit totheONposition.
・PresstheacceleratorpedaJ[ightly.
・Turn the key fully c10Ckwise to crank the engine・(Once the eng!neis started,remOVe yourhandfromthekeylmmediately,) Do not ho]d the$tarter SWitchin the START POSition for over10 $eCOnds at a time; otherwise it will cause damage to the Starter.If the englne WOn’t startin about5 SeCOnds,remOVe yOur hand from the key. Wait 30 seconds after the englne StOPS COmPletelyandtryagaIn.
・The englne may be hard to start when the ambient temperatureislow.To help start a CO[d englne,turn the starterswitch to the ON POSition to preheatthe englne.1tis advisable to preheat the englne for about8 seconds
Whentheambienttemperatureisbe10WOOCor 320F(L27,L32-2),for about5seconds when theambienttemperatureisOOC or320Forfor about 20 seconds when the ambient temperatureis-10OCor140F(L35,L40)・lfthe englneWOn’tstart,return thestarterswitchto the OFF position and wait about 30 seconds beforepreheatingitagaln.
・Checkthemetersandwarnlnglights. 1f the brake oilpressure monitor Lamp comes On andthewarn]ng buzze†sounds,aPP[ythe brakes andletthe eng[ne run at medium rpm untilthemonitorlampgoesoutandthebuzzer StOPSSOunding・
● Checkforoil,fuel,OrWaterleaks. a CAUTloN
WiththeengLnerunnlng,donotturnthestarter SWitch from the ON position;Otherwise the electricalpartsw‖bedamaged.
Startingandstoppingthe Loader Starting
AUTOMATICGEAR・SH[FTING
Put the grIP Of the shiftleverinto your desired gear POSition.lnthemanua(-Shiftmode,Shiftgearsoneby One.Donotskipfromlstto3rdor4th,forexampIe・ lDlRECTlON GEARSHIFTING
(Makesurenooneisaroundthe10ader.)
Raise the booms and tilt back the bucket so that the 10adergetsreadyfortrave[lng.
↓
You an reverse the direction of travelwithout StOPPlng the10ader.1tis good practice to reverse thedirectionoftravelwiththeshift[everin2ndgear. Nevertrytorever$ethedirectionoftravelata high$Peed;itisverydangerou$・ a CAUTloN
On10aders with automatic transmission,do not reverse the direction oftrave暮when the gears are in4thspeed.ThecIutch unitcouldbedamaged.

TURNING
Pressthe brake pedaland releasethe parking brake. Shifttheshiftleverintheforwardposition.
Holding the steering wheel knob turn the steering Wheelinthedirectionyouwanttoturn. a WARNlNG
Donotmaketurn$athigh$Peeds;Otherwisethe 10adermightup$et. Turnthe$teeringwheelalittletoturns10Wly. a CAUTloN
When the steenng wheelis turned fu”yin either directiorl,thefrontandrearframesswivelaroundthe Center]Oint of the10ader.Do not try to turn the Steering wheeIfarther;Otherwi$e the englne might $tal10rthe$teerlngWheelunjtmightfailtooperate PrOPerly.
Release the brake pedalwhi[e presslng the acceIeratorpedaIs10Wly.
SHUTTING OFFENGINE lSTOPPlNG
Release the accelerator pedal and press the brake PedaIto bring the10ader to stop・Do not use the Parking brake to brake the10ader exceptin an emergency;Otherwise the parking brake wi[lbe damaged.
◆
After making sure the10ader comes to a stop,Place the shiftleverin neutraland press the parking brake “ON”switch.
↓
Lower the bucket on the ground horizonta]Iy・ltis advisabletoparktheLoaderonalevelsurface・B10Ck thewheels.
AcAUTON
The englne With a turbocharger must be COOled down bylettingit run atidIe rpm for about5minutesbeforeshuttingoff.
Letthe englne run at10W rPmforabout5minutesto COOlit down. a CAUTloN
Engines with turbocharger are very hot after OPeration.To prevent seizure,be sure to cool itdownbeforeshuttingofftheengJne・

PIace the[oad handlingIeverin neutraland engage theIever10Ck.Turn the starter switch to the OFF POSitiontoshutofftheenglne・
Removethekeyandkeepitsecure・
HANDLING LOADERSWITHAUTO-
MATJCTRANSMISS(ON
GENERAL DESCRIPT10N lHANDLlNG
The automatic transmission automaticalJy con- troIs the transmission according to the gears
Selectedbytheshiftlever,detectingthetraveling SPeedandtheenglnerPm.
●You can select the transmission mode between automatic and manual.ln the manualmode, you need to controlthe transmission uslng the Shiftlever.
FUNCT]ON
The transmission speed automatically changeses according to the position of the shiftlever. WhentheshiftJeverisinpositionsotherthanl SPeed,the transmission always shiftsinto2nd SPeed.When the DSSis operated,the transmissionshiftsdownintoIstspeed.
・With the USS(Up Shift Switch),the transmission automatically shifts up wjthin a Selectedspeedrange.
・The automatic transmissjon unit js equlPPed Withakjck-downdevicewhichquickensshifting downwhenascendingas10Pe,
・The transmission won’t shift up when the engine speed is at low rpm so that engine braking[SaVailableonadownhil].
・The djrection oftravelis reversed bychang[ng the speed gears.This prevents the seizure of the clutch unit.
CHECKING OPERAT[NG STATUS
When the starter switchis turned to ON,the loaderchecktheoperatingstatusofthesolenoid Valve ofthe transmission.
Adjust the gnp end of the shiftlever to the speed youwant. Forheavywork,adjustfor2ndor3rdspeedandfor ljghtwork,adjustjtfor3rdor4th speed,Selectthe 4thspeedfortravelingwjthoutload,
Speed DSSoperation USSoperation range (boomJever) (bucketlever)
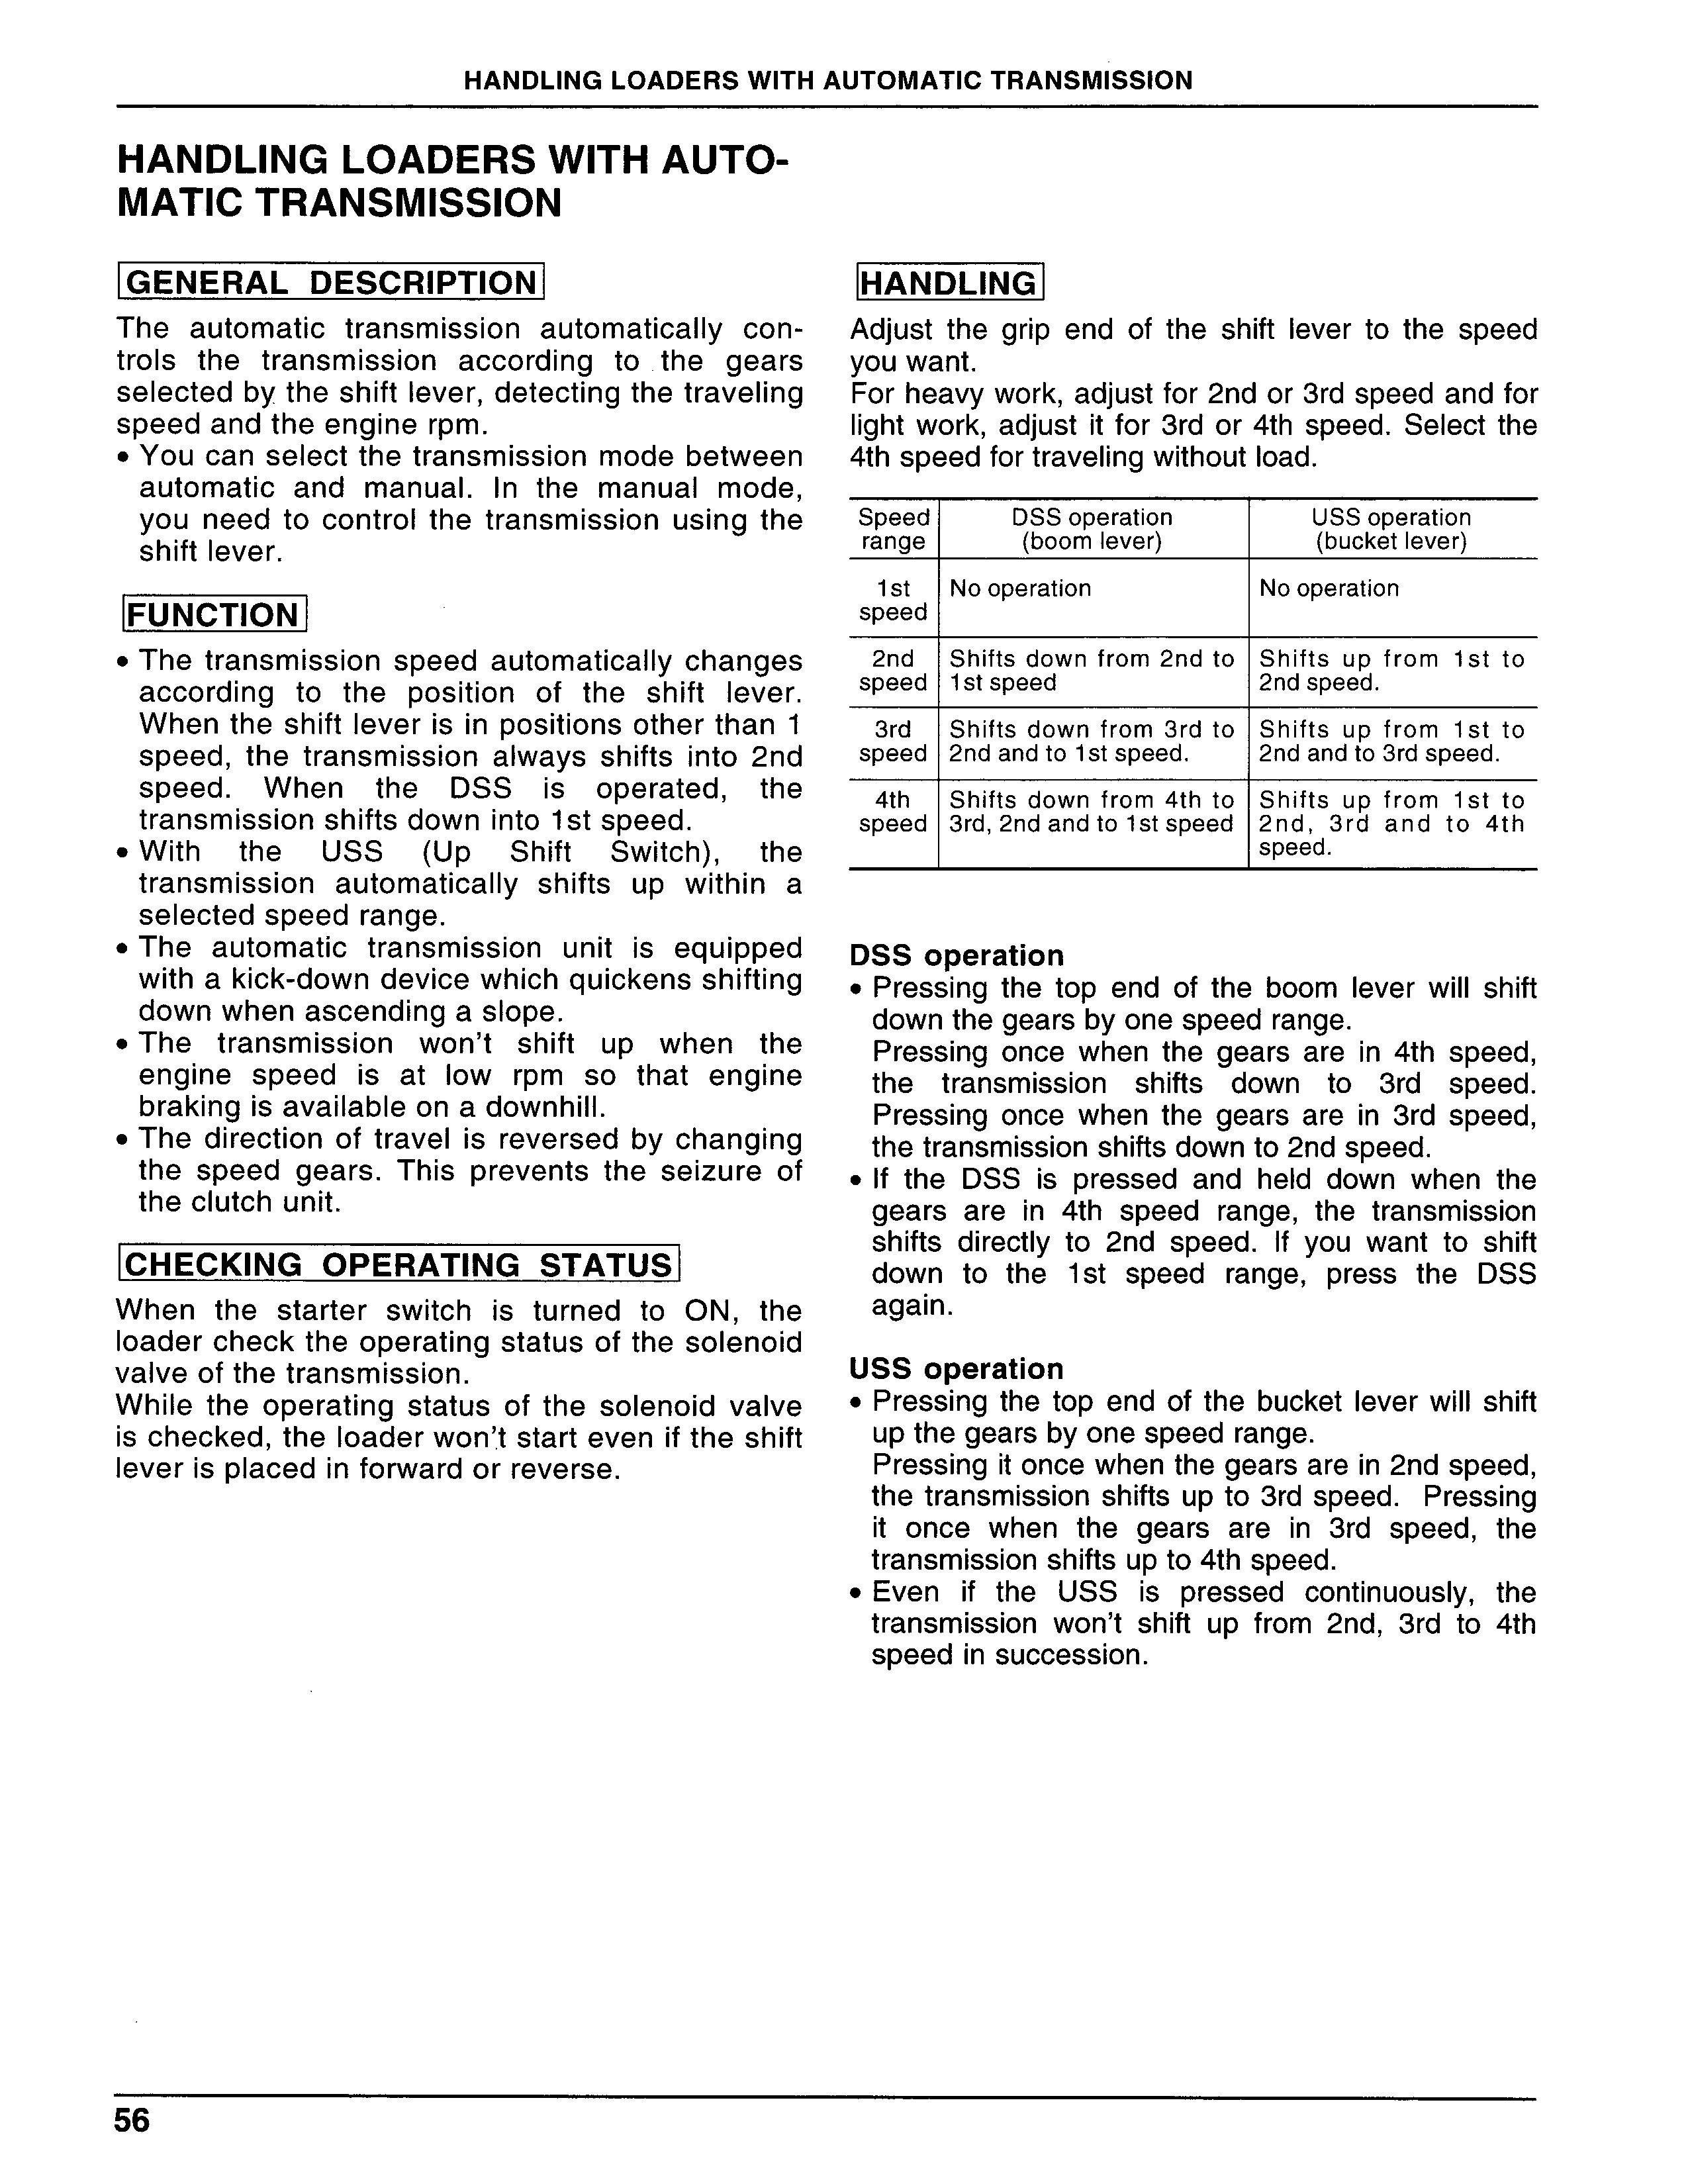
1st Nooperation
SPeed
2nd Shiftsdownfrom2ndto Shiftsupfromlstto
SPeed 1stspeed 2ndspeed.
3rd Shiftsdownfrom3rdto Shiftsupfromlstto
SPeed 2ndandtoIstspeed. 2ndandto3rdspeed.
4th Shiftsdownfrom4thto Shiftsupfromlstto SPeed 3rd,2ndandtoIstspeed 2nd,3「dandto4th SPeed.
DSS operation
・Presslng the top end ofthe boomleverwillshift downthegearsbyonespeedrange.
Presslng OnCe When the gears arein4th speed, the transmission shi什S down to 3rd speed.
Presslng OnCe When the gearsarein3rd speed, thetransmissionshiftsdownto2ndspeed.
・lf the DSSis pressed and he[d down when the gears arein4th speed range,the transmission Shifts directly to2nd speed.Jf you want to shift down to thelst speed range,PreSS the DSS agaln・
USS operation
Whi[e the operating status ofthe solenoid valve ischecked,theloaderwon’,tStarteVeniftheshift JeverjspJacedinforwardorreverse.
・Presslngthetop endofthe bucketleverwillshift upthegearsbyonespeedrange.
Presslngitoncewhenthegearsarein2ndspeed, thetransmissionshiftsupto3rdspeed.Presslng it once when the gears arein3rd speed,the transmissionshiftsupto4thspeed.
・Evenif the USSis pressed continuously,the transmission won’t shjft up from2nd,3rd to4th SPeedinsuccession.
SPEEDRANGECHANGEPATTERN BY3- MODESELECTORSWITCH
Switchposition Speedrangechangepattern
H Thespeedrangechangepointfrom (loadhandling 2ndto3rdspeedisdelayedto mode) hampershiftingupinVcyclework.
L Thespeedrangechangepointfrom (TraveIingmode) 2ndto3rdspeedor3rdto4thspeed isquickenedtomakeitsmootherto accelerate the traveling speed.
M Thespeedrangechangepointisset (lntermediate inthemiddIebetweentheabovetwo mode) Settings.
Make sure that the10aderis stopped and the Shiftleverisin neutraL before operating the3- mode selectorswitch.
REVERSINGTHEDIRECT10NOFTRAVEL lfyouwanttoreversethedirectionoftraveluslng the shiftlever a10ne,Without usng the brake
Pedal,itis good practice to place the gearsin 2nd speed range.If the direction of trave[is reversedwhenthegearsarein4thor3rdspeed, thetransmission automaticallyshiftsdownto3rd Or2nd speed.This prevents the seizure of the Clutch unit. a WARNlNG
・When reversing the direction of trave], make sure thereis no one around the toader.
●Do not rever$e the direction of travelat a high speed;Otherwise an accident might OCCur Or the10ader could fai[to operate norma”y.
AcAUT[ON
●You cannot reverse the direction of travel
When the traveling speedis higher than a Certainlevel.
・The 4th speedIamp b[inks and buzzer SOundswhenyoutryto reversethedirection of travel at a speed higher than a certain level.S[ow down theloader and reverse the direction of travelwith the gearsin3rd or 2ndspeed.
TRANSPORTlNG THE LOADER TRANSPORTfNGTHELOADERONA TRAILER a CAUTloN
SecurelyJockthe10aderin place on the truck topreventitfrom movlngWithchainsorstraps andbyb10CkingthewheeIs.Whentransporting theloader over public roads,Observe10Cal traffic regulations relatingtotheoveralllength, Width,height,and weight of both the10ader and the truck.
CAUT10NSTO BETAKEN WHEN LOAD-
ING AND UNLOADlNG THE LOADER ltis advisable to ask a specialist to10ad and unload theloader onto and from the trailer.The OPeratOr may nOt be familiar with this kind of WOrk.
When using ramps lessthan150
・Loadingandun10adingmustbecarriedouton alevelsurface.The rightandleft ramps must bethesameheight.
・When10adingthe10aderontothetruck,gOuP Slowlyin forward or reverse(according to the typeofthebed),makingsuretherightandleft Wheelsareproperlyallgnedontheramps・
If the loader is not aligned properly with thehe ramps,gO down the ramps and start over agaln・
・Use anti-Skid ramps when you are golng tO WOrkin the rain or the snow;Otherwise the loader may skid and faJloff the ramps, CauSingaseriousaccident.

Whenusingacrane.
A wARN州G
・U$e a Crane Of sufficient capacity to hoi$t the weight of the10ader(incLuding the Weight ofanattachment,ifsoequipped.)
●Lock the front and rear frame$ With the Safetylink.
●Insta”optionaL 41iftinglugs on the SPeCified po$ition$. Perform 4-POint hoi$ting.Do not make3-POint or2-POint hoisting.
Support
Set ramps with an angJe ofless than15O,uS[ng thetabIe as a rule ofthumb.
Bedheight Ramplength
1000mm(39in) 3700mm(146in)
750mm(30in) 2775mm(109in)
500mm(20in) 1850mm(73in) a WARNlNG
Load$ mu$t be driven $traight onto the ramps.Both front wheels(and or rear Wheels)must bein contact with the ramps Simultaneou$ly.
・Use ramps of sufficientlength,Width and Strength.
・Before[oading or un10ading theloader,make Sure tO aPPly the parking brake to the trailer truckand blockthe wheeLs.
・Ramps must be spaced evenly from the CenterOfthetrailer’sbedandsecureIy10Cked to the trailer.The trailer surface must be Cleananddry.
●Consult your authorized dealer about the in$ta11ationofoptiona[lifting]ugs.
●Lift the Loader alittle off the ground and make sure the chain$ Or rOPe$ are PrOPerly secured to the Lugs and the Loaderis stable.
WhenrunnlngOnitsown A wARNING
After driving for an extended hour,the 10ader’s tires may heat up,CauSlng the internaltirepressuretoriseexcessively,and in the worst case the tires could exp10de. Make sure to park the10ader for20to30 minutes for every one-hour driving,tO COOl down the tires.
Observe all traffic regulations including anyny special regulations authorized within the work area,forexample,SPeedlimitations.
・Drive s10W,and go round pot holes or other Obstacles,ifany,intheworkarea.
・Whendriv[ngOnPublicroads,CarryneCeSSary licenseand permit.BeaLertforothervehicles and pedestrians.Abide by traffic regulations anddrivesafely.
Towing
・The towline must be a10ng the centerline of bothyourloaderandthevehicletobetowed.
The10aderis not equlPPed with any towlng P[n, When necessaryto towanothervehicle,the tow rope must be tied to the positions specified on Page32,
The Loader mu$t be used fortowing onlyln an emergenCy・
A wARNING
Do nottowanothervehiclea10ngdistance. 1tisdangerous.
A wARN[NG
When towing another vehicle on a pubLic road,take necessary measures to[et other Vehicles and people know that you are towing another vehicle.Use a flag,rOtating lamp,Orhazardlamp.
There are several requirements you must abide by when towing another vehicle.Learn the regulations and rules about towlng anOther Vehic[e and observethem.
・Check the weights of your10ader and the Vehicle to be towed and make sure your loader has sufficient braking capacity to stop the towed10ad.
● Checkif the vehicle to be towed can be braked and steered.1f not,do not a”ow anyonetorideonthetowedvehicle.
・Checkthetowropeortowbarfordamageand make sureit has sufficient strength for the WOrk.
● When necessary to descend a gradient, another towlng Vehicle must be usedin the rearto retard.
・Start s10W[y.A sudden start canlead to a brokentowrope.
・Jfyouuseanyothertowlngdevice,refertothe tnstruction Manualsupplied with the towlng device.
Whenthe10aderi$tOWedbyanothervehicle lf the englne WOn’t start,remOVe the front and rear prope‖ershafts;Otherwise the transmission WilJrotate without being properly[ubricated, CauSJng Seizure.Before removlng them,aPPly the parking brakes and block the wheels SeCurely.
If the engine can be started and the steering Whee]and brakes function normally,have SOmeOne getOn the10aderyou are golngtOtOW forsteerlngit.
1fitis difficulttotowthe10ader,tranSPOrtitbya trai[ertrucktoyournearestrepairshop.
Whentowingthe10ader
暮n addition to the above measures,release Parking brakesif the engJne WOn’t start or hydraulic pumps are defective,refernng
Measurestobetakeninan Emergency
Brake system:The brakes can be applied by pressing the brake pedal thanks to the oil
PreSSure StOredin the accumulator.1f the englneStallsduringtravellng,mOVetOanOut-Of- traffic area and park.Do not pump the brake Pedalat this time;Otherwise the brake oil
PreSSure W川 be used up,thus causing the brakes tofail.
.fthe brakescannotbe applied bypresslng the brake peda],PuSh the parking brake“ON” SWitch.
Steering system:The steerIng Wheelbecomes hard to turn due to an inoperative hydraulic SyStem.
If the englne Stalls during traveIlng,Park the ]oaderin an out-0トtraffic area and check the CauSeOfthetrouble.
Forcomplicated trouble,COntaCtyOurauthorized dealer.
The water depthis animportant factor to take into consideration when the[oaderis workingIn SWamPy areaS.Do not enterwaterwhose depth exceeds the Loader’s minimum ground clearance heightorishighenoughtowetthebottomofthe axlehouslng.
As a ruLe ofthumb,the a”owable waterdepthis about400 mm(15.7in).This means that the loadershould not be usedin a river.
0bservethefolrowlngCOnditions:
・Check the water depthin advance when CrOSS[ngaCrOSSariver.
・Use the same precautions before crosslng across a swampy area.

・Donotenterriverswhoseriverbedissteepor Whosef10Wisrapid. a CAUTloN
Avoid useofthe[oaderin saltwater,Saltwater use will cause the development of rust to Shorten theIife ofthe10ader.
Afterworking[n a SWamPy area,Carefully wash the10aderandapplyanti-ruStCOatings. a WARNlNG
・Batteries give offexp10Sive gases.Do not SmOke.Keepflameandspa沌SaWay.
・Take care when using meta”ic tooIs・lf a metalLic toolis placed between the POSitive termina]and the englne b10Ck or the10ader body,SParks may deve10P, CauSingexp10Sionorfirehazards・
・lf battery electrolyte comesin contact With the skin or the eyes,it wi”cause a burn or blindne$S.Wear safety glasses, rubberg10Ve$andapron.
・lf e[ectrolyte comesin contact with the Skin or getsin the eye,fIush repeatedly with cold water and seek medical attention.
・Make$uretO Shutofftheeng]neand turn Off the starter switch before working on thebattery.
(tobecontinuedtonextpage) a WARNlNG
Before trying to disconnect the battery COnneCtOrS,make sure to Lower the bucket Onthegroundhorizonta[ly,aPPlytheparking brake,turn the starter switch to the OFF POSitionand$hutofftheengJne.
Do not put metaL tooIs ortheljke on thetop Surfaceofthebattery.
To prevent the deve10Pment Of sparks, disconnectthe(-)side(grounding$ide)first・
To reconnect,the(-)side should be COnneCtedlast.
1.Removing the battery unit from the10ader andchargIngWithastationarycharger
Read the lnstruction Manual for the chargerer

Carefu”y and follow the specified charglng PrOCedure.
・If the batterylS tO be chargedindoors,have good ventilation.Remove the battery caps to al10WgaSeStOeSCaPe.
・Whjlethebatteryjsbeingcharged,neVerbring fIame cIose to the battery.Care should be exercised nottoletany meta[licobjectcontact thebatteryterminals.
・Aftercharglng,Clean the batteryterminals and apply grease before mounting the battery on theloader.
2.Replacing discharged batteries with Charged batterie$
・Once completely discharged,the battery wi” haveashortservicelife.Replacethebatteries Withnewonesassoonaspossible.
・Make sure the batteryand cable polarities are the same;the(+)battery terminalto the(+) Cable terminaland the(-)battery terminalto the(-)cable terminaL.Tighten the nuts SeCurely.
・The di$POSa[of a discharged battery must be left to the dealer from which the battery WaS boughtorto a specialist.Do notthrow itawaywithoutpermissjon.
3.U$ingaboostercabletotemporarilyrestore thebatteryperformance
AwARN[NG
●When connecting a booster cabLe,uSe Caution not to short-Cjrcuit the battery’s POSitiveandnegativeterminalswithacabIe C[ip;ifshorted,thebatterycanexp10de・
●Use caution when connecting the booster CabLe to the englne b10Ck of a disabLed 】oader,because sparks may deve[op.The Cable must be connected to the englne b10Ck placed asfarawayas possibIe,from thebattery.
●Do notlet a disabJed10ader contact the OPerative10ader.
・When starting the englne Of a di$abled 10ader,WearPrOteCtiveglas$eS.
・The10aderhastwo12-VOltbatteries,24voltsin totaI.Make sure the mating battery has the SameVOJtage.
・Connectingtwoboostercables:
①Turn the starter switches of the operative Vehic[e and the disabled10ader to OFF. Conヮectthe red cab[e cLiptothe(+)battery termlna10fthe disabledloaderand connectthe Other red cliptothe(+)batteryterminalofthe OPerativevehicle;
②Connectone blackend ofthe boostercableto the(-)batteryterminaloftheoperativevehicle;
③Connect the other black end of the booster Cable to the eng[ne b10Ck of the disabled VehicLeplacedasfarawayaspossible,fromthe battery.
・Makesurethefourc[ipsaresecureandmaking goodcontact.
・StarttheenglneOfthedisab[ed10ader.
・AftertheenglneOfthedisab[ed Loaderstarts, remove the clipsin descending numerica1 0rderof ④,③,②,and①. a WARNlNG
You can release the parking brake in the PrOCedure gNen below,Without using the Parking brake switch. However, the PrOCedure must be used only when you CannOt reLease the parking brake with the Parking brake switch.Under any other Circumstance should not this procedure be used.The sameis true of
Beforeyou tryto releasethe parking brake in the foILowing manner on a grade,b[ock the wheels securely enough to withstand the weight ofthe10ader.Have a gujde and make sure there is no one around and under the10ader.
If the parking brake cannot be released with the Parkingbrakeswitch,duetoadefectivebrakeoil a WARNlNG
Before trying to operate the emergency Valve($POOl),make sure to apply the Parking brake to prevent accidentalrol10f the Loader. lf the10ader won’t move due to a broken electricalwirlngWhichmakesitimpossibletoturn Onandofftheso[enoid,yOuCanmOVetheloader inthefollowlngmanner:
PumP Or Other faiJurein the brake system, reIease the parking brakein the fo]]owlng manner:
Procedure:
Note=OnL27,thevalvepositionisdifferent・
① Loosen the bo[t securing the plate on the transmission controIvalve.

② RaisethespooLlOmm(0.39in),andyouw州 be able to move theloaderin forward(3rd SPeed);10Werthespoo110m叩(0・39in),and you wilt be able to moveln reVerSe(3rd SPeed).
③After moving theloader to an out-Of-traffic area,returnthespoolintoneutralandtighten theplateboltsecurely.
Procedure Note:OnL27,thebrakecoverpositionisdifferent.
①Remove the plug⑧attached to the parking brake cover.
②Removethereleasebolt/nut⑥.
③Screwthe boltandflatwasher(W.0.nut)into theplughole④untiLthefarend.
④The brake w= be released by further tighteningtheboLt⑥about2turns(about2- 3mm or O.08-0.1in.)after the bolt head touches the brake cover.
HANDL[NGIN COLDWEATHER 6・ lncoldweatherorwhentheambienttemperature is-00C(320F),bearinmindthat:
The water and lubricants used in the loaderer mayfreeze.
● The surface on which the10ader travelis Slippery.
Keeplngtheaboveinmind,Observethefol10Wlng COnditions:
1.Addwaterandlubricants beforeworking,nOt afterworking.(Thisdoesnotapplytofuel・)
Exhaustgasescan k=sothe10ader mustbe warmed up with adequate ventilation.

7.Warm upthe Load handling system.0perate the hydraulic peda[s sJowly to actuate the Cylindersseveraltimes・
8.Attach tire chains to allfour wheeLs when WOrking on a road covered with snow, especialJyonanlCyrOad・
2.Add LLC(Long Life Coolant)to the radiator COO=ng water.The wheelloaders are delivered from the factory with LLCin the radiatorandingeneralyoudon’tworryabout thecoolant,However,Whenyour10aderisto be usedin a cold reg10n Where the ambient temperature might drop to-100C to-40OC (140F to-40OF),increase the concentration Of the LLC.
9.After work,take measures to prevent the freezlngOfwateronthepartsasfoHows:
・TapethekeylnSertionsljt・
・TherubberpartslikethewIPerSmightfreeze・ Take care not to al10W them to contact other PartS.
3.Change the englne Crankcase oi[to cold- WeatherenglneOil.
4.Use hard-tO-freeze fuel.To prevent the condensation of moisture to theinner wallof the tank,take care toleave half the fuelin the tank when finishing the day’s work・Add COJd-Weatherfueltofillupthetank.
5.A[ways keep the batteryln a Wel]charged COnditionsincethereisdangerofthe battery being damagedif the electrolyte freezes・ After work,be sure tolet the englne run at low rpm for about 5 minutes.As an aIternative method,dismountthe batteryand keepitin a warmindoor place.Keep the SPeCific gravity ofthe electrolyte atl.2800r below.
● Remove snow and water at the bottom and insideoftheIoaderwith a rod and brush.
・Park theloaderindoors,if possible.Parkit on a level surface and cover with a large Vlnylsheet.
・lf not possible to store the10aderindoors, Parktheloader on alevelhard surface and COVeritwithavlnylsheet.
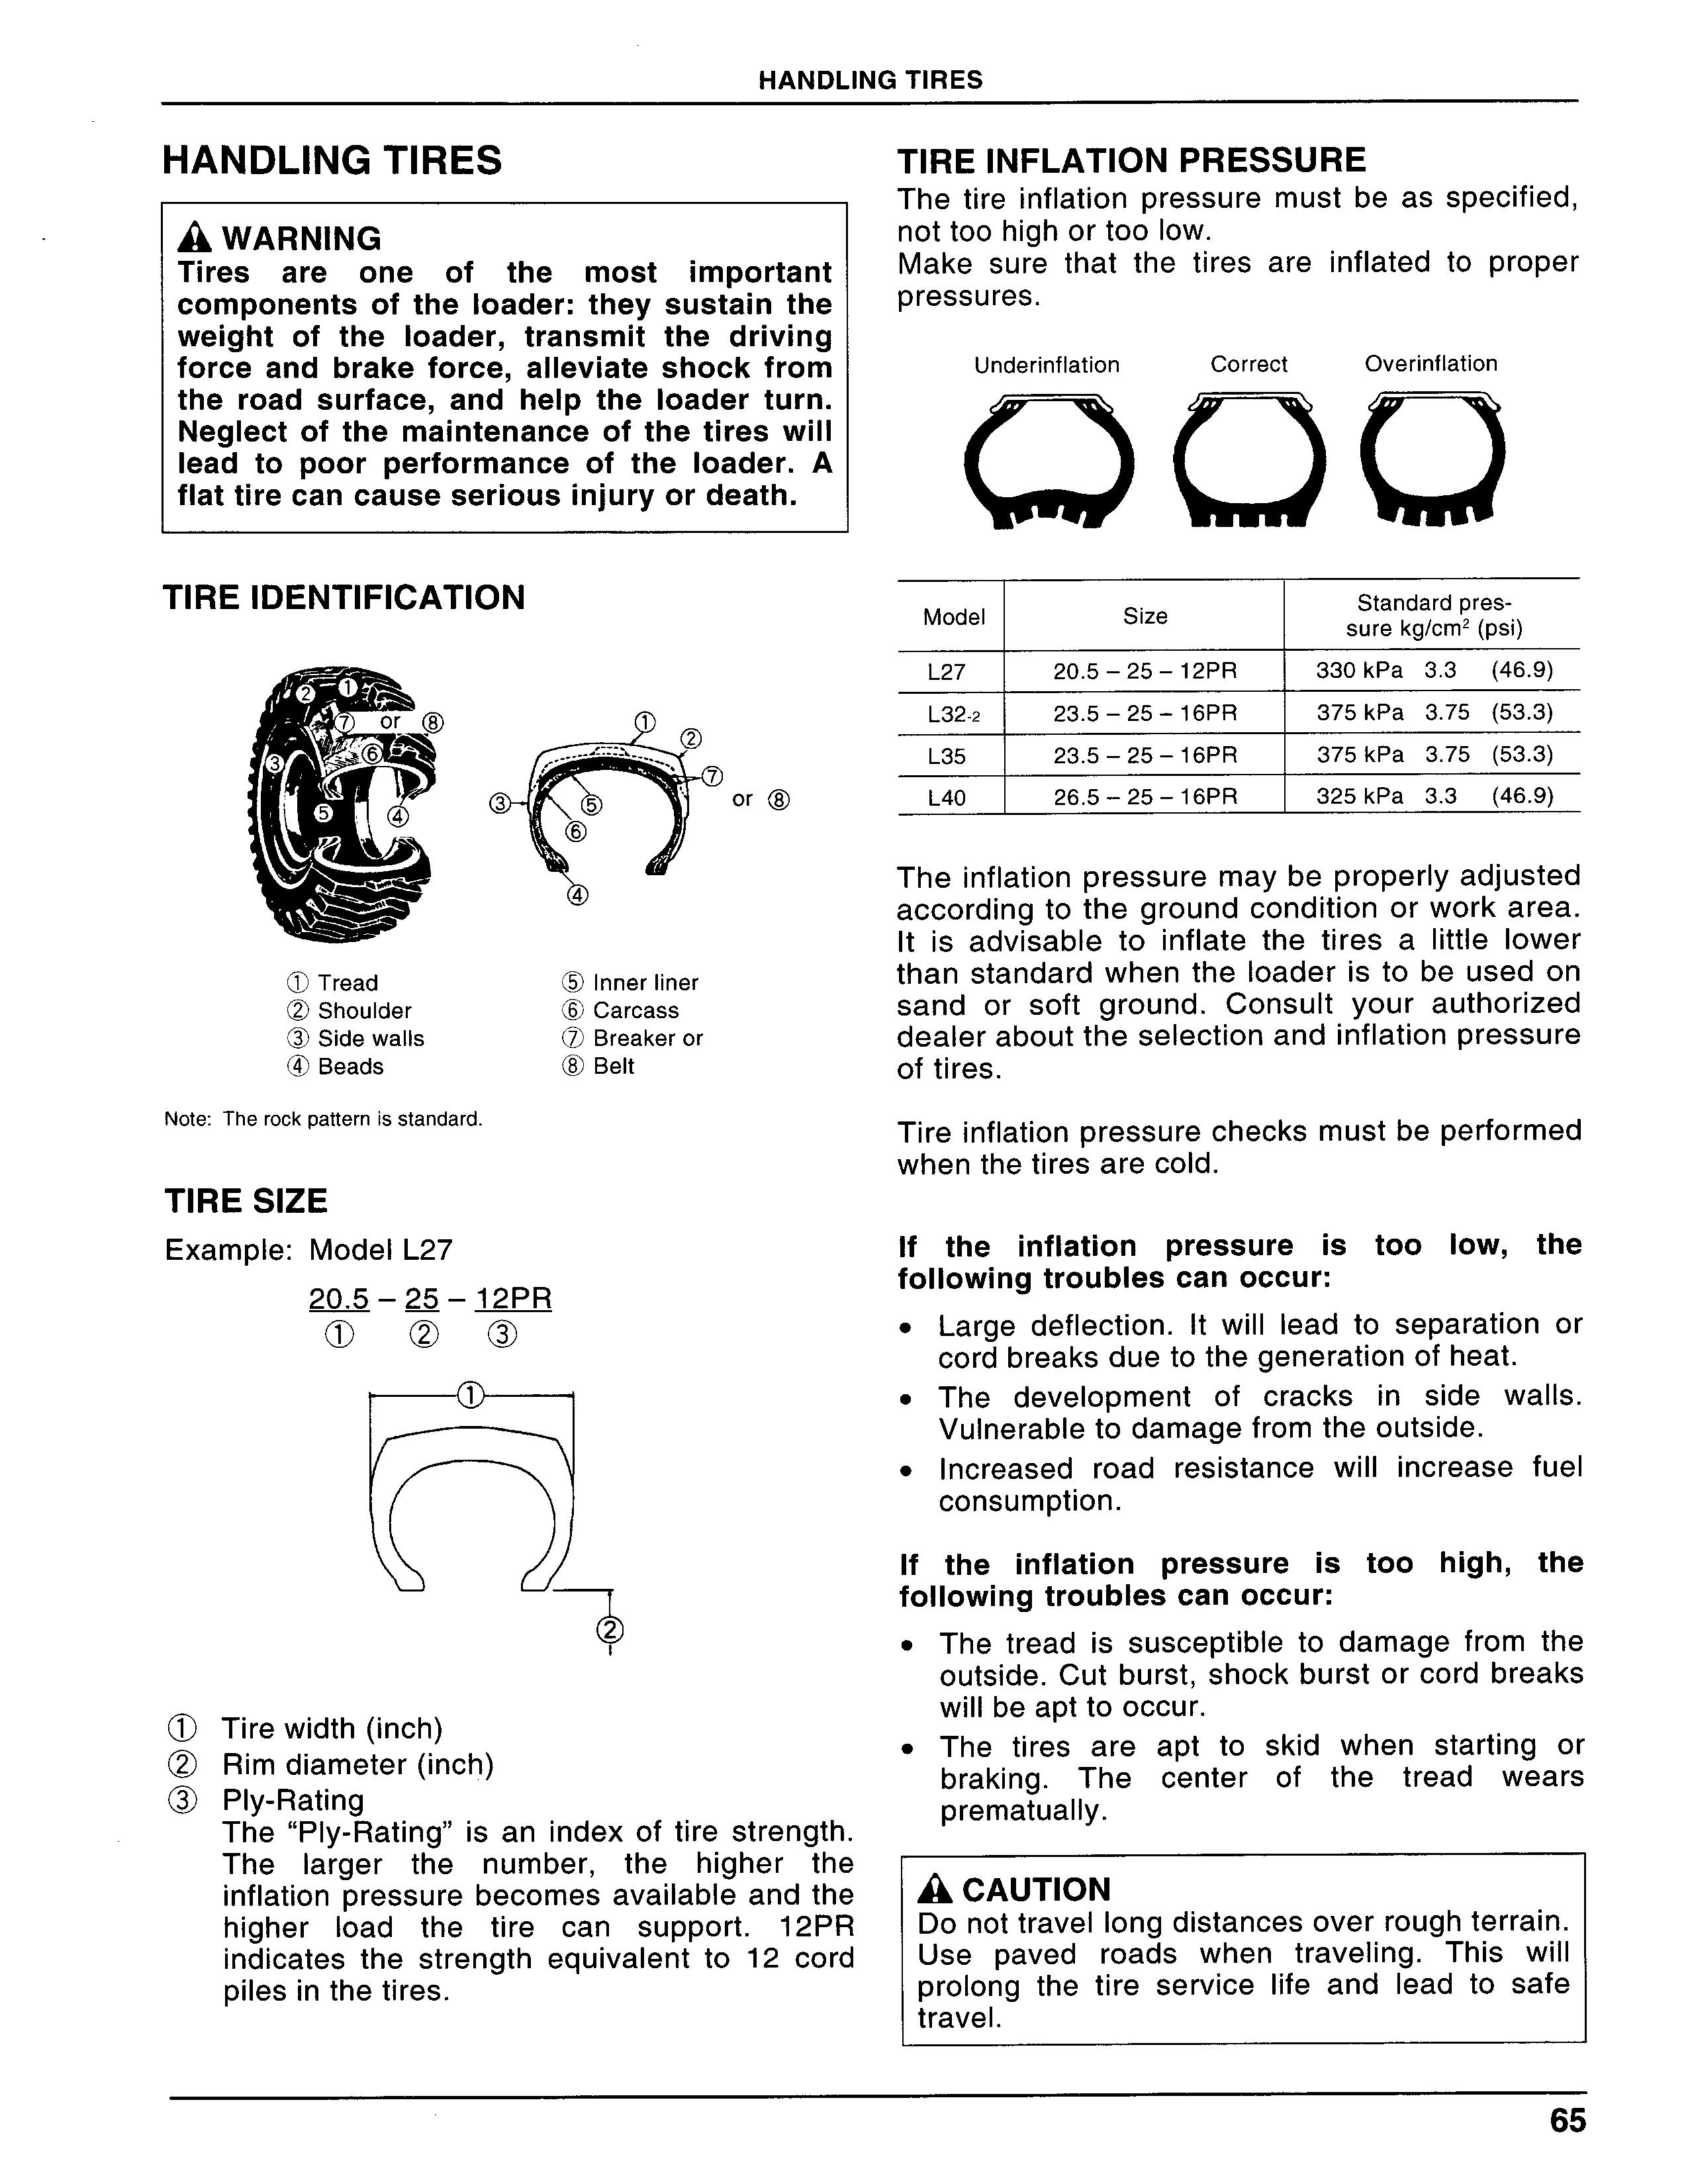
HANDLlNG TlRES TlRE lNFLATlON PRESSURE a WARNlNG
Tires are one of the mostimportant COmPOnentS Of the10ader:they sustain the Weight of the10ader,tran$mit the driving force and brake force,a”eviate shock from the road surface,and help the[oader turn. Neglect of the maintenance ofthetires will lead to poor performance of the10ader.A flattirecancauseseriouslnJuryOrdeath.
ThetireinfIation pressure must be asspecified, nottoohighortoo10W.
Make sure that the tires are inflated to proper PreSSureS・
Underinflation Correct OverinfLation
Model Size Standardpres- Surekg/cm2(PSi)
L27 20.5-25-12PR 330kPa 3.3 (46.9)
L32_2 23.5-25-16PR 375kPa 3.75(53.3)
L35 23.5-25-16PR 375kPa 3.75(53.3) L40 26.5-25-16PR 325kPa 3.3 (46.9)
①
3)SidewaLIs
TlRE SlZE
Example:ModelL27
① (∋
③
② Rimdiameter(inch)
③ Ply-Rating
The“P]y-Rating”is anindexoftire strength・
Thelarger the number,the higher the inflation pressure becomesavailableandthe higher Load the tire can support・12PR indicates the strength equlValent to12cord Pilesinthetires.
Thejnflationpressuremaybeproperlyadjusted accordingtothegroundconditionorworkarea・ ltis advisable toinflate the tires alittle10Wer than standard when the10aderis to be used on Sand or soft ground.Consu[t your authorized dealerabouttheselectionandinflationpressure Of tires.
Tireinflationpressurechecksmustbeperformed when thetires are cold.
1f theinflation pres$ureis too10W,the fo”owlngtrOublescanoccur:
● Large deflection・lt willlead to separation or COrdbreaksduetothegenerationofheat・
・The development of cracksin side waL[s・ Vulnerabletodamagefromtheoutside・ ●lncreased road resistance wi”increase fuel COnSumPtion.
1f theinflation pressureis too high,the fo”owingtroub[escanoccur:
・The treadis susceptible to damage from the OutSide.Cut burst,Shockburstorcord breaks W=beapttooccur・ a CAUTloN
65
T[RE ROTAT10N lfoneorbothofthefronttiresshowdeeperwear than those of the rear tires,rOtate the tires PrOPerly.Thislets the tires wear uniformly,thus making it possible to prolong the entire service Life ofthe tires.
How to rotate thetires:
● Rotate the tires between the front and rear Wheels.Donotswapthetiresdiagonally. ・Alltreads pattern must face forward.The traction pattern affects fue.consumption and thesafetyoftraveHing.
Howto checktheextent of tirewear
Measure the extent ofwearatan areal/40fthe tread’soutermostpart. (POintsmarkedx)
Tread width a WARNlNG
The wheels$houId have tires which arefree from cutsand showless wear,because the tires sustain a lot more weight when 10ading,un10ading and braking・Damaged Or eXCeSSively worn tires can cause a PunCture Or burst,thusleading to persona1 InJuryOrdeath.
TheリSefuIlimit(replacementtime)iswhenthe tirelS WOrn 85% compared to a new one. Replace any tire showlng eXCeSSively uneven WearOraCOrdlayerexposedtoviewwitha new One,eVenifitisnotworn85%. a CAUTloN
Equalize wear of the front and rear tires・Do notusetiresofdifferenttypes,COnStruCtionsor Sizes.Failure to observe these conditions wi” adverselyaffectthepowertrainincludingaxles OrtranSmission,CauSlngthemalfunctionofthe 10ader.
Whenreplaclngtjres,makesuretousetiresof the same type,COnStruCtion,and size for a]l thefourwheeJs.1tisalsoadvisableto replace the fourtiresatthe sametime.

Removingandreinstallingtires Wheels
a WARNlNG
Atire with a wheelis heavy.Servicingit js difficult and dangerous.It aLso needs a hoist for removlng and reinsta”ing tires.1t is advisable to ask your authorized dea]er Ora$PeCialisttodothework.
Ifyouaregoingtojackupthe10aderfortire maintenance,Observe the fol10Wing condi・ tions:
・Park theIoader on dry,f]at and hard ground.
・Carryouttheworkbyatleasttwopeople: One for working on tires and one as a helper who al$O keeps bystanders from Standingnearthe10ader.
●Do not use the bucket to raise the front Wheels.
・Jackthe10aderupJu$tenOugh to remove tires.Donotraisethe10adertoohigh.
●B10Cktherearwheel$Whenyou areabout to remove the front wheels and b10Ck the front wheel$ When you are about to remove the rear wheels.
●Be sure to use supports under a jacked- up10ader.Do not try to keep the10ader raisedupwithajackorjacks.
・The rear axle maycradle.To preventthis, Wedge a rigid squared timer between the axle and frame.
●When remov]ng the wheelbolt$,the one at the top position must be removed[a$t, With the tirelifted with a hoist.
・Thetighteningtorqueofthewhee]boltsis 773N・m(78.8kgf・m)(5701bf・ft).
a WARNlNG
When disassemb[ing of a tire and rim assemblyisneeded,aSkaspeciali$t・ Remov?ru$t(if apy)from the rim・An excessively rusty rim often indicates the deve10PmentOfcracks.Replacesuch a rim assemb]y.
ONETOUCHCOUPLER(HYDRAU- LICTYPE)
The one touch coupler alLows easy exchange between[oad handling attachments such as buckets.
AwARNING:
Do not a”ow bystanders near the Loader.
The operation of the coupler plnS are COntrOlledfromtheoperator’sseat.
Removal
Beforeremovlngthehydrauliconetouchcoupler, Changethehydrau[ic hose Leadingtotheangling CyIinder(for the angLing plow of snow removal attachment),tO the coupler cylinder of the one touch coupler.(See page 70“lnstalling and removinghydraulichose.”)
Place a pallet under the attachment you are aboutto remove.
①Keep the bucket horizontalabout20cm(7.9 in)abovethepa‖et.
②A wARNING:Set the parking brake
SeCurely.0perate the coupler cylinder with theattachmentleversoastoremovetheplnS.
③Place the bucket(attachment)as near the edge of the pa”et as possible,for easy remova10ftheonetouchcoupler.
④Lowerthe booms alittle and carefully tilt the bucket forward,and the bucket(attachment) Willdjsengagefromtheonetouchcoupler, lnstal】ation