3 minute read
Functions of and How to Use User Mode (TT-300XL-1)


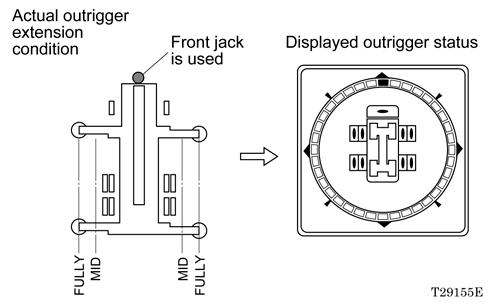
1. Front jack
When the front jack is set, the symbol lights to indicate that the front jack is set.
2. Outrigger state symbol
Indicates the way the outriggers are extended. Flashes while an outrigger state is in process of being registered, and lights up when the registration is completed.
3. "on-rubber" state symbol
When power is supplied (PTO switch is turned ON), the symbol lights to indicate that the outriggers are not set.
4. Boom position indicator
Indicates the boom position in 10 increments.
Functions of and How to Use User Mode (TT-300XL-1)
Selecting Operational Status
WARNING
Should the operational status be incorrectly registered, the crane may overturn or be damaged, leading to a serious accident. Prior to every operation, check that the registered status corresponds to the actual status of the crane.
Selecting Outrigger Status
[NOTICE]
When power is supplied (PTO switch is turned ON), the ìon-rubberî status is automatically selected (ìon-rubberî state symbol lights).
Turning the power off (PTO switch: OFF) automatically erases all the previous settings stored in memory after approximately 2 hours. To resume the operation more than 2 hours after the power has been last turned off, enter the settings all over again.
If an outrigger or the front jack is stowed after registration of outrigger status, the registered status is automatically switched to the ìon-rubberî status. In this case, register the outrigger status again before starting crane operation.
Register the outrigger state using the right or left outrigger status select key and the register key.
When the outrigger or left outrigger status select key is pressed, the outrigger state symbol (and the front jack symbol) flashes in accordance with the status that the load moment indicator detects. After making sure that the display conforms to the actual outrigger and front jack conditions, press the register key. The outrigger state symbol (and the front jack symbol) will change from flashing to continuous lighting and the moment display, rated lifting capacity display and actual load display will return to normal display conditions, meaning that the state has been registered.


Functions of and How to Use User Mode (TT-300XL-1)

Selecting Lift Status
[NOTICE]
The boom lift status is the default status and is automatically selected (the boom lift symbol lights up) when the power supply is turned on (the PTO switch is placed in the ON position).
Turning the power off (PTO switch: OFF) automatically erases all the previous settings stored in memory after approximately 2 hours. To resume the operation more than 2 hours after the power has been last turned off, enter the settings all over again.
Register the lift status using the lift mode select key and the register key.
[NOTICE]
After selecting the intended lift status, press the register key to register the status. The corresponding indicative symbols will change from flashing to lighting and the moment display, rated lifting capacity display and actual load display will return to normal display conditions, meaning that the state has been registered.
(When the jib set status is selected, the jib lift symbol will remain flashing.)
Each time the lift mode select key is pressed, the mode changes in numerical sequence, from (1) to (4). The display returns to (1) if you press the switch while the status (4) is displayed on the screen. Select the status that corresponds to the actual lift status.

Functions of and How to Use User Mode (TT-300XL-1)
Selecting Number of Parts of line
[NOTICE]
If the registered number of parts of line is smaller than the standard number, a maximum allowable lifting load is limited, depending on the registered number. If zero(0) is registered, however, the AML performs as if the standard number were registered. Similarly, the AML works on the basis of the standard number of parts of line if the registered number is larger than the standard number, or other than the values specified for your model.
When the power supply is turned on (i.e. PTO switch ON), the standard number of parts of line corresponding to the work condition is selected.
Register the number of parts of line by use of the number of parts of line select key and the register key, as follows:
1. Press the number of parts of line select key. The number of parts of line symbol will flash, and the number of parts of line will be shown on the jib angle display in a flashing mode.
2. Press the increase or the decrease key to set the number to the actual number of parts of line.
[NOTICE]
When the increase or the decrease key is pressed, a numeral showing the number of parts of line changes from flashing to lighting, and increases or decreases.
When the increase or the decrease key is kept pressed, the number of parts of line continuously increases or decreases.
3. Once the intended number of parts of line is set, press the register key to register the number. Then, the number of parts of line symbol will be turned off and the jib angle display will return to a normal status.
[NOTICE]
The number of parts of line can be confirmed by pressing the display alteration key.