1 minute read
Model 5200 High-Level Orderpicker
from Raymond 5200 High-Level Orderpicker Lift Truck Maintenance Manual SN 1000 and up - PDF DOWNLOAD
Section 7.Component Procedures
Electrical Components Switches (General)
Switches (General)
Refer to the electrical schematic in the Appendix to identify the electrical circuit location of the switch.
Deadman Switches
There are two deadman switches (S2 and S23).
Replacement
Use extreme care whenever the lift truck is jacked up. Never block the lift truck between the telescopic and the floor. Keep hands and feet clear from vehicle while jacking the lift truck. After the lift truck is jacked, place solid blocks beneath it to support it. Do not rely on the jack alone to support the lift truck. See “Jacking Safety” on page2-8.
5.Lift the pedal assembly out of the platform to access the switches.
6.Remove the two screws mounting the deadman switch(es) to the bracket.
7.Disconnect the wires from the switch(es). Note location and mark, if necessary, for reconnection later.
8.Replace the bad switch(es).
9.Reconnect the wires.
10.Align the pedal assembly with the holes in the platform.
11.Install a washer and lock nut on the bottom of each deadman pedal assembly post.
12.Reconnect the battery connector and turn the key switch ON. Test the lift truck operation before returning to service.
1.Raise operator platform high enough (at least 3 feet [91.44 cm]) to access the bottom of the deadman pedal from under the platform.
2.Block the operator platform with a 4 × 4 in. (100 x 100 mm) block.
3.Turn the key switch OFF and disconnect the battery connector.
4.Remove the three lock nuts and washers that secure the deadman pedal assembly to the operator platform. See Figure7-142.
Publication Number: 1043922B, Revised: 2 Sept 2015
Section 7.Component Procedures
Model 5200 High-Level Orderpicker

Warning Light Electrical Components
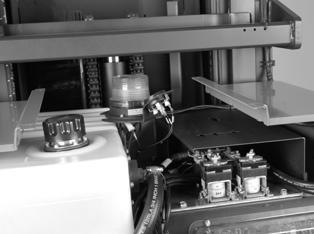
Warning Light Replacement
1.Turn the key switch OFF and disconnect the battery.
2.Unplug the warning light harness. See Figure7-143.
3.Cut cable ties.
4.Remove the foam gasket and light.
5.Install a new light and foam gasket.
6.Install new pins for the connector on the lift truck.
NOTE: Do not cut the wires off the existing warning light and “butt splice” them to the new warning light.
7.Use the correct pins for the model lift truck being serviced and crimp the pins on the wires using the correct pin tool.
8.Install the pins in the existing connector and make sure the polarity is correct.
9.Connect the harness.
10.Reconnect the battery connector and turn the key switch ON. Test the lift truck operation before returning to service.
Publication Number: 1043922B, Revised: 2 Sept 2015


