2 minute read
5Maintenance


5.1Maintenance access doors
5.1.1Overview of access doors
5-1 Access doors for maintenance on the machine
Pos.Denomination / location of the door Locking device in opened position Locking device in closed position
10Side door right rearRetaining rod 3Lock up handle 4
11Side door right frontRetaining rod 3Lock up handle 4
12Air filter doorGas pressure spring 5Door fixed by screws
13Side door left Retaining rod 3Door fixed by screws
21Engine hoodMechanical retainer 2 + two gas pressure springs 5
Locking device 6. Access after opening hood 25
22Cooler coverGas pressure spring 5Cover fixed by screws
Pos.Denomination / location of the door Locking device in opened position Locking device in closed position
23Cover front rightRetaining rod 3Lock up handle
24Cover tool boxGas pressure spring 5Lock up handle 4
25Hood left rearGas pressure spring 5Locking device 6. Access after opening door 13
The machine has 9 access doors for maintenance. The doors and covers are partly fitted with lock up handles, partly secured by screws.
For safety reasons, the locks integrated in the handles 4 must be unlocked before starting to work with the machine.
The radiator hood 32 and the middle cover 33 are screwed parts whose opening is not necessary in the limits of usual maintenance works.
5.1.2Door retaining rods
Caution!
Access doors can close accidentally and trap the operator or maintenance personnel.
After you have opened the access doors, latch them using the retaining rods..
To stop the access doors from moving unintentionally (eg. due to wind), open them fully and allow the door lock (see arrow) to latch in.
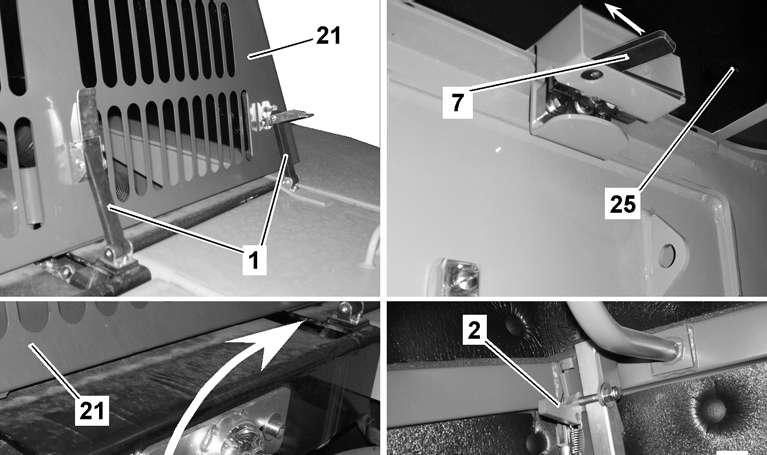
5.1.3Opening, closing, locking the engine hood 21
Fig. 5-3 Locking of engine hood in opened and closed position
Unlock the door locks 1 of the engine hood 21.
Open the side door left 13, unlatch the locking device 7 of the rear left cover 25 and tilt up the cover 25 all the way to the rear.
Bring the handle of the locking device 6 of the engine hood 21 to the vertical.
Caution!
The engine hood moves with the assistance of two gas cylinders 5. On older gas cylinders, the lifting force can drop, making the lifting and lowering of the engine hood more difficult.
As soon as you notice a decrease of the efficiency of the gas cylinders 5, make the necessary to have them replaced in the best delays.
Wenn opening the engine hood 21, make sure that in any case, even if the force of the gas cylinders is sufficient to maintain the hood, the mechanical retainer 2 engages so to prevent from unexpected lowering of the hood
Lift up the hood 21 so far the mechanical retainer 2 engages automatically
To close the engine hood 21:
Slightly lift up the hood 21 so to can disengage the mechanical retainer 2.
Close the hood 21 and secure it while closing the locking device 6 as well the door locks 1