4 minute read
Control and operation
Access and equipment of the cab a the windscreen is closed. b the windscreen is fully opened (locked in place on the roof of the cab)
Caution!
It is not allowed to work with the machine when the windscreen is in an intermediate position!
To change the position of the windscreen
Pull the lever 1 in and down to unlock the windscreen. Move the windscreen using the handle 2, secure it in one of the two positions a or b and relock using the lever 1
3.2.6Sunshade
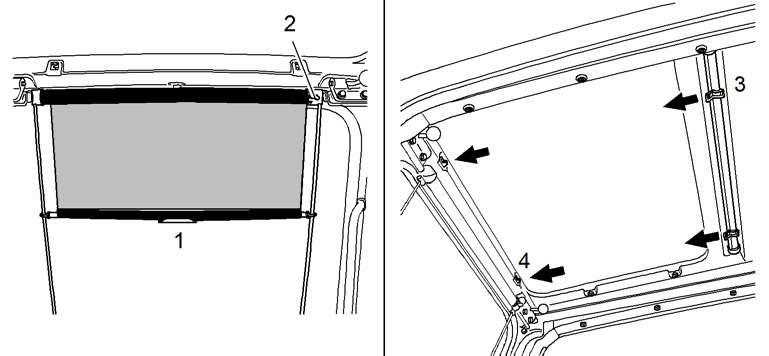
The cab is provided with two sunshades, located at the windscreen and at the cab roof window.
Manoeuvring the sunshade at the windscreen
Using the strengthening tongue 1, pull the sunshade down to the desired position. Press the red button 2, the sunshade will roll itself up.
Manoeuvring the sunshade at the cab roof
Pull out the sunshade and secure it in the holders designed for the purpose. To retract the sunshade, take it out of the holders and let it roll up slowly.
In case of emergency, remove the rubber seal 2 from all around the rear window by pulling the clip 1 on the inner side of the rear window. Thereafter push the window out.
Note!
For the machines equipped with a cab elevation, steps, ladders and hand-rails (grips) are installed to secure the descent.
3.2.8Interior lights
Dome light for cab interior lighting
The dome light is controlled via the button 1.
Push the button 1 to the right to switch on the light 2
Push the button 1 to the left.to switch on the spot 3
Push the button 1 into central position to switch the dome light off.
3.2.9Fire extinguisher
The interior of the cab of your machine is fitted with fixing points allowing the mounting of a fire extinguisher. These fixing points are on the right side wall of the cab, in the front area for machine models up to R954C, or in the rear corner for machine models R964C and above.
Possible locations for fixing the fire extinguisher
The fire extinguisher is only mounted as an option.
Note!
It is the responsibility of the owner of the machine to decide if it must be fitted with a fire extinguisher or not, considering the operating conditions and the local laws and regulations applying where the machine is used.
You can order a kit for retrofit adaptation comprising a fire extinguisher and its mounting bracket at any time at the LIEBHERR customer service.
Caution!
If your machine is fitted with a fire extinguisher: Always comply with the operating guide on the body of the extinguisher. Make sure that all the necessary inspections of the fire extinguisher prescribed by local laws and safety regulations are carried out.
3.2.10Viewing devices (option)
Danger!
Restricted field of view for camera!
Danger to life.
Pay close attention to the working area and driveway of the machine. In case of malfunction of a camera: Exclusively manoeuvre with support of a third person.
2
3.2.11The heater and air conditioner
The cab is equipped with a heating and air conditioning system as standard. The heating and air conditioning system is used to heat, cool and ventilate the cab.
Danger!
Close to operating temperatures, the elements of the heater system and the hydraulic system can reach extremely high temperatures. Do not touch any parts containing fluids or oil. There is a risk of injury from burns.
Check the heater fluid level only after the lid of the expansion vessel has cooled down so that it can safely be touched by hand. Turn the lid carefully to relieve the overpressure.
Prior to commissioning
Filling expansion tank 1 with corrosion inhibitor and antifreeze agent: Open the plug 20.
Fill the expansion tank 1 with corrosion inhibitor and antifreeze agent: Close the plug 20
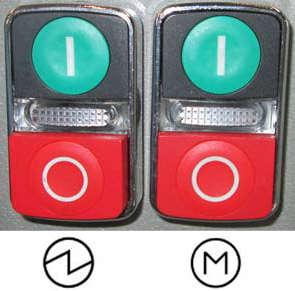
Filling heating system: Press and hold the button S206 The booster pump is working. The heating system is filled.
When corrosion inhibitor or antifreeze agent flows to the centre piece of the undercarriage:
Release the button S206
Preparation of heating system
Preparation of heating system
Set the switch S206a to position 1
Switching off heating system
Set the switch S206a to position 0
Switching heating system on/off
If the machine is fitted with 3 switches:
Start the electric motor (see "Starting the electric motor").
If the machine is fitted with 2 switches, the heating system works when the electric motor is switched off.
Press the button S180
The indicator light in the button is on.

The heating system ist now powered on. It can be controlled by the control unit.
Switching off heating system
Press the button S180
The indicator light in the button is off. The heating system is powered off.
Access and equipment of the cab
Control unit of the heating and air conditioning system
Control keys automatic CLOSED
OPEN / CLOSED
CENTER / CLOSED
CENTER / OPEN
Note!
Indications at the LCD display OPEN legroom CENTER legroom OPEN operation) manual operation) output
If the control unit recognizes a sytem error in the air conditioning circuit, a flashing error code number F1-F5 is displayed, see the section "faults and remedies", further in this manual.
Turning the control unit on
Fig. 3-47 Turning the control unit on and setting the cab temperature
Turn the system on using the key 4. The software version will be displayed for approx. 12 seconds while the control unit carries out a self test.
The heating and the ventilation of the cab are operating. The heating output and the fan speed will be controlled automatically if the AUTO symbol (20) is displayed.
Setting the desired cab temperature
The four-digit segment indicator 25 shows the desired cab temperature. Use the key 2 to increase the temperature. Use the key 3 to reduce the temperature. The adjusted temperature will remain until the next change via keys 2 and 3 is made.
Manual setting of the heating output
Fig. 3-48 Setting of the heating output and of the fan speed
Press the key 7 to adjust the heating output manually. the heating symbol 23 is displayed and will flash for 5seconds. the bar graph 24, showing the adjusted heating output, is displayed. As long as the heating symbol 23 is flashing, the heating output can be increased or reduced manually using the keys 2 or 3
Press the key 7 again, to return to automatic operation. the symbols 23 and 24 will go off, the symbol 20 is displayed again.
Manual setting of the fan speed
Press the key 5 to adjust the fan speed manually. the fan symbol 22 is displayed and will flash for 5seconds. the bar graph 21, showing the adjusted fan speed, is displayed.


