4 minute read
SXG326 & SXG323

from Iseki Mower SXG323 326 Mower Decks SCMA54 SCMB48 SCMC48 Collectors SBC550X & 600X Operator's Manual

・Move the lever to 'unload' position as below.
Hook up the rope to the front hitch(opt.). The distance between towing vehicle and mower should be less than 5m. Release the parking brake lock.
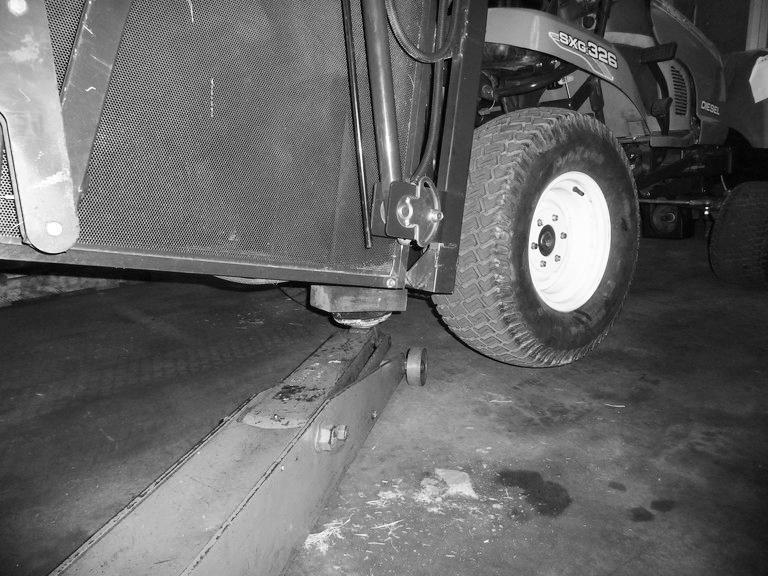
7.Jacking
When jacking mower, place the mower on level and hard ground which is sufficiently illuminated, otherwise un expected accidents may occur. Follow the instructions listed below:
・Apply parking brakes.
・Disengage all PTO.
・Remove the stater key.
・Place the jack on level.
・Put tire chocks to the rear wheel when jacking up the front wheels.
・Put tire chocks to the front wheels when jacking up.
When raising the rear axle, suitable shims, 1, should be wedge between the front axle and the front frame.

When raising the front axle, the jacking point is the front hitch or the front axle as Fig.1, For the rear axle, the jacking point is the lower flame of collector as Fig. 2.

VIII. MAINTENANCE
What are explained hereunder are the maintenance items which you can cope with. When you encounter any abnormality or trouble which is not mentioned in this manual, please ask your dealer for service.
WARNING: When lubricating or servicing the lawn mower:
• Place it on level and hard ground.
• Stop the engine and remove key from the starter switch.
• Apply the parking brake securely. (GE Type)
• Apply the parking lock securely. (E Type)
• Move the lift lever forward ( ) and lower the mower to the ground.
• Set the PTO lever to the OFF position ( ).
• Service the lawn mower after the engine has cooled down sufficiently. With these items in mind, confirm the safety conditions for maintenance operation without fail beforehand.
2.
a. Pull out the engine oil level gauge (dipstick) which is located on the right sidewall of the engine.
b. Wipe the end of the dipstick with dry cloth.
c. Then insert it into the engine properly.
d. Pull it again. Make sure that the oil level is between the upper and lower limits.
1.
a. Pull the hood lock to arrowed direction, and open with supporting side hood by another hand.
SXG326 & SXG323
e. If the level is lower than the lower limit, replenish through the engine oil filler to the upper limit with the same kind of oil as that in the engine.
CAUTION: Stop the engine and wait at least 5 minutes before checking the oil level. Engine oil is so hot just after operation as to cause burns and it takes some time as well for all the oil to return to the oil pan.
IMPORTANT: • Never replenish with a different kind of oil. The addition of different kind of oil will deteriorate the quality of the original oil.
• The oil level should not exceed the upper limit Excessive oil will cause engine trouble.
• Use oil of the quality recommended by ISEKI or 10W-30 CC grade of API classification or higher quality.
• Use oil of proper viscosity in accordance with the atmospheric temperature.
d. Insert the dipstick into the dipstick hole completely.
3. TRANSMISSION OIL LEVEL
a. You can make access to the transmission oil level gauge (dipstick) on the transmission case by removing the centre cover on step.
(1) Dipstick(3) Lower limit
(2) Upper limit(4) Unload lever e. Remove it again. Make sure that the oil level is between the upper and lower limits. f. When the oil level is lower than the lower limit, replenish with fresh hydrostatic transmission oil up to the level between the upper and lower limits.
IMPORTANT: The transmission oil is common with oil for the hydrostatic transmission (HST) and the hydraulic lift cylinder, so pay sufficient attention not to allow dust, water, and other foreign matter to be trapped in the oil.
4. COOLANT LEVEL
WARNING: Never remove the radiator cap during or just after operation. The water in the radiator is very hot and highly pressurized, so it may cause burns. Cool down the engine sufficiently before inspecting coolant level.
a. Open the engine hood.
1
(1) Transmission case(3) Oil level gauge (Dipstick)
(2) Transmission oil filler b. Pull out the dipstick. c. Wipe the tip with dry cloth.
(1) Radiator (2) Radiator cap b. Make sure that the coolant level in the reserve tank is between the upper and lower limits. If the level is lower than the lower limit, replenish the reserve tank with fresh clean soft water.
5. FUEL LEVEL
Check to see the fuel level on the fuel gauge in the meter panel.
(1) Reserve tank (3) Lower limit
(2) Upper limit (4) Drain hose
NOTE: Make sure that drain hose (4) does not come off the reserve tank. If the drain hose comes off the reserve tank, arrange the route of drain hose off the rotating area as it was.
CAUTION: Tighten the radiator cap securely, or hot water may gush out through the cap, which is very dangerous.
(1)
Fuel
gauge
The letter “F” shows the upper limit. The letter “E” shows the lower limit.
Fuel replenishment should be done before operation if required.
Fuel capacity: 21 liters (4.62 imp.gal)
DANGER: When replenishing fuel, abide by the following items, or a fire may be caused.
• Before replenishing with fuel, be sure to stop the engine and wait until the engine and heated parts cool down sufficiently.
• Keep sparks, open flames, etc. away from the fuel tank.
• No smoking!
• Spilt fuel should be wiped away immediately.
IMPORTANT: • As soon as the fuel gauge shows “E”, replenish with fuel. Never attempt to keep on operating with oil level lower than E, or air may be trapped in the fuel system, which will cause hard engine starting and poor engine power.
• Use diesel fuel. Never use heavy oil or gasoline (petrol). Use of fuel other than diesel fuel will cause fuel injection pump trouble.