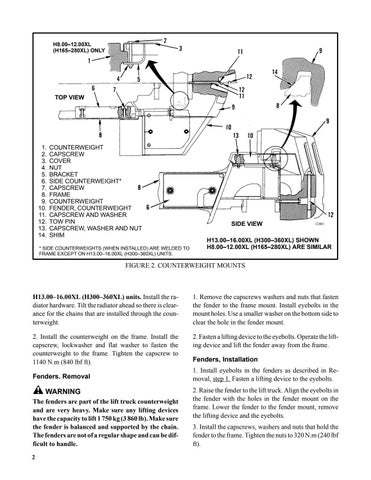
H8.00–12.00XL (H165–280XL) ONLY
TOP VIEW
1. 2. 3. 4. 5. 6. 7. 8. 9. 10. 11. 12. 13. 14.
COUNTERWEIGHT CAPSCREW COVER NUT BRACKET SIDE COUNTERWEIGHT* CAPSCREW FRAME COUNTERWEIGHT FENDER, COUNTERWEIGHT CAPSCREW AND WASHER TOW PIN CAPSCREW, WASHER AND NUT SHIM
* SIDE COUNTERWEIGHTS (WHEN INSTALLED) ARE WELDED TO FRAME EXCEPT ON H13.00–16.00XL (H300–360XL) UNITS.
SIDE VIEW
12461
H13.00–16.00XL (H300–360XL) SHOWN H8.00–12.00XL (H165–280XL) ARE SIMILAR
FIGURE 2. COUNTERWEIGHT MOUNTS
H13.00–16.00XL (H300–360XL) units. Install the radiator hardware. Tilt the radiator ahead so there is clearance for the chains that are installed through the counterweight.
1. Remove the capscrews washers and nuts that fasten the fender to the frame mount. Install eyebolts in the mount holes. Use a smaller washer on the bottom side to clear the hole in the fender mount.
2. Install the counterweight on the frame. Install the capscrew, lockwasher and flat washer to fasten the counterweight to the frame. Tighten the capscrew to 1140 N.m (840 lbf ft).
2. Fasten a lifting device to the eyebolts. Operate the lifting device and lift the fender away from the frame.
Fenders. Removal
WARNING The fenders are part of the lift truck counterweight and are very heavy. Make sure any lifting devices have the capacity to lift 1 750 kg (3 860 lb). Make sure the fender is balanced and supported by the chain. The fenders are not of a regular shape and can be difficult to handle. 2
Fenders, Installation 1. Install eyebolts in the fenders as described in Removal, step 1. Fasten a lifting device to the eyebolts. 2. Raise the fender to the lift truck. Align the eyebolts in the fender with the holes in the fender mount on the frame. Lower the fender to the fender mount, remove the lifting device and the eyebolts. 3. Install the capscrews, washers and nuts that hold the fender to the frame. Tighten the nuts to 320 N.m (240 lbf ft).
