1 minute read
Loading a Bucket

from Gehl RT165 RT165 (EU) RT165 X-Series Compact Track Loader Operator’s Manual 50950264 - PDF DOWNLOAD

1. (Figure 71) Lower the bucket to the ground.
2. Tilt the bucket slightly forward so the bucket cutting edge is pointing slightly down into the ground.
3. Drive forward until the bucket is filled with material. Adjust the bucket tilt as needed to remove an even layer of ground and to reduce tire slip.
4. Tilt the bucket back and raise it to scoop up material.
5. Reduce engine speed and back out of the material.
6. Set the bucket to transport position. See “Attachment Transport Position” on page 96.
Never push the “float” button with the bucket or attachment raised, because this will cause the lift arm to fall to the ground, which can cause severe injury or death.

Loading Trucks (or Hoppers)
Important: When the selfleveling feature is on, the tilt angle of the attachment is kept constant, relative to the ground plane, when the lift arm is raised: when the lift arm is lowered however, self-leveling is not activated. See “Self-Leveling (Option)” on page 103 for more information about the selfleveling feature.
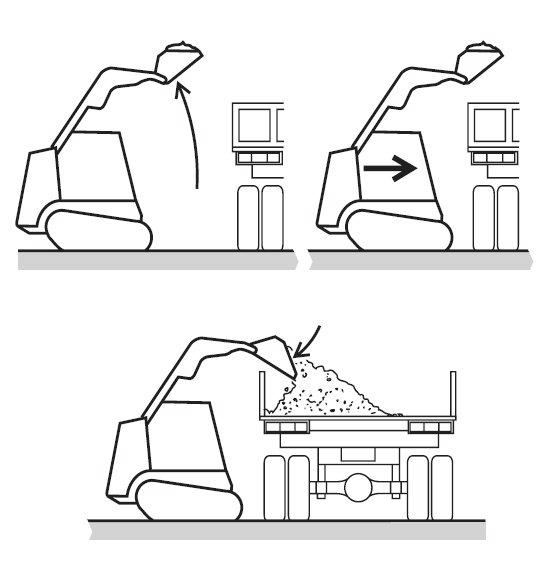
1. (Figure 72) Approach the truck and stop, allowing for clearance to raise the lift arm and loaded bucket, and raise the bucket until the lower edge of the bucket clears the truck bed.
2. Drive slowly forward and stop with the bucket over the inside of the truck.
3. Tilt the bucket forward and dump the material into the truck bed.
4. When the truck is half-loaded, use the bucket to spread the load evenly.
5. Back away from the truck while tilting the bucket back and lowering the lift arm.
Tips When Loading Trucks
• (Figure 73) The truck and machine working direction should form an angle of 45°.
• Only raise a full bucket to the height needed for dumping when you are driving in a straight line toward the truck.
• Dump with the wind behind you to keep dust away from your face, air filters and fans.