2 minute read
Preventative Maintenance

Everyday there are countless vehicles operating over the highways with transmissions in such a neglected mechanical condition, they can be referred to as failures looking for a place to break down. They lack a proper and organized preventive maintenance program.
Preventive maintenance is a general term which applies to all procedures necessary to have maximum life and satisfactory service at the lowest possible cost, short of removing and repairing the unit.
A number of conditions contrary to good preventive maintenance can generally be pointed to when inspecting a failed transmission. Taking a few minutes every so many hours or miles to do a few simple checks could help avoid eventual breakdown or reduce the repair cost. If the transmission is not cared for, it will breakdown.
Checks Before Transmission Removal
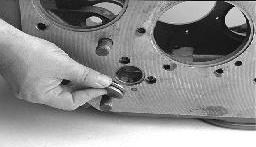
1. Air System and Connections Check for leaks, worn air lines, loose connections and capscrews. See SERVICING AIR SYSTEM. 2. Clutch Housing Mounting Check all capscrews of clutch housing flange for looseness. 3. Clutch Release Bearing (Not Shown) Remove hand hole cover and check radial and axial clearance in release bearing. Check relative position of thrust surface of release bearing with thrust sleeve on push-type clutches. 4. Clutch Pedal Shaft and Bores Pry upward on shafts to check wear. If excessive movement is found, remove clutch release mechanism and check bushings on bores and wear on shafts. See OEM literature. 5. Lubricant Change at specified service intervals. Use only the types and grades as recommended. See LUBRICANTS. 6. Filler and Drain Plugs Remove filler plugs and check level of lubricant at specified intervals. Tighten fill and drain plugs securely. 7. Capscrews and Gaskets Check all capscrews, especially those on PTO covers and rear bearing covers for looseness which would cause oil leakage. Check PTO opening and rear bearing covers for oil leakage due to faulty gasket. 8. Gear Shift Lever Check for looseness and free play in housing. If lever is loose in housing, proceed with Check No. 9. 9. Gear Shift Lever Housing Assembly Remove air lines at slave valve and remove the gear shift lever housing assembly from the transmission. Check the tension spring and washer for set and wear. Check the gear shift lever spade pin and slot for wear.
Check bottom end of gear shift lever for wear and check slot of yokes and blocks in shift bar housing for wear at contact points with shift lever.
Checks With Drive Line Dropped
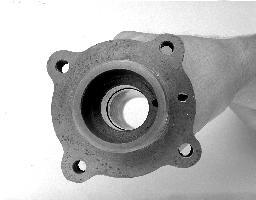
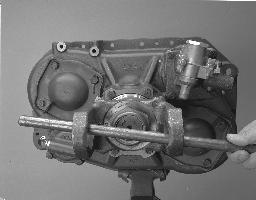
10. Universal Joint Companion Flange or Yoke Nut Check for tightness. Tighten to recommended torque. 11. Output Shaft Pry upward against output shaft to check radial clearance in mainshaft rear bearing. Checks With Universal Joint Companion Flange or Yoke Removed. NOTE:If necessary, use solvent and shop rag to clean sealing surface of companion flange or yoke. Do not use crocus
cloth, emery paper, or other abrasive materials that will mar surface finish.
12. Splines on Output Shaft Check for wear from movement and chucking action of the universal joint companion flange or yoke. 13. Mainshaft Rear Bearing Cover Check oil seal for wear.