4 minute read
2.6 O peration of the screed
Procedure for opening the gas bottle:
• Slowly open the gas bottle (9) shut-off valve (2).
• Check the response of the safety valve (7).
• If the safety valve (7) clicks (stops the gas supply), immediately close the shut-off valve (2) of the gas bottle (9) and proceed according to instructions in Chapter 3.7.3.
• Apply the procedure for resetting the safety valve function.
• Do not apply the procedure for resetting the safety valve function more than twice. If the failure is not removed, close the valve (2) of the gas bottle (9) and call an authorised service for repair.
Do not reset the safety valve more than twice. Unless the failure is removed, call an authorised service.
Procedure for resetting the safety valve function: This procedure only serves for resetting the safety valve in case that the safety valve is activated.
• Press the button for resetting the safety valve (8) and hold it pressed for 20 s.
• Gas pressure builds up and the safety valve (7) remains opened.
• Release the safety valve reset button (8).
• Unless the safety valve function is deactivated, close the shut-off valve (2) of the gas bottle (9) and call an authorised service to troubleshoot the failure.
Do not reset the safety valve more than twice. Unless the failure is removed, call an authorised service.
Procedure for setting operating pressure:

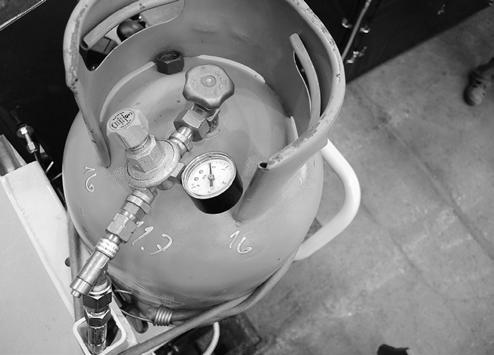
• Set the gas operating pressure on the reducing valve (3) by valve (5); the gas operating pressure must be at the range of 0.6 – 0.8 bar.
• Check the set values on the gas pressure gauge (6).
• The maximum operating pressure is 1 bar.
Always keep an operating pressure in the range of approx. 0.6 bar to 0.8 bar.
Never exceed the maximum operating pressure of 1 bar.
Procedure for switching the screed gas heating on and off:
• Insert the key into the ignition box (11) in the position “0” and switch over to the position “I”.
• To switch it on, turn the screed heating switch (13) to the upper position.
• The screed gas heating indicator lamp (28) will light up on the display.
• The gas supply solenoid valve opens the gas inlet to the burners.
• Automatic ignition boxes will activate spark plugs within 10 s.
• The burners ignite and the gas burns.
• A thermal sensor situated on the screed checks the temperature of the screed lower surface.
• When the temperature is too high, the thermal switch interrupts power supply and the solenoid valve closes the gas supply.
• When the temperature is too low, the thermal switch restores power supply and the solenoid valve opens the gas supply.
• To switch off the screed gas heating, turn the screed heating switch (13) to the lower “OFF” position.
• The screed gas heating indicator lamp (28) will go off on the display.
• Automatic screed heating ignition boxes will interrupt power supply and the solenoid valve closes the gas supply.
Note
To accelerate screed heating, place the screed on a solid non-flammable surface.
If an active error indicator lamp (31) and the error code (32) light up on the display during paving, switch off the screed gas heating function and proceed according to the instructions in Chapters 3.7.3 or 3.7.7.
Do not reset the safety valve more than twice. Unless the failure is removed, call an authorised service.
2.6 O peration of the screed
Procedure for gas bottle disconnection:
• Close the shut-off valve (2) on the gas bottle (9).
• Disconnect the gas bottle by screwing out the cap nut (4) of the reducing valve (3) on the gas bottle shut-off valve (2).
• When disconnecting the reducing valve from the gas bottle, pay attention to the thread direction.

• Check the seal of the reducing valve (3) for damage and replace the reducing valve seal if needed.
• Mount the protective cap (1) onto the gas bottle shut-off valve (2).
Caution! Risk of damage to the thread when connecting the gas bottle.
Caution! The reducing valve is fitted with a cap nut which has a left-handed thread.
When the gas bottle is dismounted from the machine, it must be stored in special areas.
Use only original spare parts delivered by the machine manufacturer.
2.6.9 Loading material to the machine
Always load the material into the machine at the place of paving, just before performing paving. The beacon of the machine must be activated when loading a material to the machine.
Procedure for loading the machine
• Start the engine.
• Lower the screed to the ground.
• Make sure the warning beacon is connected.
• Turn off the engine.
• Turn the key in the ignition box (11) from position “0” to position “I”.
• The beacon is activated.
• Leave the driver’s stand.
• Open the hopper extension.
• Make sure there are no persons in the dangerous area of the machine.
• Move away from the danger zone of the machine.
• Wait until the loader moves away from the danger zone of the machine.
• Close the hopper extension.
• Get on the driver's stand.
• Switch over the key in the ignition box (11) from position “I” to position “0“.
• The beacon is deactivated.
It is prohibited to load the material to the machine during machine operation. The machine must be parked on a flat and solid surface with the engine off and with the activated beacon.
Risk of burns when loading the machine.
The material is hot. Its temperature ranges from approx. 120 to 180°C.
Leave the driver's stand and move to a safe distance, before loading the machine with material. The safe distance is at least 5 metres.


