9 minute read
8.8.4 Replacingtheairfilter

from Dynapac DTR75D Walk behind twin drum roller Operation & Maintenance Instruction Manual DL820751 PDF

NOTICE!
Danger of engine damage!
–Do not start the engine after having removed the air filter.
Protective equipment: n Working clothes n Safety shoes n Protective gloves
1. Park the machine safely ÄChapter 6.6 ‘Parking the machine in secured condition’ on page 90.
2. Allow the engine to cool down.
3. Remove the cover.
4. Check the pre-filter in the cover for dirt or blockage, clean if necessary.
5. Unscrew the wing nut and remove the air filter.
B-695-0221
6. Replace the seal ring.
7.
NOTICE!
Danger of engine damage! –Prevent dirt from getting into the air intake opening. –Do not clean the air filter housing with compressed air.
Clean the filter housing with a clean, lintfree cloth.
8. Replace the air filter.
9. Insert the air filter carefully into the filter housing and fasten it with the wing nut.
10.
NOTICE!
Danger of engine damage!
–Ensure correct fit of cover and seal.
Close the cap.
8.8.5 Checkingthehydrauliclines
This work must only be performed by an expert / qualified person!
1. Park the machine in secured condition
ÄChapter 6.6 ‘Parking the machine in secured condition’ on page 90.
2. Check all hydraulic lines.
Hydraulic hoses must be immediately replaced if: n the outer layer is damaged down to the inlay (e.g. chafing, cuts, cracks), n embrittlement of the outer layer or formation of cracks in the hose material, n the hose shows deformation in pressurized and depressurized condition, which do not comply with the genuine shape of the hydraulic hose (e.g. layer separation, formation of blisters, crushed spots, buckling), n leaks on hose, socket or fitting, n the hydraulic hose has separated from the fitting, n fittings are damaged or deformed, whereby the function and strength of the hose - fitting connection is impaired, n the fitting shows corrosion that impairs both function and strength, n incorrect installation (squeezing, shearing or chafing points), n paint covered hydraulic hoses (no detection of identifications or cracks), n shelf life and service life exceeded.
3. Replace damaged hydraulic hoses immediately, fasten these properly and avoid chafing.
4. Only operate the machine after it has been repaired.
Maintenance – Every 2 years / every 500 operating hours
8.9 Every2years/every500operatinghours
8.9.1 Changinghydraulicoilandhydraulicoilfilter
NOTICE!
Risk of damage!
–Perform the oil change when the hydraulic oil is warm.
–Use only hydraulic oil of the permitted specification ÄChapter 8.2.4.1 ‘Hydraulic oil’ on page 107
–Filling quantity: ÄChapter 8.3 ‘List of fuels and lubricants’ on page 109.
Protective equipment: n Working clothes n Safety shoes n Protective gloves
1. Park the machine safely ÄChapter 6.6 ‘Parking the machine in secured condition’ on page 90
Draining off hydraulic oil
B-924-0004
Maintenance – Every 2 years / every 500 operating hours
3. Clean the area around the filler opening and remove the cap.
4. Clean the area around the drain plug.
WARNING!
Danger of burning on hot components!
B-834-0311
–Wear your personal protective equipment (protective gloves, protective clothing).
–Avoid touching hot components.
5. Unscrew the drain plug and collect any oil running out.
6. Clean the drain plug and screw it back in with a new seal ring.
7. Unscrew the filter housing.
8. Take out the old filter element and clean the filter housing.
9. Clean the thread on the filter housing.
10. Reassemble the filter housing with a new filter element and a new O-ring.
11. Tighten the filter housing.
B-834-0312
DTR75D
Filling up hydraulic oil
12. Clean the area around the cover (2).
13. Remove the screws (1) and take off the cover.
14. Remove the suction filter (4) and replace it.
15. Attach the cover with a new seal (3) and fasten the screws.
16. Tighten the screws crosswise in the correct sequence (1 - 10), tightening torque: 15 Nm (11 ft·lbf).
17. Then retighten the screws in the same sequence, tightening torque: 35 Nm (26 ft·lbf).
NOTICE!
Risk of damage!
–Use only hydraulic oil of the permitted specification ÄChapter 8.2.4.1 ‘Hydraulic oil’ on page 107.
Concluding work
18. Fill in new hydraulic oil through a funnel with screen filter.
19. Check the hydraulic oil level in the inspection glass, top up if necessary.
ð Nominal value: Middle of inspection glass
20. Retighten the cap and covering plate.
21. Check the connections on the hydraulic oil tank and the hydraulic oil filter for leaks.
22. Dispose of the hydraulic oil and hydraulic oil filter in line with environmental regulations.
8.10 Asrequired
8.10.1
Cleaningthewatersprayingsystem
Protective equipment: n Working clothes n Safety shoes n Protective gloves
1. Park the machine safely ÄChapter 6.6 ‘Parking the machine in secured condition’ on page 90.
2. Open the water tank cover.
3. Open the lever and drain off all water.
4. Unscrew the two spray tubes and pull them out of the frame.
5. Flush the water tank out with a strong water jet.
6. Flush spray tubes and water lines.
7. Insert the spray tubes and screw them tight.
8. Fill the water tank with clean water and close the cap.
8.10.2 Cleaningthescrapers
Protective equipment: n Working clothes n Safety shoes n Protective gloves
1. Park the machine safely ÄChapter 6.6 ‘Parking the machine in secured condition’ on page 90.
2. Loosen and pull out the cleaning rod.
3. Clean the scraper with the cleaning rod.
4. Insert the cleaning rod again and fasten it.
8.10.3 Checking/adjustingthescrapers
Protective equipment: n Working clothes n Safety shoes n Protective gloves ð Align the scrapers with a distance of approx. 1 mm parallel to the drum.
1. Check the condition of the front and rear scrapers, as well as both middle scrapers regarding settings and condition; readjust them if necessary.
2. To readjust the scrapers, loosen the fastening screws and press the scraper towards the drum.
3. Fasten the fastening screws again.
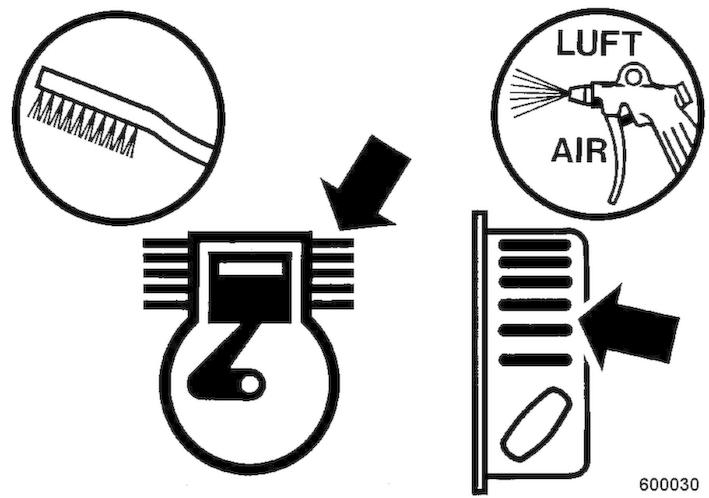
8.10.4 Cleaningthecoolingfinsandthecoolingairintake openings
How dirty the cooling fins and cooling air intake openings are depends very much on the daily operating conditions; clean daily if necessary.
Protective equipment: n Working clothes n Protective gloves n Safety goggles
1. Park the machine safely ÄChapter 6.6 ‘Parking the machine in secured condition’ on page 90
2. Allow the engine to cool down.
3. Remove dried dirt with a suitable brush from all cooling fins and cooling air intake openings.
4. CAUTION!
Danger of eye injuries caused by particles flying around!
–Wear your personal protective equipment (protective gloves, protective clothing, goggles).
Blow out the cooling fins and cooling air intake openings with compressed air.
5. In case of damp or oily contamination you should consult our customer service department.
8.10.5 Cleaningthemachine
NOTICE!
Danger of engine damage caused by reduced cooling!
–Immediately remove any oil or fuel leaks near fuel tank, cylinders or cooling air intake.
Protective equipment: n Working clothes n Safety shoes n Protective gloves n Safety goggles
1. Park the machine safely ÄChapter 6.6 ‘Parking the machine in secured condition’ on page 90.
2. Allow the engine to cool down for at least 30 minutes.
3.
NOTICE!
Electric components can be damaged by water entering into the system!
–Do not guide the water jet directly into the cooling air openings of the recoil starter, into the air filter, the exhaust outlet, the battery or other electrical equipment.
Clean the machine from the outside and inside with a water jet.
4. Warm up the engine for a while to avoid corrosion.
8.10.6 Measuresifthereisariskoffrost
Protective equipment: n Working clothes n Safety shoes n Protective gloves
1. Park the machine safely ÄChapter 6.6 ‘Parking the machine in secured condition’ on page 90.
2. Open the water tank cover.
3. Open the lever and drain off all water.
4. Close the cover again.
8.10.7 Measurespriortoextendedshut-downperiod
8.10.7.1 Measuresbeforeshuttingdown
If the machine is shut down for a longer period of time, e.g. winter season, the following work must be carried out:
1. Clean the machine thoroughly.
2. If there is a risk of frost, perform appropriate measures ÄChapter 8.10.6 ‘Measures if there is a risk of frost’ on page 136.
3. After shutting down store the machine under cover in a dry and well ventilated room.
4. Spray a thin oil film onto to all lever joints and bearing points without lubrication.
5. Repair damaged paint; preserve bare areas thoroughly with anti-corrosive agent.
6. Clean the water separator.
7. Fill the fuel tank with diesel fuel to prevent the formation of condensation water in the tank.
8. Change engine oil and oil filter.
9. Change the fuel filter.
10. Protect the cooled down engine against dust and moisture.
8.10.7.2 Batteryserviceduringprolongedmachinedowntimes
WARNING!
Danger of injury caused by exploding gas mixture!
–Remove the plugs when recharging the battery.
–Ensure adequate ventilation.
–Smoking and open fire are prohibited!
–Do not lay any tools or other metal objects on the battery.
–Do not wear jewellery (watch, bracelets, etc.) when working on the battery.
–Wear your personal protective equipment (protective gloves, protective clothing, goggles).
Protective equipment: n Working clothes n Protective gloves n Safety goggles ð Reference values: 12.6 V = fully charged; 12.3 V = discharged to 50%. ð The open-circuit voltage of the battery occurs approx. 10 hours after the last charging process or one hour after the last discharge.
1. Switch off all consuming devices (e.g. ignition, light).
2. Measure the open-circuit voltage of the battery at regular intervals (at least 1x per month).
3. Recharge the battery immediately after an open-circuit voltage of 12.25 V or less is reached. Do not perform fast charging.
4. Switch off the charging current before removing the charging clamps.
5. After each charging process allow the battery to rest for one hour before taking it into service.
6. For standstill periods of more than one month you should always disconnect the battery. Do not forget to perform regular open-circuit voltage measurements.
8.10.7.3 Measuresbeforerestarting
1. Replace the fuel filter.
2. Replace the air filter.
3. Change the engine oil and clean the oil filter.
4. Check cables, hoses and lines for cracks and leaks.
5. Check the service life of hydraulic hoses and replace if necessary.
6. Start the engine and run it for 15 to 30 minutes with idle speed.
7. Check the oil levels.
8. Clean the machine thoroughly.
9.1 Preliminaryremarks
Malfunctions are frequently caused by incorrect operation of the machine or insufficient maintenance. Whenever a fault occurs you should therefore thoroughly read these instructions on correct operation and maintenance. If you cannot locate the cause of a fault or rectify it yourself by following the trouble shooting chart, you should contact our customer service department.
Starting the engine with jump leads
9.2 Startingtheenginewithjumpleads
NOTICE!
A wrong connection will cause severe damage in the electric system.
–Bridge the machine only with a 12 Volt auxiliary battery.
Protective equipment: n Working clothes n Safety shoes n Protective gloves n Hearing protection
1. Remove the cap from the plus pole of the battery.
B-834-0343
2. Flip open the cap of the pole clamp (minus pole).
Troubleshooting – Starting the engine with jump leads
3. First connect the plus pole of the external battery to the plus pole of the starter battery using the first jump lead.
4. Next, connect the second jump lead to the minus pole of the energizing external battery and then to the minus pole of the starter battery.
5. Start the engine: ÄChapter 6.2 ‘Starting the engine’ on page 80.
6. After starting, disconnect the minus poles first and the plus poles after.
7. Fold down the caps or put them on again.
9.3 Startingtheenginewiththerecoilstarter
Start the engine with the recoil starter only if the battery is defective, empty or missing.
Exhaust fumes contain toxic substances and can damage your health, cause unconsciousness or even death.
WARNING!
Danger of poisoning by exhaust gases!
–Do not inhale exhaust gases.
–Avoid operation in closed or partly closed rooms, or ensure adequate ventilation when working in trenches.
WARNING!
Loss of hearing caused by too high noise burdens!
–Wear your personal protective equipment (ear protection).
Troubleshooting – Starting the engine with the recoil starter
Protective equipment: n Hearing protection n Safety shoes n Protective gloves
1. Folding down and adjusting the steering rod ÄChapter 6.1 ‘Folding down and adjusting the steering rod’ on page 78
2. Set the throttle lever to “MIN” position.
3. Shift the travel lever to neutral position.
4. Shift the vibration lever to position “0”.
Troubleshooting – Starting the engine with the recoil starter
CAUTION!
Danger of injury caused by uncontrolled machine movement!
–Always hold on to a running machine.
–Always keep an eye on a running machine.
NOTICE!
The starter rope may tear off! –Do not pull the starter rope all the way against the end stop.
Pull the starter handle quickly and with power.
9. Manually guide the starter handle back to initial position.
10. If the engine does not start during the first attempt, repeat the starting process.
11. Run the engine warm for approx. 1 to 2 minutes in idle speed.
NOTICE!
Danger of engine damage!
–Warm up engine for a short while before starting work. Do not operate the engine immediately under full load.
9.4
9.4.1
Fusebox Fuse Amperage Designation F153 10 A Fuse for potential 15 F103 10 A Fuse for potential 15
9.4.2
Fuse Amperage Designation F00 30 A Main fuse