11 minute read
Operation – Emergency procedures

from Dynapac DTR75D Walk behind twin drum roller Operation & Maintenance Instruction Manual DL820751 PDF

5. If the travel lever does not engage in neutral position, pull out the reversing protection if necessary.
6. Shift the travel lever forward.
7. Move the machine forward, away from the obstacle.
7.1 Loadingthemachine
Use only stable loading ramps of sufficient load bearing capacity.
Loading ramps and transport vehicle must be free of grease, oil, snow and ice.
The ramp inclination must be less than the gradeability of the machine.
Make sure that any persons keep a safety distance of at least 2 metres while the machine is driven onto or down from the transport vehicle. The instructing person should not be inside the travel range of the machine.
Use only transport vehicles with a sufficient load bearing capacity for the weight to be loaded ÄChapter 2 ‘Technical data’ on page 13
Protective equipment: n Working clothes n Safety shoes n Protective gloves
1. DANGER!
Danger to life caused by the machine slipping or turning over!
–Make sure that no persons are in the danger zone.
Drive the machine carefully onto the transport vehicle.
2. Park the machine safely ÄChapter 6.6 ‘Parking the machine in secured condition’ on page 90.
3. Fold the steering rod up to transport position.
4. Secure the steering rod with one hand and lock it with the locking bolt.
7.2 Lashingthemachinetothetransportvehicle
Do not use lifting points that are damaged or impaired in any way.
Always use appropriate lifting tackle at the lifting points.
Use lifting tackle only in the specified loading direction.
Lifting tackle must not be damaged by machine parts.
Protective equipment: n Working clothes n Safety shoes n Protective gloves
1. Fasten four ratchet straps to the marked lashing points.
2. Lash the machine securely to the transport vehicle. B-834-0337
7.3 Loadingbycrane
Loads must only be attached and hoisted by an expert / capable person.
Do not use damaged or in any other way impaired lashing points.
Use only lifting gear and lifting tackle with sufficient load bearing capacity for the weight to be loaded. Minimum load bearing capacity of lifting gear: see max. operating weight
ÄChapter 2 ‘Technical data’ on page 13
Always use appropriate lifting and lashing means on the lifting and lashing points.
Use lifting and lashing gear only in the prescribed direction of load application.
Lifting tackle must not be damaged by machine components.
When lifting the machine avoid uncontrolled movements of the load. If necessary hold the load with guide ropes.
Protective equipment: n Working clothes n Safety shoes n Protective gloves
1. Fasten the lifting tackle to the intended lifting point.
2.
DANGER!
Danger to life caused by suspended loads!
–Do not step or stand under suspended loads.
Lift the machine carefully and set down again at the intended location.
7.4 Aftertransportation
Use only stable loading ramps of sufficient load bearing capacity.
Loading ramps and transport vehicle must be free of grease, oil, snow and ice.
The ramp inclination must be less than the gradeability of the machine.
Make sure that any persons keep a safety distance of at least 2 metres while the machine is driven onto or down from the transport vehicle. The instructing person should not be inside the travel range of the machine.
1. Folding down and adjusting the steering rod ÄChapter 6.1 ‘Folding down and adjusting the steering rod’ on page 78
2. Start the engine ÄChapter 6.2 ‘Starting the engine’ on page 80
3.
DANGER!
Danger to life caused by the machine slipping or turning over!
–Make sure that no persons are in the danger zone.
Drive the machine carefully off the transport vehicle.
8.1 Preliminaryremarksandsafetynotes
DANGER!
Danger to life caused by an operationally unsafe machine!
–The machine must only be serviced by qualified and authorized personnel.
–Follow the safety regulations for maintenance work ÄChapter 3.10 ‘Maintenance work’ on page 45.
WARNING!
Health hazard caused by fuels and lubricants!
–Safety regulations and environmental protection regulations must be followed when handling fuels and lubricants ÄChapter 3.4 ‘Handling fuels and lubricants’ on page 30.
Wear your personal protective equipment.
Do not touch hot components.
Park the machine on horizontal, level, firm ground.
Perform maintenance work only with the engine shut down.
Make sure that the engine cannot be accidentally started during maintenance work.
Thoroughly clean machine and engine before starting maintenance work.
Do not leave any tools or other objects, that could cause damage, in or on the machine.
After maintenance work has been completed, dispose of fuels and lubricants, filters, sealing elements and cleaning cloths in an environmentally friendly way.
After all maintenance work is completed reinstall all guards and safety installations.
8.2 Fuelsandlubricants
8.2.1 Engineoil
8.2.1.1 Oilquality
The following engine oil specifications are permitted: n API CF or higher quality n ACEA B2-B4 or higher quality n MIL-L-2104 C / MIL-L-46152 D
Avoid mixing engine oils.
8.2.1.2 Oilviscosity
Since engine oil changes its viscosity with the temperature, the ambient temperature at the operating location of the engine is of utmost importance when choosing the viscosity class (SAE-class).
The temperature data of the SAE-class always refer to fresh oils. The engine oil ages during travel operation because of soot and fuel residues. This adversely affects the properties of the engine oil, especially at low ambient temperatures.
Optimal operating conditions can be achieved by using the oil viscosity chart as reference.
* Mineral oil base
** Semi-synthetic base
*** Synthetic base
8.2.1.3 Oilchangeintervals
Annually or every 250 operating hours.
When changing to a higher alloyed oil quality after a longer period of operation, it is recommended to perform the first oil change of the higher quality oil already after 25 operating hours.
8.2.2 Fuel
8.2.2.1 Fuelquality
The following fuel specifications are permitted: n EN 590 n ASTM D975 Grade-No. 1-D and 2-D n BS 2869 A1/A2
In order to fulfil national emission regulations one must strictly use the legally required fuels (e.g. sulphur content).
8.2.2.2 Winterfuel
For winter operation use only winter diesel fuel, to avoid clogging because of paraffin separation.
At very low temperatures disturbing paraffin separation can also be expected when using winter diesel fuel.
Diesel fuels suitable for temperatures down to -44 °C (-47 °F) are available for Arctic climates.
NOTICE!
Danger of engine damage!
–The admixture of petroleum and the addition of “flow enhancing additives” (fuel additives) is not permitted.
8.2.2.3 Storage
Even traces of zinc, lead and copper can cause deposits in the injection nozzles, especially in modern Common-Rail injection systems.
Zinc and lead coatings in refuelling systems and fuel lines are not permitted.
Copper containing materials (copper lines, brass items) should be avoided, because they can cause catalytic reactions in the fuel with subsequent depositing in the injection system.
8.2.3 Oilforexcitershafthousing
Use only engine oils according to the following specifications: n API CI-4 or higher quality
Avoid mixing engine oils.
NOTICE!
Components may get damaged!
–Do not use low-ash engine oils for the exciter shaft housing.
8.2.4 Hydraulicoil
8.2.4.1 Hydraulicoil
The hydraulic system is operated with hydraulic oil HV 32 (ISO) with a kinematic viscosity of 32 mm2/s at 40 °C (104 °F).
When refilling or changing oil, use only hydraulic oil type HVLP according to DIN 51524, part 3, or hydraulic oil type HV according to ISO 6743/4.
The viscosity index must be at least 150 (observe information of manufacturer).
8.2.4.2 Bio-degradablehydraulicoil
The hydraulic system can also be operated with a synthetic ester based biodegradable hydraulic oil.
The biodegradable hydraulic oil
Panolin HLP Synth. 46 or Plantohyd 46 S meets all the requirements of a mineral oil based hydraulic oil according to DIN 51524. In hydraulic systems filled with biodegradable hydraulic oil, always use the same oil to top up and do not mix oil types.
When changing from mineral oil based hydraulic oil to an ester-based, biologically degradable hydraulic oil, you should consult the lubrication oil service of the oil manufacturer, or our customer service for details.
NOTICE!
Danger of damage to the hydraulic system!
–After the changeover check the hydraulic oil filters increasingly for contamination.
–Have regular oil analyses performed regarding the water content and mineral oil.
–Replace the hydraulic oil filter at the latest after 500 operating hours.
Maintenance – List of fuels and lubricants
8.3 Listoffuelsandlubricants
ÄChapter 8.2.2 ‘Fuel’ on page 105
Chapter 8.2.3 ‘Oil for exciter shaft on page 106 may get damaged! Do not use low-ash engine oils for the exciter shaft housing. us) or ester based biodegradable hydraulic oil oil’ on page 107
Specification: ÄChapter 8.2.4.2 ‘Biodegradable hydraulic oil’ on page 107
8.4 Running-ininstructions
8.4.1 Generalinformation
When commissioning new machines, the running-in instructions listed in this chapter must be carried out after the specified operating hours.
The maintenance work listed must be carried out in addition to the regular maintenance intervals.
8.4.2 Afterthefirst25operatinghours
1. Change the engine oil ÄChapter 8.8.1 ‘Changing engine oil and oil filter element’ on page 119.
2. Check engine and machine for leaks.
3. Retighten the fastening screws on air filter, exhaust and other attachments.
4. Retighten the bolted connections on the machine.
8.6 Weekly
8.6.1 Checking,cleaningtheairfilter
NOTICE!
Danger of engine damage!
–Do not start the engine after having removed the air filter.
–If necessary, the air filter may be cleaned up to six times. The air filter must be replaced at the latest after half a year or 500 operating hours respectively.
–Cleaning does not make sense if the air filter element is covered with a sooty deposit.
–Do not use gasoline or hot fluids to clean the filter element.
–After cleaning the air filter must be inspected for damage using a torch.
–Do not continue to use a damaged air filter element. If in doubt use a new air filter.
Protective equipment: n Working clothes n Safety shoes n Protective gloves n Safety goggles
1. Park the machine safely ÄChapter 6.6 ‘Parking the machine in secured condition’ on page 90.
2. Allow the engine to cool down.
3. Remove the cover.
4. Check the pre-filter in the cover for dirt or blockage, clean if necessary.
5. Unscrew the wing nut and remove the air filter.
6. Check the seal ring for damage, change if necessary.
7.
NOTICE!
Danger of engine damage! –Prevent dirt from getting into the air intake opening. –Do not clean the air filter housing with compressed air.
Clean the filter housing with a clean, lintfree cloth.
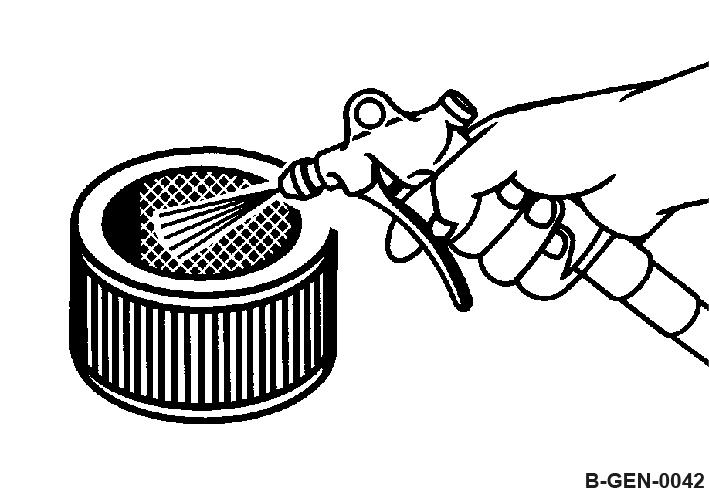
8. CAUTION!
Danger of eye injuries caused by particles flying around!
–Wear your personal protective equipment (protective gloves, protective clothing, goggles).
Blow the air filter out with dry compressed air (max. 5 bar (73 psi)) from inside to outside by moving the gun up and down inside the element, until it is free of dust.
9. Examine the air filter with a torch for cracks and holes.
10. Replace the air filter if it is damaged.
11. Insert the air filter carefully into the filter housing and fasten it with the wing nut.
12. NOTICE!
Danger of engine damage! –Ensure correct fit of cover and seal.
Close the cap.
8.6.2 Checkingandcleaningthewaterseparator
The service intervals for the water separator depend on the water content in the fuel and can therefore not be determined precisely. After taking the engine into operation you should check for signs of water and dirt initially every day.
Protective equipment: n Working clothes n Safety shoes n Protective gloves
1. Park the machine safely ÄChapter 6.6 ‘Parking the machine in secured condition’ on page 90
2. Place the transparent container under the drain plug.
3. Loosen the drain plug and drain the fluid until pure diesel fuel starts to run out.
4. Collect the escaping fluid.
5. Screw the drain plug back on tightly. Ensure leak tightness.
6. Dispose of collected fluid in line with environmental regulations.
8.7 Semi-annually 8.7.1 Batteryservice
Maintenance free batteries also need care. Maintenance free only means that the fluid level does not need to be checked.
Every battery has a self-discharge, which may, if not checked occasionally, even cause damage to the battery as a result of exhaustive discharge.
Exhausted batteries (batteries with formation of sulphate on the plates) are not covered under warranty!
Protective equipment: n Working clothes n Safety shoes n Protective gloves n Safety goggles
1. Park the machine safely ÄChapter 6.6 ‘Parking the machine in secured condition’ on page 90.
2. Remove the holding fixture (1) of the battery.
3. Remove the battery (2) and the vibration damping mat (3).
4. Check the condition of the vibration damping mat; replace if necessary.
5. Clean the outside of the battery.
6. Clean the battery poles and terminals and grease them with pole grease (Vaseline).
7. On serviceable batteries check the acid level, if necessary top up to the filling mark with distilled water.
8. Install battery and vibration damping mat.
8.8 Annually
8.8.1 Changingengineoilandoilfilterelement
NOTICE!
Danger of engine damage!
–Change the oil only with the engine at operating temperature.
–Use only oil of the permitted specification ÄChapter 8.2.1 ‘Engine oil’ on page 104.
–Filling quantity: ÄChapter 8.3 ‘List of fuels and lubricants’ on page 109
Protective equipment: n Working clothes n Safety shoes n Protective gloves
1. Park the machine safely ÄChapter 6.6 ‘Parking the machine in secured condition’ on page 90.
Draining off engine oil
2. Clean the area around the filling port and remove the cap.
B-834-0348
3. Clean the area around the drain plug.
WARNING!
Danger of burning on hot components!
–Wear your personal protective equipment (protective gloves, protective clothing).
–Avoid touching hot components.
4. Unscrew the drain plug and collect any oil running out.
5. Clean the drain plug and screw it back in.
Changing the oil filter B-LOM-0007
6. Clean the area around the filter cover.
7. Remove the filter cover and pull the oil filter out of the housing.
8. Clean the sealing face on the engine.
9. Insert a new oil filter.
10. Check the seal on the filter cover for damage, replace if necessary.
11. Attach the filter cover with the seal and tighten it.
Filling in engine oil
12. Fill in fresh engine oil up to the bottom edge of the filling opening.
13. After a short test run, check the oil level on the dipstick, top up oil if necessary.
14. Close the cap.
Concluding work
15. Check filter cover and drain plug for leaks.
16. Dispose of the oil and oil filter in an environmentally friendly way.
8.8.2 Replacingthefuelfilter
NOTICE!
Danger of engine damage!
–Ensure strict cleanliness! Thoroughly clean the area around the fuel tank beforehand.
–Never operate the engine after having removed the fuel filter.
Protective equipment: n Working clothes n Protective gloves
1. Park the machine safely ÄChapter 6.6 ‘Parking the machine in secured condition’ on page 90.
2. Use a suitable vessel to collect running out fuel.
3. Close the fuel line in front of the fuel filter.
4. Clean the area around the fuel filter.
5. Loosen the hose clamps on the three fuel lines and disconnect the fuel lines.
6. Remove the screw, open the bracket and take off the fuel filter.
7. Replace the fuel filter.
Observe the installation direction (arrow) when assembling the new fuel filter.
8. Insert the new fuel filter and fasten the bracket with the screw.
9. Attach the fuel lines and fasten them with hose clamps.
10. Open the fuel line.
11. After a short test run check fuel filter and fuel lines for leaks.
The fuel system is selfbleeding.
12. Dispose of fuel and fuel filter in an environmentally friendly way.
8.8.3 Changingtheoilintheexciterhousing
NOTICE!
Components may get damaged!
–Use only oil of the permitted specification ÄChapter 8.3 ‘List of fuels and lubricants’ on page 109.
–Do not use low-ash engine oils for the exciter shaft housing.
Protective equipment: n Working clothes n Safety shoes n Protective gloves ð Filling quantity: ÄChapter 8.3 ‘List of fuels and lubricants’ on page 109
1. Park the machine on level ground.
2. Park the machine safely ÄChapter 6.6 ‘Parking the machine in secured condition’ on page 90.
3. Clean the area around filler screw (1) and drain plug (2).
4. Unscrew the filler screw.
5. Unscrew the drain plug and collect any oil running out.
6. Clean the drain plug and screw it in with a low-strength sealing agent (e.g. spare parts number: DL 009 700 16).
7. Fill in new oil.
8. Clean the filler screw and screw it in with a low-strength sealing agent (e.g. spare parts number: DL 009 700 16).
9. Dispose of oil in line with environmental regulations.